Search the Community
Showing results for tags 'bios'.
Found 11 results
-
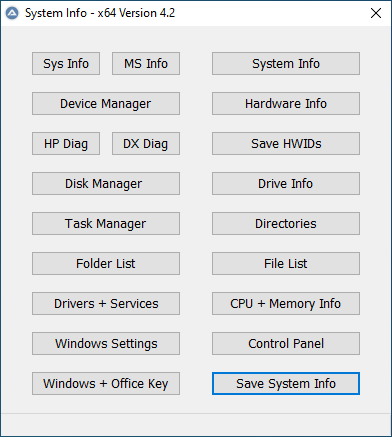
Topic Closed - Instead use PE_Tools and read more in VHD_Compact PDF ================================================================== System_Info Portable App for System Management and to collect System Properties such as Firmware (UEFI Or BIOS) and Partition Style (MBR Or GPT) and Operating System, Architecture and Drives, and Windows + Office Keys The Save System Info button is quite useful and will present the System Properties in a TXT File. Credits and Thanks to: - Uwe Sieber for making ListUsbDrives - http://www.uwe-sieber.de/english.html - Nir Sofer for making produkey - https://www.nirsoft.net/utils/product_cd_key_viewer.html - Nir Sofer for making serviwin - https://www.nirsoft.net/utils/serviwin.html - Franck Delattre for making CPU-Z - https://www.cpuid.com/softwares/cpu-z.html - JFX for making AutoIt Function to determine Windows + Office Key - https://www.autoitscript.com/forum/topic/131797-windows-and-office-key/ - Terenz for making AutoIt Functions to determine Partition Style and Firmware -https://www.autoitscript.com/forum/topic/186012-detect-an-uefi-windows-and-gpt-disk-type/ - Tripredacus for giving AutoIt code to determine Hardware UUID - this topic Download: System_Info at GitHub

-
Hey all I have been at this for several months now. I currently own a Intel Computestick model which has an atom processor and 2GB of ram. I understand that when Windows XP was out there was no such thing as a UEFI boot. I have added the needed SATA drivers in order for it to find the SSD inside it. Problem being is that it just wont boot into the windows xp setup at all naturally because its UEFI only. The computestick I am using for this wonderful experiment is the STCK1A32WFC. But there has to be some type of way of doing this! A lot of my very very old programs will only work in XP and I purchased these computesticks for that single purpose - installing windows XP on. The computestick does not have a legacy BIOS option sadly, So simply changing to Legacy BIOS in the BIOS is not an option. I have tried it out (the ISO) in virtualbox and it works just fine - in legacy mode naturally. The bios screen looks like this: It has an option of either Windows 8.1/10 32-bit mode or Ubuntu 64-bit mode. Most of the time if I make a Windows XP boot USB via Rufus it boots fine in Windows 8.1/10 mode using GPT and UEFI selected. When I try running, say Ventoy, it will only boot up the windows xp iso using the Ubuntu 64-bit option (since ventoy is linux based menu). Trying to boot from the USB drive using Rufus doing MBR with BIOS (or UEFI-CSM) something like Windows-XP-Professional-Incl-SATA-Drivers.iso does not bring anything up for either option. I hear its possible to get windows XP to boot in UEFI using some vista beta files which is explained in more detail here But I am unable to follow it. I understand Windows XP can not boot from a GTP partition and UEFI. BUT there has to be something that can do it out there! It would be awesome if a guru could help out with getting this Windows XP onto this stick!!!
-
 I have a laptop which requires compability module to run Windows 7 ( Came with Windows 8.1, downgraded it to 7 ). I turned the compability module off for no reason and it works pretty fine. Is there a way that I can check if the bios is running the module automatically? EDIT: Compability module is working, it doesn't load safe mode without it.
 -
https://www.dell.com/community/Desktops-General-Read-Only/Dimension-8200-Bios-A09-Hyperthreading/td-p/466727 Hello, I have a Dell Dimension 8200 with a Pentium 4, 3.06 Ghz, 1.5 GB RAM, and a Geforce 6200. The Bios on this computer is A09, however, this version of the bios doesn't support hyper-threading, an older version of it did (Dell took down the hyper-threading bios soon after the release). On the link above, users mention a place I could find the bios at, but they didn't post a link, and just refer to the site as "Spongebob's website." Does anyone know where I could reach this site, or does anyone know of another way I could get this bios? -thanks
-
Hi! I have HP Pavilion dv6 notebook. It uses the AHCI mode of drives handling and my Win7 work OK with it. Now I found a way how to modify the BIOS to allow to change the AHCI mode into IDE mode. I have some reasons why to do it - sometimes I experiment with various hobbyists OSes and also FreeDOS which I sometimes boot feels better with IDE setting. So please dont't respond me to simply keep the AHCI setting. However after switching into IDE the win7 booting unsuccesfully ends in the first loading screen and the computer restarts. I expected this behaviour, though. My question is: The reinstalation certainly helps. But is necesarry the whole reinstalation with rewritting of all system? Or there is some possibility of limited instalation like "fix the booting problems"? Or the installation CD is not necessary at all and it can be solved in some other way? And last question: Can I expect big performance slowdown or the effect will be rather negligible?
-
 Today, in my Optiplex 780 Desktop with Win 7 Pro 64-bit and 8GB RAM, I cloned my hard drive from old drive to new drive. To do that, I went into BIOS (which is the A14 version), went to Drives, enabled SATA2, and plugged the new empty hard drive into the SATA2 socket on the motherboard. The original drive has always been in the SATA0 socket, and the CD-DVD has always been in the SATA1 socket. The clone went well (using Macrium Reflect Free in a USB stick). When I took out the old drive and connected the new cloned drive to the original SATA0 socket, the Optiplex gave me errors on the reboot. It said it was missing a drive in SATA2 and did i want to Continue, go into System or run Diagnostics. After a few reboots with that error, I went back into BIOS - Drives and disabled SATA2. Then reboot went very well without errors, a few times. All good. However, those errors aren't right. I should be able to enable SATA2 in BIOS and not get errors just because no actual drive is plugged into the SATA2 socket on the motherboard. (That's how it works in a different Dell Optiplex 3010 I have). So what's going on? Why am I getting this error? (By the way, the old drive was a 10-year old Maxtor 500GB, and the new drive is a Seagate Firecuda ST1000DX002. Do you think the SATA2 socket fell so in love with the Firecuda that it just can't let go?) Thanks. \ /
 -
Hi, guys, I need some help. I am trying to resurrect an old PC, an Acer Aspire 5315. It used to run Vista, but that's been wiped out now, and it didn't come with installation disks. I need to flash the BIOS, so I got it from the Acer site. It's an .EXE file. I tried FreeDOS, but it refused to run "in DOS mode". So I have created a WINPE disk. It boots into a command line, but if I run the .EXE file I got from the Acer site, it fails silently. I just get the prompt back, no windows pop up and the BIOS remains in its old version. A "VER" in the command line shows "Microsoft Windows [Version 6.2.9200]". Any ideas? Do I have to install a full-fledged Windows just to run this file? I plan to install Linux in it after flashing the BIOS... Any legal way to run Windows just for a couple minutes?
-
Over the last few years I've found that I nearly always end up with computers that are based on Gigabyte motherboards. My current computer, just bought, also has a Gigabyte motherboard. Over the last couple of days I found that I couldn't get into the BIOS to check some settings. No matter what I did the BIOS just would not open up for me. Cutting a long story short, I looked for a solution on the web and that lead me to the following website: http://www.gigabyte.com/MicroSite/369/images/app-center.html Wow, if you download the "Gigabyte App Center Utility" from there you are in for a treat - there are some very useful progams available using that center for users of Gigabyte motherboards. Once I had the App Center installed and figured how to use it I downloaded an app called "Fast Boot" and at one click, while I was in Windows, it let me issue the instruction that on the next system reboot I would automatically go into the BIOS (after clicking the setting it automatically reboots the computer). Works like a charm. Days of muttering solved at a click. I'm surprised that I've used Gigabyte motherboards for years and never knew of this - so many useful programs for tweaking the system. So I thought I'd post up here and share the tip for others. P.S. I'm vaguely aware that Win8 has 'apps' that won't run on Win7 systems (I have Win7 myself) but this isn't anything to do with that kind of 'app'.
-
 Virtualize Win8.1: BIOS + MBR Physical Partition > to > WIM Image > to > UEFI GPT VHD Virtualizing Win8.1 from BIOS + MBR Physical Partition > to > .WIM Image > to > UEFI GPT .VHD Sometime last year I found out about Native boot VHDs and tried to go that way for good. There were some issues with hardware and OS (Win7 at the time) not working out and lot of new things that I was learning about VHDs. Anyways, that confusion, learning and failure led to a better path So this 2015, I figured out how to get VHDs (with Fresh Win 8.1 Installs via Install.WIM DISM Apply Image) to Native Boot on Surface Pro 3 (Sp3). I am going to attempt doing the following steps using DISM/ ImageX: MBR [Customized Win 8.1] (Physical) > Create Image > [Customized Win 8.1 .WIM] (Virtual - File based so - No sectors or MBR/GPT?? ). [Customized Win 8.1 .WIM] (Virtual) > Apply Image > [Empty New GPT .VHD] (on SP3) My thought is that by going to .WIM I bypass the whole converstion drama between MBR/BIOS & GPT/UEFI as the .WIM is agnostic of both of them? Is this a valid thought or not? Thoughts? NOTE: I can.. try out the above with creating a small FRESH MBR Windows 8.1 partition on X61T/ T61 and then doing the above 2 steps. Convert it to a .WIM and then applying to a GPT .VHD I am guessing a SYSPREP is recommended somewhere in between. Someone somewhere also mentioned doing Sysprep in a VM/ Hyper V instead? Or is it not needed? Thoughts? Where and how would you recommend applying the SYSPREP?
 -
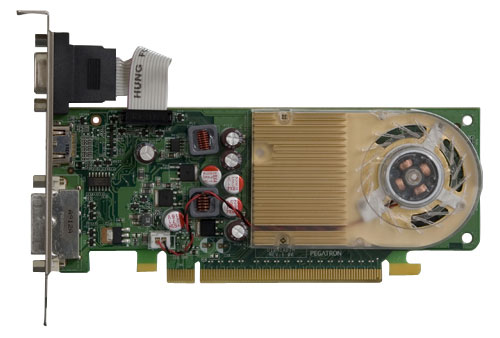
Hi there: Really long time no come back to MSFN... The new forum really run slow on my old Win9x machine, heh~ BTW, I am looking for the BIOS of the HP G210 display card BIOS, the exact outlook is as below pic: http://partsurfer.hp.com/ShowPhoto.aspx?partnumber=586382-001 I pretty sure my card's BIOS is corrupt, since I tried to flash other brand (MSI/PNY) G210 BIOS to this card, and it becomre alive again, but the side effect is that the fan becore so NOISEY, its why I look for the original BIOS for the card. This card is in lots of HP/Compaq desktop computer, if some MSFNers see this post, pls help me to backup the BIOS by GPU-Z or nvflash, thanks a lots! NOTE: the slimline series also got this card, but in low profile, the upper VGA head is disabled by BIOS (Coz I got this BIOS and tried) Best Regards, Ken Yaksa
-

Compaq TC1000 won't boot from CF card larger than 504 MB!
ppgrainbow posted a topic in Windows 9x/ME
Hey there! I recently got a technician to install a 32 GB Compact Flash memory card in which 29.8 GB is supposed to be usable, but I'm faced with a new problem. The BIOS isn't even properly recognising most of the 29.8 GB, but according to BootITNG 1.87 and MS-DOS 8.0 FDISK, only the first 504 MB is recognised! To make matters worse, FDISK from MS-DOS 7.1 is only recognising the first 24 MB of the CF card! I paid nearly $80 for a 32 GB CF card and an additional $4 for a Compact Flash to IDE adapter and I would absolutely hate to see that I wasted $84 on something that does not work correctly, if not at all. The Compact Flash card on the CF-to-IDE adapter is identified as a Sandisk 32 GB Extreme CompactFlash memory card with the model number SDCFX-032G-A61 and the BIOS identifies it as a QalDisi QDAFX-030G-(PM). I am using the CF card as bootable to attempt to reinstall Windows XP SP1 from the MS-DOS 7.1 prompt on the Compaq TC1000, but it turns out that the BIOS isn't even cooperating at all. In the main section of the BIOS, the BIOS version is 0F13 (BIOS date 2003-10-06) with the KBC version of 19.29. Serial number and asset tags are identified as KRD33905DJ. Would I have to use a dynamic drive overlay (DDO) to get the CF card in the Compaq TC1000 to recognise properly or other methods to get the CF card recognised at full capacity? If so, please post your thoughts as I'm looking for answers here. Update: The BIOS continues to misidentify the SanDisk 32 GB card as "QalDisk QDAFX-030G-(PM)". What's worse is the when I attempt to write the boot partition on the CF card, and when I either reboot or press CTRL-ALT-DELETE, all of the changes are lost! I already destroyed the 30 GB hard drive and is on the virge of ditching the Compaq TC1000 if issues aren't fixed.


.thumb.jpg.91d36bb68fca6784f84a1755a100139d.jpg)