vxiiduu
Content Type
Profiles
Forums
Events
Everything posted by vxiiduu
-
There are many APIs in Windows 10 which Chrome will use, many of them are security or sandboxing related. Just as an example off the top of my head, nested job objects is something I saw in the chromium source code.
-
Skylake is relatively easy. I mean the Skylake iGPU even has an official win7 driver that works without modding.
-
I have been greatly overhauling the internals of VxKex recently. In upcoming releases, there will be big improvements, such as: Better support for applications which are started from other applications. Many installers depend on this functionality, but so far the implementation in VxKex has been buggy and incomplete. In the upcoming releases, this will be done properly. Better support for rewriting imports of DLLs that are loaded after a program starts. Currently you have to tick "Wait for child process to exit" in the settings, which many users probably didn't know to do. In the upcoming releases, DLLs that are loaded after program startup will always be rewritten, as they should be. Better support for console applications. Currently, the support for console applications started from cmd.exe is buggy, as a direct result of #1 (applications started from other applications), and required a workaround. Better error reporting messages. Some users may have noticed the beginnings of better error messages starting from version 0.0.0.3. The default error messages provided by Windows are sometimes extremely unclear, so in new releases they will be replaced by custom error messages which tell you what is going on. Better information logging. Currently, log is displayed in a console window, which is often too narrow to display the information properly - and the text is disorganized. In the future, logs will be stored in a different format and you will be able to view them neatly in an application similar to Windows Event Viewer. You can expect a new release in the next few weeks or months containing some of the above features. Feel free to ask here or open github issues if you have technical questions.

-
Minecraft works fine for me on my desktop with a rtx2060 but on my laptop, new versions of MC don't work. Apparently they need some directx features which those old iGPUs don't have. Just stick with old version of minecraft honestly they didnt add that much good stuff
-
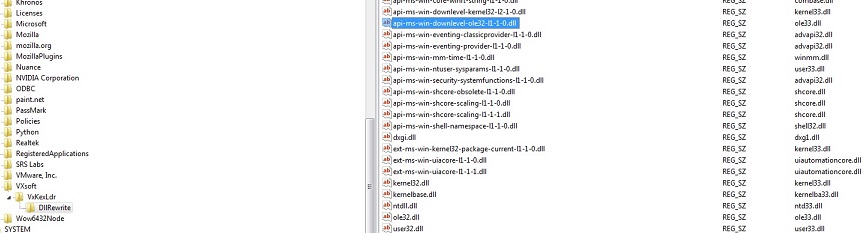
I will add that to next release. In the meantime you can go to registry, browse to HKEY_LOCAL_MACHINE\SOFTWARE\VXsoft\VxKexLdr\DllRewrite, add a new String key, named api-ms-win-downlevel-ole32-l1-1-0.dll, and set value to ole33.dll and see if it works. Let me know whether that helped
-
Mypal68 works great on XP. Even JS bloatware sites like discord, youtube and twitch all work. There are very few useful sites that don't work on Mypal68. Unfortunately, it doesn't work on Windows2000 even with extended kernel, but what can you expect. Many thanks to the author feodor2.
-
I doubt they really care that much, based on the fact that Aero blur is totally broken on Firefox Win7 and it looks like garbage. I guess it will be good for Classic theme users.
-
Edge is basically Chrome with a different UI. It doesn't do anything special with regards to integrating with the OS (on windows 7 - windows 10 and 11 is a whole different story). If you prefer the UI, then install it; otherwise just stick with whatever you are using now.
-
Works fine for me. I used Resource Hacker, changed all instances of "MS Shell Dlg" to "Comic Sans MS" (there are 17 dialogs you need to do this for), compiled all the resource scripts (Play button on the toolbar in RH) and then saved the files on the desktop before copying them to the MUI folder. I don't think you can change the font of the menus or status bar. But everything else can be changed. Probably you are either not correctly saving the MUI file or not putting it in the right place.
-
You just edited the PE import table? With like CFF explorer or something? That isn't a sustainable solution and it won't work for many functions. Which app are you trying to get running?
-
For a quick and dirty solution to GetDpiForMonitor you can just set *dpiX and *dpiY both to 96, and return S_OK. Or, if you feel like doing it "properly" there are GDI functions you can use to get the real DPI for the system, which you can use instead. As for SetProcessDpiAwareness, there's SetProcessDPIAware on Windows 7 - or you can just return a success code and do nothing. These DPI functions really don't matter too much if you have a normal (96 dpi or thereabouts) screen.
-
The USB itself will almost certainly work on Windows 7 even if they don't list support. Maybe some random bundled crapware won't work, but no one uses that stuff anyway.
-
Windows 7 on the Intel Alder Lake/Z690 platform
vxiiduu replied to Carlos S. M.'s topic in Windows 7
Install ThrottleStop and see if you can fiddle with C-States/EIST or whatever they call it these days. Some sort of CPU power saving options. Those settings may be in the BIOS as well. I remember that with my other CPU (which was a 3rd gen, ivy bridge, so maybe not that relevant) if I disabled all the power saving options the idle power would be like 50W. Also, I notice that on Win7 the CPU voltage is much higher, which also points to a power saving option not being set when it should. If the BIOS settings don't help, give Throttlestop a try, it really works for tuning your CPU power consumption. -
Porting Snipping Tool to Windows 7 from Windows 10
vxiiduu replied to InterLinked's topic in Windows 7
Whoops, I forgot to include the MUI file. I put it in the repo now, just download the whole repo (Code->Download ZIP) and run snippingtool.exe and it should work. -
Porting Snipping Tool to Windows 7 from Windows 10
vxiiduu replied to InterLinked's topic in Windows 7
Yes, if you are going to make the EXE yourself, the original source EXE must be from Windows 10 1507. 1809, for instance, doesn't work because they changed the snipping tool to include some annoying UWP banner ad (which you don't want anyway). If you want a pre-made EXE it's available on my github under the SnippingToolEx repo. Obviously MS doesn't care enough to take it down. -
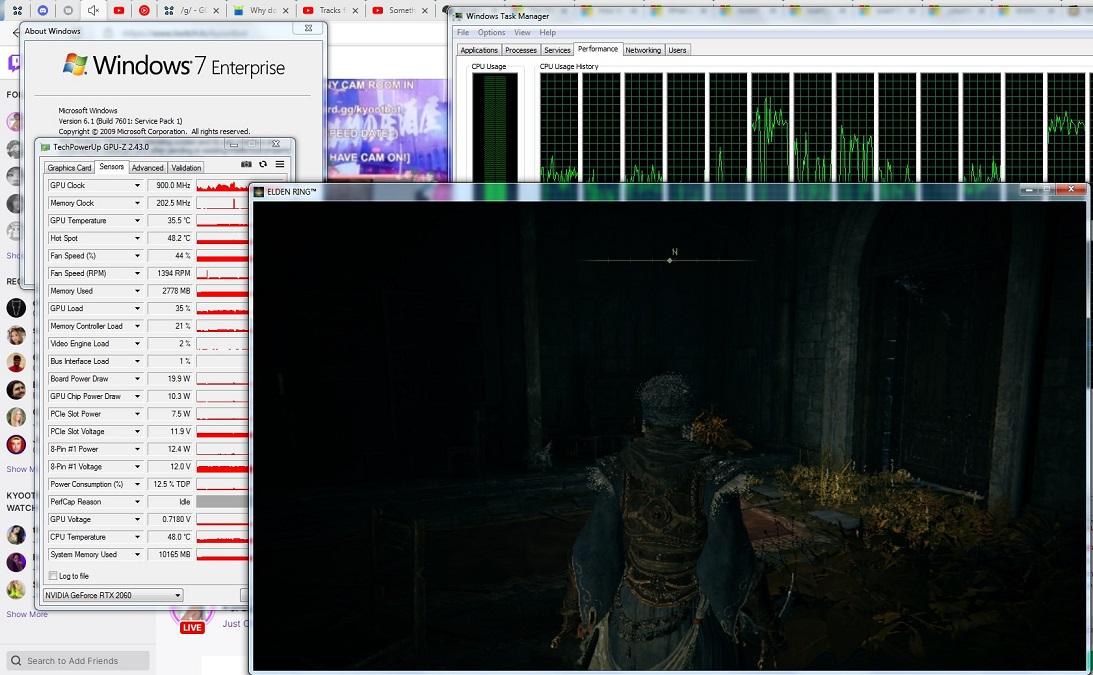
For anyone who wants to play it, someone made a mod to allow Elden Ring (which uses DX12) to run on Windows 7. I've tested it and it sort of works fine, but has very bad performance at least on my computer. https://www.nexusmods.com/eldenring/mods/12
-
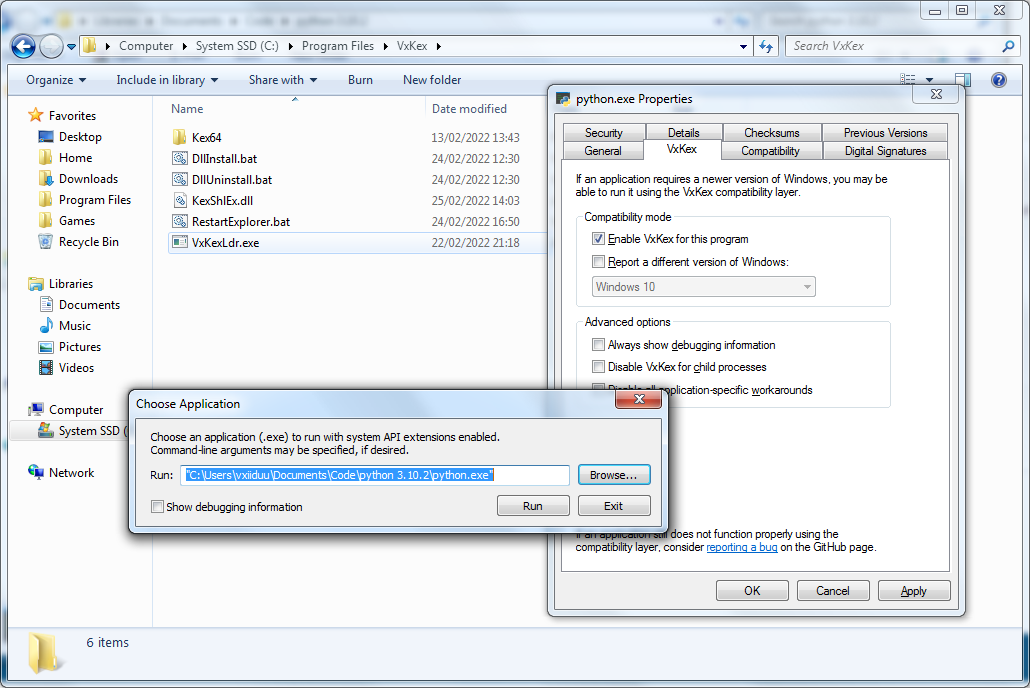
Yes, it is definitely possible and probably quite easy. But I won't try to do that at the moment because I am working on a Windows 7 "extended kernel" project which will allow python, onedrive and other incompatible products to run without having to download and copy DLLs around like the previous "compatibility pack" approach I was using, which becomes unmaintainable when working on supporting many applications at once.
-
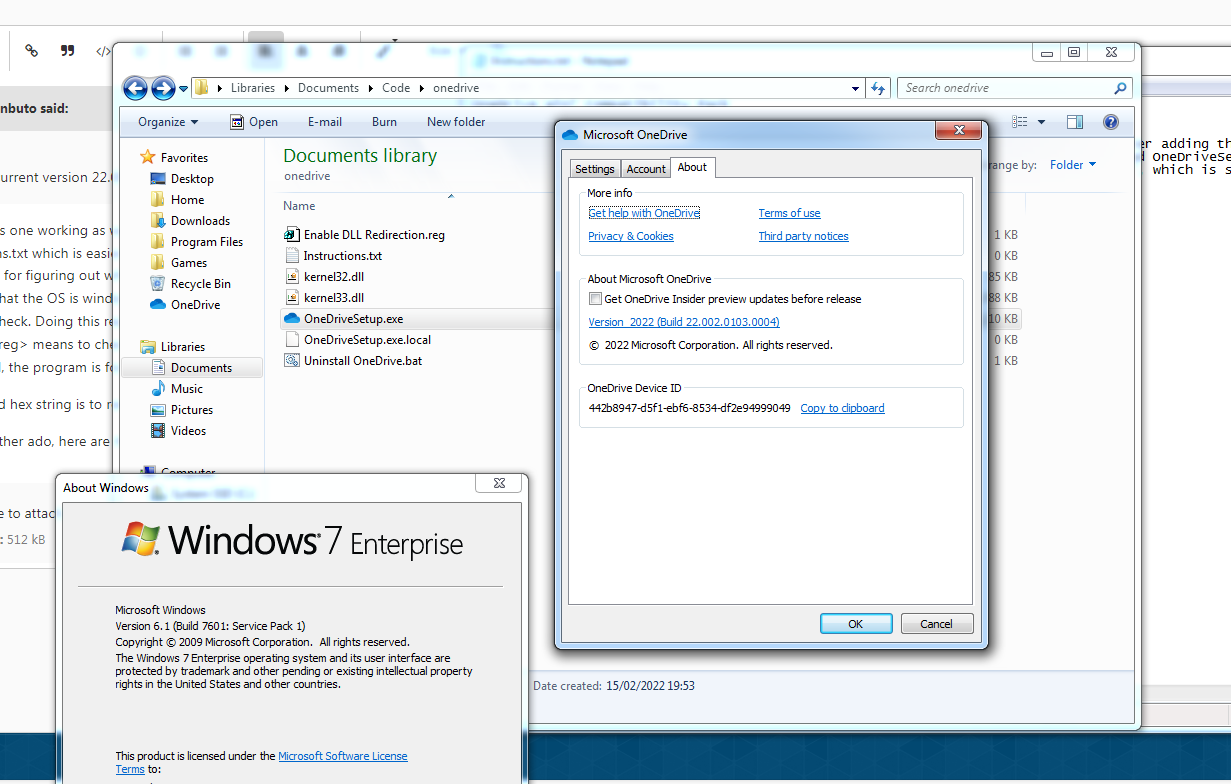
Yeah, I've gotten this one working as well. This time I've used a better solution which should work with many future versions of the Skydrive installer, so that I don't have to keep modifying the binary with hex editor. Download the Zip file attached to this post and read Instructions.txt which is easier to follow than the hex editing solution I described in my previous post. You are welcome to contact me through pm or discord or whatever if you want a better explanation. The methods I used for figuring out which bytes to edit are too complicated to fully explain here, but essentially you look at what APIs the program is calling. I use a tool called "API Monitor". There is an API called VerifyVersionInfoW which skydrive installer calls in order to... verify that the OS is windows 10 or higher. Then I set a breakpoint on that function, and then open WinDbg (a debugger) to attach to the Skydrive installer process, find out where exactly it is checking the return value (a BOOL) of VerifyVersionInfoW, and patch out the check. Doing this requires knowledge of assembly language. You can run the hex strings I gave through a disassembler to find out the difference. For the first one: 84 C0 to 84 DB, this changes the instruction from TEST AL, AL to TEST BL, BL. Test <reg>, <same reg> means to check whether a CPU register is zero. In this case, EAX contains a BOOL (either 1 or 0), the return value of the VerifyVersionInfoW API call, which can be accessed through the AL pseudo-register. By changing the function to check for BL instead, the program is fooled, because using the debugger I could see that just by chance, at that point in the program execution, BL contains a non-zero value. The second changed hex string is to remove the cryptographic signature check on the installer, using a similar methodology. This needs to be done because once you modify the installer it will know that it wasn't a "legit" one from Microsoft. However, with the new method, this doesn't have to be done since the original installer file is not modified. Anyway without further ado, here are the instructions (same as Instructions.txt inside the zip file) for the new, easier method which will work for multiple versions of skydrive. If you are downloading the x64 version of OneDrive installer, you need to use the 64-bit compatibility pack which is also attached to this post. If you get error 0xc000007b when trying to install, you are using the wrong version of the compatibility pack. OneDrive Win7 Compatibility Pack Refer to Screenshot.png for proof that it works. 1. Double-click on "Enable DLL Redirection.reg" and add the registry entries. 2. RESTART YOUR COMPUTER, this step is mandatory. Won't work unless you restart after adding the registry entries. 3. Download the latest (or your preferred version) of OneDrive, which will be called OneDriveSetup.exe 4. Place the downloaded file in the folder of the compatibility pack (next to the empty file, OneDriveSetup.exe.local) 5. Double-click to run "CopyKernel33.bat", which copies C:\Windows\SysWOW64\kernel32.dll into the pack folder. 6. Run OneDrive setup to install it. In order to uninstall, you can use the Control Panel add and remove programs screen, and the uninstaller will work fine. You are free to delete the compatibility pack and the original installer after installing, however, you will need the compatibility pack to install new versions. Auto-update probably won't work. And here's a screenshot: OneDrive_Win7CompatPack.zip OneDrive_Win7CompatPack_x64.zip
-
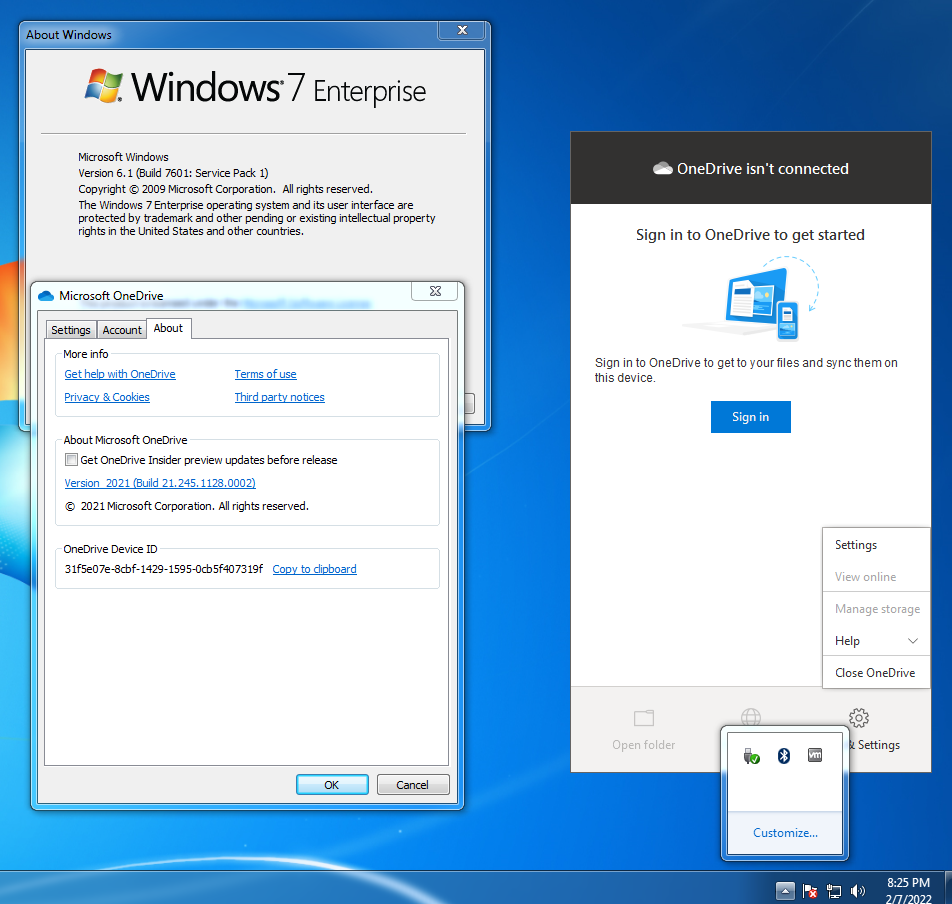
Yes, this appears to be correct. Here are instructions to patch the latest (as of writing) onedrive installer so that it will install and work on Windows 7. OneDrive installer version 21.245.1128.0002, download link: https://oneclient.sfx.ms/Win/Prod/21.245.1128.0002/OneDriveSetup.exe 1. Open OneDriveSetup.exe in HxD or any other hex editor 2. Ctrl+F and search for hex string "84 C0 75 11 C7" 3. Change "84 C0 75 11 C7" at the beginning to "84 DB 75 11 C7" 4. Ctrl+F and search for hex string "8B F0 89 B5 30" 5. Change "8B F0 89 B5 30" to "31 F6 89 B5 30" 6. Save and exit 7. Run installer and it will work. I don't have a microsoft onedrive account and I'm not interested in making one, so you'll have to test by yourself to see if it actually works. Honestly, I don't understand why one would install windows 7 and then add modern MS garbage on top of it, but at least it was an interesting technical exercise to get the installer running. I don't know whether the auto update will f*k everything up when it runs, so do this at your own risk yada yada. Uninstalling the app from the control panel does appear to work fine. Known Issues: The taskbar icon of OneDrive is blank. You have to hover over the blank space to find where the icon is.
-
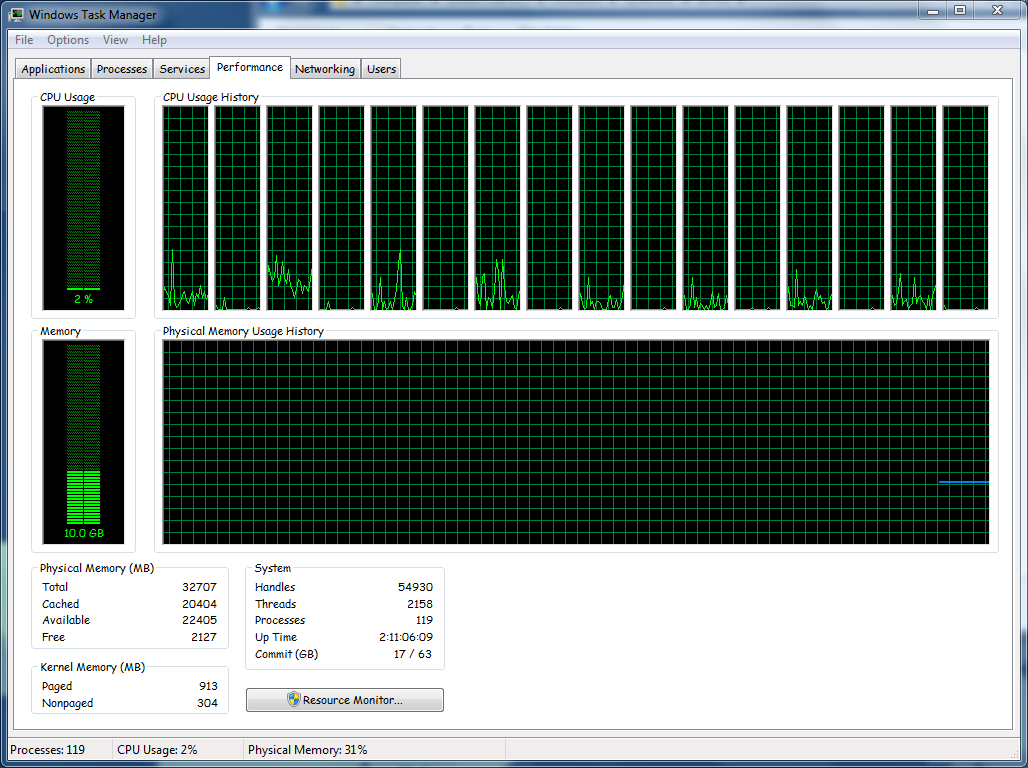
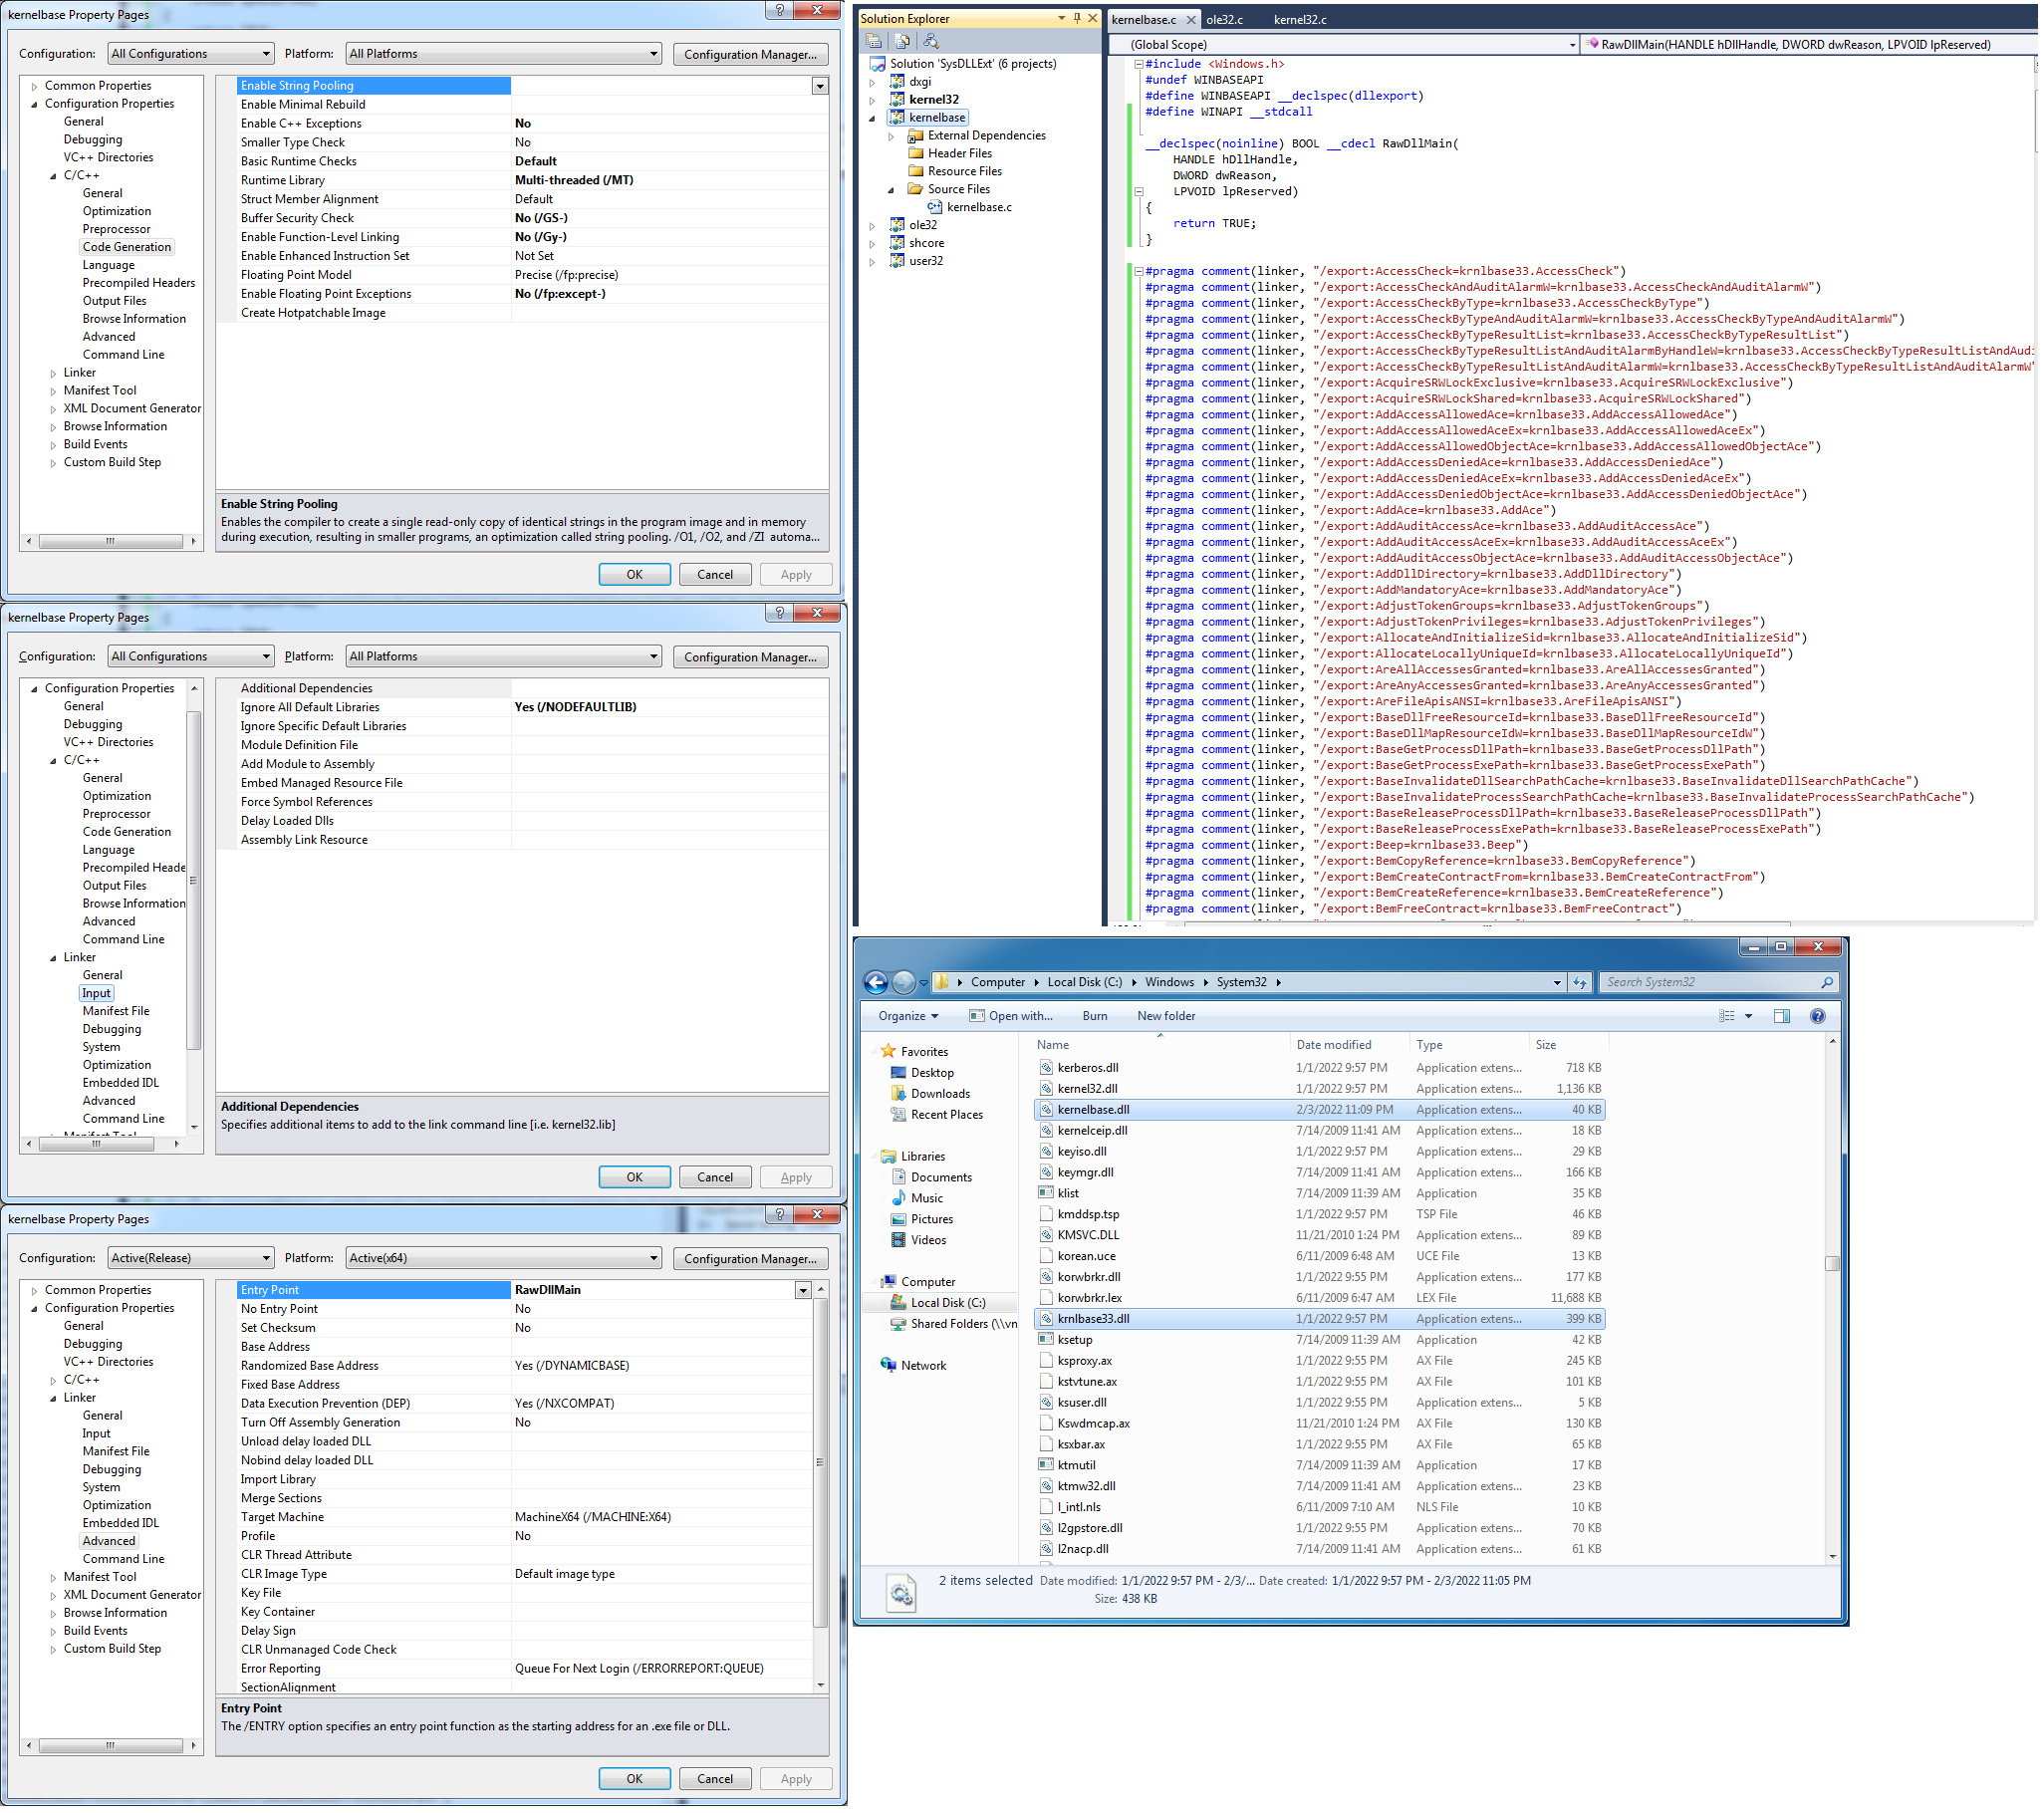
How are you patching kernelbase.dll? I have a virtual machine with a proxied user32.dll (i.e. user32.dll is written by me, which exports my added functions, and then proxies all original functions to "user33.dll" which is the original user32.dll). However, when I try to proxy kernelbase.dll, I get a bluescreen. STOP: c0000142 {DLL Initialization Failed} Initialization of the dynamic link library winsrv failed. The process is terminating abnormally. Inspecting winsrv.dll, we can see that it imports kernel32.dll, which in turn imports kernelbase.dll. The original Kernelbase.dll itself only imports ntdll.dll. However, my patched kernelbase.dll imports kernel32.dll due to the Microsoft visual C runtime (MSVCR100.DLL), which is a BIG problem since kernel32.dll depends on kernelbase.dll (a cyclic dependency). In order to solve this problem, I statically linked the Microsoft visual C runtime into my kernelbase.dll, resulting in only a kernel32.dll import (no msvcr100.dll import) But this still requires kernel32.dll which is the big problem. So then, I fiddled with more compiler and linker settings in order to remove the kernel32 dependency as well - as pictured. Then I went into my virtual machine and took ownership of kernelbase.dll and renamed it to krnlbase33.dll, and copied my kernelbase.dll to replace it. After rebooting, the system works. Note, that I haven't added any functions to kernelbase.dll, so I can't help you with your functions (unless you provide your source code). When you add your functions, keep in mind that you can NOT call any C runtime functions like printf, strlen, etc. You have to write your own implementations of those functions (which is easy). You also cannot call ANY function in ANY library that directly or indirectly depends on kernel32.dll. In practice, that means you can basically only call functions in ntdll.dll and the "original" kernelbase.dll (krnlbase33.dll in my example) - which is quite a lot of useful functions, actually. Note that "original" kernelbase.dll contains lstrcmp, lstrcmpi, lstrcpyn, and lstrlen in case you find those useful. Hope that was helpful, ask me if you have any further questions.
-
Windows 7 on the Intel Alder Lake/Z690 platform
vxiiduu replied to Carlos S. M.'s topic in Windows 7
Simplix includes generic USB3 and NVMe drivers. You shouldn't need to install any other USB3 drivers, because Simplix already includes the backported xhci drivers from Win8. Get simplix from https://blog.simplix.info/update7 After downloading the EXE, just get a Win7 ISO, and drag the ISO on top of the EXE which will integrate the updates and create a new ISO. AHCI and audio should just work from my understanding, using the generic driver included in Win7. The Ethernet requires this driver from earlier in the thread. And make sure you enable CSM/legacy boot/USB compatibility in the BIOS if any such options are present. -
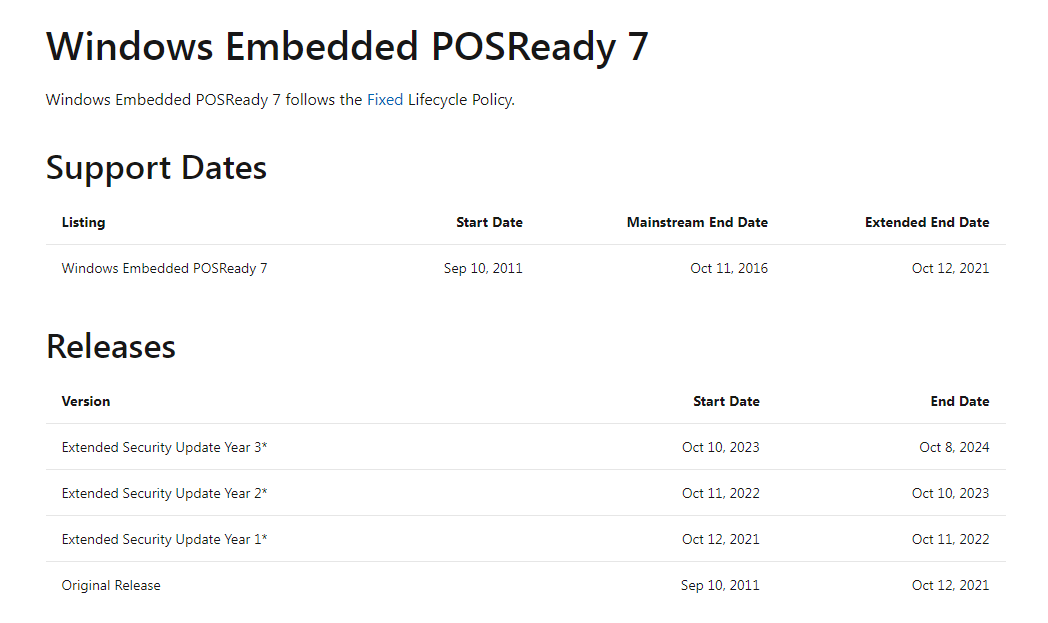
Windows POSReady 7 receives ESUs until after that date anyway. It is the last version of Windows 7 to receive updates from Microsoft. Hopefully someone will figure out how to apply its ESUs to Enterprise.
-
There is another thread with MSI PRO Z690-A motherboard and 12th gen intel. You should read it. As for NVMe and USB3, just use the Simplix update pack. https://blog.simplix.info/update7 For your video card, use NVCleanstall. Note that your integrated GPU will not be able to function.
-
Porting Snipping Tool to Windows 7 from Windows 10
vxiiduu replied to InterLinked's topic in Windows 7
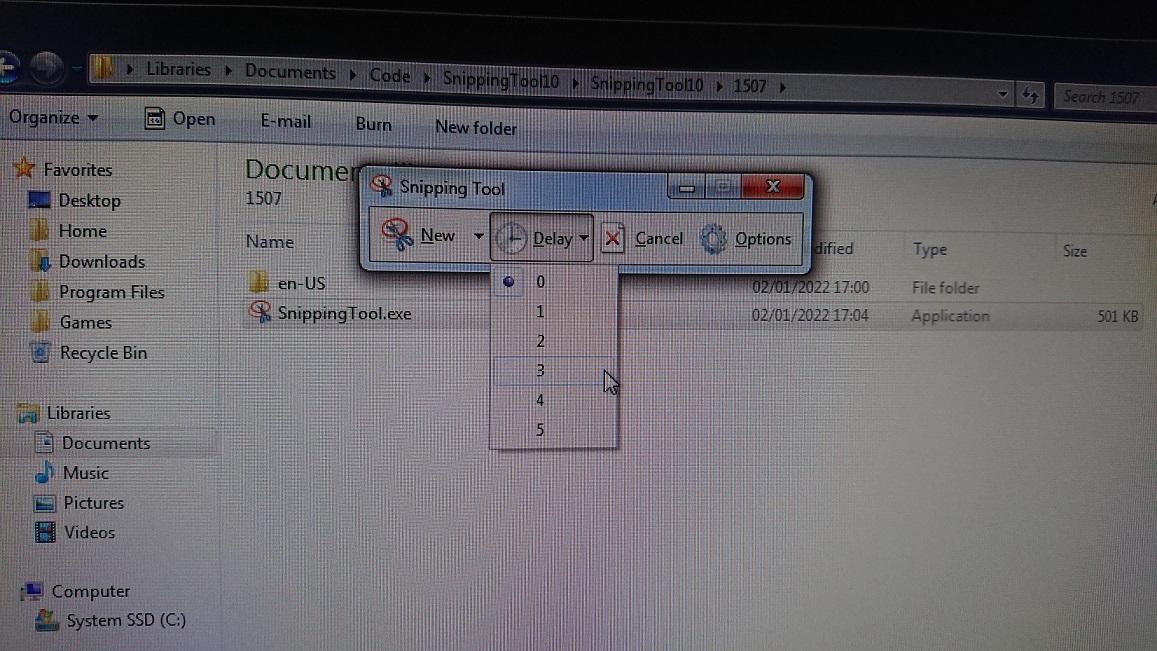
It has been done. The delay functionality is working. Works on Vista and 7 (and probably 8, 8.1 as well). This Snipping Tool is from Windows 10 1507 (the RTM release). The SHA-256 hash of the original SnippingTool.EXE is "fccf231e0e4437baba86f64752e13562c9a2aa2d699a8dae7fafc85b48da4aa8" Porting requires 2 hex edits: one to change the NT version from 10.0 to 6.0 in order to trick Windows into running it, and the second to bypass some licensing/permission check that Microsoft put in. Dunno if it's fine to distribute the .EXE here (probably not), hence why I only include instructions. These instructions ONLY WORK FOR x64 Snipping Tool. If there is a big demand I can also work out how to do it for the 32-bit Snipping Tool as well. 1. Obtain Windows 10 1507 RTM x64 ISO, open with 7-Zip, then open sources\install.wim with 7-zip 2. Go to Windows\system32 and drag SnippingTool.exe to desktop (or some other location) 3. Next to SnippingTool.exe, make a folder called "en-US" (or whatever your language code) 4. From your 7-zip window, go to Windows\system32\en-US (or whatever your language code) and drag SnippingTool.exe.mui into the "en-US" folder you made in step 3 5. Open SnippingTool.exe in HxD or some other hex editor 6. At offset 0x120, change "0A 00 00 00 0A 00 00 00 0A 00 00 00" to "06 00 00 00 06 00 00 00 06 00 00 00" 7. At offset 0x1D19C, change "40 55 41 54 41 55" to "B8 01 00 00 00 C3" 8. At offset 0xF6B0, change "B8 FA 00 00 00" to "B8 2C 01 00 00" 9. Save file and exit hex editor At this point, you can simply open the edited SnippingTool.exe and get the Windows 10 snipping tool as pictured. You may also replace the Windows Vista/7 stock snipping tool with this one if you desire. For reference, the SHA-256 hash of the modified SnippingTool.exe is supposed to be "c60898fb4ea6984aaee1f2d3c9b73560bf0aaff64b9855e3d58e9855f3836433" "It runs but only displays an error box with no text!" This is caused by incorrect MUI file, or incorrect placement of the MUI file. As in picture, en-US folder should be next to SnippingTool.exe, and SnippingTool.exe.mui should be inside that folder. And keep in mind, everywhere I say "en-US", this means the language code used by your system. For example, ja-JP or fr-FR for Japanese and French respectively. Edit: Add bug fix for ghost menu entries in certain circumstances (this bug happens in win10 as well)
-
https://github.com/nalexandru/api-ms-win-core-path-HACK Copy this DLL into the directory of Python (you must use portable/"embeddable" version) and it will work perfectly. All versions up to 3.10.1 I've tested works perfect Windows 7 x64. It works for running Blender as well. New versions of Python work perfectly fine on Windows 7 with this opensource DLL. api-ms-win-core-path-blender-0.3.1.zip