wimb
Content Type
Profiles
Forums
Events
Everything posted by wimb
-
Plus: - Undocumented nice feature for Unattended Install where LocalAccount = UserName FullName = RegisteredOwner Organization = RegisteredOrganization Thanks for this handy feature Another topic, I have serious BSOD problems with Windows 10x64 version 2004 as described in BSOD Crashes Windows 10 since May Update What do you think about it ?
-
Tested and OK for Capture followed by Apply of Win10x64 version 2004 The nice thing is that Win10x64 2004 is booting without the need to use first Safe Mode as was experienced previously.
-
GWTx64.exe is working OK now in Win10x64 version 2004 Thanks for fixing
-
In Win 10x64 version 2004 then GWT64.exe Failed to download necessary files whereas GWT.exe is working OK
-
Update USB_FORMAT-44 and UEFI_MULTI-44 plus the Addon-glim-agFM files - UEFI_MULTI_x64.exe allows Run Again to Add Other Boot Image - UEFI_MULTI_x64.exe supports to Make or Modify booting of internal harddisk having MBR or GPT partitioning - Grub4dos Menu improved taking the effecst of two partition drives and Ventoy into account - Added menu_Win_ISO.lst with preconfigured Grub4dos entries for Windows ISO files in folder images - Update Grub4dos Menu files - menu.lst and menu_Linux.lst and menu_Win_ISO.lst Copy Windows and Linux ISO files to folder images for booting with preconfigured Grub4dos entries as given in menu_Win_ISO.lst and menu_Linux.lst Download: USB_FORMAT and UEFI_MULTI
-
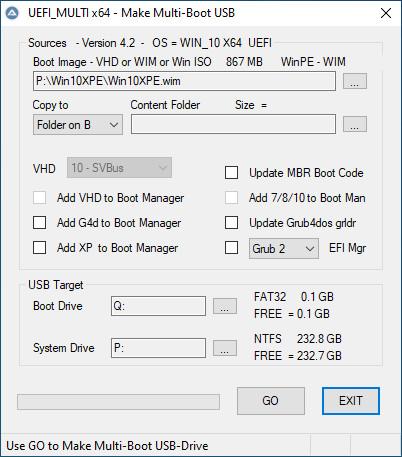
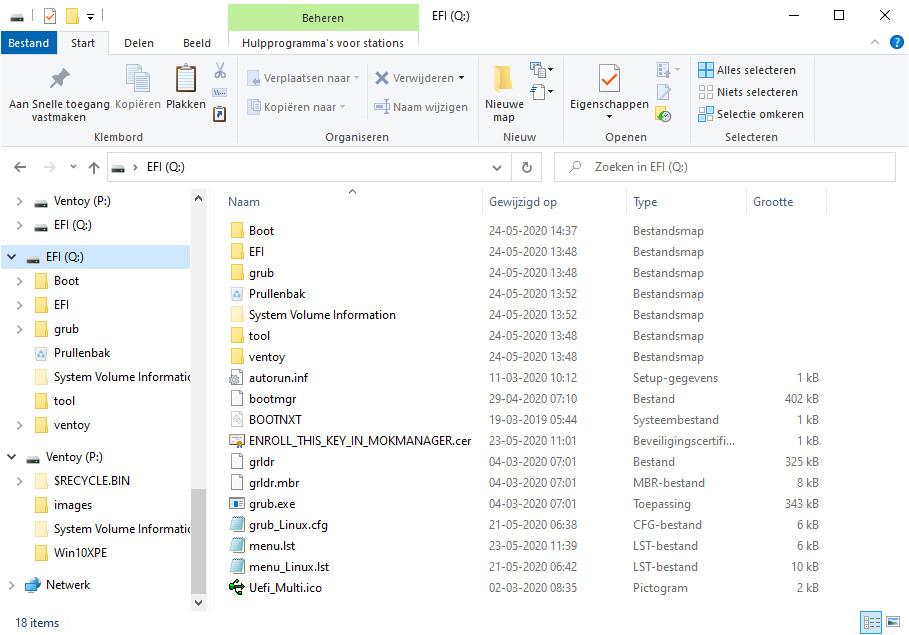
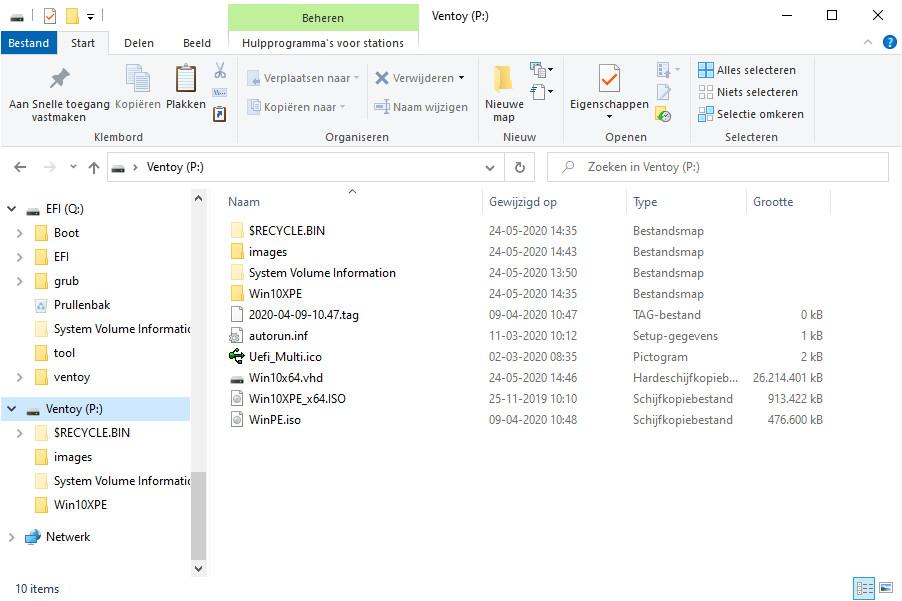
Update UEFI_MULTI-42 plus the Addon-glim-agFM file - Update of a1ive Grub2 File Manager to v7.2.0 - UEFI_MULTI-42 Grub4dos menu.lst has entries to boot in BIOS mode straight with Win10XPE_x64.ISO and WinPE.iso - UEFI_MULTI-42 can make new entries for booting Windows ISO files with Grub4dos in BIOS mode - UEFI_MULTI-42 is compatible with Ventoy USB Drive that was modified to have unhidden 130 MB FAT32 EFI Drive - requires to adjust Ventoy EFI file grub\grub.cfg to make Ventoy Boot Menu with added Boot options for Windows Boot Manager and for Grub4dos and Grub2 Menu USB Portable SSD - MultiBoot Ventoy Drive with support for booting VHD and WIM files in Windows BootManager and Grub4dos Menu and Grub2 Menu Download: UEFI_MULTI Ventoy EFI file grub\grub.cfg - File given in UEFI_MULTI-42\UEFI_MAN\ventoy-1.0.11\grub folder ..... terminal_output console #colect all image files (iso files) set ventoy_img_count=0 vt_list_img $iso_path ventoy_img_count #Main menu if [ $ventoy_img_count -gt 0 ]; then if [ $VTOY_DEFAULT_MENU_MODE -eq 0 ]; then vt_dynamic_menu 0 0 else vt_dynamic_menu 0 1 fi if [ "${grub_platform}" == "efi" ] -a [ -e "/EFI/Microsoft/Boot/bootmgfw.efi" ]; then menuentry "Windows EFI BootManager" { chainloader /EFI/Microsoft/Boot/bootmgfw.efi } fi if [ "${grub_platform}" == "pc" ] -a [ -e "/bootmgr" ]; then menuentry "Windows BootManager" { chainloader +1 } fi if [ "${grub_platform}" == "pc" ] -a [ -e "/grub.exe" ]; then menuentry "Grub4dos Menu" { linux /grub.exe } fi if [ -e /grub_Linux.cfg ] -a [ -e "(hd0,msdos1)/images" ]; then menuentry "Grub2 Menu" { set iso_drive=(hd0,msdos1) export iso_drive configfile /grub_Linux.cfg } fi else menuentry "No ISO files found (Press enter to reboot ...)" { echo -e "\n Rebooting ... " reboot } fi == == How to modify Ventoy USB Drive to have unhidden 130 MB FAT32 EFI Drive 1. Ventoy2Disk.exe is used first to Format USB Portable SSD 2. Ventoy Hidden EFI Drive on USB must be made visible - In Windows 10x64 use DiskPart > list vol and than select vol of EFI (in my case nr 14) - assign - EFI drive is mounted as e.g. Q: - Also possible is: After booting with Win10XPE from RAMDISK the Hidden EFI Drive is auto mounted 3. Copy folders and files from Ventoy EFI drive to folder e.g. V_EFI on your harddisk 4. In Windows Explorer Format Ventoy and EFI drive with NTFS FileSystem 5. In Windows Disk Management Remove Ventoy EFI partition 6. Reduce Size of Ventoy NTFS drive by 100 MB 7. In unused space Create New simple Volume with Label EFI and Size 130 MB and Format with FAT32 FileSystem 8. Copy folders and files from V_EFI folder back to your new created EFI partition 9. Modify or Replace on Ventoy EFI drive file grub\grub.cfg as indicated above 10. Copy some Linux ISO file and / or Win10XPE_x64.ISO and WinPE.iso file and folder Win10XPE with WIM file to Ventoy NTFS drive 11. Use UEFI_MULTI_x64.exe in Win10x64 OS - Select EFI drive as Boot Drive and Ventoy drive as System drive 12. Use UEFI_MULTI_x64.exe in Win10x64 OS - Select PE WIM e.g. boot.wim or Win10XPE.wim file Or Win10x64.vhd as Boot Image file 13. Click GO to make MultiBoot Ventoy Drive booting with WIM and VHD file in Windows BootManager and booting with Grub4dos Menu and Grub2 Menu

-
Sure I know, but the given Manual can be helpful and is NOT general but specific on using WinNTSetup A complete description with ALL details and Screenshots just for WinNTSetup will be better of course.
-
How to use WinNTSetup x64 and ISO file for Installation of Windows 10 x64 in VHD or partition of SSD harddisk Manual: Win10_Install.pdf Subjects like Download ISO, Create VHD, use Tweaks, Unattended Install, Add Drivers and Capture WIM are described and illustrated with Screenshots.
-
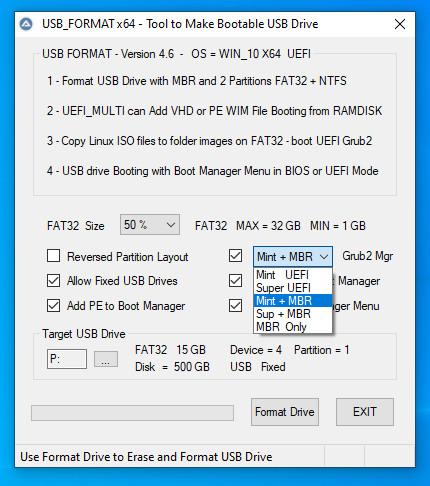
Update USB_FORMAT-41 and UEFI_MULTI-41 plus the Addon-glim-agFM files - USB_FORMAT - Make PE-Boot-WIM entry in Boot Manager Menu for booting with boot.wim file from RAMDISK - After Format Drive simply copy your PE boot.wim file to USB Boot drive - USB_FORMAT - Make Win10x64.vhd VHD entry in Boot Manager Menu for booting with Win10x64.vhd file as FILEDISK - After Format Drive simply copy and rename as Win10x64.vhd file in USB NTFS drive of Portable SSD - VHD FILEDISK option can only be added for Fixed USB Drives and Windows 10 Or Win10XPE as operating system - The iso folder of Grub2 Live ISO Multiboot is moved to the root of USB Boot Drive instead of being a subfolder of EFI as implemented in SuperUEFIinSecure Boot Disk v3 Release The reason is that iso folder inside EFI is a source of trouble for booting Linux ISO files - Simply Copy Your Linux ISO file to iso\YourLinux folder - Update of a1ive Grub2 File Manager to v7.1.2 - Update of Manual Win10_Install.pdf - In Win10x86 Or Win8.1 x86 OS - Support for UEFI x86 with file efi\boot\bootia32.efi from firmware file Windows\Boot\EFI\bootmgfw.efi Download: USB_FORMAT and UEFI_MULTI
-
Hallo ChrisR Thanks for your help and to give an alternative site at GitHub for download of Win10XPE (the best PE ever made)
-
Thanks for your answer. Let us hope that someone (reading this) can and will take care to bring Win10XPE back online again.
-
@JFX The website of TheOven is down, so that Win10XPE is not available for download. Can you help to bring Win10XPE back online again ?
-
Update USB_FORMAT-31 and UEFI_MULTI-97 plus the Addon-glim-agFM files - Added Grub2Win for booting in BIOS mode with GRUB2 Live ISO Multiboot menu for a lot of Linux ISO files like with Grub2 in UEFI Secure mode - Added Knoppix runtimelivecd.iso support for GRUB2 Live ISO Multiboot menu in BIOS and UEFI Secure mode - Update of a1ive Grub2 File Manager Download: USB_FORMAT and UEFI_MULTI
-
Update USB_FORMAT-30-addon_v7-beta4.zip and UEFI_MULTI-96-addon_v7-beta4.zip available Added Support for UEFI Secure booting with a lot of Linux ISO files by using: - GRUB2 Live ISO Multiboot menu of Super-UEFIinSecureBoot-Disk_v3.zip is present in Addon v7-beta4 - Simply copy your Linux ISO file to USB Boot Drive in folder \iso\YourLinux Download: USB_FORMAT and UEFI_MULTI
-
Update of Manual: - Added Section: How to make USB Drive booting with various Linux ISO versions in BIOS and in UEFI Secure mode UEFI_MULTI supports three ways to Boot Linux ISO files: 1. Boot from USB straight with Grub4dos menu entry in BIOS mode Or with Grub2 menu entry in UEFI Secure mode - method is fast and reliable menu entries are already available e.g. for linuxmint.iso - runtimelivecd.iso - knoppix.iso - ubuntu.iso - ubuntu-19.10-desktop-amd64.iso 2. Boot from USB with a1ive Grub2 File Manager, which is a blackbox that enables to select Linux ISO - available in BIOS and UEFI Secure mode 3. Boot from USB with AIO Boot - previous Integration of Linux ISO generates Grub4dos and Grub2 menu entries Method 2 and 3 are useful in case menu entry for method 1 is not (yet) available, but otherwise method 1 is preferred Download: USB_FORMAT and UEFI_MULTI
-
WinNTSetup4.rar download is old version 4.01 MediaFire download is new version 4.1
-
All my projects are now available for download as wimb GitHub Releases Download: USB_FORMAT and UEFI_MULTI and Make_WinPE and MBR_Backup Manual: VHD_Compact PDF
-
All my projects are now available for download as wimb GitHub Releases Download: USB_FORMAT and UEFI_MULTI and VHD_WIMBOOT and System_Info and MBR_Backup
-
All my projects are now available for Download as Releases at wimb GitHub Download: USB_FORMAT and UEFI_MULTI and VHD_WIMBOOT and System_Info and MBR_Backup
-
addons v7-beta3 with support for a1ive Grub2 File Manager - agFM Use R-mouse 7-zip menu to Extract here will Add the content of addon to existing folder Confirm Overwrites with yes x64 Program with setting Other EFI Manager will Copy .....\UEFI_MAN\efi content to folder EFI on USB FAT32 Boot Drive x64 Program with setting Other EFI Manager will Copy .....\UEFI_MAN\ENROLL_THIS_KEY_IN_MOKMANAGER.cer to root of USB FAT32 Boot Drive In this way the files of a1ive Grub2 File Manager and Super-UEFIinSecureBoot-Disk_minimal_v3 are Added to the USB Multi-Boot Drive Personally I prefer to have Portable SSD booting in BIOS and UEFI Secure mode from USB with Win10XPE (most powerful) from RAMDISK and Win10 VHD as FILEDISK. If desired one can add Ubuntu or Knoppix ISO booting with Grub4dos in BIOS mode and with Grub2 in UEFI Secure mode using the supplied Linux menu entries. Adding a1ive Grub2 File Manager agFM is not needed and booting through agFM is often slower and less reliable for the Linux ISO files. agFM is looking nice and is especially quite useful to boot Linux ISO files for which no entries are given yet to boot straight with Grub4dos or Grub2.
-
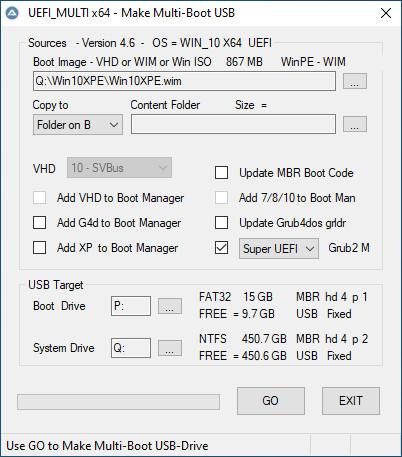
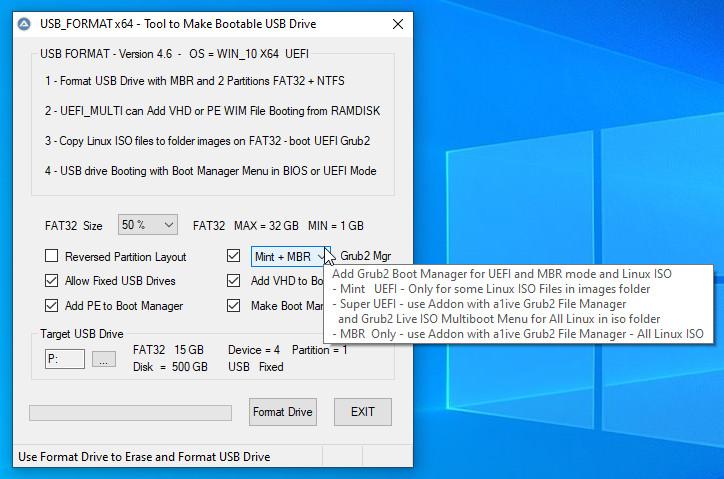
USB_Format and UEFI_MULTI - Make Multi-Boot USB-Drive Format USB Drive with MBR and 2 Partitions = Active FAT32 + NTFS USB drive Booting with Windows Boot Manager Menu in BIOS or UEFI Mode UEFI_MULTI can make Boot entry for Windows 10/11 x64 in VHD as FILEDISK UEFI_MULTI can make Boot entry for PE WIM file for Booting from RAMDISK WinNTSetup can Add Windows 10/11 x64 VHD to Boot Manager Menu Manual: VHD_Compact PDF - Windows To Go Download: USB_Format and UEFI_MULTI and PE_Tools and Make_WinPE Best Performance: Switch AntiVirus Software e.g. Microsoft Defender Off Go straight to New Design USB_Format and UEFI_MULTI ================================================================ Description for old version 6.3 Not supported anymore ..... USB Format Tool - Make Bootable USB Drive with MBR and 2 Partitions USB Multi-Boot of Linux ISO + Windows 10 VHD + Win10XPE in BIOS Or UEFI Secure mode 1 - Format USB Drive with MBR and 2 Partitions = Active FAT32 + NTFS 2 - UEFI_MULTI can Add VHD or PE WIM File Booting from RAMDISK 3 - Copy Linux ISO files to folder images on FAT32 - Boot UEFI Grub2 and BIOS Grub4dos 4 - USB drive Booting with Windows Boot Manager Menu in BIOS or UEFI Mode Download: USB Format Tool and UEFI_MULTI at wimb GitHub More Info: Install Windows 10 from USB after booting with WIM or VHD == Linux ISO Info: UEFI Secure boot support requires Format Drive using Grub2 as EFI Manager Copy and Rename your Linux ISO files to folder images on FAT32 USB Boot drive U-BOOT Supported filenames for Linux ISO in folder images are: linuxmint.iso and runtimelivecd.iso and knoppix.iso and ubuntu.iso and kali-linux.iso and Porteus.iso PassWord=toor Download: Linux-Mint and Knoppix-Live and Ubuntu and Porteus x86_64 and Kali 64-bit Live Booting Linux ISO files in images folder: UEFI mode - Linux Mint Grub2 booting with FAT32 file \EFI\Boot\BOOTx64.EFI and \Boot\grub\grub.cfg and grub_Linux.cfg Menu UEFI mode - Super UEFI Grub2 booting with FAT32 file \EFI\Boot\BOOTx64.EFI and \grub\grub.cfg and grub_Linux.cfg Menu MBR BIOS - a1ive Grub2 Boot Manager installed in MBR and booting with \grub\grub.cfg and grub_Linux.cfg Menu MBR BIOS - also available Grub4dos Menu booting with menu.lst and menu_Linux.lst Booting Linux ISO files in iso folder: UEFI mode - GRUB2 Live ISO Multiboot (glim) menu in folder \grub\glim\main.cfg and inc-linux.cfg files MBR BIOS - GRUB2 Live ISO Multiboot (glim) menu in folder \grub\glim\main.cfg and inc-linux.cfg files MBR BIOS - also available Grub4dos Menu booting with menu.lst and menu_Linux.lst In case UEFI Grub2 is not available as Boot option in your F8 Boot Menu then you need to use BOOTICE 1.3.3.2 to Add UEFI entry. Unneeded for USB-Stick, but UEFI Grub2 boot entry is easily lost in case of Portable SSD. Select as UEFI Boot entry the Linux Mint Grub2 file \EFI\Boot\BOOTx64.EFI a1ive Grub2 File Manager Info: Not needed since booting straight with Linux ISO using Grub4dos in BIOS mode and Grub2 in UEFI mode is preferred. But if you prefer support of a1ive Grub2 File Manager - Download Addons at wimb GitHub Use R-mouse 7-zip menu to Extract here will Add the content of addon to existing folder and confirm Overwrites with yes In x64 program use Super EFI Manager as setting for support of a1ive Grub2 File Manager In this way the files of a1ive Grub2 File Manager and Super-UEFIinSecureBoot-Disk_minimal_v3 (more info) are Added to the USB Multi-Boot Drive How to Boot from USB with AIO Boot - USB_FORMAT - Format USB Drive with MBR and 2 Partitions = Active FAT32 + NTFS - Download AIOBoot-v0.9.9.9.7z - Unpack and Copy content of folder AIOBoot-v0.9.9.9 to USB FAT32 and overwrite existing UEFI Boot files - On USB run AIOCreator.exe - Select Integration Linux OS and your Linux ISO - UEFI_MULTI will Keep AIO UEFI files and Add a1ive Grub2 File Manager to AIO\grubfm and Add Boot Manager entry \AIO\grub\grub2win
-
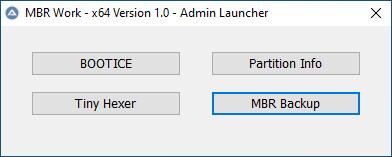
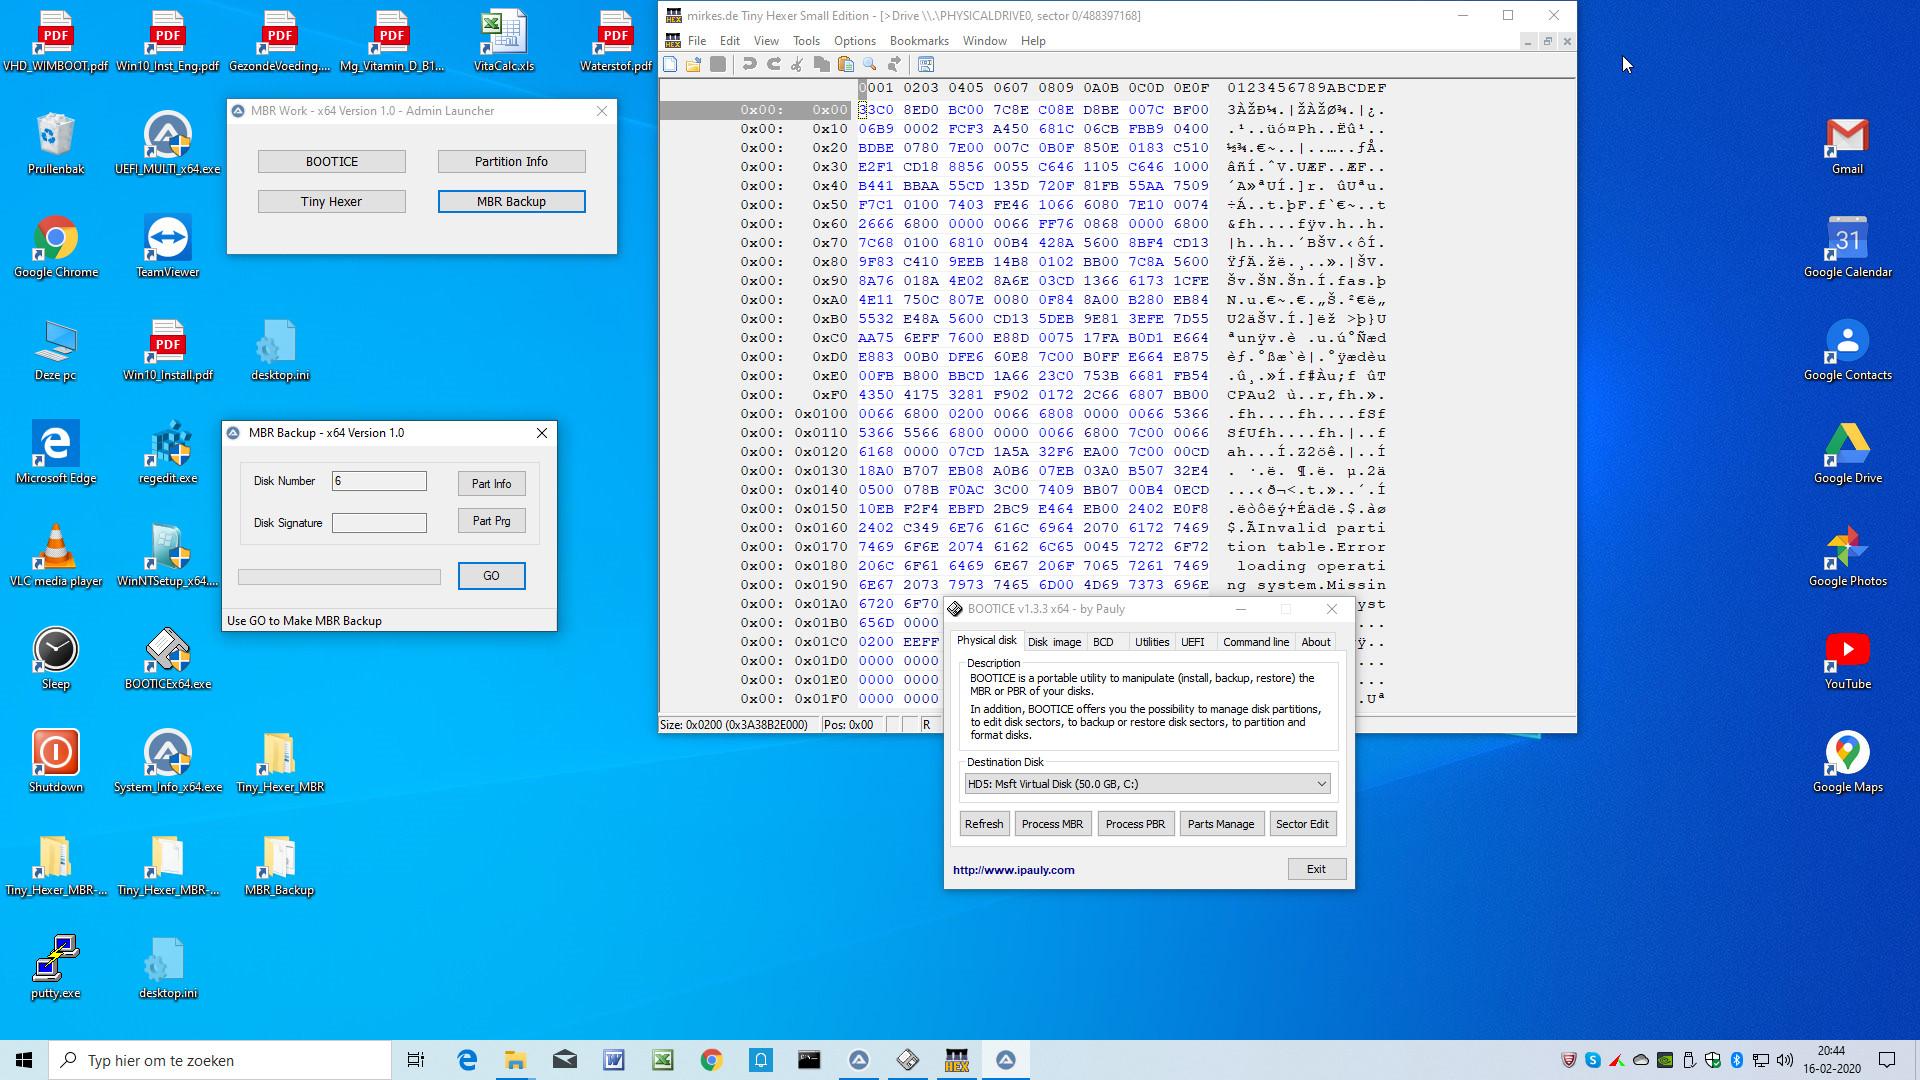
*** Update - MBR_Backup - Added - MBR_Backup_x64.exe Program with GUI - Added - MBR_Work.exe - Admin Launcher for Tiny Hexer, BOOTICE, Partition Info and MBR Backup Download: TinyHexer MBR at GitHub - Use R-mouse 7-zip menu twice to Extract here - first case password = bootwimb ==
-
Reserved for future use ....
-
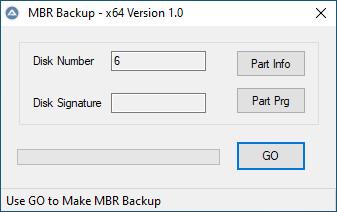
MBR Backup Download: TinyHexer MBR at GitHub - Manual: VHD_Compact PDF - Use R-mouse 7-zip menu twice to Extract here - first case password = bootwimb Program MBR_Backup_x64.exe with GUI MBR_Work.exe - Admin Launcher for Tiny Hexer, BOOTICE, Partition Info and MBR Backup Program - MBR_Backup.cmd Use R-mouse Menu to Run MBR_Backup.cmd as Administrator is required Make Backup of all Bootsectors of all Local Harddisks Fixed + Removable Learn More Using the Links in MBR_bookmarks.html in Folder Help_Info Use TinyHexer (mpth_small.exe) to Study and Compare BootSectors in Detail Use TinyHexer for Restore of Bootsectors - Hopefully Never Needed In any case always run TinyHexer as Administrator, otherwise you get no access to the Disk drives Backup Contains BootSector Files for: Guid Partition Table - GPT - First 34 Sectors of GPT Harddisk Master Boot Record - MBR - Sector 0 of Harddisk containing Partition Table Extended Partition Boot Record - EPBR - Beginning of Extended Partition Extended Boot Records - EBR - Beginning of Logical Partitions within Extended Partition BootSectors - 16 Sectors for NTFS or FAT32 and 1 Sector for FAT32 or FAT And Partition Info File = MBR_Date_ComputerName.txt
-
Install from USB After Booting with WIM or VHD
wimb replied to wimb's topic in Install Windows from USB
How to Inject Win10 VHD System to Fix Computer In case of computer troubles it is often desired to have a quick fix available without disturbing existing configuration. We can decide to Inject from USB in 10 minutes a 50 GB VHD with New Windows 10 x64 System for local account. Windows 10 in VHD has the advantage that the VHD can be copied to any location. Windows 10 is Universal and will adjust automatically the drivers needed for the hardware in use. After Injection, the VHD System is personalised by Switching to Microsoft Account and Changing User Data Locations. - Prepare Portable SSD Bootable from USB with PE WIM and VHD file as described in this document Manual: Win10_Install.pdf - Disconnect Internet LAN Ethernet cable - Boot from USB - after beep use F8 menu - Select in Boot Manager Menu Win10XPE WIM file located on Portable SSD - Copy 50 GB VHD with New System for local account and located on USB Portable SSD to your internal SSD Drive C: - UEFI_MULTI is used to Add VHD in Boot Manager Menu for booting from internal SSD - BOOTICE use tab BCD and Z:\efi\microsoft\boot\BCD Or Z:\Boot\BCD in Prof Mode to Set as Default the Added VHD - Option - For existing System Drive C: use Malware Removal Tool like McAfee Stinger - Option - Restore Registry use Registry Backup Portable - Copy folders from RegBackup\MY-PC\datetime\C to Drive C: - Reboot from internal SSD by selecting in Boot Manager menu the Injected VHD with New Windows 10 x64 System - On Data partition Create 5x empty folder for Documents, Pictures, Downloads, Music and Videos My Computer - R-mouse on icon > Properties > tab Location > Move ... Select folder to change the User Data location - Swith to your Microsoft Account via Config > Accounts and Reboot - Option - Restore Backup of User Data made with SyncBack Free on external USB and kept safely offline - Connect Internet LAN Ethernet cable Alternatively you can use: How to Fix Booting of Windows 10 using bcdboot Use bcdboot to Fix on the hidden FAT32 drive the EFI\Microsoft\Boot\BCD entry Or Boot\BCD entry - Boot from USB - after beep use F8 menu - In Win10XPE use R-mouse menu to Open Admin Command Window - Use bcdboot to make BCD in your hidden FAT32 drive mounted by WinNTSetup x64 as Drive Z: bcdboot C:\Windows /s Z: /f ALL How to ReInstall Windows 10 If you want to ReInstall Windows 10 x64 while completely disturbing existing configuration then - Boot with Win10XPE from USB - after beep use F8 menu - In Win10XPE then - Backup to external USB drive your User Data from C:\Users\YourName - In WinNTSetup x64 use as Windows Installation file your Capture Wim file Or use Win10x64 ISO file from TechBench - Select as Installation drive your Attached VHD mounted as Drive Y: Or your internal SSD drive C: and Use NTFS Format - Select Setup and Legacy Boot Menu Style and OK to Install Win10x64 in VHD or partition of internal SSD and Reboot How to Backup your Computer A. System Backup - Swith off Defender - WinNTSetup - R-mouse menu - Local Windows Inst. - Capture Wim to make Backup WIM file - Time = 5 min The Captured WIM file of your System can be used for fast Re-Install of Win10 including all Programs and Settings - Registry Backup Portable can make a Backup in folder C:\RegBackup of the Windows Registry useful for System Restore - Time = 5 sec - MBR Backup can make Backup of Partition Table and Bootsectors of all Local Harddisks Fixed + Removable - Time = 10 sec Use TinyHexer to study and Restore Bootsectors - Hopefully Never Needed B. Data Backup - SyncBack Free - Make Backup of User Data on external USB kept safely Offline - Backup Time = initially few hours - update in 10 min - Backup using File History - available in Windows 10 - More Info - Time = initially few hours - autoupdate running in the background - Backup your Data in OneDrive in the Cloud - Backup kept safely on Remote Location - Time = initially few hours - autoupdate