Jump to content

Search the Community

Showing results for tags 'VHD'.

  • Search By Tags

    Type tags separated by commas.
  • Search By Author

Content Type


Forums

  • The General Stuff
    • Announcements
    • Introduce Yourself!
    • General Discussion
  • Microsoft Software Products
    • Windows 11
    • Windows 10
    • Windows 8
    • Windows 7
    • Windows Server
    • Older Windows NT-Family OSes
    • Windows 9x/ME
    • Other Microsoft Products
  • Unattended Windows Discussion & Support
    • Unattended Windows
    • Other Unattended Projects
  • Member Contributed Projects
    • Nuhi Utilities
    • Member Projects
    • Other Member Contributed Projects
    • Windows Updates Downloader
  • Software, Hardware, Media and Games
    • Forum Categories
    • Mobile Devices
  • Customizing Windows and Graphics
    • Customizing Windows
    • Customizing Graphics
  • Coding, Scripting and Servers
    • Web Development (HTML, Java, PHP, ASP, XML, etc.)
    • Programming (C++, Delphi, VB/VBS, CMD/batch, etc.)
    • Server - Side Help (IIS, Apache, etc.)

Calendars

There are no results to display.


Find results in...

Find results that contain...


Date Created

  • Start

    End


Last Updated

  • Start

    End


Filter by number of...

Joined

  • Start

    End


Group


AIM


MSN


Website URL


ICQ


Yahoo


Jabber


Skype

Found 12 results

  1. Mini 10x64 in VHD created with Win_Reduce_Trusted Download: Win_Reduce_Trusted-40 and VHD_WIMBOOT Download: Portable VLC x64 vlc-3.0.12-win64.7z Or Portable Freeware and Firefox Portable and LibreOffice Manual: VHD_WIMBOOT.pdf 1. WinNTSetup - Fresh Install in 25 GB VHD using Win10x64 ISO from TechBench 2. VHD_WIMBOOT - Capture WimBoot LZX and Apply in Compact LZX mode in VHD 3. Mount VHD with doubble-click and use Win_Reduce_Trusted on Offline Windows - Reduce in 1 minute gives Mini 10x64 VHD UsedSize = 1.79 GB - Capture WimBoot LZX WIM = 1.19 GB and Apply Compact LZX in 3.9 GB VHD 4. Boot with 3.9 GB VHD - Always use the supplied Firewall App Blocker and Enable WhiteList to Allow Internet Browser only - This is the easiest way to block unwanted internet traffic including Windows Update and prevents the growth of Used Size inside VHD
  2. USB Format Tool - Make Bootable USB Drive with MBR and 2 Partitions USB Multi-Boot of Linux ISO + Windows 10 VHD + Win10XPE in BIOS Or UEFI Secure mode 1 - Format USB Drive with MBR and 2 Partitions = Active FAT32 + NTFS 2 - UEFI_MULTI can Add VHD or PE WIM File Booting from RAMDISK 3 - Copy Linux ISO files to folder images on FAT32 - Boot UEFI Grub2 and BIOS Grub4dos 4 - USB drive Booting with Windows Boot Manager Menu in BIOS or UEFI Mode Download: USB Format Tool and UEFI_MULTI at wimb GitHub More Info: Install Windows 10 from USB after booting with WIM or VHD and in Win10_Install.pdf == Linux ISO Info: UEFI Secure boot support requires Format Drive using Grub2 as EFI Manager Copy and Rename your Linux ISO files to folder images on FAT32 USB Boot drive U-BOOT Supported filenames for Linux ISO in folder images are: linuxmint.iso and runtimelivecd.iso and knoppix.iso and ubuntu.iso and kali-linux.iso and Porteus.iso PassWord=toor Download: Linux-Mint and Knoppix-Live and Ubuntu and Porteus x86_64 and Kali 64-bit Live Booting Linux ISO files in images folder: UEFI mode - Linux Mint Grub2 booting with FAT32 file \EFI\Boot\BOOTx64.EFI and \Boot\grub\grub.cfg and grub_Linux.cfg Menu UEFI mode - Super UEFI Grub2 booting with FAT32 file \EFI\Boot\BOOTx64.EFI and \grub\grub.cfg and grub_Linux.cfg Menu MBR BIOS - a1ive Grub2 Boot Manager installed in MBR and booting with \grub\grub.cfg and grub_Linux.cfg Menu MBR BIOS - also available Grub4dos Menu booting with menu.lst and menu_Linux.lst Booting Linux ISO files in iso folder: UEFI mode - GRUB2 Live ISO Multiboot (glim) menu in folder \grub\glim\main.cfg and inc-linux.cfg files MBR BIOS - GRUB2 Live ISO Multiboot (glim) menu in folder \grub\glim\main.cfg and inc-linux.cfg files MBR BIOS - also available Grub4dos Menu booting with menu.lst and menu_Linux.lst In case UEFI Grub2 is not available as Boot option in your F8 Boot Menu then you need to use BOOTICE 1.3.3.2 to Add UEFI entry. Unneeded for USB-Stick, but UEFI Grub2 boot entry is easily lost in case of Portable SSD. Select as UEFI Boot entry the Linux Mint Grub2 file \EFI\Boot\BOOTx64.EFI a1ive Grub2 File Manager Info: Not needed since booting straight with Linux ISO using Grub4dos in BIOS mode and Grub2 in UEFI mode is preferred. But if you prefer support of a1ive Grub2 File Manager - Download Addons at wimb GitHub Use R-mouse 7-zip menu to Extract here will Add the content of addon to existing folder and confirm Overwrites with yes In x64 program use Super EFI Manager as setting for support of a1ive Grub2 File Manager In this way the files of a1ive Grub2 File Manager and Super-UEFIinSecureBoot-Disk_minimal_v3 (more info) are Added to the USB Multi-Boot Drive How to Boot from USB with AIO Boot - USB_FORMAT - Format USB Drive with MBR and 2 Partitions = Active FAT32 + NTFS - Download AIOBoot-v0.9.9.9.7z - Unpack and Copy content of folder AIOBoot-v0.9.9.9 to USB FAT32 and overwrite existing UEFI Boot files - On USB run AIOCreator.exe - Select Integration Linux OS and your Linux ISO - UEFI_MULTI will Keep AIO UEFI files and Add a1ive Grub2 File Manager to AIO\grubfm and Add Boot Manager entry \AIO\grub\grub2win
  3. VHD_WIMBOOT - Apply and Capture of WIM Files for OS in VHD Download: VHD_WIMBOOT-53.zip at GitHub APPLY of WIM File in wimboot mode to VHD gives Operating System with only variable and boot essential files total about 1 GB in VHD. The VHD contains also pointers to the non variable files in the WIM archive, so that it seems that the complete OS is present in the VHD. The VHD content can be generated in 2 minutes from the WIM archive of about 9 GB, so that a backup of the system is always available. The VHD + WIM set can be copied to any drive so that we have a portable Operating System. The WIM file cannot be changed by viruses or other malware so that the system is reliable and if needed it is easy to generate new VHD. The VHD can boot as 25 GB FILEDISK from Portable SSD to allow changes, but also booting always Fresh from 3.9 GB RAMDISK is possible. VHD WIMBOOT has support for Office and Printer and any program can be installed, which is all not possible in case of WinPE In case of VHD WIMBOOT on each machine it takes extra boottime and space to adjust the drivers for that machine The VHD WIMBOOT solution is Portable, but not as flexible as Win10XPE, where boottime is not dependant on machine hardware Credits and Thanks to: Microsoft for making WIMBOOT - https://msdn.microsoft.com/en-us/library/dn631793.aspx and https://docs.microsoft.com/en-us/windows/win32/w8cookbook/windows-image-file-boot--wimboot- synchronicity aka Eric Biggers for making wimlib - https://wimlib.net/ schtrom for making SVBus Virtual SCSI Host Adapter for GRUB4DOS - http://reboot.pro/topic/21787-svbus-virtual-scsi-host-adapter-for-grub4dos/ alacran for support and info - http://reboot.pro/topic/21957-making-the-smallest-win10-install-wimboot-mode-on-512-mb-vhd/ and http://reboot.pro/topic/21972-reducing-wimboot-source-wim-file-using-lzx-compression-and-vhd-using-gzip-or-lz4-compression-to-save-room-and-also-load-faster-on-ram/ JFX for making WinNTSetup to Install Windows 2k/XP/2003/Vista/7/8/10 x86/x64 - https://msfn.org/board/topic/149612-winntsetup-v394/ Uwe Sieber for making ListUsbDrives - http://www.uwe-sieber.de/english.html Pauly for making BOOTICE - available via http://reboot.pro/files/file/592-bootice-v1332/ and https://sites.google.com/site/gbrtools/home/software/bootice-portable/bootice-downloads chenall, yaya, tinybit and Bean for making Grub4dos - http://grub4dos.chenall.net/categories/downloads/ Thanks to karyonix, alacran, Wonko the Sane, tinybit, yaya, chenall, cdob, JFX, steve6375, ReTokener, synchronicity, schtrom and Microsoft Development is described here - http://reboot.pro/topic/18182-uefi-multi-make-multi-boot-usb-drive/page-5 The program is released "as is" and is free for redistribution, use or changes as long as original author, credits part and link to the reboot.pro support forum are clearly mentioned VHD_WIMBOOT - http://reboot.pro/topic/21977-vhd-wimboot-apply-and-capture-of-wim-files-for-os-in-vhd/ Author does not take any responsibility for use or misuse of the program.
  4. Hi JFX... @JFX @jaclaz @wimb @alacran FOR VHD INSTALL- "%wpath%\WinNTSetup%pp%.exe" VHD-CREATE -file:"%FREEDRIVE%\WIMBOOT\Win10x64-WB.vhd" -size:15GB -type:expandable -label:"Win10x64-WB" set e=%errorlevel% set "ALPHABET=_ABCDEFGHIJKLMNOPQRSTUVWZYZ" call set VHD_DRIVE=%%ALPHABET:~%e%,1%% if "%VHD_DRIVE%"=="" echo ERROR! if "%VHD_DRIVE%"=="_" echo ERROR! echo Win10x64-WB.vhd is mounted as %VHD_DRIVE% "%wpath%\WinNTSetup%pp%.exe" NT6 -source:"%isopath%" -wimindex:"2" -syspart:%SYSPART% -tempdrive:%VHD_DRIVE% -unattend:"%XML%" -drivers:"%E2BDRIVE%\SVBus" -Sysletter:C -RunAfter:"COPY_VHD_WIMBOOT_FILES.cmd %E2BDRIVE% %VHD_DRIVE% %OSPART%" -setup -reboot -testSigning FOR VHD CAPTURE- I use following command to Capture Win10x64-WB.vhd to Win10x64-WB.wim in WIMBOOT mode. wimlib-imagex.exe capture %VHD_DRIVE% C:\WIMBOOT\W10x64-WB.wim --config=%E2BDRIVE%\VHD_WIMBOOT\WimBootCompress-2019-03-31.ini --include-integrity --wimboot --compress=LZX --threads=4 Applying WIM to VHD in WIMBoot mode- Currently I use following command to Apply WIMBooted Win10x64-WB.wim to 1.5 GB Win10x64-WB.vhd in WIMBOOT mode. wimlib-imagex.exe apply C:\WIMBOOT\W10x64-WB.wim %VHD_DRIVE% --wimboot What exactly WinNTSetup command I should use that will be equivalent to above wimlib-images apply command in WIMBOOT mode ? Regards....
  5. Go direct to new description including Windows 10 Install Windows 10 from USB After Booting with WIM or VHDX https://msfn.org/board/topic/121446-install-from-usb-after-booting-with-pe/?do=findComment&comment=1155026 ================================================================================ Install of XP or Windows 7 from USB After Booting with 7 PE and by using WinNTSetup2_x86.exe and Setup ISO file in Virtual drive 0. Use BOOT_USB.exe to prepare USB or HDD drive for booting with Grub4dos Menu and using 7 PE Boot Image file - Info BOOT_USB - http://www.911cd.net/forums//index.php?showtopic=24424 - Info Make_PE3 - http://www.911cd.net/forums//index.php?showtopic=23931 1. Boot from USB or HDD with 7 PE loaded in RAMDISK - use Grub4dos Boot Menu and 7pe_x86_E.iso Boot Image file 2. Use R-mouse to Mount Windows Setup ISO in ImDisk virtual drive - If needed first Install ImDisk driver by running imdiskinst.exe (also available in makebt folder) 3. Quick Format TargetDrive - use NTFS FileSystem 4. Run WinNTSetup2_x86.exe and prepare Target drive for Install of XP or Windows 7 Thanks to JFX - http://www.msfn.org/board/topic/149612-winntsetup-v2/ 5. Reboot from Target Drive and Install XP or Windows 7 Instead of 7 PE you can use any other way of booting that allows you to Format and prepare your Target Drive. You might decide e.g. to boot with Portable Windows XP IMG or with Windows 7 VHD from USB In any case you can use WinNTSetup2_x86.exe to prepare your Target drive for Install of XP or Windows 7 See Tutorial file XP-W7-Setup.txt in IMG_XP\Help_Info folder Info IMG_XP - http://www.911cd.net/forums//index.php?showtopic=23553 Download - End of Support The advantage is that you never boot from USB during XP Setup and that makes everything much more reliable and you have full control of what you are doing. Also using a single XP Setup ISO file mounted in ImDisk Virtual drive is much more reliable than having a bunch of XP Setup files on USB. Transfer of the ISO file to USB is much faster and easier to maintain. Instead of USB-stick it is much better to use Portable 2.5 inch USB-harddisk e.g. Samsung S2 As easy to carry and connect, but much higher speed and more capacity. ================================================================================ old approach with useful info left here for reference *** Install from USB AFTER Booting with PE *** Install from USB without Booting from USB by using U_XP_SET ================================================================================ 0. Introduction Install of XP from USB involves: Boot in 30 seconds with LiveXP Boot Image from RAMDISK loaded in few seconds from HD (preferred) or from USB in 5 minutes Run USB_XP_Setup.exe and select and Quick Format your Target Drive on which you want to Install XP Select your XP Setup Source folder and LiveXP Boot Image file and use GO to prepare Target Drive for Install of XP Reboot Computer from Target Install Drive and Select XP Setup from boot.ini Menu Proceed as usual with TXT-mode and Reboot for GUI-mode of Unattended XP Setup To perform the above requires some preparation: Prepare XP Setup Source Folder and Live XP Boot Image file as described in Tutorial in Sections 2 and 3 Use Make_USB.exe so that your USB-stick or USB-Harddisk contains XP Setup Source folder and U_XP_SET folder and LiveXP Boot Image file Run BOOT_IMG.exe to Install LiveXP Boot Image file as boot option on C-BootDrive of Harddisk For blank HDD you need to create first an Active Primary NTFS partition: Use Make_USB.exe to make USB-stick having XP Setup Source and being bootable with LiveXP Use BOOT_IMG.exe to make USB-stick also bootable with Parted Magic 4.6 (See Section 6) After booting from USB-stick with Parted Magic from GRUB4DOS menu, you can create Primary NTFS partition using GParted Reboot from USB-stick with LiveXP PE and Set Active the created Primary NTFS partition using Disk Management In LiveXP you must fix the MBR of your HDD using MBRFix.exe (in makebt folder), since Parted Magic will not create the required MBR bootcode to make drive bootable If your HDD is drive 0 then in cmd window opened at makebt folder run: MbrFix /drive 0 fixmbr Run USB_XP_Setup.exe to Quick Format TargetDrive and prepare HDD for Install of XP Reboot from HDD for Install of XP and continue as usual with TXT and GUI mode of XP Setup (change BIOS settings to boot from HDD if needed) ================================================================================ 1. Install of XP using USB_XP_Setup.exe The package U_XP_SET contains Folder USB_XP_Setup with 3 Programs, which you can Launch via PStart.exe Menu Make_USB.exe can Copy your XP Source to USB-Drive and can make it Bootable with LiveXP for Emergency BOOT_IMG.exe Copies WinBuilder LiveXP Boot Image file to C-Harddisk or USB-Drive and makes Entry for boot.ini Menu and GRUB4DOS menu.lst for Booting with LiveXP PE from RAMDISK. This is useful as Escape Boot Option in case Booting with Windows XP or XP Setup may fail, so that you can Repair your System or use Ghost for System Backup and System Restore. USB_XP_Setup.exe can make XP Setup BootFolder $WIN_NT$.~BT on Install-Drive usually C: and will specify in TXTSETUP.SIF where to find the FULL XP Source on partition 1 of USB-Stick. For all other cases of Install of XP e.g. from any Harddisk folder or Network Shared folder or from CD / DVD disk, then the XP Source is always Copied to $WIN_NT$.~LS folder on Target Install-drive. Before you Start to Install XP: Prepare XP Source Folder and Live XP Boot Image File as described in Sections 2 and 3 Vista as OS requires to turn User Account Control OFF (only needed for the old Batch cmd Programs) Run the SFX SelfExtractor U_XP_SET.exe and use Extract to the Root of your Workstation Harddisk In this way you will get on your Local Harddisk the folder U_XP_SET with PStart.exe to launch the 3 Programs Copy Winbuilder\Workbench\Common\BootSDI\setupldr.bin and ramdisk.sys to USB_XP_Setup\makebt\srsp1 folder Run Make_USB.exe and Select and use as Target Drive a FAST USB-stick (e.g. Corsair Flash Voyager 4-8 GB) Use Format Stick button or HP Format Tool to format Target USB-stick with NTFS FileSystem (Fastest for FileCopy) Select your XP Source Folder and LiveXP Boot Image File and Enable Copy of U_XP_SET Folder to Make your USB-stick Run BOOT_IMG.exe to Copy WinBuilder LiveXP Boot Image file to C-BootDrive of Harddisk and make Entry for boot.ini Menu and GRUB4DOS menu.lst for Booting with LiveXP PE from RAMDISK. This is also useful as Escape Boot Option in case Booting with Windows XP or XP Setup may fail, so that you can Repair your System or use Ghost for System Backup and System Restore. The XP Setup Procedure for Fresh Install of XP: Connect USB-Stick having XP Source in partition 1 (Connect before Booting with LiveXP from HDD) or use any other XP Setup Source. Remove All Other USB-Drives like CardReaders and USB-Harddisks Reboot from C-Harddisk and Select to Boot from RAMDISK with LiveXP into PE Environment Run USB_XP_Setup.exe and Quick Format with NTFS your Selected Target Install-Drive usually C: Use GO to make XP Setup BootFolder $WIN_NT$.~BT on Target Install-Drive. First give XP Setup Source Path and give LiveXP RAM BootSDI IMAGE File. So in case when XP Setup fails, you have LiveXP as Escape Boot Option available on your Fresh Formatted Install Drive. XP Source not on USB-stick is always Copied to $WIN_NT$.~LS folder on Target Install-drive. If you Install on other than Active C-drive, then Use Disk Manager to Activate Install Drive Partition Reboot Computer from Install Drive and Select XP Setup from boot.ini Menu Proceed as usual with TXT-mode and GUI-mode of Unattended XP Setup In TXT-mode after FAST loading drivers the blue screen becomes black and then one needs to wait sufficiently until the blue screen with the Drive Partition List appears. Select the Install Partition usually C: and Auto proceed with FileCopy and Reboot for GUI-mode of XP Setup. WARNING Don't Delete the Install Partition, just Install on this previously in PE Quick Formatted NTFS Partition. Changing the Partitioning is a task which is done in LiveXP PE Environment with 7Tools Partition Manager 2005 of Paragon ( Preferred ) or Acronis Disk Director 10. The advantage of the present technique is that there are no changes needed in the BIOS Setting. Booting for XP Setup occurs all the time as normal from the C-Install Drive if you Install on C-Drive. Thus the USB-stick does not need to be bootable and it is not needed that the motherboard supports booting from USB. In the case of total computer disaster it can still be handy to boot with LiveXP from USB-drive. Another advantage is that you can use the FULL XP Source unchanged just as with Install from CD and the $OEM$ folder is recognised and the [unattended] section of winnt.sif file is used as normal. Moreover USB_XP_Setup.exe allows to Select from different XP Sources on USB-Drive to be used for XP Setup. Supports the use of BTS DriverPacks located in OEM Folder in XP Source Folder on USB-Drive http://driverpacks.net/downloads Install XP from USB AFTER booting with PE does not make use of WINNT32.EXE In fact the only thing I do is Create the XP BootFolder $WIN_NT$.~BT of only 12 MB on the Install Drive by parsing dosnet.inf and to specify in TXTSETUP.SIF where to find the FULL XPSOURCE. In this case the XP Setup Source Folder must be on USB-stick. For all other cases of Install of XP e.g. from any Harddisk folder or Network Shared folder or from CD / DVD disk, then the XP Source is always Copied to $WIN_NT$.~LS folder on Target Install-drive. Thanks to ilko_t I have learned how to use SetupSourcePath and SetupSourceDevice to specify in TXTSETUP.SIF where to find the XP Source Folder, thus enabling Alternative location of Setup files when installing from HD media http://www.msfn.org/board/Alternative-loca...en-t119742.html ================================================================================ TXT-mode XP Setup Error in case of Install of XP with Setup Source on USB-stick TXT-mode Setup Memory/CD-Error means harddisk nr in SetupSourceDevice is incorrect Solution: - ReBoot with LiveXP Boot Image from RAMDISK, Run PStart and run again USB_XP_Setup.exe - Now Select Copy XP Setup Source Folder to Target Drive folder $WIN_NT$.~LS - Reboot Computer from Install Drive and Select XP Setup from boot.ini Menu Possible causes of TXT-mode Setup Memory/CD-Error are: - Change of Harddisk Numbering by BIOS due to Hardware Configuration Change on Reboot. Try to disconnect ZIP-drive, Cardreader or use different USB-port. - Change of Harddisk Numbering by BIOS due to connecting USB-drive AFTER Booting with PE or XP XP Setup may fail - due to XP Source Harddisk Number Change on Reboot In this case Reboot with LiveXP PE and USB-drive CONNECTED to Reset Harddisk Number Run USB_XP_SETUP.cmd again to get correct SetupSourceDevice in TXTSETUP.SIF - Inconsistent Harddisk Numbering by BIOS caused by Incompatible type of USB-stick - Intuix 8 GB - Old BIOS versions, where harddisk number of USB-Drive and Install Drive are Reversed in TXT-Mode and GUI-Mode You can Use Disk Manager Manually to determine Harddisk Numbers and use Notepad to correct harddisk nr and XP SOURCE Folder in TXTSETUP.SIF [setupData] SetupSourcePath = "\XPPRO\" SetupSourceDevice = \device\harddisk1\partition1 In this case change file %instdrive%\txtsetup.sif and %instdrive%\$WIN_NT$.~BT\txtsetup.sif ================================================================================ How to boot with LiveXP from Harddisk using extra option in boot.ini Menu was described by me in http://www.911cd.net/forums//index.php?sho...21682&st=24 Combining this technique with the possibility to make XP Setup BootFolder $WIN_NT$.~BT on C-Install-Drive by parsing dosnet.inf and to specify in TXTSETUP.SIF the XP Source location on USB-stick has resulted in this way of Install of XP from USB-stick AFTER booting with PE from C-Harddisk. In LiveXP you can Connect to Network Drive using PENetwork Manager with Path: \\ComputerName\ShareName User: ComputerName\UserName Pass: PassWord It might be necessary to switch off the Firewall of the Network computer. Network Shared Folders can also be used as Source folder in USB_XP_Setup.exe and Make_USB.exe For Install of XP in a folder e.g. WIN51 next to existing WINDOWS folder or for Repair Install you can use USB_XP_Setup.exe direct from HDD without booting first into PE Environment. Repair Install using USB_XP_Setup.exe XP Setup Source Folder can be on USB-stick or anywhere else. Connect USB-stick having XP Source in partition 1 Remove All Other USB-Drives like CardReaders and USB-Harddisks Reboot as NORMAL from C-Harddisk, so that BIOS Resets USB-drive number Run USB_XP_SETUP.exe to make XP Setup BootFolder $WIN_NT$.~BT on Install-Drive usually C: Repair Install is enabled by Disabling [unattended] Section using ; in C:\$WIN_NT$.~BT\winnt.sif file Reboot Computer from Install Drive usually C: and Select XP Setup from boot.ini Menu Select in TXT-mode Existing Windows for Repair and continue with GUI-mode of XP Setup ================================================================================ 2. XP-Source Preparation Take care that your XPSOURCE Folder is located on your Harddisk in a simple Path without SPACES. Copy the Content of your Windows XP Setup CD to your XPSOURCE Folder on Harddisk Slipstream ServicePack SP3 First Manually in your XP-SP2 Source (don't use here nLite). http://www.helpwithwindows.com/WindowsXP/S...ice_Pack_3.html Siginet's RyanVM Integrator or nLite can then be used to Integrate Windows UpdatePacks in the XP-Source. Preferred is using RyanVM Integrator 1.6 - http://integrator.siginetsoftware.com/index.php?download Or Alternatively use nLite to Integrate Windows UpdatePacks http://www.nliteos.com/ Windows XP UpdatePacks and Addons: http://www.ryanvm.net/msfn/ http://www.ryanvm.net/msfn/updatepack-sp2.html http://integrator.siginetsoftware.com/index.php?addons http://www.ryanvm.net/forum/ Supports the use of BTS DriverPacks located in OEM Folder on USB-Drive http://driverpacks.net/downloads For Install of XP on a modern system with SATA Drives it is needed to use DPsBase.exe for Integrating in your XPSOURCE BTS DriverPack Massstorage with TXT Mode Enabled. In that case a lot of Extra RAID SCSI and SATA Drivers (about 120 extra) are Integrated which appear in the XP Setup BootFolder $WIN_NT$.~BT on Install-Drive and can prevent a lot of XP Install Boot Problems. It will be useful to Add also Chipset, CPU and LAN DriverPack, which are small so that the decompression at the beginning of GUI-mode of XP Setup does NOT take to much time. Always first use RyanVM Integrator or nLite and then use DPsBase to Improve your XP-Source. The program supplies a Customised presetup.cmd and changes the winnt.sif file for use of DriverPacks. When you don't use nLite, you can copy the supplied $OEM$ folder to your XP Source folder. Change $OEM$ folder to your needs for UserAccounts and Registry Tweaks and Adding Drivers. CMDLINES.TXT is used for making UserAccounts and install of Registry Tweaks at T-12 Info see: http://unattended.msfn.org/unattended.xp/ PnP Drivers specified in winnt.sif can be added to $OEM$\$1\Drivers http://unattended.msfn.org/unattended.xp/view/web/34/ TEXTMODE Drivers defined in winnt.sif and located in $OEM$\TEXTMODE folder of the XP Source can be used instead of using F6 floppy for MassStorage Drivers. The content of the $OEM$\TEXTMODE folder is copied by USB_XP_Setup.exe to XP Setup BootFolder $WIN_NT$.~BT\$OEM$ See cdob and allanf in http://www.boot-land.net/forums/index.php?...5306&st=180 Smart Driver Backup 2.12 of Jaque is very useful to Backup your drivers before install of XP. http://www.911cd.net/forums//index.php?showtopic=20555 The complete XP-Source can be copied by Make_USB.exe to USB-Drive. Computation of Estimated XP Folder Size is used to prevent USB-stick overflow and includes cmpnents + I386 + AMD64 + $OEM$ + OEM Folders. Excluding LANG and WIN98X Folders from Copy to USB is the Default Setting in Make_USB.exe Main Menu, which reduces the XP-Source on USB-Drive by 135 MB ================================================================================ 3. LiveXP Boot Image File Preparation Download LiveXP e.g. lx77rc2cxw.exe from folder Projects or lx77rc2cbw.exe from folder Portable http://amalux.winbuilder.net/ Run the downloaded exe and extract to simple path without spaces e.g. extract to root of your local harddisk. You can add a Ghost script (Ghost Plus!.script) which is very handy for System Backup and Restore. Copy file Ghost Plus!.script from http://amalux.winbuilder.net/index.php?dir=MyScripts/Backup/ to <WinBuilder>\Projects\LiveXP\Apps\System folder For making LiveXP Boot Image file you need original XP-SP2 or XP-SP3 Setup CD copied to folder in root of harddisk. Use simple name without spaces for XP Setup Source folder and Switch Off your Firewall and AntiVirus protection. The MassStorage DriverPack for support of SATA drives is automatically integrated in LiveXP made with WinBuilder. In case of WinBuilder Errors use Button Clean Temporary Files in Advance. On Success Save WinBuilder Settings with WB Manager useful later for Restore of Settings. Run WinBuilder to make in 15 min your LiveXP_WIM.ISO or LiveXP_RAM.ISO Boot Image file in folder <WinBuilder>\ISO Alternatively you may use BootSDI.img file made in folder <WinBuilder>\ISO\Ram\I386 ramdisk.sys and setupldr.bin of Windows Server 2003 SP1 must be in <WinBuilder>\Workbench\Common\BootSDI directory. Activate Finish > Create Image > Boot SDI and Run WinBuilder. You can Deactivate Emulation and Burn Image, since we don't need a CD for our purpose. IMG-type files can be changed afterwards more easily by simply mounting them in Virtual Drive with R-mouse using ImDisk or with VDK. Run makebt\Mount_IMG.cmd and Select to Mount your BootSDI.img file in a Virtual Drive using VDK Copy your add-ons to your Virtual Drive in which you mounted BootSDI.img file Use UnMount_IMG.cmd to Close the Virtual Drive and Save the Changes in your BootSDI.img file FileName of IMG or ISO files for loading into RAMDISK, like LiveXP BootSDI.img file, must be conform DOS 8.3 because otherwise in case of FAT or FAT32 Filesystem you would get Error 14 (File Not Found). Tutorial of amalux on how to create LiveXP Boot Image files using WinBuilder http://www.boot-land.net/forums/?showtopic=4111 ================================================================================ 4. Install of Drivers and Programs Automatic Install of Drivers during XP Setup 1. Using 7-Zip Compressed DriverPacks located in OEM Folder on USB-Drive, which are decompressed by presetup.cmd at beginning of GUI-mode of XP Setup. http://driverpacks.net/downloads For Install of XP on a modern system with SATA Drives it is needed to use DPsBase.exe for Integrating in your XPSOURCE BTS DriverPack Massstorage with TXT Mode Enabled. In that case a lot of Extra RAID SCSI and SATA Drivers (about 120 extra) are Integrated which appear in the XP Setup BootFolder $WIN_NT$.~BT on Install-Drive and can prevent a lot of XP Install Boot Problems. First use RyanVM Integrator and then use DPsBase to Improve your XP-Source. The program supplies a Customised presetup.cmd and changes the winnt.sif file for use of DriverPacks. 2. Using DriverForge.v4.5.4.exe to Install from C:\Drivers at T-9 of GUI XP Setup (just for the last Reboot). DriverForge.v4.5.4.exe made by kickarse http://www.msfn.org/board/index.php?showtopic=110783 At end of TXT-mode XP Setup the folder $OEM$\$1\Drivers is copied to C:\Drivers and $OEM$\$1\Install\DriverForge.v4.5.4.exe is copied to C:\Install When you don't use nLite, you can Copy the supplied USB_XP_Setup\$OEM$ folder to your XP Source folder. For Auto Use of DriverForge at T-9 you can place uncompressed drivers (or folders) in Drivers of $OEM$ and then Uncomment two rules by removing ; in U_XP_SET\USB_XP_Setup\w_sif\winnt.sif file (see below). You can also change driverforge.ini to your needs if you want to use drivers on a different location, or you may even use the compressed DriverPacks. [setupParams] UserExecute = "%SystemDrive%\INSTALL\SetupPar.cmd" Method 2 can be very fast because you can just use in Drivers your well known set of required drivers. The ATI Catalyst Control Center can be Installed separately with other Apps After Setup has completed. Smart Driver Backup 2.12 of Jaque is very useful to Backup your drivers before install of XP. http://www.911cd.net/forums//index.php?sho...20555&st=69 ================================================================================ Install of Programs After XP Setup has finished It is handy to use the Office Integrator of Siginet and benners to Integrate Service Packs and HotPacks before installing Office. http://www.siginetsoftware.com/forum/ Download Office Integrator v1.1 Build 16 http://integrator.siginetsoftware.com/inde...dons&id=213 The Folder usb_cfg_extra provides a script for Windows Post-Install Wizard (WPI) - http://wpiw.net/ WPI is very handy for the Automatic Install of Programs after Install of XP from USB. Some Tweaks are done at best when XP Setup has completed e.g. the IE7_Tweaks and NoWallpaper So I combine these tweaks with the Install of Apps using WPI and launch WPI Manually AFTER logon and when the XP Desktop is ready. As example a config.js script is provided in U_XP_SET\USB_XP_Setup\usb_cfg_extra\INSTALL_PRGS_WPI\WPIScripts In WPI script there is the option to run SFC /purgecache which deletes the dll cache by deleting the files in Folder C:\WINDOWS\system32\dllcache This is a very simple way to reduce the WINDOWS Folder Size by 360 MB The Result is a XP WINDOWS Folder Size on Harddisk of only 900 MB inclusive all Updates. Install of XP from USB including Drivers with DriverForge and Post Install using WPI for the Apps is realised Now within 30 minutes using USB-stick with NTFS Format. ================================================================================ 5. Install Vista from USB Procedure for Install of Vista or Windows 7 from USB-stick Download and Extract U_XP_SET package making U_XP_SET folder on your Harddisk Launch PStart.exe in U_XP_SET folder Run BOOT_IMG.exe from PStart Menu to Install Windows PE 2.1 ISO as GRUB4DOS Boot Option in menu.lst Menu on Harddisk Boot Drive e.g. C:\ Reboot in 40 sec with Windows PE 2.1 ISO loaded by GRUB4DOS from HD into RAMDISK X: Run Vista Setup from folder on USB-stick by using e.g. Free Commander in PE 2.1 Environment Select and Format your Install Drive e.g. C:\ Proceed with Install of Vista from USB (Copy + Extract) Disconnect USB-stick precisely at First Reboot (just at the BIOS Beep when the screen is black). Without Removal there is 10 min Extra Install time. Proceed with Install of Vista - Totally in about 18 min The present approach is Install of Vista from USB without booting from USB. So you don't need BIOS USB Boot Support and you don't need to change BIOS Settings. Moreover, Vista Setup Source can be located in a folder on USB-stick so that it does not interfere with other Setup Sources like folders with Vista x64 or Windows 7 Setup Source. Thanks to jaclaz for Help with GRUB4DOS menu to boot with Windows PE 2.1 ISO file. Thanks to allanf for making WinBuilder Project to make Windows PE 2.1 ISO having GUI interface http://www.boot-land.net/forums/index.php?showtopic=7053 Download WAIK 1.1 Vista SP1 from http://www.microsoft.com/downloads/details...;displaylang=en Booting in 40 sec with pe21.iso loaded by GRUB4DOS from HD into RAMDISK X: allows then to Launch Vista or Windows 7 Setup.exe from folder on USB-stick. http://www.boot-land.net/forums/index.php?...=6800&st=37 Instead of Windows PE 2.1 we can also use VistaPE ISO, but booting with VistaPE will take several minutes. http://www.boot-land.net/forums/index.php?showforum=51 ================================================================================ Windows PE 3.0 ISO Boot Image With PStart Menu for Portable Programs Universal PE Booting from RAMDISK for Rescue and Install of XP or Windows 7 ================================================================================ Making Windows PE 3.0 ISO using AIK for Windows 7 Requirements The Windows Automated Installation Kit (AIK) for Windows 7 WLAN HotFix file Windows6.1-KB972831-x86.cab Installed Windows 7 to supply files to improve Windows PE 3.0 Program Make_PE3.cmd to make in 2 min your pe3.iso Boot Image in folder C:\winpe3_x86 Step 1. The Windows Automated Installation Kit (AIK) for Windows 7 Download KB3AIK_EN.iso from HERE Use ImgBurn or Nero to Burn the ISO Image on DVD Install Windows AIK according to: In case of Windows 7 Set User Account Control Off or use R-mouse Menu to Run as Administrator Run STARTCD.EXE from the AIK DVD In case of XP as OS - Install .NET Framework 2.0 In case of XP as OS - Install MSXML 6.0 Install Windows AIK Download WLAN HotFix from http://support.microsoft.com/kb/972831 Extract the HotFix to get file Windows6.1-KB972831-x86.cab Copy your HotFix file to folder WinPE_OCs made in Windows AIK\Tools\PETools\x86 folder. C:\Program Files\Windows AIK\Tools\PETools\x86\WinPE_OCs\Windows6.1-KB972831-x86.cab Step 2. Get Program Make_PE3.cmd to make pe3.iso Download - End of Support Run the SFX SelfExtractor Make_PE3.exe and use Extract to the Root of your Workstation Harddisk. The folder Make_PE3\PE3_mod contains file WIN7_Files.txt and 4 folders: PE3_add - Add your extra non-driver files in subfolder x86 structured as in Windows PE 3.0 PE3_reg - x86 subfolder contains 3 predefined Registry files with Windows 7 settings to improve the Registry of Windows PE 3.0 WIN7_add - Files needed from Installed Windows 7 are collected by the program in subfolder x86 WIN7_drivers - Add your Driver files e.g. for WLAN in folder x86 (recurse scanning allows subfolders with driver files) The actual filelist used by the program to get files is the generated WIN7_add_files.txt copy in folder WIN7_add\x86 In case of 64-bits Operating System then everywhere folder amd64 is used instead of x86 so that 64-bits can have its own list of files. For 64-bits Operating System you have to make similar registry files from your own Windows 7 Registry. Step 3. Run Make_PE3.cmd as Administrator to Create Windows PE 3.0 ISO pe3.iso of about 155 MB has been created in 2 minutes in folder C:\winpe3_x86 Working Directory Folder C:\winpe3_x86 is Created if it does not exist. File winpe.wim remains unchanged and is copied as file boot.wim to folder C:\winpe3_x86\ISO\sources The boot.wim file is mounted by imagex.exe in folder C:\winpe3_x86\mount Files from WIN7_add\x86 and PE3_add\x86 are added to mount by xcopy.exe, Packages and Drivers are added by Dism.exe The PE3 SYSTEM and SOFTWARE Registry files are improved with Windows 7 Settings using reg import Then imagex.exe will Unmount and Commit changes in boot.wim And finally oscdimg.exe will create the pe3.iso file in folder C:\winpe3_x86 Folders WIN7_add\x86 and AIK_Tools are generated and stay ready for future use. WARNING: In Windows 7 OS not using as Administrator results in Errors, because using imagex.exe reg.exe and dism.exe is Not allowed by User Account Control. If you made this mistake, you need before the next run to empty folder C:\winpe3_x86\mount Step 4. Install pe3.iso as GRUB4DOS boot option on HDD or USB Use BOOT_IMG.exe to Install pe3.iso of about 155 MB as GRUB4DOS boot option on HDD or USB Copy folder PStart or U_XP_SET to Root of HDD or USB drive to provide PStart Menu for portable programs. Download ppApps_Base!.exe from amalux for a nice collection of Portable Programs. http://amalux.winbuilder.net/index.php?dir=Portable%2F Add additional Portable Programs to folder Progs in folder PStart. Use PStart > Edit > Add file to modify PStart Menu. GRUB4DOS menu.lst entry title Boot pe3.iso - ISOfind --set-root --ignore-floppies /pe3.isomap /pe3.iso (0xff)map --hookroot (0xff)chainloader (0xff)/BOOTMGR Step 5. Reboot with pe3.iso from GRUB4DOS Menu on HDD or USB Boot with 155 MB pe3.iso in 30 sec from HDD or in 4 min from USB-stick. Use MultiRes from PStart PE3 System Menu to adjust the Screen Resolution to 1024 x 768 pixels Using ImDisk Install allows to use mounting e.g. XP Setup ISO in a in a Virtual Drive If desired, Run CmdHere to add Command Prompt Hereto the R-mouse context menu. Step 6. Install of XP or Windows 7 AFTER booting with pe3.iso If your XP Setup Source is an ISO file, then first install ImDisk driver so that you can mount the ISO in a virtual drive. Use PStart > Edit > Add file to select imdiskinst.exe from U_XP_SET\USB_XP_Setup\makebt folder and Run to install ImDisk driver. Then Launch Notepad from cmd window or from PStart Menu. In Notepad Select File > Open to get the FileSelector which can be used as File Browser for All Files. Then with R-mouse on the ISO file you can use the ImDisk context menu to mount the ISO in a Virtual Drive. If your Setup Source is a folder on HDD or USB or a CD/DVD drive then you don't need to use ImDisk. Launch USB_XP_Setup.exe from PStart Menu to prepare your Target drive for Install of XP. Info USB_XP_Setup.exe of U_XP_SET package http://www.911cd.net/forums//index.php?showtopic=21883 Launch NT6.X fast installer from PStart Menu to prepare your Target drive for Install of Windows 7. Info NT6.X fast installer of fujianabc http://www.boot-land.net/forums/index.php?showtopic=10126 Mounting XPSETUP.ISO in ImDisk Virtual Drive = = Windows PE 3.0 with PStart Menu for Portable Programs and having Browse for Folder Support = = Windows PE 3.0 with Partition Manager and Internet - Opera Portable and PENetwork.exe = = Windows PE 3.0 with PStart Menu for PE3 System and for Portable Programs = = ================================================================================ 6. MultiBoot USB-drives prepared with Make_USB.exe CD / DVD Content can be copied unchanged to Root of USB-stick by using the Add Extra Content Selector. This allows to use a well-tuned CD / DVD as Setup Source including Apps for Install of XP from USB. In this case you must Uncheck the Copy Checkbox of XP Setup Source Folder Selection so that this XP Source Selection is only used to have access to the XP BootFiles NTLDR and NTDETECT.COM and is NOT used as normal to Copy the XP Source to a Folder on Target Drive. Support for Ultimate Boot CD - UBCD ISO booting via boot.ini Menu from GRUB4DOS menu.lst Menu See Info of Icecube given in U_XP_SET\USB_XP_Setup\usb_cfg_extra folder. UBCD 5 - http://www.boot-land.net/forums/index.php?showtopic=7312 Support for LiveXP minint was added to the BartPE group of Make_USB.exe Autodetect of modified ntdetect.com when placed in U_XP_SET\USB_XP_Setup\makebt folder Support for VistaPE on MultiBoot USB-stick was made, where you can use the Vista Add Extra Source Selector to Select your VistaPE\Target\VistaPE-Core Folder. VistaPE - http://www.boot-land.net/forums/index.php?showforum=51 BOOT_IMG.exe can be used to Add Multiple BartPE type IMG or ISO files. LiveXP - BootSDI.img or BartPE.iso booting from RAMDISK must contain I386\SYSTEM32\DRIVERS\RAMDISK.SYS file of Windows 2003 SP1 In that case Win2k3 SP1 setupldr.bin is renamed as RMLD1 and patched for ramx1.sif file with the SetupData instead of winnt.sif The index in RMLDx can range from 1-9 for support of 9 different LiveXP Boot Image Files. http://www.911cd.net/forums//index.php?sho...21682&st=24 BOOT_IMG.exe can be used to Add Multiple CD-ISO Images as Boot Option to GRUB4DOS menu.lst Menu, where mapping of the ISO image to (hd32) or (0xff) is used. VistaPE and Windows PE 2.1 ISO are booting from RAMDISK this way. Other CD-ISO images when Installed on HD are copied first to RAM using the --mem option, so that Harddisk operations are allowed. In the case of Removable USB-stick the --mem option is NOT used in order to gain speed in all cases. Then the CD-ISO Files need to be contiguous (unfragmented), check and repair with wincontig: http://diddy.boot-land.net/grub4dos/files/map.htm Parted Magic 4.0 of Patrick Verner and Icecube is a handy Partition Manager. Parted Magic can be booted with grub4dos iso emulation. http://partedmagic.com/documentation/124-g...so-booting.html Download pmagic-grub4dos-4.0.iso.zip from http://www.digitalincursion.net/partedmagic/ Use latest BOOT_IMG.exe to Install pmagic-4.0.iso as GRUB4DOS Boot Option in menu.lst on your Harddisk or USB-stick. menu.lst title Boot pmagic-4.0.iso - ISO from RAMfind --set-root --ignore-floppies /pmagic-4.0.isomap --mem /pmagic-4.0.iso (0xff)map --hookroot (0xff)chainloader (0xff) After Booting with Parted Magic ISO from GRUB4DOS menu.lst on Harddisk, you can use GParted to change the partioning of your USB-stick e.g. to Create a second partition. In a similar way Booting from HD with LiveXP BootSDI.img into RAMDISK allows to use Acronis Disk Director 10 to create multiple partitions on USB-stick, without any need to use a filter driver as needed in regular Windows XP. Guides on How to Make MultiBoot USB Drives: Make_USB.exe is used to make MultiBoot USB-sticks having NTLDR-type bootsector and boot.ini Menu plus GRUB4DOS menu.lst Menu. NTLDR + NTDETECT.COM and boot.ini are copied to the root of an USB-stick previously NTFS formatted with Format Stick procedure, so that it is configured as a Harddisk having NTLDR-type BootSector. BOOTMGR-type Bootsector made by Vista Disk Management will be changed to the compatible NTLDR-type Bootsector. This is the way to make Bootable USB-stick with boot.ini Menu, where GRUB4DOS grldr can be launched from boot.ini Menu. Booting is as: MBR > BootSector > NTLDR > boot.ini > grldr > menu.lst The Bootsector refers to NTLDR file in Root of USB-stick or Harddisk Windows XP can be launched from any primary partition of any harddisk using arcpath in boot.ini Menu. Windows Vista can be launched from any harddisk using chainload of bootmgr in menu.lst Menu of GRUB4DOS. Make_USB.exe can also be used to Install LiveXP BootSDI.img as Boot option on e.g. 30 GB USB Harddisk Primary partition, previously Formatted with NTFS FileSystem using Windows XP or Vista Disk Management. Guide for MultiBoot USB-stick with boot.ini Menu http://www.911cd.net/forums//index.php?showtopic=20089 Important Info on making MultiBoot USB-drives was given by diddy in 2 Guides: Guide for Multi-booting from a USB Drive http://www.911cd.net/forums//index.php?showtopic=18846 Multiboot Usb (pe, Linux And Dos), Using Syslinux, GRUB4DOS and/or multiple partitions Grub4dos Guide http://diddy.boot-land.net/grub4dos/Grub4dos.htm More Info on Booting with GRUB4DOS grldr with menu.lst Menu http://grub4dos.sourceforge.net/wiki/index...ub4dos_tutorial grub4dos, .iso images and (hd32) or (0xFF) mapping http://www.boot-land.net/forums/index.php?showtopic=5041 Install of Grub4dos MBR BootCode is used to make Bootable USB-sticks without the need of having XP Setup Source. Booting is as: MBR > grldr > menu.lst In this case Grub4dos grldr BootLoader can e.g. direct Boot CD ISO or DOS floppy images or chainload BOOTMGR of Vista or Windows 7 Setup Source. = = ================================================================================ Format Stick using Make_USB.exe An AutoIt3 Routine was created to Format USB-sticks with a Harddisk like structure and NTFS/FAT32/FAT FileSystem. It can be used in Make_USB.exe with the Format Stick Button instead of using the HP Format Tool. First 100 Sectors of USB-stick are erased quickly using dsfi.exe and file Erase_100.bin MBR BootCode is obtained from XP file dmadmin.exe just as in MBRBatch.cmd made by jaclaz http://www.boot-land.net/forums/?showtopic=3191 Partition Table entry is constructed from the USB-stick CHS geometry as derived from MBRWiz.exe /list Partition is ending on Cylinder boundary to improve bootability as compared to HP Format Tool, which would give a CHS-LBA unbalanced partition. CHS Knockout Patches and Dummy Second Partition are user selectable options to improve USB-stick bootability CHS Knockout Patches can be applied to XP-MBR BootCode (HP Patch) http://www.boot-land.net/forums/index.php?...=2246&st=15 and to FAT32 or NTFS BootSector to improve bootability as described by Clemens Fruhwirth and tested by cdob to be useful. http://blog.clemens.endorphin.org/2007/12/...ndows_3170.html http://www.911cd.net/forums//index.php?sho...1702&st=129 http://www.boot-land.net/forums/index.php?...5306&st=215 http://www.boot-land.net/forums/index.php?showtopic=8528 Apply HP Patch to USB-stick XP-MBR Code for CHS Knock-out Change at offset 0xCA 3 bytes - 0xB8 0x01 0x02 --> patched to 0xEB 0x1A 0x90 Apply 4x NOP Patch to FAT32 and NTFS BootSector for CHS Knock-out FAT32 boot sector ("MSDOS5.0" found at offset 0x03) : Change at offset 0xE6 - 4 bytes - 0x0F 0x82 0x4A 0x00 --> patched to 0x90 0x90 0x90 0x90 NTFS boot sector ("NTFS" found at offset 0x03) : Change at offset 0xD9 - 4 bytes - 0x0F 0x82 0x3A 0x00 --> patched to 0x90 0x90 0x90 0x90 USB-sticks with Dummy Second Partition of about 8 MB (using 1 Cyl in case of n/255/63 geometry) can be generated to further improve bootability as described by online http://www.boot-land.net/forums/index.php?showtopic=7512 The Format Stick routine was further improved for FAT and FAT32 FileSystem, by patching after Format two important bytes which determine bootability of USB-stick. MBR - Reset FAT FileSystem byte = 0E (LBA) at offset 0x1C2 in MBR, after format it was 06 (CHS) and not bootable FAT BootSector - drive-id patch 0x80 at offset 0x24 , after format it was 00 and Not bootable MBR - Reset FAT32 FileSystem byte = 0C (LBA) at offset 0x1C2 in MBR, after format it was 0B (CHS) and Not bootable FAT32 Bootsector - drive-id patch 0x80 at offset 0x40 , after format it was 00 and Not bootable FAT and FAT32 USB-stick are NOT bootable without patching these two critical bytes, and flashing cursor or Disk Error would be the result. The problem is that Windows OS all the time tries to reset these bytes to NON-bootable value. But this problem was overcome in the present procedure. ================================================================================ 7. Make_IMG.exe - Make and Install Boot Image File - Type IMG or ISO Supported are: Make and Install 15 MB FreeDOS FAT12 Superfloppy IMG file from Source Folder containing kernel.sys Make and Install 25 MB MS-DOS FAT16 Superfloppy IMG file from Source Folder containing IO.SYS Make and Install 15 MB XP Recovery Console FAT12 IMG file Booting from RAMDISK and made from Windows XP Setup Source Make and Install LiveXP / BartPE / UBCD4Win ISO or NTFS Compressed IMG Files Booting from RAMDISK (max 500 MB) Install WinPE 2.1 or VistaPE ISO files Booting from RAMDISK Install CD-ISO file e.g. ubcd50b12.iso or pmagic-4.0.iso or LiveXP_RAM.iso as boot option in GRUB4DOS menu.lst Menu Images are made from a Virtual Drive by using ImDisk virtual disk driver of Olof Lagerkvist http://www.ltr-data.se/opencode.html For using Make_IMG.exe it needs to install previously the ImDisk Driver with U_XP_SET\USB_XP_Setup\makebt\imdiskinst.exe You will find the Image files made with Make_IMG.exe in U_XP_SET\USB_XP_Setup\makebt\make_image folder. For the XP Recovery Console a 15 MB FAT12 Superfloppy Image file is made, where the cmdcons folder is generated by parsing dosnet.inf of the Windows XP Setup Source. Then cmdcons folder is renamed as i386 and ramdisk.sys of win2k3 is added instead of the original one. In root of bootdrive we have setupldr.bin of win2k3 renamed as the bootloader RCLDR, which is patched for using rcons.sif as setup information instead of winnt.sif to allow MultiBoot Environment. More Info: http://www.boot-land.net/forums/index.php?...=5316&st=60 I would like to thank jaclaz for making use of his CATCH22 folder. http://www.911cd.net/forums//index.php?sho...20983&st=25 Adding the CATCH22 folder to the root of any HD-like device allows to use Recovery Console Superfloppy Boot Image without using admin password and to get unlimited access to any folder by connecting to CATCH22 instead of to WINDOWS folder and then using the command: batch SETALLON For the LiveXP / BartPE / UBCD4Win ISO or NTFS Compressed IMG Files Booting from RAMDISK, it is possible to migrate USB-stick to DriveLetter U: so that Shifting of other Drive Letters is prevented. In root of boot drive we have Win2k3 SP1 setupldr.bin renamed as RMLD1 and patched for ramx1.sif file with the SetupData instead of winnt.sif The index in RMLDx can range from 1-9 for support of 9 different LiveXP Boot Image Files. http://www.911cd.net/forums//index.php?sho...21682&st=24 Install of Boot Image files is possble on Harddisk Boot Drive C: or on Bootable USB-stick made e.g. with Make_USB.exe by making boot entries in GRUB4DOS menu.lst Menu and in some cases in XP boot.ini Menu as well. The program will recognize the type of image and will generate the corresponding GRUB4DOS entry in menu.lst The DOS Superfloppy Images including DOS-Apps are booting from RAM, which allows to boot with DOS from a NTFS Harddisk. FreeDOS Superfloppy file BTFRDOS.img is in folder Downloads - http://wimb.winbuilder.net/downloads/ GRUB4DOS is updated to the latest version grub4dos-0.4.4-2009-06-11 which is also essential for booting the DOS Superfloppy Images using the generated menu.lst entries. More Info on GRUB4DOS Menu entries for various types of Image files: http://www.boot-land.net/forums/index.php?showtopic=5041 http://diddy.boot-land.net/grub4dos/Grub4dos.htm = = ================================================================================ Summary After preparing your USB-stick with Make_USB.exe we have two cases, each of them needs Booting from HD into RAMDISK with a compatible PE Boot Image. Install of XP needs Booting with LiveXP - IMG allowing to format Install Drive with NTLDR type BootSector. Install of Vista and Windows 7 need Booting with Windows PE 2 - ISO allowing to format Install Drive with BOOTMGR type BootSector. Procedure - Install XP from USB-stick Connect USB-stick and Run BOOT_IMG.exe Install LiveXP IMG in boot.ini / GRUB4DOS Menu on Harddisk HD Boot LiveXP into Ramdisk - Quick Format and Run USB_XP_Setup.exe HD Reboot and Select XP Setup from boot.ini Menu Keep USB-stick Connected Until AFTER Logon XP Procedure - Install Vista or Windows 7 from USB-stick Run BOOT_IMG.exe Install Windows PE 2 ISO in GRUB4DOS Menu on Harddisk HD Boot Windows PE 2 into Ramdisk - Start Vista Setup from USB Precisely on First Reboot - Remove USB-stick The present approach is Install from USB without booting from USB. So you don't need BIOS USB Boot Support and you don't need to change BIOS Settings. Moreover, Unchanged Setup Sources can be used and can be located in a folder on USB-stick so that they do not interfere with eachother. ================================================================================ LiveXP + U_XP_SET = = Credits: I would like to thank ilko_t for publishing his AutoIt3 Source of WinSetupFromUSB_0-1-1.au3 at MSFN Forum http://www.msfn.org/board/index.php?showtopic=120444 Parts of WinSetupFromUSB were used for Creating Make_USB.exe ================================================================================ From Tutorial at BootLand: http://www.boot-land.net/forums/?showtopic=5306 The original topic was started on July 29, 2008 and was closed at January 4, 2010 because it was often inaccessible due to overload (nr of pageviews was 132.698) ================================================================================
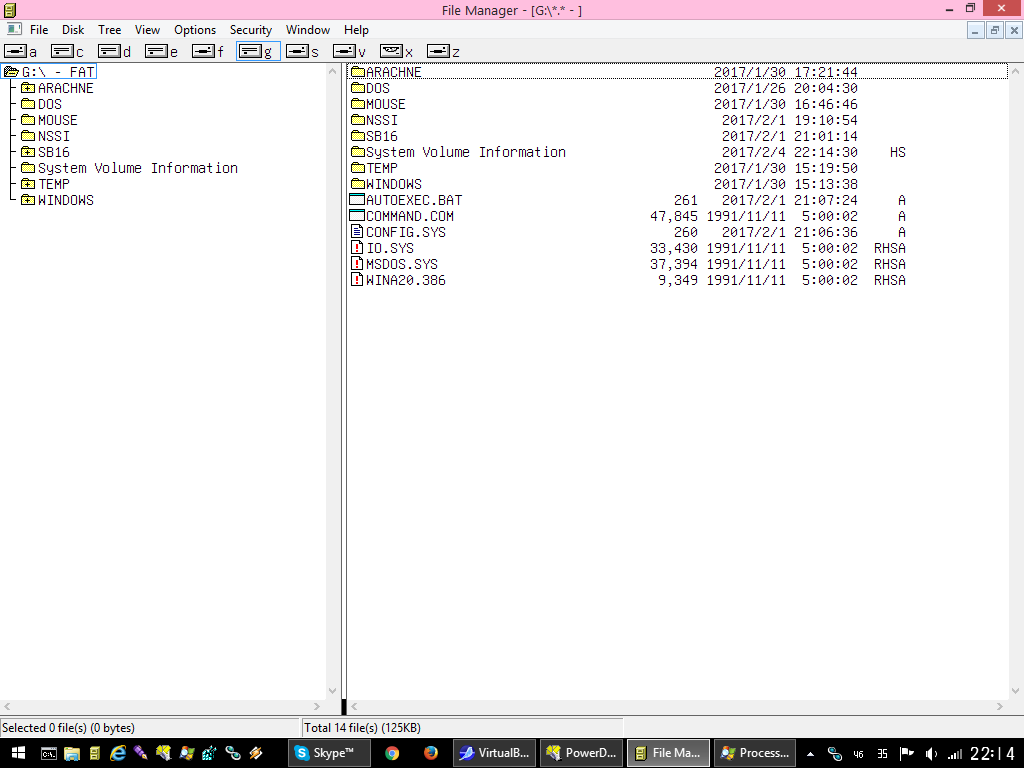
  6. Does anyone have any idea on how to stop File Explorer from automatically creating the "\System Volume Information" on VHD hard disk images that are mounted as a drive? I have a MS-DOS FAT formatted VHD that were created in Virtual PC 2007 when I was on Windows Vista for nearly three years. MS-DOS 6.22 and below only supports the FAT partition and has no support for long file names at all. If I try to attach the VHDs with one click using File Explorer, the "\System Volume Information" gets automatically written to the attached VHD and it ends up corrupting the volume label when running MS-DOS on VPC 2007 or Hyper-V! Here's an example screenshot of what it looks like: The "\System Volume Information" is only used for System Restore points and in my opinion, it shouldn't be created when another internal hard drive doesn't have a System Restore point enabled. Is there a way to stop File Explorer from automatically creating the "System Volume Information" folder to the attached VHD?
  7. I am running a Windows 10 virtual machine inside Hyper-V on Windows server 2012 after a sudden ram loss hyper-V struck to dead end and i was forced to kill it and today when i tried to run it Hyper-V was unable to boot windows 10 os file and a bsod error message was shown What to do PLEASE HELP
  8. Deploy & Compare VHDs of many portable Windows To Go WTG Creators Apps with your support A. What I'd like to do: 1. Deploy VHDs created by each of these tools. - I'll be doing many instances of this, so I'd like to make it as SIMPLE, EASY & AUTOMATED as possible. - Deploy with minimal interaction, configured & working devoid of pesky features, such as Windows update disabled - Open to other suggestions on these sample deployments - Whether I should VM or Native Boot them? I am wondering which of the following I should use as I am familiar with DISM - DISM (DISM++/ DISM GUI) + Silent/ UnattendedAnswerFile.Xml + MSDN ISO - Install.Wim {Would it better to extract it ahead of time} (Also, how do I add .xml on commandline when I am booting from DVD/ .ISO - via a USB Flashdisk?) Do I need any of the following? + Customized Install.wim - Customize using.. ?? + Some of the MDL Tools like MSMG Toolkit + I did read about MDT and I am wondering if it would be overkill to learn for this.. ?? 2. Compare how they are deployed - Understand the differences - File/ Directory Structure Comparison - I'm gonna use Beyond Compare for that - Registry Comparison - Any recommendations on apps that can do this well for entire Reg? - Any other comparisons I should perform to see differences B. WTG Creators under evaluation: (Open to try any more app suggestions as well) - WTG - Enterprise - DISM – Powershell Scripts - WTG Creator – extracted for use in – Pro Volume - WinNTSetup - MSFN - WinToUSB - AOMEI Partition Assistant - WiNToBootic - Easy2Boot/ RMPrepUSB - Rufus Maybe some more. deploy, compare, vhd, wtg, windows-to-go
  9. What is Significance of MSR, SYS, EFI partitions for Win 8.1 Native Boot VHD? How? I ask because I've built and native booted several variations of Win 8.1 VHDs on target SPro 3. I'd like to know pros & cons. CONTEXT: So, with a lot of help and input from multiple amazing people from multiple forums and coming closer to the goal of my project. I have found and tested the ways and means to complete the steps in my project. Some interesting questions and thoughts have come up. (http://forums.mydigitallife.info/threads/62362-Virtualize-Win8-1-BIOS-MBR-Physical-Partition-gt-to-gt-WIM-Image-gt-to-gt-UEFI-GPT-VHD?p=1085352&viewfull=1#post1085352) PROJECT MILESTONES SO FAR: A - Was able to find articles that help bypassing Sysprep errors on Win 8.1 Did some extensive Driver Cleaning/ Reseting from OEM/Intel/Non MS drivers to MS Win 8.1 native drivers e.g. Prototype sample runs involved Sysprepping Fresh Win 8.1 installs while eliminating issue causing Metro App packages. B - Played with DISM, Disk2VHD, GPTGEN in various configurations with Win 8.1 e.g. Prototype sample runs involved imaging Fresh Win 8.1 MBR/ BIOS installs and converting or applying them to GPT/UEFI VHDs and native booting them in Step C C - Have been able to Native boot Win 8.1 VHDs using BCDBOOT: QUESTIONS & DECISIONS about MSR, SYS, EFI Partitions on Win 8.1 Native Boot VHD: I am left with some final decisions to make and questions.. Before I apply my Customized_Windows.WIM... What kind of Partitioning structure should I CREATE IN/ FOR my FINAL VHD? I ask because I've built and native booted several variations of Win 8.1 VHDs on target SPro 3. Some with Single Partition Volumes and others with Sys+EFI etc. OPTIONS/ EXAMPLES of Sample VHDs executed & installed on Surface Pro 3: [:\Windows] DISM Installed Natively [sys:300M][EFI:100M][:\Windows] Vanilla Install via Hyper V Possibly also doable using VDisk commands via Native Install as well. I guess. Also, during this Vanilla install it was trying to create the MSR partition in addition to the above. I did read about the MSR, SYS, EFI partitions online as well as how OSes can also run without those. https://technet.microsoft.com/en-us/library/dd799232(v=ws.10).aspx https://technet.microsoft.com/en-us/library/dd744301(v=ws.10).aspx Also, if ever V2P for Upgrading to Win10 and then P2V again There were some workarounds posted on Technet (need to find link, will find and post) as Windows cant upgrade on Native Boot VHD. BOOT BCDBOOT QUESTION: With single partition volume VHDs, its simple & clear how to APPLY and USE ..BCDBOOT. With these SPECIAL PARTITIONS, I am curious what would the best way to "direct" BCDBOOT > > > ?? From where to where? https://technet.microsoft.com/en-us/library/hh824874.aspx https://technet.microsoft.com/en-us/library/gg577238.aspx EXISTING HARDWARE PARTITION VOLUMES: SPro 3 HDD (UEFI Only): [sys:350M][EFI:200M][:\Windows][Recovery:5GB] X61T HDD (BIOS Only): [:\Windows]
  10. Virtualize Win8.1: BIOS + MBR Physical Partition > to > WIM Image > to > UEFI GPT VHD Virtualizing Win8.1 from BIOS + MBR Physical Partition > to > .WIM Image > to > UEFI GPT .VHD Sometime last year I found out about Native boot VHDs and tried to go that way for good. There were some issues with hardware and OS (Win7 at the time) not working out and lot of new things that I was learning about VHDs. Anyways, that confusion, learning and failure led to a better path So this 2015, I figured out how to get VHDs (with Fresh Win 8.1 Installs via Install.WIM DISM Apply Image) to Native Boot on Surface Pro 3 (Sp3). I am going to attempt doing the following steps using DISM/ ImageX: MBR [Customized Win 8.1] (Physical) > Create Image > [Customized Win 8.1 .WIM] (Virtual - File based so - No sectors or MBR/GPT?? ). [Customized Win 8.1 .WIM] (Virtual) > Apply Image > [Empty New GPT .VHD] (on SP3) My thought is that by going to .WIM I bypass the whole converstion drama between MBR/BIOS & GPT/UEFI as the .WIM is agnostic of both of them? Is this a valid thought or not? Thoughts? NOTE: I can.. try out the above with creating a small FRESH MBR Windows 8.1 partition on X61T/ T61 and then doing the above 2 steps. Convert it to a .WIM and then applying to a GPT .VHD I am guessing a SYSPREP is recommended somewhere in between. Someone somewhere also mentioned doing Sysprep in a VM/ Hyper V instead? Or is it not needed? Thoughts? Where and how would you recommend applying the SYSPREP?
  11. Windows NTFS Compression and Native Boot VHD/ VHDX? Issues or Conflicts? I am currently cleaning out my Windows 7 x64 Ultimate SP1 for a 2 step upgrade > Win 8 > Win 8.1 and then will convert it to VHD. I have this \Windows\Installer folder that is taking a lot of space and seems to be unused mostly. Eventually, I wish to clean it out/ delete it or major stuff inside it. But, till then I was considering "compressing" option it as suggested here instead of delete/ remap right now. http://superuser.com/questions/23479/is-it-safe-to-delete-from-c-windows-installer http://superuser.com/questions/707767/how-can-i-to-free-up-drive-space-from-the-windows-installer-folder-without-killi If I do this right now (during Win 7 > 8 > 8.1) I am wondering this will cause any issues creatingin or running the VHD? I googled around for VHD and NTFS compression and did not find anything good or bad either way (with exception that Windows XP and VHD had some issues) http://blogs.msdn.com/b/virtual_pc_guy/archive/2007/05/24/be-careful-with-vhds-and-windows-xp-compressed-folders.aspx
  12. Is it possible to upgrade Windows Server 2012 to Server 2012 R2 when Native VHD Boot is used? So far I have found it's not possible. I've looked through the DISM documentation and it mentions offline updated, but I do believe that refers to OS patching, not direct upgrades. If this isn't possible, why not? I would imagine folks would rather upgrade an OS than deploy new for things like Domain Controllers, infrastructure servers, or even client OS like Windows 8 to Windows 8.1.
×
×
  • Create New...