wimb
Content Type
Profiles
Forums
Events
Everything posted by wimb
-
Thanks for the ScreenShots. Apparently the program fails to find the User_Path. Please Attach file Win_Reduce_Trusted-33\Win_reduce\Temp_List\Folder_List_Z_Users.txt so that I can see what is the origin of the problem.
-
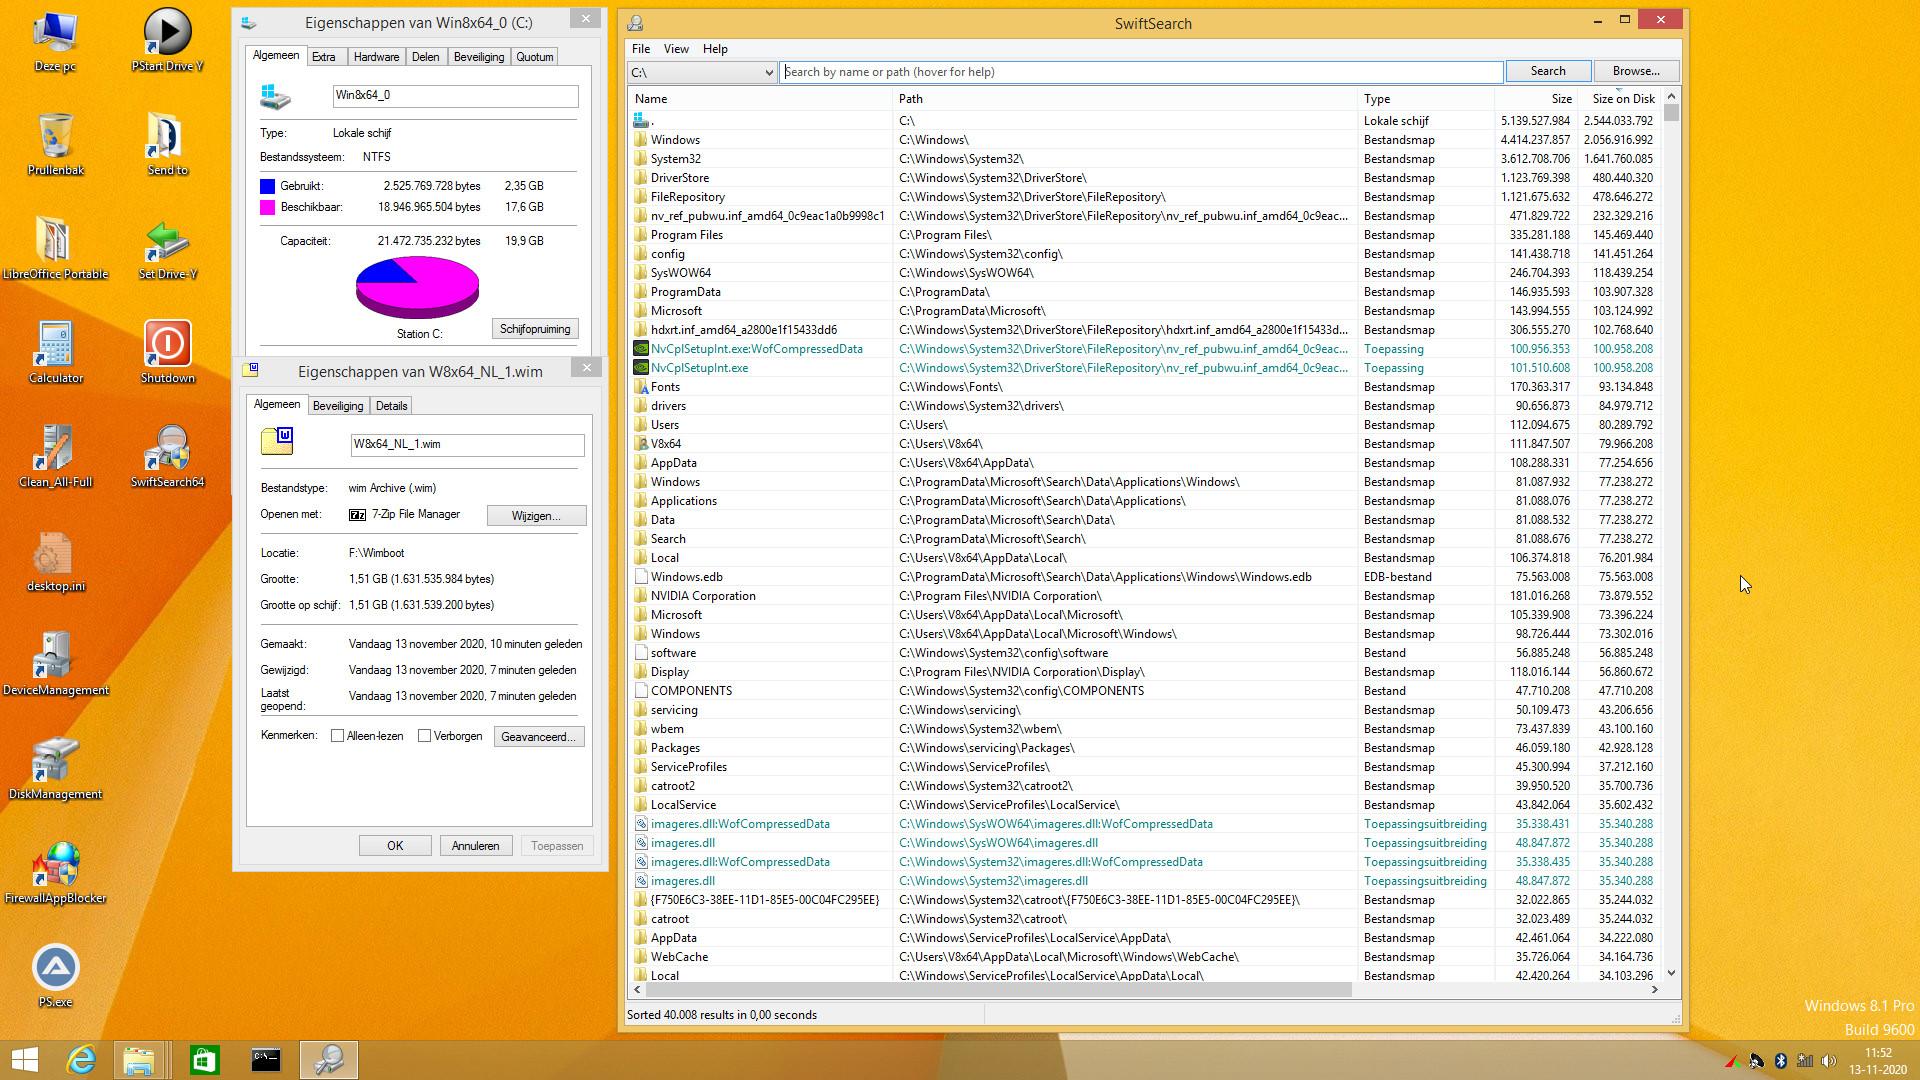
Can you give Screenshot of Win_Reduce_Trusted and of Windows Explorer showing FileList of mounted VHD Drive in Details View ? What Windows version Distribution Language do you use ? What is your ISO filename ? Can you try with English Win10 x64 from TechBench ?
-
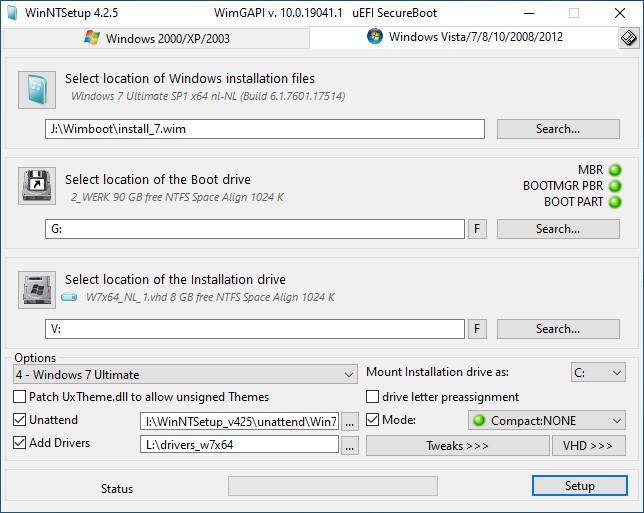
Win_Reduce_Trusted-36 is suitable to Reduce Windows 7/8/10 x64 to make Mini 7/8/10 x64 in VHD with UsedSize about 2 GB whch can be used for booting from RAMDISK Win 7/8 requires to install wofadk.sys driver as done by WinNTSetup using mode Compact:NONE

-
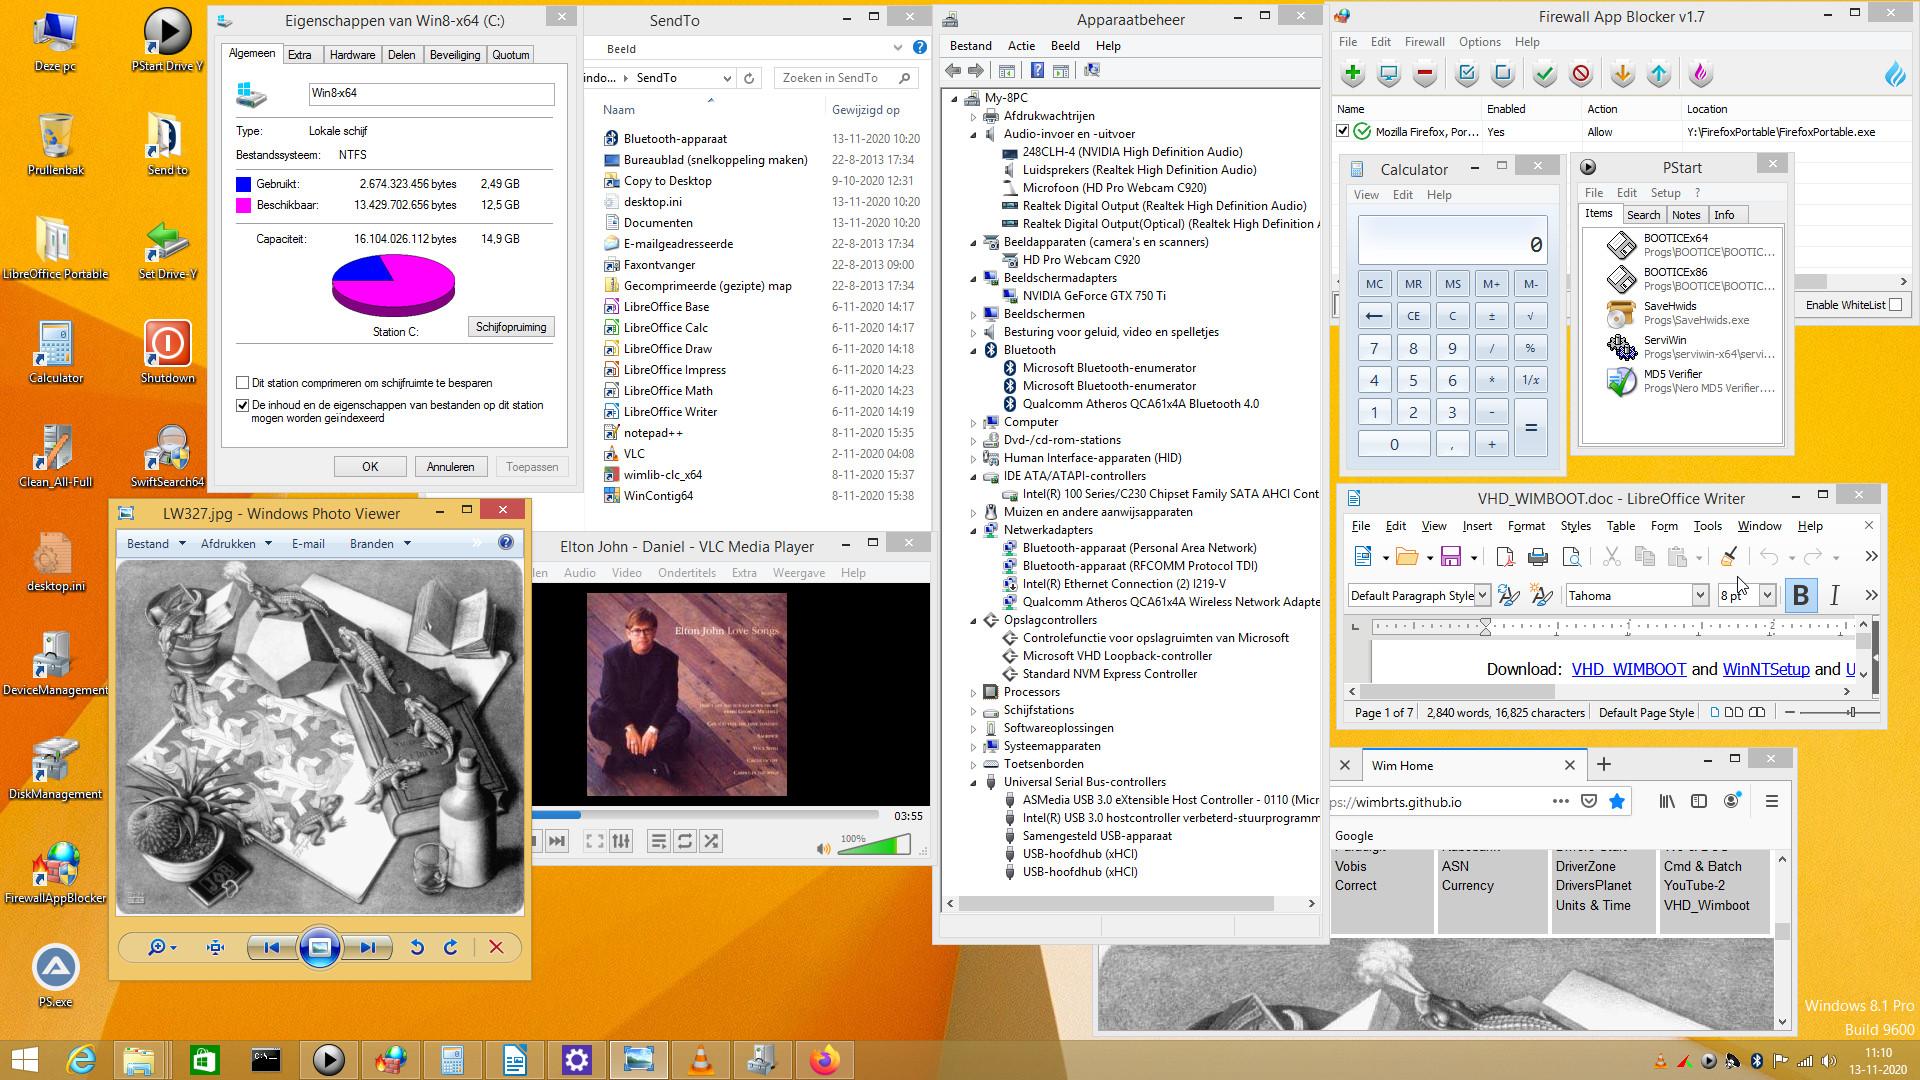
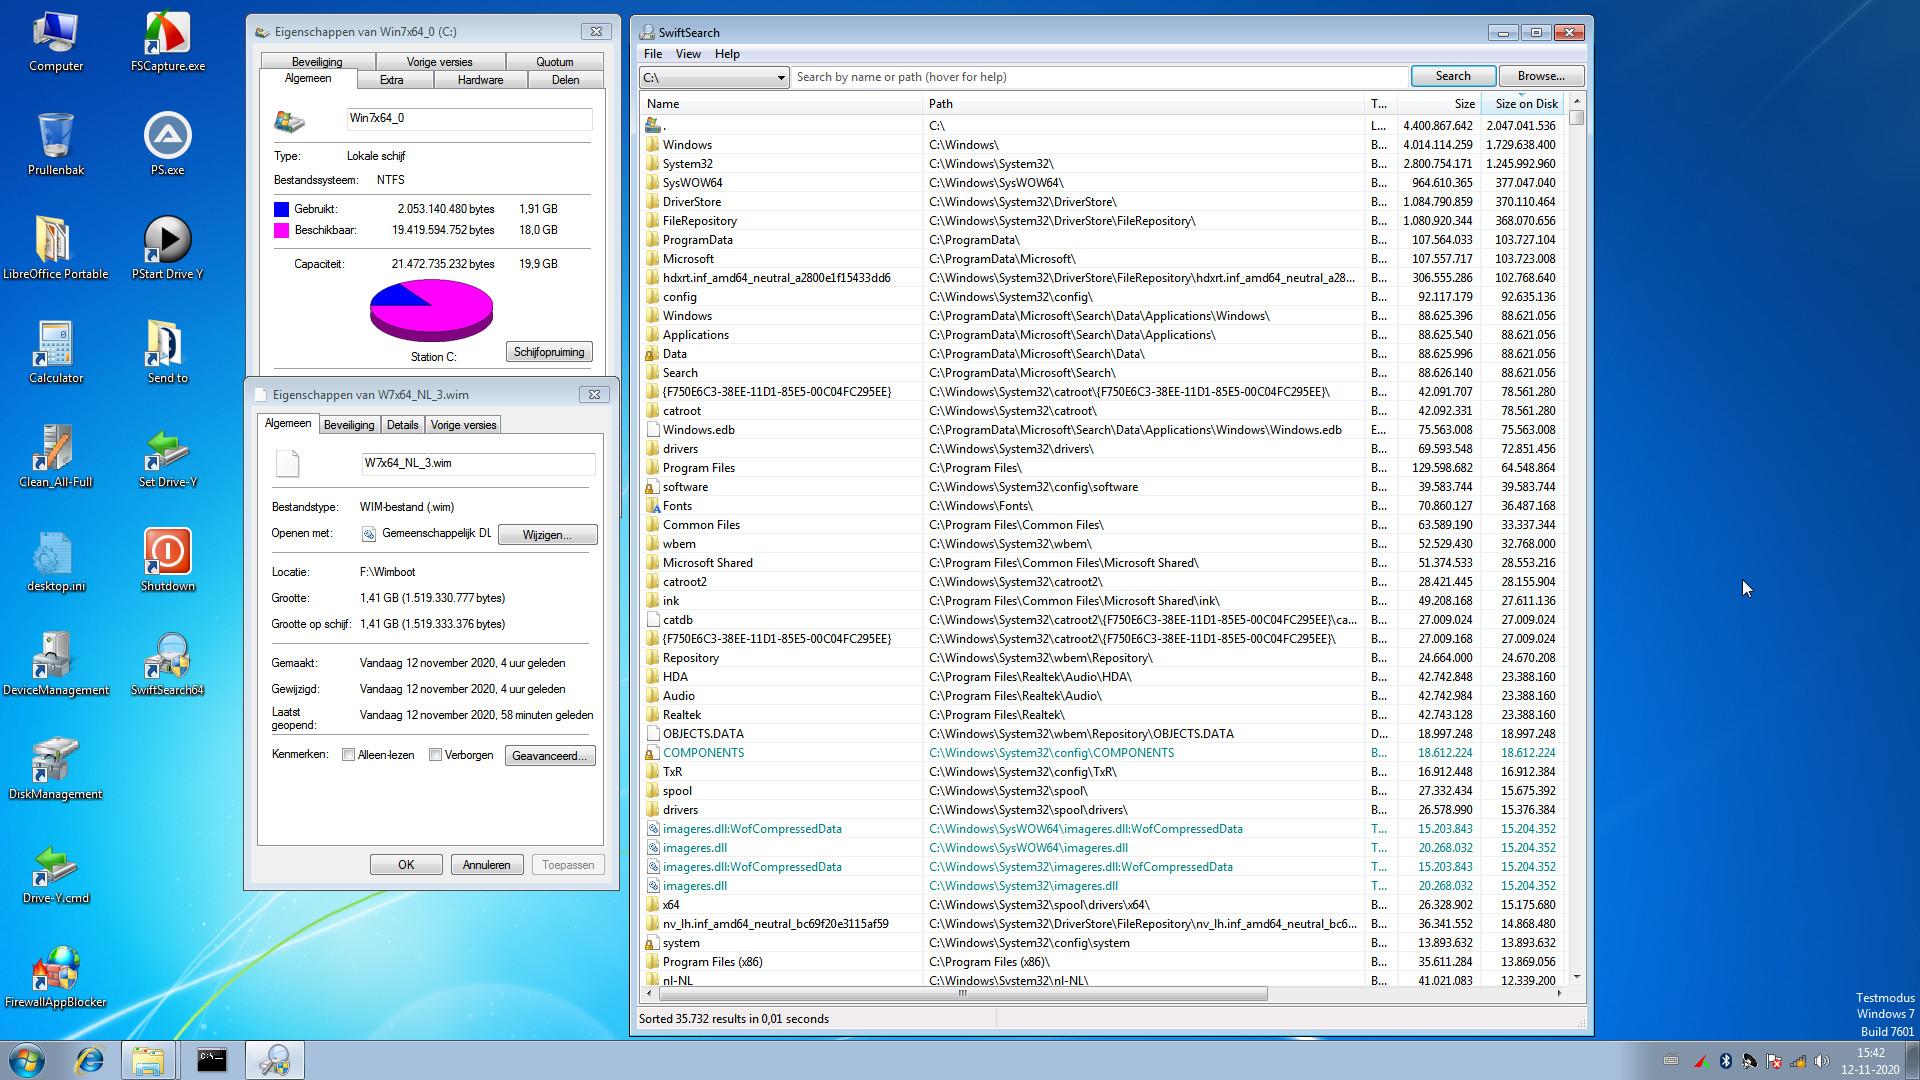
support wimb GitHub VHD_WIMBOOT - Apply and Capture of WIM Files for OS in VHD Manual: VHD_WIMBOOT.pdf Credits and Thanks to: - cdob for making the batch program base_winsxs.cmd slightly modified by wimb as base_winsxs_2.cmd http://reboot.pro/index.php?showtopic=22281&page=3#entry215317 - Nir Sofer for making AdvancedRun (64-bit) https://www.nirsoft.net/utils/advanced_run.html - alacran for sharing SysWOW64 FileList and for sharing his Mini 10x64 File / Folder Lists - alacran for sharing info on using LibreOfficePortable and making useful Desktop and SendTo Links Reducing Win10 and older OSs footprint - http://reboot.pro/index.php?showtopic=22383
-
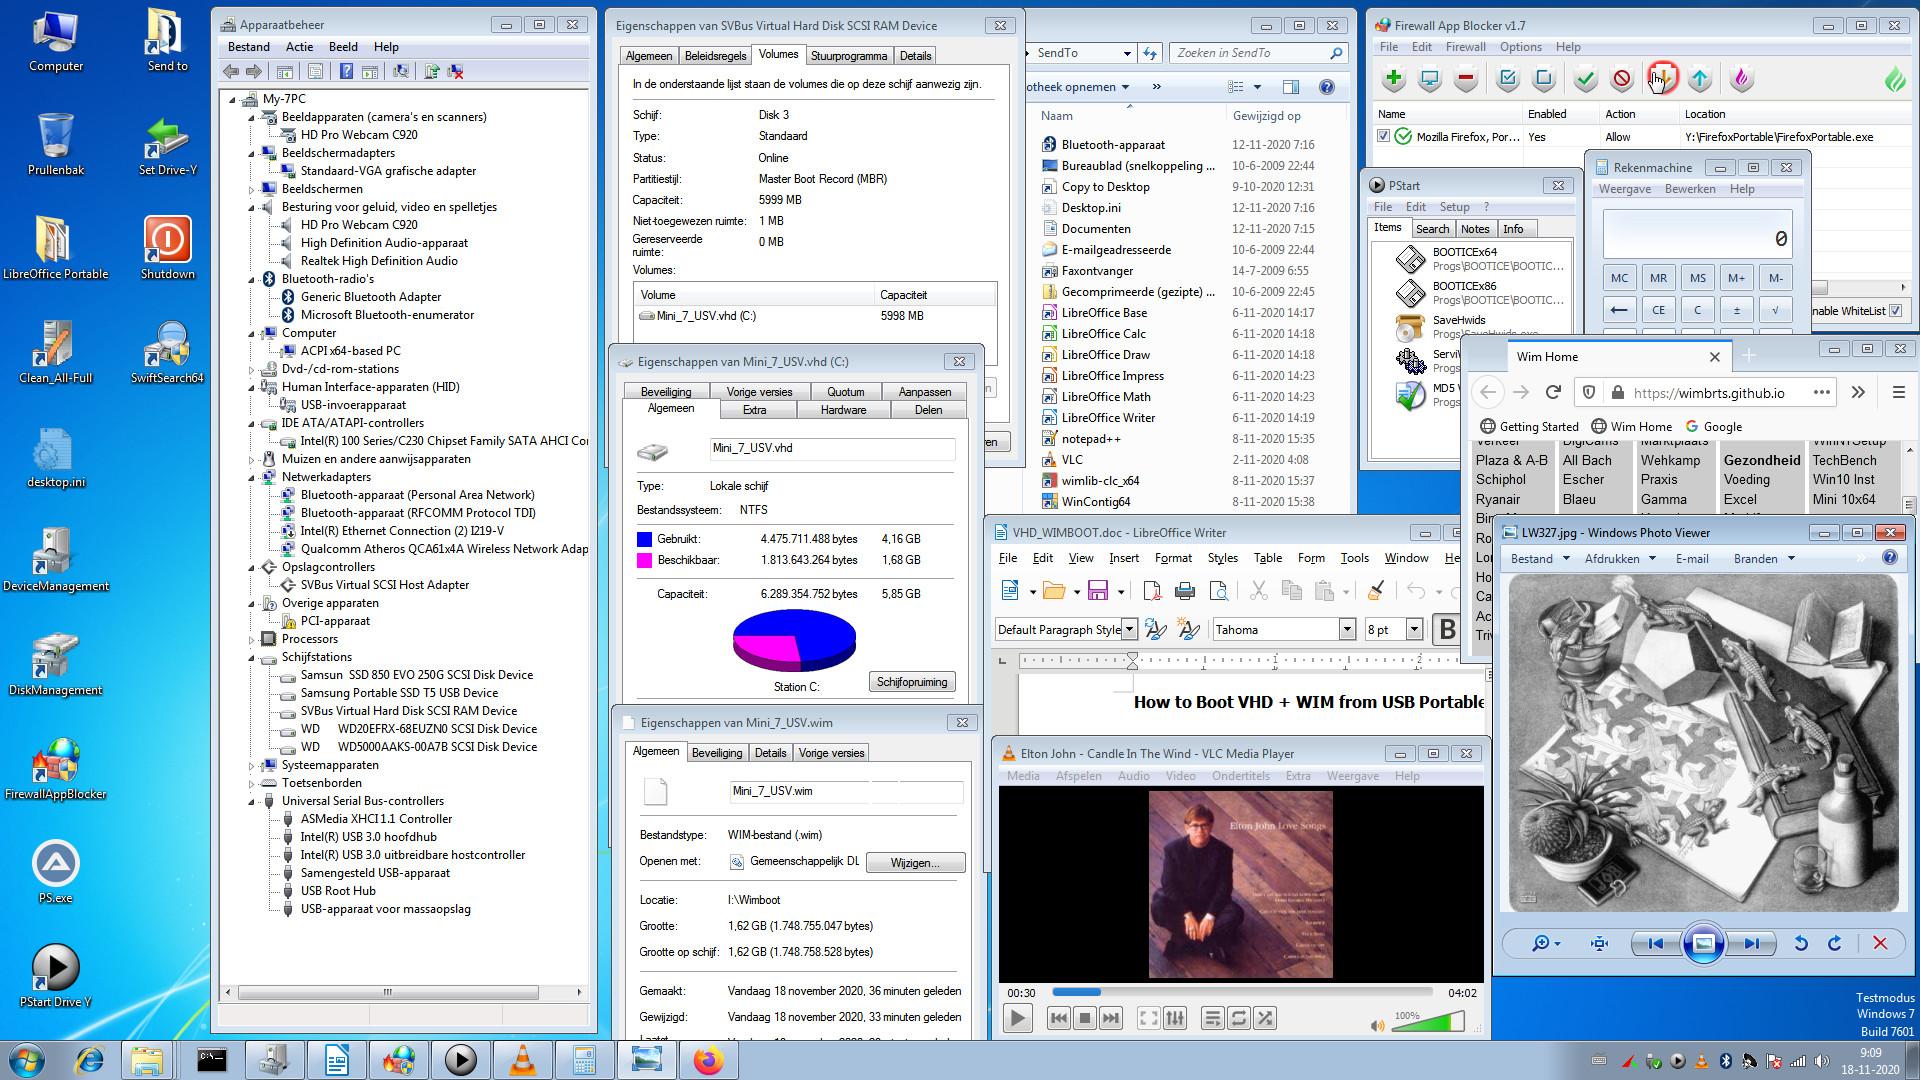
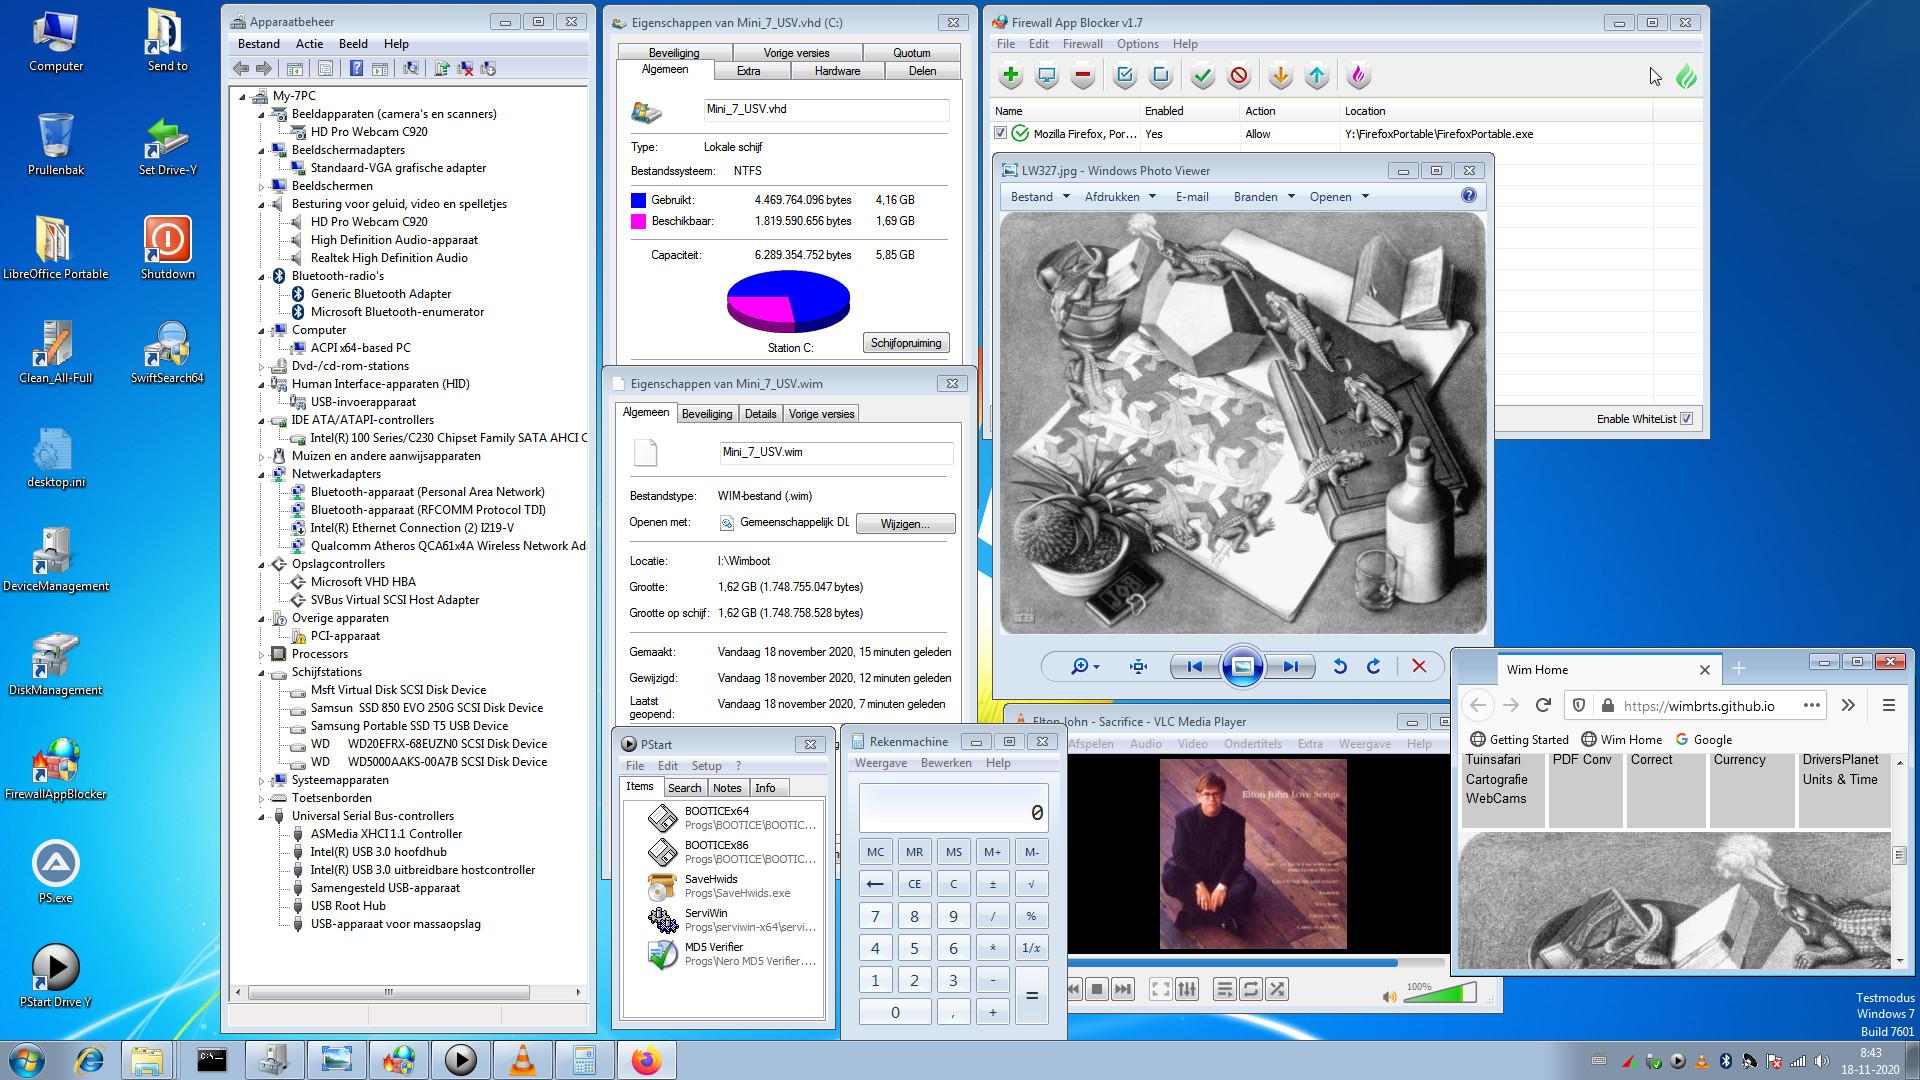
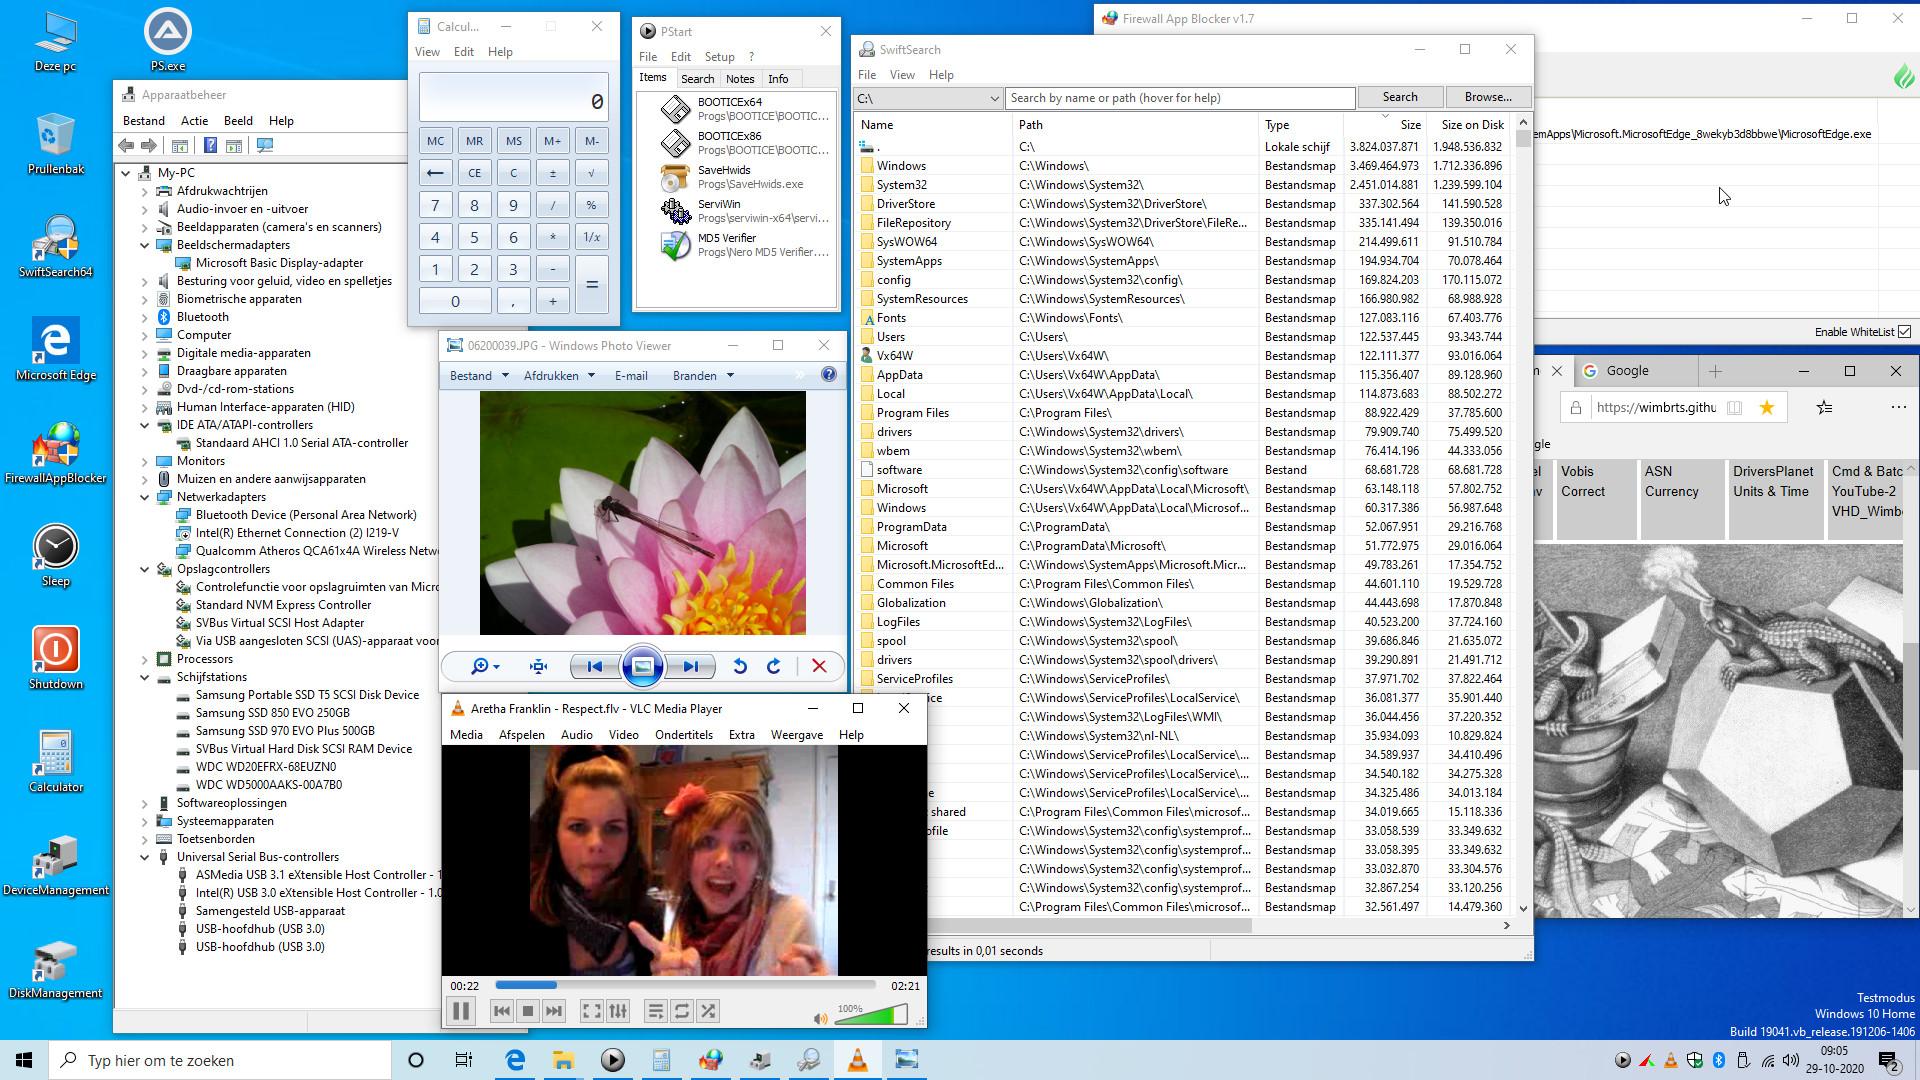
Topic Closed - Go direct to new description including Windows 10 / 11 x64 and Make_WinPE VHD_Compact - Repair and Install of Windows 10/11 x64 - Windows To Go Make_WinPE - Boot and Make PE WIM File from 10/11 x64 Windows ISO How to make USB Portable SSD booting with PE 10/11 x64 WIM file from RAMDISK and with Windows 10/11 x64 in VHD as FILEDISK Download: VHD_Compact PDF and PE_Tools and Make_WinPE ================================================================ Mini 10x64 in VHD created with Win_Reduce_Trusted Download: Win_Reduce_Trusted-40 and VHD_WIMBOOT Download: Portable VLC x64 vlc-3.0.12-win64.7z Or Portable Freeware and Firefox Portable and LibreOffice Manual: VHD_WIMBOOT.pdf 1. WinNTSetup - Fresh Install in 25 GB VHD using Win10x64 ISO from TechBench 2. VHD_WIMBOOT - Capture WimBoot LZX and Apply in Compact LZX mode in VHD 3. Mount VHD with doubble-click and use Win_Reduce_Trusted on Offline Windows - Reduce in 1 minute gives Mini 10x64 VHD UsedSize = 1.79 GB - Capture WimBoot LZX WIM = 1.19 GB and Apply Compact LZX in 3.9 GB VHD 4. Boot with 3.9 GB VHD - Always use the supplied Firewall App Blocker and Enable WhiteList to Allow Internet Browser only - This is the easiest way to block unwanted internet traffic including Windows Update and prevents the growth of Used Size inside VHD
-
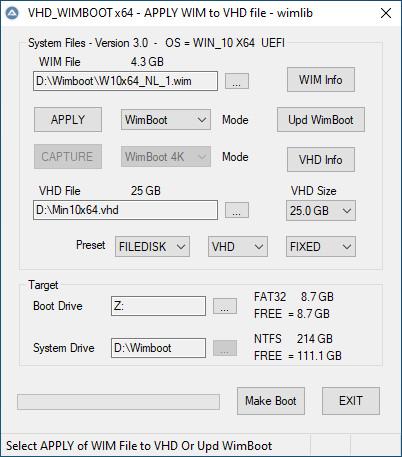
VHD_WIMBOOT - Apply and Capture of WIM Files for OS in VHD
wimb replied to wimb's topic in Install Windows from USB
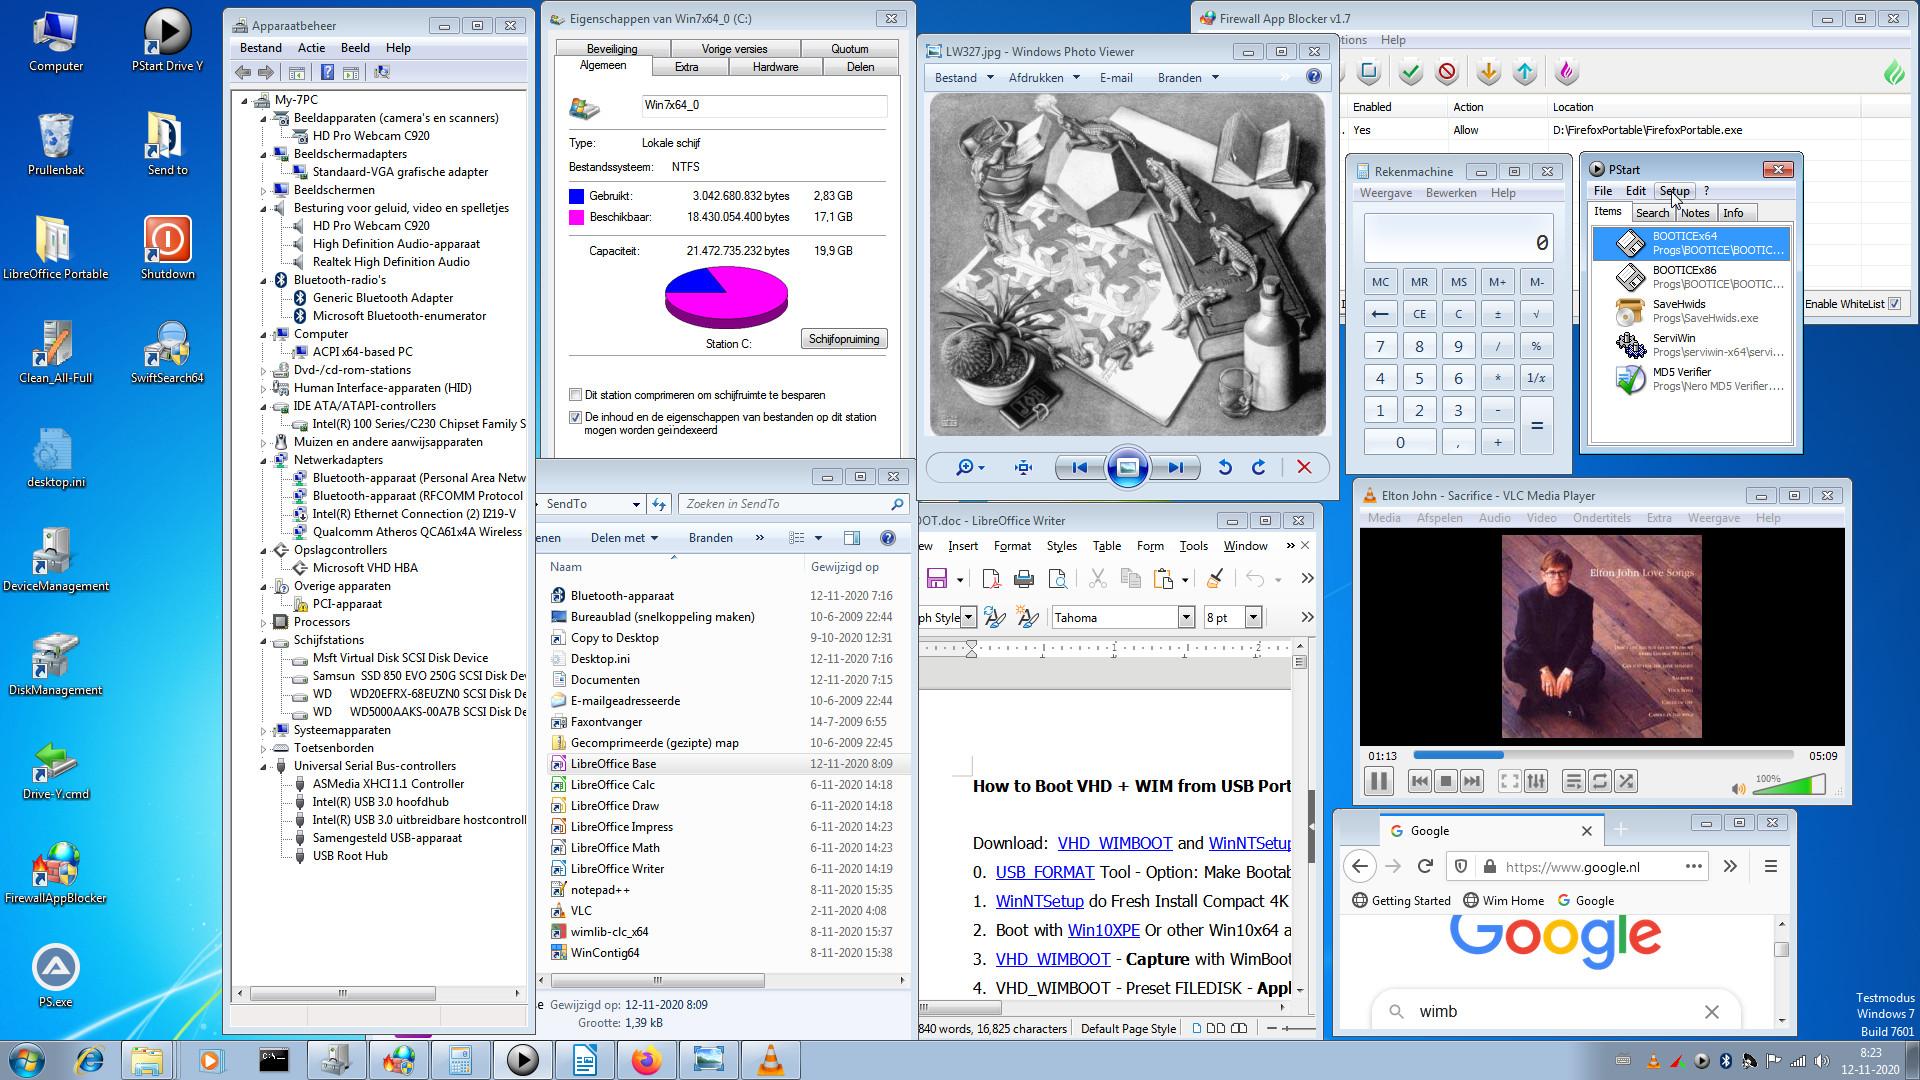
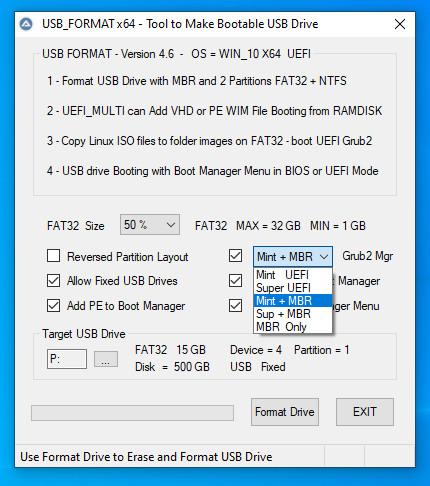
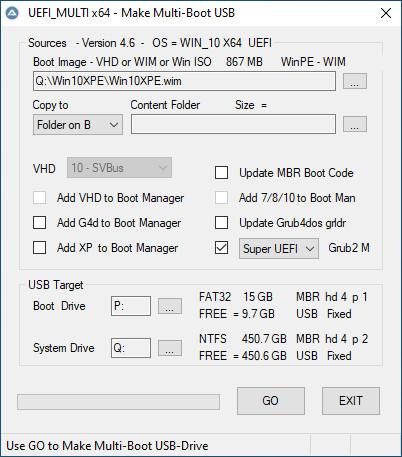
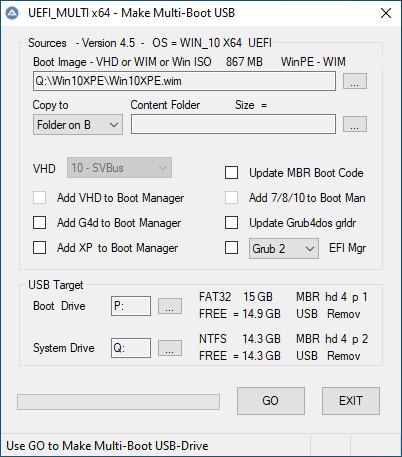
Update VHD_WIMBOOT Version 3.4 Download and Manual: VHD_WIMBOOT It means we now have the very easy procedure: 0. USB_FORMAT Tool - Option: Make Bootable USB Drive with MBR and 2 Partitions - active FAT32 Boot Drive + NTFS System Drive 1. WinNTSetup do Fresh Install Compact 4K mode of Win10x64 in 25 GB VHD located on Internal System Drive C: - use page 2 of this Manual 2. Boot with Win10XPE Or other Win10x64 and Switch off Defender - Start VHD_WIMBOOT - select System Drive and the 25 GB VHD file 3. VHD_WIMBOOT - Capture with WimBoot mode and Copy the Captured WIM File to Wimboot folder on NTFS System Drive of Portable SSD 4. VHD_WIMBOOT - Preset FILEDISK - Apply WIM with Compact LZX mode in Fixed VHD 25 GB located on NTFS System Drive of USB SSD 5. VHD_WIMBOOT - Preset RAMDISK - Apply WIM with WimBoot mode in Expandable VHD 3.9 GB located on NTFS System Drive of USB SSD 6. Internet Off (disconnect LAN cable) - Boot in MBR BIOS mode via F8 menu from USB - Boot Manager Menu with 3.9 GB VHD as FILEDISK 7. Install of SVBus driver - use R-mouse menu to Run as admin file instx64.exe of SVBus bin folder - Driver for booting from RAMDISK 8. Reboot in MBR BIOS mode from USB and select in Grub4dos Menu your 3.9 GB VHD on USB for booting from RAMDISK 9. Reboot in UEFI Or MBR BIOS mode from USB and select in Boot Manager Menu 25 GB VHD on USB for booting as FILEDISK -
VHD_WIMBOOT - Apply and Capture of WIM Files for OS in VHD
wimb replied to wimb's topic in Install Windows from USB
Update VHD_WIMBOOT Version 3.2 - Update Preset FILEDISK / RAMDISK Settings - Update Manual VHD_WIMBOOT - Preset FILEDISK - Apply WIM with Compact LZX mode in Fixed VHD 25 GB located on NTFS System Drive of USB SSD VHD_WIMBOOT - Preset RAMDISK - Apply WIM with WimBoot mode in Expandable VHD 3.9 GB located on NTFS System Drive of USB SSD Download: from GitHub VHD_WIMBOOT-32 -
VHD_WIMBOOT - Apply and Capture of WIM Files for OS in VHD
wimb replied to wimb's topic in Install Windows from USB
Update VHD_WIMBOOT Version 3.1 - Extra Mode Options: APPLY WIM File in Compact Mode with XPRESS8K and XPRESS16K Compression - Extra Mode Options: CAPTURE WIM File in WimBoot Mode with XPRESS8K and XPRESS16K Compression - Update Manual - Update WimBootCompress.ini files - Added wofadk.sys to [PrepopulateList] section Download: from GitHub VHD_WIMBOOT-31 -
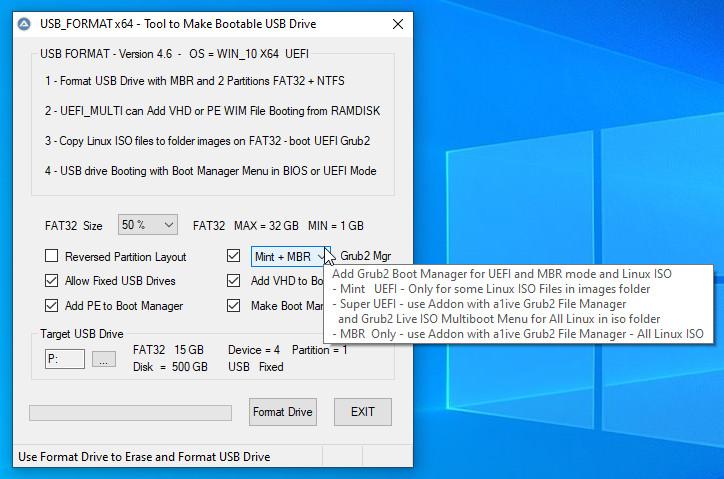
Update USB_FORMAT-50 and UEFI_MULTI-50 plus the Addon-glim-agFM files - Added: 7-zip Compressed writable files with ext3 filesystem in subfolders of folder images - Update of Manual Win10_Install.pdf No need to use Make_Ext Or AIO Creator anymore to make writable files for booting Linux with persistence After using USB_FORMAT with Mint UEFI Grub2 support (addon is not needed) - Copy and Rename Linux ISO files to folder images on USB as indicated in Manual - On USB drive in corresponding Linux subfolder of folder images: Expand the 7-zip file to 500 MB writable file for persistence support Preferred is Kali Linux 64-bit Live for Administrator tasks (forensic tasks and password cracking and wireshark) For general Office Tasks then Linux Mint Cinnamon is preferred Adding Linux ISO with persistence support to USB has never been so easy .... Download: USB_FORMAT and UEFI_MULTI and Manual: Win10_Install.pdf
-
Update USB_FORMAT-50 and UEFI_MULTI-50 plus the Addon-glim-agFM files - Update menu_Linux.lst and grub_Linux.cfg menu files for booting Linux with persistence - Added Make_Ext to make writable file with ext3 filesystem for Linux with persistence - Update of Manual Win10_Install.pdf
-
Update USB_FORMAT-50 and UEFI_MULTI-50 plus the Addon-glim-agFM files - Merged folder \EFI\grub with folder \grub so that a1ive Grub2 System for UEFI and MBR BIOS mode use the same folder \grub - AIO Menu has item Search Grub2 configfile that will find \grub\grub.cfg file for Grub2 Menu items of USB_FORMAT and UEFI_MULTI - in this way AIO can make use of Grub2 Live ISO MultiBoot Menu for Linux ISO files added to subfolder of iso rootfolder - AIO Menu can make use in MBR BIOS mode and in UEFI Secure mode of unextracted Linux ISO files simply copied to subfolder of iso rootfolder Download: USB_FORMAT and UEFI_MULTI -
-
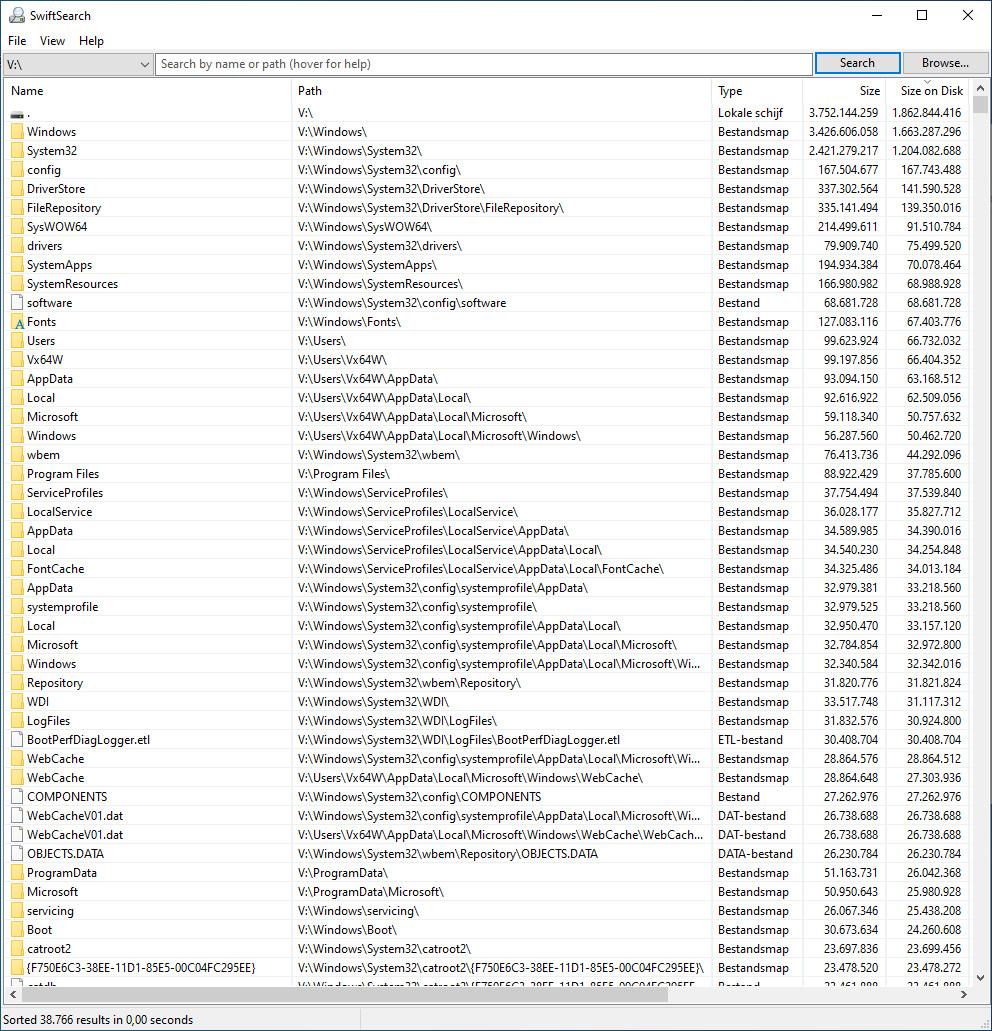
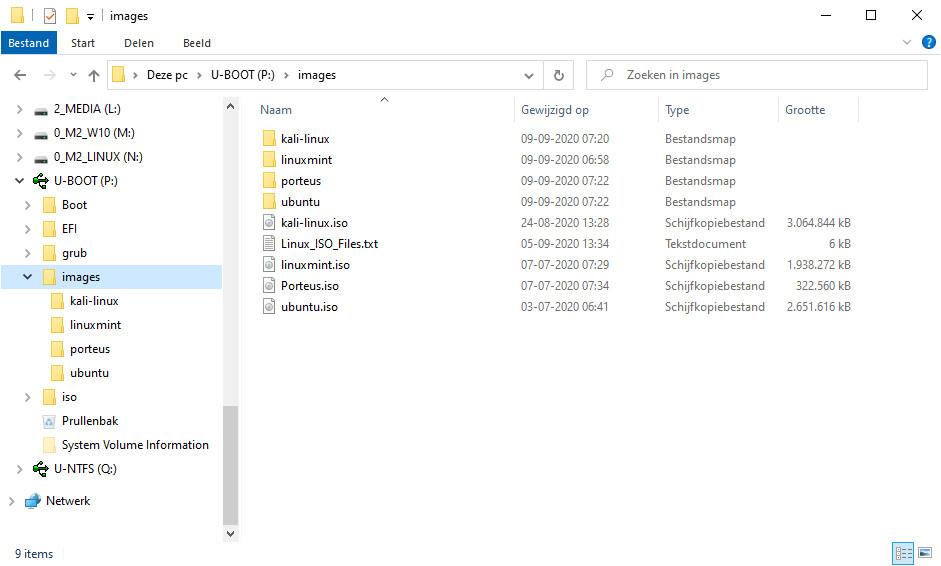
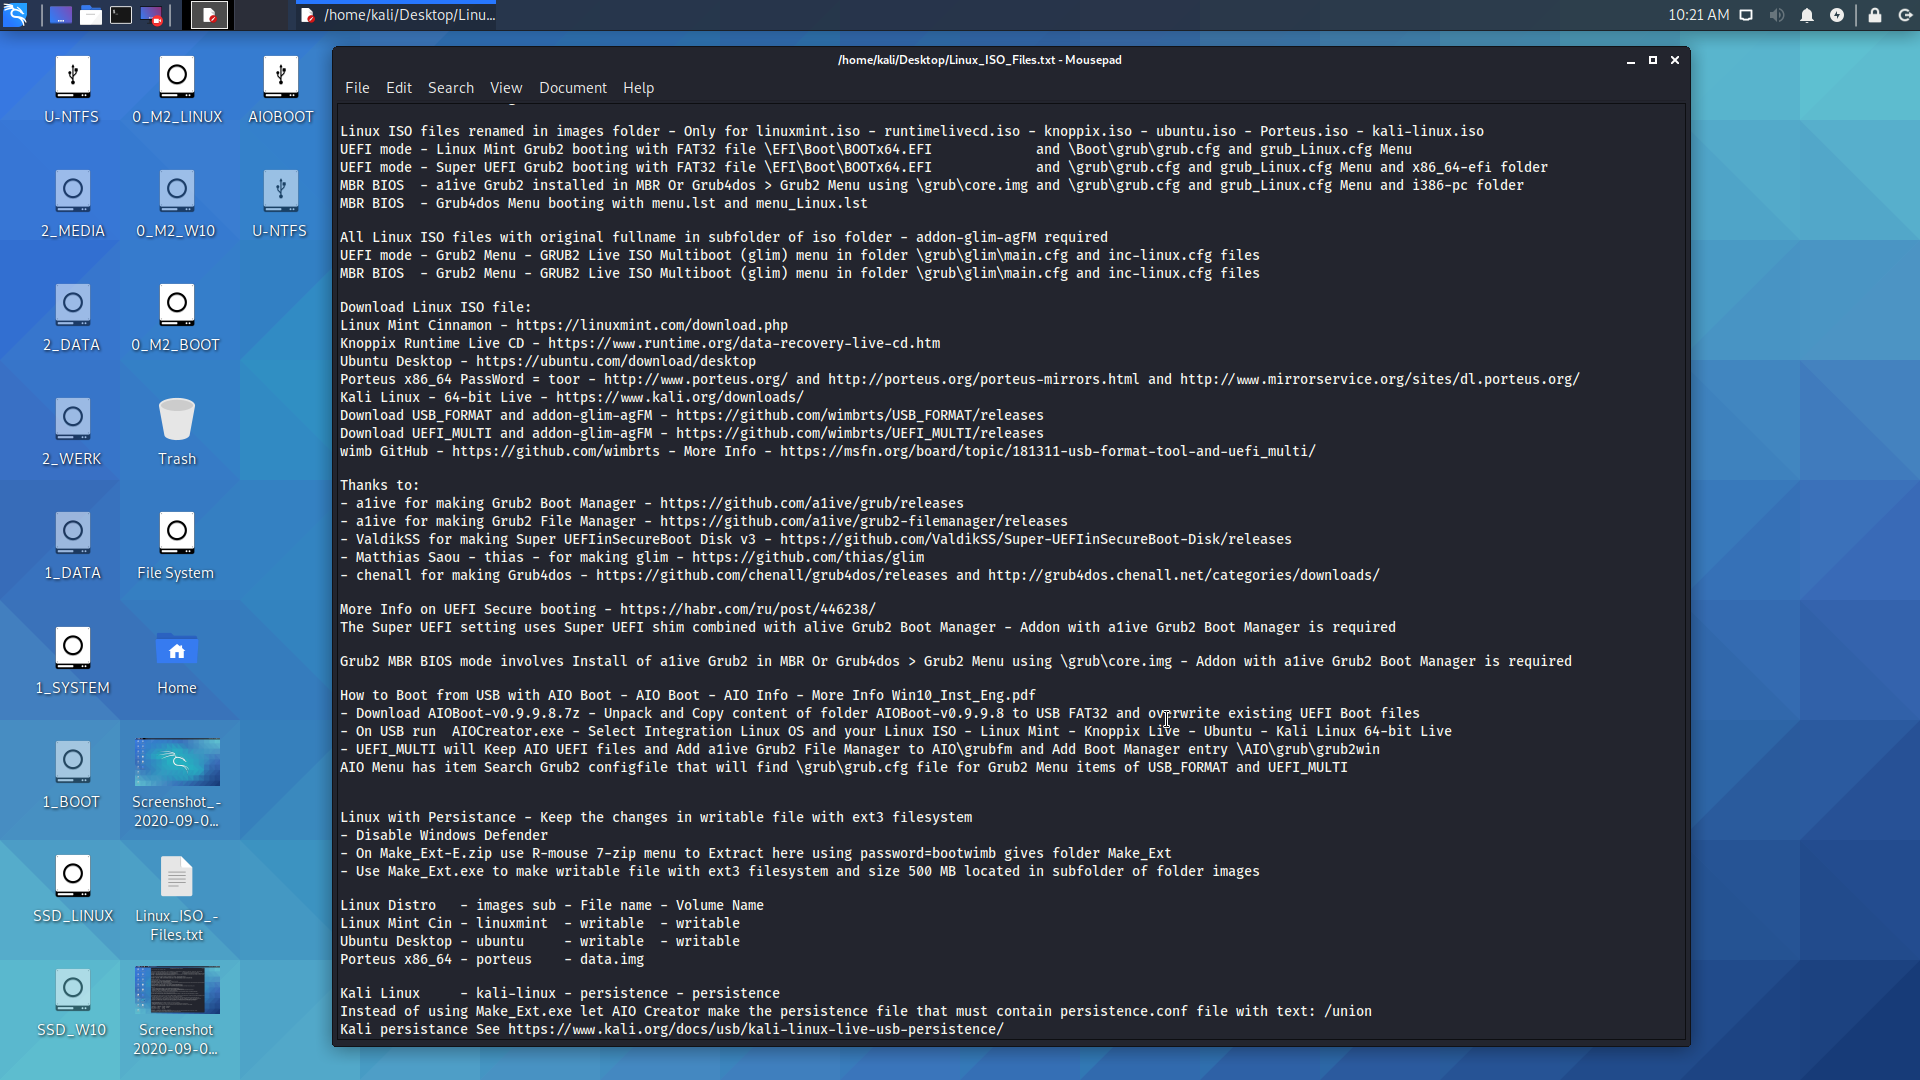
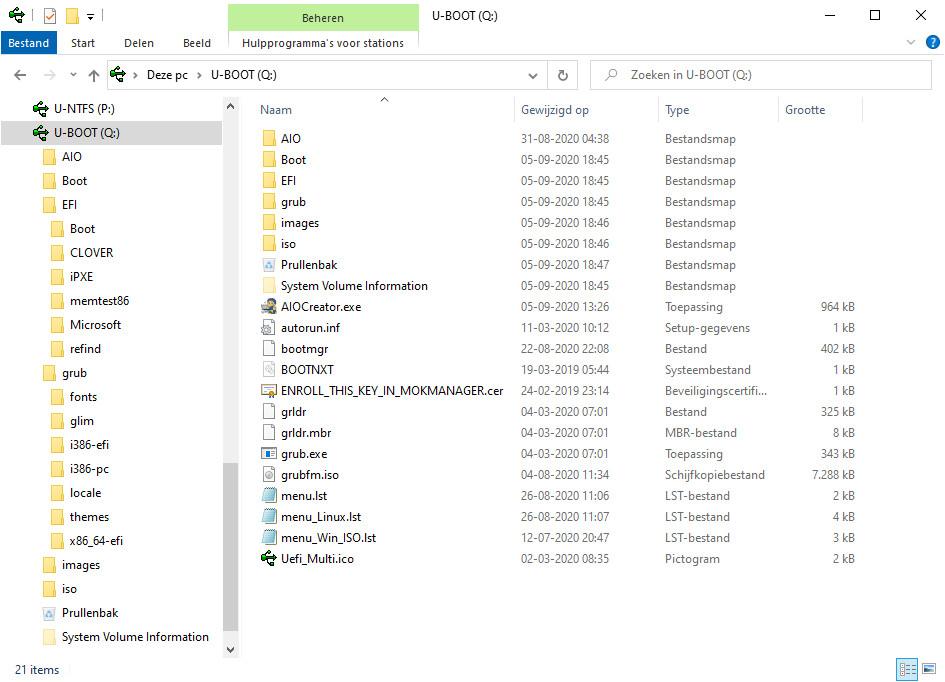
Update USB_FORMAT-49 and UEFI_MULTI-49 plus the Addon-glim-agFM files - Added MBR BIOS mode Grub2 support in Grub4dos Menu using file core.img and Grub2 system folder i386-pc located in rootfolder grub - MBR BIOS mode Grub2 Live ISO MultiBoot Menu for Linux ISO files added to subfolder of iso rootfolder e.g. for Kali Linux support add file kali-linux-2020.3-live-amd64.iso to folder iso\kali - Support for Kali Linux ISO renamed as file kali-linux.iso in folder images booting straight with Grub2 Menu in UEFI Secure mode and with Grub4dos Menu in MBR BIOS mode - Update of a1ive Grub2 Boot Manager Latest - https://github.com/a1ive/grub/releases - Update of a1ive Grub2 File Manager 7.3.3 - https://github.com/a1ive/grub2-filemanager/releases - Update for support of AIO Boot, which now also supports UEFI Secure Boot - Perfect Integration of AIO Boot with USB_FORMAT and UEFI_MULTI to make most versatile MultiBoot USB Drive How to Boot from USB with AIO Boot - USB_FORMAT - Format USB Drive with MBR and 2 Partitions = Active FAT32 + NTFS - Download AIOBoot-v0.9.9.8.7z - Unpack and Copy content of folder AIOBoot-v0.9.9.8 to USB FAT32 and overwrite existing UEFI Boot files - On USB run AIOCreator.exe - Select Integration Linux OS and your Linux ISO - UEFI_MULTI will Keep AIO UEFI files and Add a1ive Grub2 File Manager to AIO\grubfm and Add Boot Manager entry \AIO\grub\grub2win Download Linux ISO file: Linux Mint Cinnamon - https://linuxmint.com/download.php Knoppix Runtime Live CD - https://www.runtime.org/data-recovery-live-cd.htm Ubuntu Desktop - https://ubuntu.com/download/desktop Porteus x86_64 PassWord=toor - http://www.porteus.org/ and http://porteus.org/porteus-mirrors.html and http://www.mirrorservice.org/sites/dl.porteus.org/ Kali Linux - 64-bit Live - https://www.kali.org/downloads/ Rename as linuxmint.iso - runtimelivecd.iso - knoppix.iso - ubuntu.iso - Porteus.iso - kali-linux.iso in folder images Download: USB_FORMAT and UEFI_MULTI -
-
That is GOOD News for easier and faster booting since the installed drivers are uncompressed available
-
Can you give some info on how to use this new option ? What is this option doing and How does it work ?
-
Thanks JFX The new version is working OK
-
WimGAPI Mode Compact:XPRESS4K results wrongly in XPRESS8K (X) Compression, whereas wimlib is giving XPRESS4K (x) Also WOF_Compress can analyse WOF Status and Compression Algorithm of Compact files. The WOF Staus of files can be Compact Or WIM-Backed Or UnCompressed More Info WOF_Compress support topic about latest release 3.7
-
VHD_WIMBOOT - Apply and Capture of WIM Files for OS in VHD
wimb replied to wimb's topic in Install Windows from USB
Update VHD_WIMBOOT Version 3.0 - Extra Mode Options: APPLY WIM File in Normal or WimBoot Mode or Compact Mode with XPRESS4K or LZX Compression - Extra Mode Options: CAPTURE WIM File in Normal or WimBoot Mode with XPRESS4K or LZX Compression - wimlib 1.13.2 https://wimlib.net/ Download: from GitHub VHD_WIMBOOT-30
-
Update USB_FORMAT-47 and UEFI_MULTI-47 plus the Addon-glim-agFM files - Removed Grub2win for booting from Windows Boot Manager in BIOS mode with Grub2 - Added a1ive Grub2 Boot Manager - installed in MBR for booting in BIOS mode with Grub2 - Added a1ive Grub2 Boot Manager - file efi\boot\grubx64_real.efi and Grub2 system for booting in UEFI mode with Grub2 - Update of Grub2 file grub_Linux.cfg and Grub4dos file menu_Linux.lst with preconfigured Menu entries - UEFI_MULTI - improved compatibility with other USB Formatting Tools - Format USB Drive for Booting with Windows Boot Manager Menu and /or Grub2 Boot Manager in MBR BIOS or UEFI mode with in MBR BIOS mode additional support of Grub4dos Menu - Format USB Drive with two partitions FAT32 + NTFS for booting WIM and VHD and Windows ISO and Linux ISO files using preconfigured Menu entries Download Linux ISO file: Linux Mint Cinnamon - https://linuxmint.com/download.php Knoppix Runtime Live CD - https://www.runtime.org/data-recovery-live-cd.htm Ubuntu Desktop - https://ubuntu.com/download/desktop Porteus x86_64 PassWord=toor - http://www.porteus.org/ and http://porteus.org/porteus-mirrors.html and http://www.mirrorservice.org/sites/dl.porteus.org/ Thanks to: - a1ive for making Grub2 Boot Manager - https://github.com/a1ive/grub/releases - a1ive for making Grub2 File Manager - https://github.com/a1ive/grub2-filemanager/releases - ValdikSS for making Super UEFIinSecureBoot Disk v3 - https://github.com/ValdikSS/Super-UEFIinSecureBoot-Disk/releases More Info: https://habr.com/ru/post/446238/ - Matthias Saou - thias - for making glim - https://github.com/thias/glim - chenall for making Grub4dos - https://github.com/chenall/grub4dos/releases and http://grub4dos.chenall.net/categories/downloads/ Download: USB_FORMAT and UEFI_MULTI - More Info: and ==
-
WOF_Compress_x64.exe Version 3.3 is working OK in Win10XPE made according to Win10_Install.pdfand in ChrisPE Environment. Can you give Link for the PE that you are using ?
-
In your opinion, what are the best/worst versions of Microsoft Windows?
wimb replied to win32's topic in The Poll Center
Booting from USB and Fast Windows Setup and Automatic Install of all drivers is by far best supported in Windows 10 but in other aspects it can be the worst .... Windows 8 User interface and UEFI booting and Setting the dirty bit of all NTFS drives in case of boot problem was the worst ever experienced -
Update USB_FORMAT-45 and UEFI_MULTI-45 plus the Addon-glim-agFM files - Update of a1ive Grub2 File Manager to v7.3.0 - UEFI_MULTI improved user interface - UEFI_MULTI can add Grub2Win as MBR Boot option in Windows Bootmanager Menu for booting Linux ISO files Copy Windows and Linux ISO files to folder images for booting with preconfigured Grub4dos entries as given in menu_Win_ISO.lst and menu_Linux.lst Download: USB_FORMAT and UEFI_MULTI
-
Yes 2020-06-17 16:24:52, Error TOOL BCD: File is not system store. File: \Device\HarddiskVolume4\Boot\BCD Status: 0 2020-06-17 16:24:52, Error [0x0e00b3] TOOL Sysprep_Specialize_Bcd: There was an error opening the system store. Status=[0xC0000098] 2020-06-17 16:24:52, Error SYSPRP ActionPlatform::LaunchModule: Failure occurred while executing 'Sysprep_Online_Specialize_Bcd' from C:\Windows\System32\spbcd.dll; dwRet = 0x3ee 2020-06-17 16:24:52, Error SYSPRP SysprepSession::ExecuteAction: Failed during sysprepModule operation; dwRet = 0x3ee 2020-06-17 16:24:52, Error SYSPRP SysprepSession::ExecuteInternal: Error in executing action for Microsoft-Windows-Sysprep-SpBcd; dwRet = 0x3ee 2020-06-17 16:24:52, Error SYSPRP SysprepSession::Execute: Error in executing actions from C:\Windows\System32\Sysprep\ActionFiles\Specialize.xml; dwRet = 0x3ee 2020-06-17 16:24:52, Error SYSPRP RunPlatformActions:Failed while executing Sysprep session actions; dwRet = 0x3ee 2020-06-17 16:24:53, Error [0x060435] IBS Callback_Specialize: An error occurred while either deciding if we need to specialize or while specializing; dwRet = 0x3ee The bootmgr files released since 2020 silently fail to be updated by bcdboot command. For the bootmgr x64 versions of january and april I got failure of setup for install in VHD of Win 7/8 x64 and Win10x86 In MBR mode booting with bootmgr x64 version 29-04-2020 (1909 update) then there is a mismatch with booting Win10x86 VHD during Setup. Normally WinNTSetup will update bootmgr file (by using bcdboot ?) so that it corresponds to Windows to be installed. The bootmgr versions since 2020 refuse replacement by bcdboot.exe The issue is solved by Microsoft with bootmgr of version 2004 that also is not updated by bcdboot, but allows to Install 7x64 Or 10x86 version in VHD without the reported error.
-
Thanks for the info on using msoobe.exe to fix the annoying Windows setup error. I tried to use msoobe.exe to fix the error but it did not work for me I have hope that 2004 version of bootmgr can prevent the error .... In any case that worked for me.
-
The bootmgr files released since 2020 silently fail to be updated by bcdboot command. For the bootmgr x64 versions of january and april I got failure of setup for install in VHD of Win 7/8 x64 and Win10x86 The problem is fixed by Microsoft with the latest release of bootmgr x64 of Win 10 version 2004 This Win10x64 bootmgr file of 11-05-2020 as tested by me allows Install of 7x64 and Win10x86 in VHD booting in MBR BIOS mode.
-
Thank you for sharing your experience regarding Win 10 2004. I decided also to stay at 1909 until BSOD problems are solved ....