mazin
Content Type
Profiles
Forums
Events
Everything posted by mazin
-
If you haven't solved the problem, yet, you can use either CreateUser or WISCON. HTH
-
[Request] Run Command Box Custom Bitmap
mazin replied to ricktendo's topic in Graphics and Designing Art
While in ResHacker, I just pull the edges of the RUN BOX. These numbers are changed accordingly: 1003 DIALOGEX 0, 0, 337, 130 But before I do that, I design my pic (or pick one) then add it to BITMAP resources. I, then, resize the RUN BOX according to my pic. If RUN BOX looks ugly or looks like not well-organized with my pic, I design or pick a new pic. I do that till I get my desired RUN BOX. I hope I got you correctly. -
@ Vits Even if you only have got one partition (C:), it's recommended to use %SystemDrive% instead of C:! You might change your mind sooner or later creating another partition (D:). In this case, if you install WinXP on D:, your code will not work. Just a thought. @ PaulIA When it comes to future, there will be new LU and MSP for version 10. I suggest you read this guide, too. Given that download links may change, in that guide, the method may still work. HTH
-
[Request] Run Command Box Custom Bitmap
mazin replied to ricktendo's topic in Graphics and Designing Art
Yes, there's excessive use of special effects. But, you have a good sense in making all stars look alive. However, your 6th pic in post #5 is the best IMO. I mean that you freely changed dimensions of RUN BOX. Your pics are nice. I can use Adobe Photoshop to do something to my pics. My RUN and SOLAR pics are made with Adobe from scratch. -
cleanup.cmd not deleting dotnet folder
mazin replied to piXelatedEmpire's topic in Unattended Windows 2000/XP/2003
@ piXelatedEmpire I'm sorry for this. But I can't understand why you're insisting to delete the folder by your cleanup.cmd! You can just use HKLM\..\RUN to delete the folder. Both the following methods should work. You can use one of them to do the job. It does not matter whether dotnet2 has or hasn't been installed yet. I assume the folder you want to delete is: %SystemDrive%\dot20 I, also, assume that it is deletable. (not protected) EITHER: Add these lines to any batch file you use at T-13 or T-12. OR:Import this reg file at T-13 or T-12. Or just delete "Windows Registry Editor Version 5.00" and add the rest to any reg file you may have got. HTH -
When you install Windows, press SHIFT+F10. At the command prompt, type notepad.exe and browse to that location. It's probably on Drive C. Copy/paste from there. DONE!
-
[Request] Run Command Box Custom Bitmap
mazin replied to ricktendo's topic in Graphics and Designing Art
Welcome back! Yes, this is WolfX2's touch! I like it. Thanks. Here it is: -
You're welcome.
-
Thanks, Paul! I wanted to post that guide long ago. I just lacked time. But, finally, I got the time to compile and test it again and again on my machine. Any thoughts are welcome, tho.
-
You may find this topic useful: http://www.msfn.org/board/index.php?showtopic=82047
-
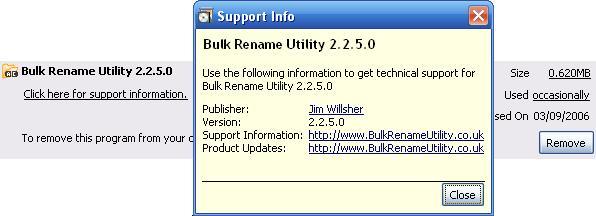
WinRAR-SFX Installer/Uninstaller. Example: Bulk Rename Utility. STEP 1: Files to be added to the SFX. I downloaded the zipped version of BRU because I like customization :-) I take out these files from the downloaded archive: 1- Bulk Rename Utility.exe 2- BRU_XP.dll 3- pcre.dll 4- Bulk Rename Utility.chm 5- Changelog.rtf 6- Readme.rtf 7- Tips.txt I put the extracted files in C:\BRU. STEP 2: Reg file for tweaks, if necessary. I create BRUtweak.reg to configure BRU prior to the first use. This is the content of BRUtweak.reg: REGEDIT4 [HKEY_CURRENT_USER\Software\Jim Willsher\BULK RENAME UTILITY\Main Window] "AlwaysOnTop"=dword:00000000 "WindowPlacement"="1,37,800,536,3,2" "Col Name"=dword:000000a0 "Col NewName"=dword:000000a0 "Col SubDir"=dword:00000028 "Col Type"=dword:00000032 "Col Size"=dword:00000028 "Col Created"=dword:00000032 "Col Modified"=dword:00000032 "Col New Length"=dword:00000032 "Col Time Taken"=dword:00000032 "Col Attributes"=dword:00000032 [HKEY_CURRENT_USER\Software\Jim Willsher\BULK RENAME UTILITY\Preferences] "Favourite Path"="" "Auto Save Favourite On Exit"=dword:00000000 "Store Favourite Pathnames"=dword:00000000 "Display Icons"=dword:00000001 "Highlight Active Criteria"=dword:00000001 "Display Warning Message"=dword:00000001 "Display Confirmation Message"=dword:00000001 "Display Gridlines"=dword:00000001 "Full Row Select"=dword:00000000 "Overwrite Target Files"=dword:00000000 "New Location Copy Not Move"=dword:00000000 "Auto Select Entries"=dword:00000000 "Ignore Folder Extensions"=dword:00000001 "Change Attributes H"=dword:00000000 "Change Attributes A"=dword:00000001 "Change Attributes R"=dword:00000001 "Colour New Name OK"=dword:00008004 "Colour New Name Invalid"=dword:000000ff "Colour Active Criteria Back"=dword:00000080 "XP Sorting"=dword:00000001 "Sort Column"=dword:00000000 "Sort Dir"=dword:00000001 [HKEY_CURRENT_USER\Software\Jim Willsher\BULK RENAME UTILITY\Tip] "FilePos"=dword:0000020c "StartUp"=dword:00000000 As you can see, there are three main keys in BRUtweak.reg! They are: [HKEY_CURRENT_USER\Software\Jim Willsher\BULK RENAME UTILITY\Main Window] [HKEY_CURRENT_USER\Software\Jim Willsher\BULK RENAME UTILITY\Preferences] [HKEY_CURRENT_USER\Software\Jim Willsher\BULK RENAME UTILITY\Tip] Actually, and after using the program itself, an additional key is written to the Registry. It is: [HKEY_CURRENT_USER\Software\Jim Willsher\BULK RENAME UTILITY\Settings] Well, that's actually no problem because deleting the key "Jim Willsher" will delete the subkeys, too. This task is assigned to BRUunins.cmd as you'll see below. STEP 3: Batch file for perfecting installation and uninstallation. I create BRUtweak.cmd to: 1- run BRUtweak.reg then delete it. 2- Write uninstall strings to the Registry. 3- create BRUunins.cmd! BRUunins.cmd will uninstall BRU when you press "Remove" in "Control Panel-->Add or Remove Programs". Both BRUtweak.cmd and BRUunins.cmd are self-deleted. This is the content of BRUtweak.cmd: (you just copy/paste) STEP 4: Creating the SFX. Well! So far, we've got 9 files. They are: 1- Bulk Rename Utility.exe 2- BRU_XP.dll 3- pcre.dll 4- Bulk Rename Utility.chm 5- Changelog.rtf 6- Readme.rtf 7- Tips.txt 8- BRUtweak.reg 9- BRUtweak.cmd Assuming the 9 files are in C:\BRU, we do the following to create our SFX: 01- Open WinRAR. Browse to C:\BRU where you keep the 9 files. 02- Use your expertise with the keyboard and mouse to highlight (select) the 9 files. 03- Go to "Commands" menu. Select "Add files to archive". The "Archive name and parameters" dialog box should appear with the "General" tab activated. 04- Tick "Create SFX archive" and "Create solid archive". 05- In the "Archive name" field, change the suggested name given by WinRAR to BRU.exe then choose "Best" from the "compression method" combo box. 06- Go to "Advanced" tab. Press "SFX options". The "Advanced SFX options" dialog box appears with the "General" tab activated. 07- In the "Path to extract" field, type "Bulk Rename Utility" without quotes. -- This means that the package (SFX) will be extract, during installation, to: %ProgramFiles%\Bulk Rename Utility. -- Make sure the "Create in "Program Files"" radio button is selected. -- Make sure the "Save and restore paths" check box is not checked. 08- In the "Run after extraction" field, type "BRUtweak.cmd" without quotes. -- As shown in STEP 3, BRUtweak.cmd is necessary to be run after extraction to perform some tasks. 09- Still in the "Advanced SFX options" dialog box, press the "Advanced" tab. -- Press the "Add shortcut..." button. The "Add shortcut" dialog box appears. -- Select "Start Menu/Programs". In the "Source file name" field, type "Bulk Rename Utility.exe" without quotes. This is the name of the file you create a shortcut to. -- In the "Destination folder" field, type "Bulk Rename Utility" without quotes. This is the name of the shortcut folder that will be created under: %UserProfile%\Start Menu\Programs. -- In the "Shortcut description" field, type "Bulk Rename Utility - Renames multiple files on the fly!" without quotes. -- In the "Shortcut name" field, type "Bulk Rename Utility" without quotes. This is the link that will appear as: %UserProfile%\Start Menu\Programs\Bulk Rename Utility\Bulk Rename Utility.lnk -- Now, press "Ok" to return back to the "Advanced" tab. ++ Repeat the same steps again to create two more shortcuts; one for "Bulk Rename Utility.chm" and one for "Readme.rtf". 10- Still in the "Advanced SFX options" dialog box, press the "Modes" tab. -- Under "Silent mode", select "Hide all". This tells the SFX not to show setup screens. -- Under "Overwrite mode", select "Overwrite all files". This tells the SFX to overwrite any files pre-existing in the destination folder %ProgramFiles%\Bulk Rename Utility, if there's any. 11- Press "Ok" on the "Advanced SFX options" dialog box to close. -- Press "Ok" on the "Archive name and parameters" dialog box and wait for the compression process to finish. BRU.exe is now created in C:\BRU. 12- Move BRU.exe to a safe place on your harddisk as you'll use it to install BRU afterwards. -- Delete the folder C:\BRU as it's no longer needed. STEP 5: Installing BRU from your UAXPCD. Since you configured the SFX (BRU.exe) to install silently (Hide all) you don't need to add switches on the command line when installing BRU. Simply, you install it this way: start /wait %SystemDrive%\Install\BRU.exe This assumes that BRU.exe is put in %SystemDrive%\Install at the time of installation. Otherwise, change the path to your own. Note: Save time when creating a SFX. Steps from 07 through 10 are summarized here: This summary is called "Comment". Actually, if you have this comment in hand, you can ignore Steps from 07 through 10. In Step 06, go to the "Comment" tab directly instead of going to the "Advanced" tab. In the "Enter a comment manually" field, just paste the above Comment, then press "Ok". You're done!

-
Good catch, Takeshi!
-
They are cool but the original one is more beautiful and simple.
-
Avast 4.7 Pro and TuneUp Utilities 2006 were discussed many times. Just search and you'll find the answers. I don't know about the other two.
-
Two Favorites/Bookmarks icons, opinions requested
mazin replied to coyotewrw's topic in Customizing Windows
I vote rounded. I wouldn't prefere any of them, though. I'd like a star inside a circle. That's actually how my icon looks like. -
I gave it up. Now, coffee!
-
[Request] Run Command Box Custom Bitmap
mazin replied to ricktendo's topic in Graphics and Designing Art
SOLAR! And this, till I have my dinner! -
I strongly think that RUN and STARTUP execute at the same time.
-
[Request] Run Command Box Custom Bitmap
mazin replied to ricktendo's topic in Graphics and Designing Art
RUN! Well! Dream about this till I have my lunch. C U! -
Well! First: Some points about SVCPACK. Yes, that's how SVCPACK method works. Because SVCPACK.INF is executed from HDD not from a CD-ROM, files listed in SVCPACK.INF get copied to your HDD, first. This is where SVCPACK folder and its contents copied to: X:\$WIN_NT$.~LS\i386\SVCPACK\blabla Workaround: Create a CMD to set a temporary %CDROM% variable. Let it launch WMP setup from your CD. (start /wait %CDROM%\Install\WMP10.exe /YourSwitches) Put that CMD in your SVCPACK folder. (.\i386\SVCPACK\MY.CMD) List That CMD in your SVCPACK.INF! It's always recommended that WMP be set up first (prior to other apps). That's it. Also, no need to (DEL %0) because the whole directory of X:\$WIN_NT$.~LS, along with its contents, will be deleted automatically by Windows SETUP. Second: Repackaging WMP setup files. This step is not obligatory in any way. You can, just, use the original exe to set up WMP without any problems. Use these switches in your CMD: start /wait %CDROM%\Install\WMP10\WMP10.exe /C:"setup_wm.exe /Q /R:N /NoPID /DisallowSystemRestore" But, I just extract the original exe then re-compress extracted files in a SFX, with these arguments: Setup=setup_wm.exe /Q /R:N /NoPID /DisallowSystemRestore TempMode Silent=1 Overwrite=1 You can, then, run WMP setup with: start /wait %CDROM%\Install\WMP10\WMP10.exe Third: Tweaking WMP and deleting shortcuts. As I mentioned earlier, I install WMP prior to other apps. After all other apps finishes their installation, my CMD runs WMP10.reg then executes thses commands: If not exist "%UserProfile%\Application Data\Microsoft\Internet Explorer\Quick Launch\Windows Media Player.lnk" move "%UserProfile%\Start Menu\Programs\Windows Media Player.lnk" "%UserProfile%\Application Data\Microsoft\Internet Explorer\Quick Launch\*.*" >NUL If exist "%UserProfile%\Start Menu\Programs\Windows Media Player.lnk" del "%UserProfile%\Start Menu\Programs\Windows Media Player.lnk" >NUL If exist "%UserProfile%\Start Menu\Programs\Accessories\Entertainment\Windows Media Player.lnk" del "%UserProfile%\Start Menu\Programs\Accessories\Entertainment\Windows Media Player.lnk" >NUL Finally. I'm telling how I've been doing it. If, for any reason, this doesn't work for you; it's not my problem. However, I should say that all reg tweaks applied for WMP under SVCPACK stick for any user account. So do the shortcuts. Also, I'm using the SVCPACK method normally, that is; WMP10.exe is in SVCPACK folder. This means that I don't add WMP setup to my CMD, you know. Additionally, Windows Media Player Associations work per machine. You won't have to apply them for each user, individually. But, Windows Media Player ToolBar works per User. You will have to apply it for each user, individually; unless there's a reg tweak to apply it while under SVCPACK. Then, it could work for any user. Anyone knows a reg tweak for Windows Media Player ToolBar?
-
[Request] Run Command Box Custom Bitmap
mazin replied to ricktendo's topic in Graphics and Designing Art
Looks good. Haven't applied them yet, tho. Fantastic PT.lincoln! I like free designs, too. -
Yes, Paraglider's version outputs valid REGEDIT data. I can just copy/paste and voila. Or I can save the output file as .reg after cleaning it up. However, both TianWei's and Paraglider's versions monitor HKEY_USERS\S-1-5-21-.. not HKEY_CURRENT_USER\.. So, I have to edit the main keys. That's good, anyway. NB: RegShot zipped file (Paraglider's version) contains many files. You only need the following files: 1- regshot.exe 2- regshot.ini 3- language.ini 4- readme.txt 5- whatsnew.txt NB: language.ini contains many languages. You can erase languages other than yours. Also, you can add your own language if it's not listed. NB: LANGUAGE.ini is the same for both TianWei's and Paraglider's versions.
-
[Request] Run Command Box Custom Bitmap
mazin replied to ricktendo's topic in Graphics and Designing Art
Schools Inn Oh yeah.. It's **** September. -
[Request] Run Command Box Custom Bitmap
mazin replied to ricktendo's topic in Graphics and Designing Art
I haven't heard from WolfX2! :-) I'd like the STARS bmp for RUN dialog box. I'm sure WolfX2 can make a more beautiful one. Ah, its 400x75x24b! -
If you don't like it in Startup folder, put it somewhere else (%SYSTEMROOT%\update.cmd, for example), then call it from HKLM\..\RUN. update.cmd can delete itself and delete the HKLM\..\RUN entry, afterwards.