geezery
Content Type
Profiles
Forums
Events
Everything posted by geezery
-
@echo off set comp = echo 1 for maximum echo 2 for fast echo 3 for none echo " " set /p type=Enter compression type: if %type%==1 set comp=maximum if %type%==2 set comp=fast if %type%==3 set comp=none echo %comp%
-
I'm working on the file path popup on the start, but the error handling I want is a little tricky. Would that chkdsk /r option be good? I can put that one in the next rel if you guys want. I'm out of ideas, so if you have some put it here. Maybe those capture and append could be better done, but I don't personally use those much. So if someone want's to improve those go on. But I hope you post the improved versions here also. Like I mentioned here I got this also working on vmware when I put 600mb virtual memory. I didn't test what is the limit, but I think that is enough.
-
Ok, I finally got this HTA working on VMWARE with network support, so it was easier to locate the bug. I upped a new version again, I hope it works. There was a little error on line 327 Original: strTaskValue = "imagex /apply "+objSel2.options(objSel2.selectedindex).text+" " + Radio.Id + " c:" Fixed: strTaskValue = "imagex /apply " & myfilepath +objSel2.options(objSel2.selectedindex).text+" " + Radio.Id + " c:" so the path to the wim files were missing.
-
I had also problem with Inno setup files, but when I copied the fresh version of the innounp.exe to UE\bin\ folder it works great.
-
I try to fix all the errors today. Problem is that I don't have any test environment since I haven't been able to test in virtual environment. I have to try raising the virtual memory. I also havent got network working properly in virtual environment.
-
Sorry dudes, I cant help you today, because I can't make any tests. jstchill -> Did you tried it on real environment or Virtual? I got also those errors when I tried on MS VirtualPC and Innotek Virtualbox.
-
Can someone else test the apply, because I don't have test environment here at work? p4antb0y -> Like I said the picture should be non commercial freely distributed. I think that vista background can't be freely added to this package. I didn't undestand that dropdown system. Can you describe it better?
-
I think I found an error in the script. On ParseFile Sub Change this line strIndx(i) = Left(tmpStr1, Len(tmpStr1) -2) To this strIndx(i) = Left(tmpStr1, Len(tmpStr1) -3) Can you test it?
-
If someone want's to help me with this project. I have one request. Nice background would be great, since I don't have any skills to make a nice one by my self. Of course it should be freely distributed so any commercial material is not allowed.
-
You can use diskpart to do the format c:\ for you, I assume you have only one disk. diskpart.txt select disk 0 select partition 1 format fs=ntfs label="system" quick active exit There is already a Ghost HTA available, search the Winpe Section on this forum. You can of course add a button here to start ghost32.exe Make this sub '***************************************************************************** 'Ghost32 '**************************************************************************** Sub Ghost32 Set objShell = CreateObject("Wscript.Shell") objShell.Run "Ghost32.exe" 'You have to put the necessery ghost files to WinPE path variable i. e. Windows\System32 End Sub Then you must add the button to HTA: <Button class = 'btn' id=capture onclick=Ghost32()> Ghost32 </Button> [code] I don't think that there is a point to make ghosting commands here, because there is so much of them.
-
V0.21 Fixed some major bugs and added also possibility to use the Wims "Description" field.
-
Maybe you can put exit on the lastline of the startnet.cmd startnet.cmd wpeinit net use command ImageXHTAv2.hta exit Then just put the put the window.close on the script. I didn't test this method, but I think it should work, because the startnet.cmd stops when the ImageXHTAv2.hta is running, and it continues after it is closed. I have already fixed all the errors and put some addons also. I will post the new zip soon.
-
I must fix some problems. Fixed version coming soon.
-
Look at the first post.
-
I think you can write a vbscript for your problem, if the applying continues automaticly after the cd change. There is a possibility to read the stdout and when it idles you can prompt user to put next cd inside. But I don't actually know how the applying of splitted wim works.
-
You can find the WinRe Waik tutorial there. Follow the steps, and build yourself WinRe and execute these. chkdsk /r BootRec /FixBoot BootRec /FixMbr http://blogs.msdn.com/winre/default.aspx
-
Can you put your system specs here also. Is the hard disk SATA or normal IDE? http://www.daniweb.com/techtalkforums/thread41835.html http://h10025.www1.hp.com/ewfrf/wc/fastFaq...cname=c00035720 I think you should go to Recovery Console. Press R on the first menu that appears, when you insert your Windows XP cd inside. -Choose the first Windows installation. My guess "1" -Then you must know your Administrator pasword. Might be blank. -Type these to the console chkdsk /r fixboot fixmbr Then restart the machine and try to install again. If you have a SATA hard drive you might have to install SATA drivers also. Press "F6" on the beginning of the installation. You might have a diskette that came with your motherboard / machine. Or you can just slipstream the Sata drivers to your installation media. But that's a different stroy.
-
Hello everyone reading my thread. I have spent the whole weekend designing the next release of this. I have made some nice changes in the script. -No more those static images.txt files -Dynamic drop down list of the image files (ability to have many images in the shared folder) -Capture and Append options It's almost ready, I have to clean the script a lot and make some error checking. I try to release it tomorrow. I think this can be useful also for those who only want to drop their "vanilla" sysprepped images from cd or dvd. I have to also make new instructions for this. BTW: there is a link on the first post to zipped version, but I wouldn't bother using it, since the next rel. will be totally better
-
If it works on Windows for you, then it should work also in PE. You can always open CMD-Prompt in PE and try to go to the I:\ share. The refresh button also checks the images.txt file again, if you want to refresh it.
-
OK, I have found a way to get imagex /info wimfile.wim to variable Dim oShell, oExec Set oShell = CreateObject("WScript.Shell") Set oExec = oShell.Exec("imagex.exe /info D:\Waik\F1_WINPE.wim") ImgInfo = oExec.StdOut.ReadAll WScript.echo ImgInfo
-
I think I'm going to add support for multiple *.wim files in the hard coded folder. Maybe it can be dynamic also. I have to change the code a lot. If someone has example for me to get the imagex /info wimfile.wim output to variable I could make that easily. There is a nice component available, but it is not free. **** http://www.smartdeploy.com/products/index.htm
-
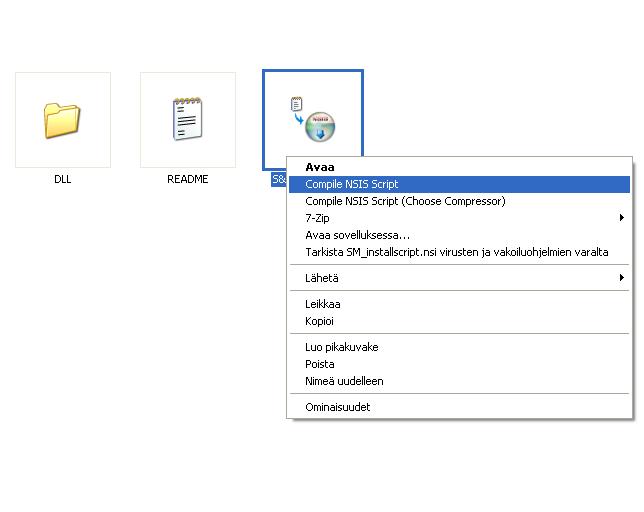
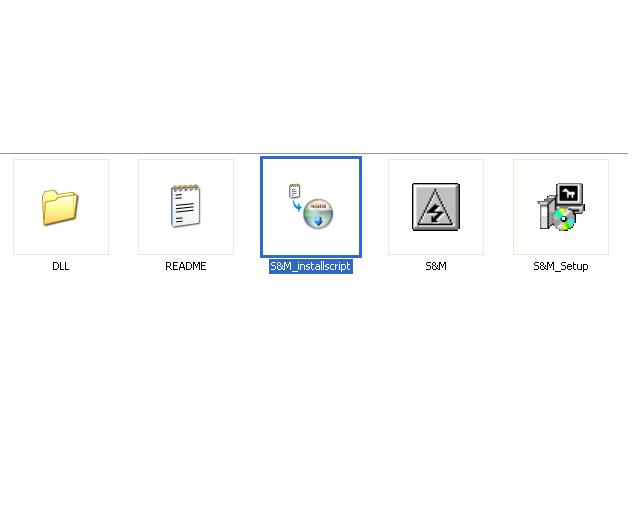
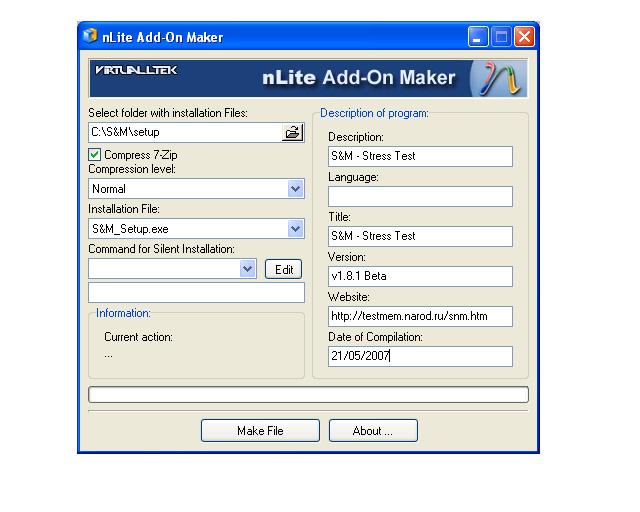
You can make these addons by yourself. Here is a small tutorial for this program. 1. Extract the files from it to C:\S&M\ 2. Download NSIS 3. Install NSIS 4. Open Notepad and prepare to write some NSIS scripting:) I tried to put comments as much as I can ;S&M_installscipt.nsi ; ;Sample NSIS silent installation script by Geezery ; ;Name of the program Name "S&M - Stress test v1.8.1 beta" ;Name of the executable file OutFile "S&M_setup.exe" ;Installation path InstallDir "$PROGRAMFILES\S&M\" ;Silent installation / uninstallation by default. You don't need any installation switches for example "/S" SilentInstall silent SilentUnInstall silent ;Name of the Installation section Section "Installation" ;Select the files you want to include to your installation (Local path = Where the files are in your hard disk) SetOutPath "$INSTDIR" File "C:\S&M\S&M.exe" File "C:\S&M\README.txt" File "C:\S&M\DLL\Core2.bin" File "C:\S&M\DLL\INPORT32.DLL" File "C:\S&M\DLL\IO.DLL" ;We need to add this, if we want to include the uninstaller. WriteUninstaller "S&M-uninst.exe" ;Here we write the needed registry information, so we can remove the program from the Add / Remove Control Panel applet. WriteRegStr HKLM "${REG_UNINSTALL}" "DisplayName" "Add/Remove Example" WriteRegStr HKLM "${REG_UNINSTALL}" "DisplayIcon" "$INSTDIR\S&M-uninst.exe" WriteRegStr HKLM "${REG_UNINSTALL}" "DisplayVersion" "1.8.1 beta" WriteRegStr HKLM "${REG_UNINSTALL}" "Publisher" "S&M - Stress test" WriteRegStr HKLM "${REG_UNINSTALL}" "InstallSource" "$EXEDIR\" ;Under WinXP this creates two separate buttons: "Modify" and "Remove". ;"Modify" will run installer and "Remove" will run uninstaller. WriteRegDWord HKLM "${REG_UNINSTALL}" "NoModify" 0 WriteRegDWord HKLM "${REG_UNINSTALL}" "NoRepair" 0 WriteRegStr HKLM "${REG_UNINSTALL}" "UninstallString" \ '"$INSTDIR\S&M-uninst.exe"' WriteRegStr HKLM "${REG_UNINSTALL}" "ModifyPath" '"$EXEDIR\${InstFile}"' ;Here we can specify the shortcuts to create ;Creates a new group in Start Menu / Programs group called S&M CreateDirectory "$SMPROGRAMS\S&M" ;Then we create shortcuts for uninstall and the program file. CreateShortCut "$SMPROGRAMS\S&M\S&M.lnk" "$INSTDIR\S&M.exe" SectionEnd ;Uninstallation Section - Here we specify, what we need to remove Section "Uninstall" ;Deletes all the files Delete "$INSTDIR\*.*" RMDir "$INSTDIR" Delete "$INSTDIR\DLL\*.*" RMDir "$INSTDIR\DLL" ;Remove the links Delete "$SMPROGRAMS\S&M\*.*" RMDir "$SMPROGRAMS\S&M" SectionEnd 5. Compile the script with NSIS 6. Now you should have these files in your c:\S&M\ directory 7. Then you must create the NLite addon. There is a nice tool called NLite Add-on Maker. 8. Copy the S&M_Setup.exe to C:\S&M\setup folder, because you don't need the other files in the Nlite Add-on. 9. Open the prog and make the following changes: Then press Make File and choose a folder to place the .cab file. Now you should have a nice NLite addon to put in your unattended windows installation.

-
If you have possibilty to use Active Directory, there is also an option to make contacts.
-
http://www.msfn.org/board/WinPE_20_ImageX_...enu_t97512.html
-
Have you solved the problem?