ner
Content Type
Profiles
Forums
Events
Everything posted by ner
-
try... boot into cd: bootrec /fixmbr bootrec /fixboot Or did you already try that? as for the image then It all depends on what type of image you have.. Can you provide the details.... and see this: http://support.dell.com/support/topics/glo...toggle=&dl=
-
I found this on another website and i followed it, and it works 100%... did it for SP1 and then for SP2... 1.Prepare another hard disk or a drive partition (Guide: Change size of existing partition in Vista). 2.Install Windows Vista RTM to the secondary partition or drive (not the main boot or system partition). The primary reason for installing a new copy of Vista in another partition or drive is to ensure that no boot associated files of that computer related to BCD and boot.ini being part of the final Vista DVD image with SP1 integrated. 3.After installation finished, Windows Vista will boot into Out of the Box Experience (OOBE), where users will come to the part after setup that requires users to set up his or her user name, password, general settings and etc. Once in the OOBE phase, type Ctrl-Shift-F3 to enter Audit mode. 4.The system will reboot into Audit mode, and a SysPrep window will pop up and show. Do not close the SysPrep window. 5.Run the Vista SP1 setup installer (e.g. Windows6.0-KB936330-X86-wave0.exe, Windows6.0-KB936330-X64-wave0.exe or Windows6.0-KB936330-X86(x64)-wave0.exe), and let the service pack installation completes. 6.Optionally, users can run a new tool comes with SP1 called Vsp1cln.exe to remove older versions of components that have been upgraded to new versions in SP1 to save disk space. To remove these older RTM files, simply run Vsp1cln.exe via Winkey+R (Run command) or via the command prompt after SP1 is installed. 7.After the completion of SP1 service pack, the users will come back at the main Vista desktop with the SysPrep window open. At the SysPrep selection dialog, select OOBE, Generalize, and then Shut Down the system. 8.Boot the system into a WinPE disk or another OS install (i.e. Windows XP). Do NOT boot back into Vista. 9.Run the following imagex command (imagex can be download here or found in WAIK). Note that GimageX (a gui front-end for imagex) is not supported. imagex /compress maximum /flags "Ultimate" /capture d: c:\install.wim "Windows Vista Ultimate" where d: is the drive Vista is installed on and c:\install.wim is the location to store the new install.wim. Replace “Ultimate” after the /flags switch with whatever edition of Vista installed (supported flags are HomeBasic, HomePremium, Starter, Ultimate, Enterprise, ServerDatacenter, ServerEnterprise and ServerStandardand, all no space between words) to slipstream SP1, and also the drive letter of where Vista is installed and location to save the generated install.wim. 10.Once the image has been built, replace the old install.wim in the Vista RTM ISO in \Sources\ with the newly created install.wim using a registered version of UltraISO (Version 8.0 or higher). Save the ISO and you’re done. You can also rebuild the ISO using vLite by extracting the contents of the Vista RTM ISO to a temporary directory, replacing the install.wim and using vLite’s Vista Burning/ISO creation features. One can also use vLite to remove unwanted features in Vista SP1. Note that the whole process above is to slipstream SP1 into a single edition of Vista. To integrate SP1 into all the editions of Vista, repeat steps above for each edition and use the imagex /append function to build an install.wim that contains all the editions of Vista, and then replace the original install.wim with install.wim with all editions or editions required in the RTM ISO image as per last 2 steps. Link to website http://www.mydigitallife.info/2008/02/15/h...dows-vista-rtm/
-
64 version is here: http://www.microsoft.com/downloads/details...;DisplayLang=en Windows Vista introduces a breakthrough user experience and is designed to help you feel confident in your ability to view, find, and organize information and to control your computing experience. The visual sophistication of Windows Vista helps streamline your computing experience by refining common window elements so you can better focus on the content on the screen rather than on how to access it. The desktop experience is more informative, intuitive, and helpful. And new tools bring better clarity to the information on your computer, so you can see what your files contain without opening them, find applications and files instantly, navigate efficiently among open windows, and use wizards and dialog boxes more confidently. Service Pack 2 for Windows Server 2008 and Windows Vista (SP2) is an update to Windows Vista and Windows Server 2008 that supports new kinds of hardware and emerging hardware standards, and includes all updates delivered since SP1. SP2 simplifies administration by enabling IT administrators to deploy and support a single service pack for clients and servers. SP2 is an update to Windows Server 2008 and Windows Vista that incorporates improvements discovered through automated feedback, as well as updates that have been delivered since SP1. By providing these fixes integrated into a single service pack for both client and server, Microsoft provides a single high-quality update that minimizes deployment and testing complexity for customers. Service Pack 1 is a prerequisite for installing Service Pack 2. Please make sure that your system is running Service Pack 1 before you install Service Pack 2. Note: Windows Server 2008 released with Service Pack 1 included. Windows Vista SP1 information and downloads can be found on the Windows Vista SP1 TechNet page. Homepage - http://microsoft.com
-
Microsoft has released SP2 http://www.microsoft.com/downloads/details...;DisplayLang=en
-
Hi all, Well time has come for me to wipe my hard drive and re-install my system, Now i have been using AVG Free for the past year or so and was just wondering what everone else was using... So Let me have the news on the best Free antivirus your using...
-
Commands for working with Windows PE 3.0 and the new WAIK
ner replied to paxamime's topic in Windows PE
All I did was to create a bat file (cmd file) and run as admin! Creates a new CD Image in about 2/3 mins.. I have attached my file for you CREATECD_V2.CMD -
Thank you so much! Worked 100%
-
Thanks IcemanND: Just updated and testing now..
-
I followed this guidance from MS http://technet.microsoft.com/en-gb/library/bb887430.aspx created my test lab, created an image using ghost 11.5 and the created a winpe3.0 cd, works all ok, took a day and half to complete and test
-
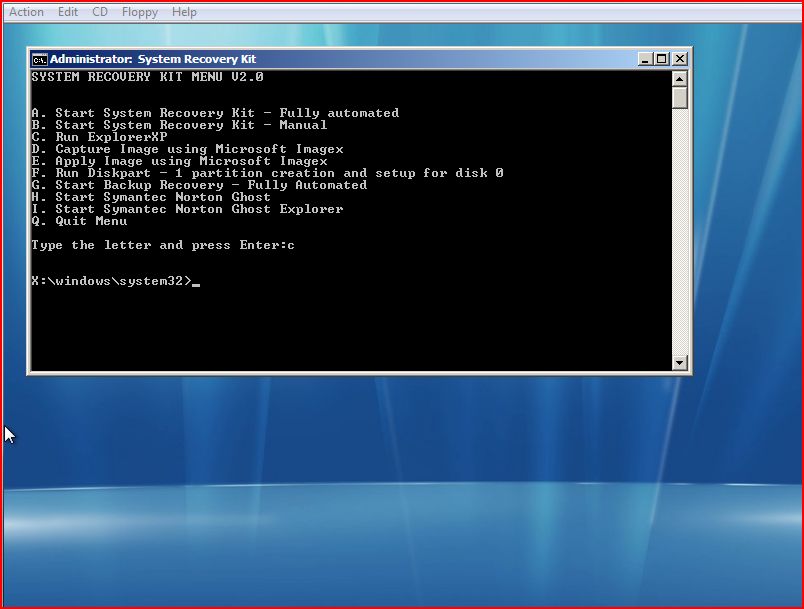
the menu code is here: @ECHO OFF CLS :LOOP ECHO.SYSTEM RECOVERY KIT MENU V2.0 ECHO. ECHO. ECHO A. Start System Recovery Kit - Fully automated ECHO B. Start System Recovery Kit - Manual ECHO C. Run ExplorerXP ECHO D. Capture Image using Microsoft Imagex ECHO E. Apply Image using Microsoft Imagex ECHO F. Run Diskpart - 1 partition creation and setup for disk 0 ECHO G. Start Backup Recovery - Fully Automated ECHO H. Start Symantec Norton Ghost ECHO I. Start Symantec Norton Ghost Explorer ECHO Q. Quit Menu ECHO. :: SET /P prompts for input and sets the variable :: to whatever the user types SET Choice= SET /P Choice=Type the letter and press Enter: :: The syntax in the next line extracts the substring :: starting at 0 (the beginning) and 1 character long IF NOT '%Choice%'=='' SET Choice=%Choice:~0,1% ECHO. :: /I makes the IF comparison case-insensitive IF /I '%Choice%'=='A' GOTO ItemA IF /I '%Choice%'=='B' GOTO ItemB IF /I '%Choice%'=='C' GOTO ItemC IF /I '%Choice%'=='D' GOTO ItemD IF /I '%Choice%'=='E' GOTO ItemE IF /I '%Choice%'=='F' GOTO ItemF IF /I '%Choice%'=='G' GOTO ItemG IF /I '%Choice%'=='H' GOTO ItemH IF /I '%Choice%'=='I' GOTO ItemI IF /I '%Choice%'=='Q' GOTO End ECHO "%Choice%" is not valid. Please try again. ECHO. GOTO Loop :ItemA RECOVERY32.EXE -clone,MODE=restore,SRC=R:\IMAGE.GHO,dst=1 -sure -quiet -span -RB GOTO Again :ItemB RECOVERY32.EXE GOTO END :ItemC Explorerxp.exe /s GOTO END :ItemD imagex_capture.cmd GOTO END :ItemE imagex_apply.cmd goto END :Itemf Diskpart.cmd goto END :ItemG GHOST32.EXE -clone,MODE=restore,SRC=D:\BACKUP.GHO,dst=1 -sure -quiet -span -RB goto END :ItemH GHOST32.EXE goto END :ItemI GHOSTexp.EXE goto END :QUIT :End see i have updated the last switch on the ghost command to read -rb and have taken away the -fx - this re-boots the pc OK, but i wanted to go back to the menu, but i get back to the cmd prompt, if i type in "Menu" it works...
-
Hi all, I have created a new bootable CD under WinPE 3.0 and have also created a simple menu (thanks to you all at MSFN) and it works all OK. The only issue I have is that after restoring the image, Ghost exits back to the cmd prompt, and in order to restart the system i need to type in "Exit". Does anyone know what i can do, i have attached the menu screenshot and the ghost command used is~: GHOST32.EXE -clone,MODE=restore,SRC=R:\IMAGE.GHO,dst=1 -sure -quiet -span -FX (now the -rb switch used by ghost will restart the PC, but i want to go back to the main menu- can this be done?)

-
Commands for working with Windows PE 3.0 and the new WAIK
ner replied to paxamime's topic in Windows PE
Many Thanks Jazkal, Its was that problem. Thanks. Fully created a working version now, although i was unable to install any packages, as it said the package was not able to install for the veriosn? Anyway, woked for what i needed it to do, which was to install images via Ghost 11.5 Here is my C<D File for anyone that needs it.... RD /s/q C:\PE\winpe_x86 cd "c:\Program files\windows aik\tools\petools" call copype.cmd x86 C:\PE\winpe_x86 pause copy c:\PE\winpe_x86\winpe.wim c:\PE\winpe_x86\ISO\Sources\boot.wim pause cd "C:\Program Files\Windows AIK\Tools\x86\Servicing" Dism /Mount-Wim /WimFile:C:\PE\winpe_x86\ISO\Sources\boot.wim /index:1 /MountDir:C:\PE\winpe_x86\mount pause cd "C:\Program Files\Windows AIK\Tools\x86\Servicing" Dism /image:C:\PE\winpe_x86\mount /Add-Package /PackagePath:"C:\Program Files\Windows AIK\Tools\PETools\x86\WinPE_FPs\en-us\WinPE-HTA_en-us.cab" Dism /image:C:\PE\winpe_x86\mount /Add-Package /PackagePath:"C:\Program Files\Windows AIK\Tools\PETools\x86\WinPE_FPs\en-us\winpe-legacysetup_en-us.CAB" Dism /image:C:\PE\winpe_x86\mount /Add-Package /PackagePath:"C:\Program Files\Windows AIK\Tools\PETools\x86\WinPE_FPs\en-us\winpe-mdac_en-us.CAB" Dism /image:C:\PE\winpe_x86\mount /Add-Package /PackagePath:"C:\Program Files\Windows AIK\Tools\PETools\x86\WinPE_FPs\en-us\winpe-scripting_en-us.cAB" Dism /image:C:\PE\winpe_x86\mount /Add-Package /PackagePath:"C:\Program Files\Windows AIK\Tools\PETools\x86\WinPE_FPs\en-us\winpe-setup_en-us.cAB" Dism /image:C:\PE\winpe_x86\mount /Add-Package /PackagePath:"C:\Program Files\Windows AIK\Tools\PETools\x86\WinPE_FPs\en-us\winpe-wds-tools_en-us.CAB" Dism /image:C:\PE\winpe_x86\mount /Add-Package /PackagePath:"C:\Program Files\Windows AIK\Tools\PETools\x86\WinPE_FPs\en-us\winpe-wmi_en-us.CAB" Dism /image:C:\PE\winpe_x86\mount /Add-Package /PackagePath:"C:\Program Files\Windows AIK\Tools\PETools\x86\WinPE_FPs\en-us\winpe-PPPOE_en-us.CAB" PAUSE Copy D:\MakePE3\Windows\System32\*.* C:\PE\Winpe_x86\Mount\Windows\System32 Copy D:\MakePE3\Icon\*.* C:\PE\Winpe_x86\ISO pause cd "C:\Program Files\Windows AIK\Tools\x86\Servicing" Dism /Unmount-Wim /MountDir:C:\PE\winpe_x86\mount /Commit PAUSE cd "C:\Program Files\Windows AIK\Tools\x86" oscdimg -n -bc:\PE\winpe_x86\etfsboot.com c:\PE\winpe_x86\ISO c:\PE\winpe_x86\winpe_x86.iso PAUSE -
Commands for working with Windows PE 3.0 and the new WAIK
ner replied to paxamime's topic in Windows PE
Having REAL problems creating my image This is my command: rd /s/q C:\PE\winpe_x86 cd c:\Program files\windows aik\tools\petools call copype.cmd x86 C:\PE\winpe_x86 pause cd C:\Program Files\Windows AIK\Tools\x86\Servicing\ Dism.exe /Mount-Wim /WimFile:C:\PE\winpe_x86\winpe.wim /index:1 /MountDir:C:\PE\winpe_x86\mount\ pause cd C:\Program Files\Windows AIK\Tools\x86\Servicing\ Dism /image:C:PE\winpe_x86\mount /Add-Package /PackagePath:C:\Program Files\Windows AIK\Tools\PETools\x86\WinPE_FPs\en-us\WinPE-HTA_en-us.cab PAUSE Copy c:\MakePE3\Windows\System32\*.* C:\PE\Winpe_x86\Mount\Windows\System32 Copy c:\MakePE3\Icon\*.* C:\PE\Winpe_x86\ISO pause cd C:\Program Files\Windows AIK\Tools\x86\Servicing\ Dism /Unmount-Wim /MountDir:C:\PE\winpe_x86\mount /Commit PAUSE copy c:\PE\winpe_x86\winpe.wim c:\PE\winpe_x86\ISO\sources\boot.wim PAUSE cd C:\Program Files\Windows AIK\Tools\x86\ oscdimg -n -bc:\PE\winpe_x86\etfsboot.com c:\PE\winpe_x86\ISO c:\PE\winpe_x86\winpe_x86.iso PAUSE and i get this error: see attachment
-
This the cmd file that I use, I call this from a menu.... that is loaded during the loading of vistape (Winpe 2) This allows me then to choose which image i wish to install on the PC that I am working on... That way you still have control.. @echo off cd /d %~dp0 set imgx=%cd% if not exist "%cd%\imagex.exe" goto _notexist goto _main :_notexist echo. echo IMAGEX.EXE executable not found. Please ensure that IMAGEX_APPLY.CMD echo is in the same folder as IMAGEX.EXE before executing this script. echo This script will now exit. echo. pause exit :_main echo. echo. echo. echo [i M A G E X A P P L Y M A I N M E N U] echo. echo 1) Specify or change source path (the path to you .wim image file) echo Source: [%_asource%] echo. echo 2) Specify or change target path, where your image will be restored echo Target: [%_atarget%] echo. echo 3) Specify or change index you want to restore (a number, such as 2) echo Index: [%_index%] echo. if "%_asource%" == "" goto _menu1 if "%_atarget%" == "" goto _menu1 if "%_index%" == "" goto _menu1 echo 4) Apply your image now where ready echo From [%_asource%] To [%_atarget%] echo. :_menu1 echo Q) Quit. R) Reset all variables. echo. :_mainch set _ok= set /p _ok=Enter your choice: if "%_ok%" == "1" goto _getsrc if "%_ok%" == "2" goto _gettarget if "%_ok%" == "3" goto _getindex if "%_ok%" == "4" goto _apply if /I "%_ok%" == "q" goto _end if /I "%_ok%" == "r" goto _reset goto _mainch :_getsrc set _ok= echo. echo Specify location of source image to restore with full path. set /p _ok=Enter Source path: for %%A in (%_ok%) do set _ext=%%~xA if not exist %_ok% ( echo. echo --------------------------------------------------------- echo Path does not exist. Please input a valid location again. echo --------------------------------------------------------- goto _getsrc ) else ( if /I "%_ext%"==".wim" ( set _asource=%_ok% setx _asource %_ok% goto _main ) else ( echo. echo --------------------------------------------------------------- echo Error: The path "%_ok%" does not seem to be a valid .wim image file. echo --------------------------------------------------------------- goto _getsrc pause ) ) :_gettarget set _ok= echo. echo Specify target to install source image with full path. set /p _ok=Enter Target path: if exist "%_ok%" ( set _atarget=%_ok% setx _atarget %_ok% ) else ( echo. echo --------------------------------------------------------------- echo Error: The path "%_ok%" is not a correct location. echo --------------------------------------------------------------- goto _gettarget pause ) goto _main :_getindex set _ok= echo. echo Specify image index with number set /p _ok=Enter Index number: set _index=%_ok% setx _index %_ok% goto _main :_apply echo. echo. "%imgx%\imagex.exe" /apply "%_asource%" %_index% "%_atarget%" echo. pause goto _end :_reset set _asource= set _index= set _atarget= goto _main :_end
-
I had the same isssued, but overcame this by making a VistaPe Disk and used Symantec Ghost to create/resture the image.... However the smallest size I could get was 5 GB
-
Make your life very easy and use this : http://www.windowsupdatesdownloader.com/
-
$OEM$ Distribution Folders and VMWare
ner replied to dr_pr0phet's topic in Unattended Windows 2000/XP/2003
Good news - I am pleased for you - lets us all know how you do! -
$OEM$ Distribution Folders and VMWare
ner replied to dr_pr0phet's topic in Unattended Windows 2000/XP/2003
\ok, if you search and using the fault message given "the manufacturer provided file that setup is trying to use is corrupted", you will see that this is common with SATA & Raid controller errors, post your TXTSETUP.SIF Files.. I just added tis to the end of the file... [sourceDisksFiles] iaStor.sys = 100,,,,,,3_,4,1,,,1,4 [HardwareIdsDatabase] PCI\VEN_8086&DEV_27C3&CC_0104 = "iaStor" [sCSI.load] iaStor = iaStor.sys,4 [scsi] iaStor = "Intel® 82801GR/GH SATA RAID Controller (Desktop ICH7R/DH)" -
$OEM$ Distribution Folders and VMWare
ner replied to dr_pr0phet's topic in Unattended Windows 2000/XP/2003
how are you installing the sata drivers and can you post your winnt.sif file? this is my file ;SetupMgrTag [Data] AutoPartition=0 MsDosInitiated="0" UnattendedInstall="Yes" AutomaticUpdates=yes [unattended] UnattendMode=FullUnattended OemSkipEula=Yes OemPreinstall=Yes TargetPath=\WINDOWS UnattendSwitch=Yes WaitForReboot=No Keyboardlayout="United Kingdom" OemPnPDriversPath="Drivers\000_intel_INF;Drivers\001_Intel_LAN;Drivers\002_Intel_WLAN;Drivers\003_Nvidia;Drivers\004_Monitor;Drivers\005_HP_Media;Drivers\006_SATA_RAID" DriverSigningPolicy=Ignore [GuiUnattended] AdminPassword= EncryptedAdminPassword=NO OEMSkipRegional=1 TimeZone=85 OemSkipWelcome=1 [userData] ProductKey=xxxxxxxxxxxxxxxxxxxxxxxx FullName=xxxxxxxxxxxxxxxxxxxxxxxxxx OrgName="" ComputerName=xxxxx [Display] BitsPerPel=32 Xresolution=1440 YResolution=900 Vrefresh=60 [TapiLocation] CountryCode=44 Dialing=Tone AreaCode=XXXXX [RegionalSettings] LanguageGroup=1 Language=00000809 [identification] JoinWorkgroup=WORKGROUP [Networking] InstallDefaultComponents=Yes [Components] msmsgs=off msnexplr=off -
$OEM$ Distribution Folders and VMWare
ner replied to dr_pr0phet's topic in Unattended Windows 2000/XP/2003
H, You need to ensure that you have this within your [unattended] UnattendMode=FullUnattended OemSkipEula=Yes OemPreinstall=Yes TargetPath=\WINDOWS UnattendSwitch=Yes WaitForReboot=No install will then place your programs in the c:\install folder -
maxtor external hard drive dropped
ner replied to mystreetgang's topic in Hard Drive and Removable Media
Let us know what the Maxtor model is, as i have done a few drive rescues myself... -
Many thanks great help All sorted now, fully working Cheers
-
Cananyone help me out here; Under Winpe (Vista) I am runniung ghost as my recovery program. This is my switch command: Ghost32.exe -clone,MODE=restore,SRC=1:2\BACKUP.GHO,dst=1:1 -sure -quiet -span -FX Partition 1 on disk 1 is the C:\ drive Partition 2 on disk 1 is the D:\ drive ( on this drive i have ghost image called backup.gho only Program runs fine, finds and then restores the backup image. However after the recovery has taken place I do not have a second parttion, just 1 now the "Backup.gho!" image is now siting on the C:\ drive also? I thought that my switch said recover image to Disk 1: Partition 1 ?
-
Did anyone have any ideas on the best option?
-
What better for the creation of a partition on a new hard drive. I will be installing Vista on a new hard drive, and what to know which is the better option. A: Use Diskpart and create & Format hard drive before Vista Install commences or B: Just put in DVD and then allow Vista setup to create & format.