ner
Content Type
Profiles
Forums
Events
Everything posted by ner
-
Hi All, Well many people still ask about Windows Mail as featured within Vista, So you may be intrested to know that you can have it running under windows 7. This is what i did 1. Copied msoe.dll from our vista installation 2. used ExplorerXP to replace copy within c:\Program Files\Windows Mail\ 3. ran this at command prompt "attrib -s -h WinMail.exe" which unhide the file 4. Created desktop shortcut and thats it working windows mail 5. Ran the registry update, to make mail default - which you can get from the link below http://www.geek.im/e107_plugins/forum/forum_viewtopic.php?666 you can also get "Explorerxp" by google or just follow the other method within the link
-
Hello, Thanks for your reply, Yes i do have AIK installed under windows 7 (version 3.0) batch file worked fully under Vista. However if i call the call copype.cmd from the command promt it works, if i then delete this part from my batch file the rest all works, but i dont understand why? i also need to run this command from the command promt as it dos not work from the batch file: oscdimg -n -bc:\PE\winpe_x86\etfsboot.com c:\PE\winpe_x86\ISO c:\PE\winpe_x86\winpe_x86.iso does windows 7 look at batch files differently then?
-
attachment

-
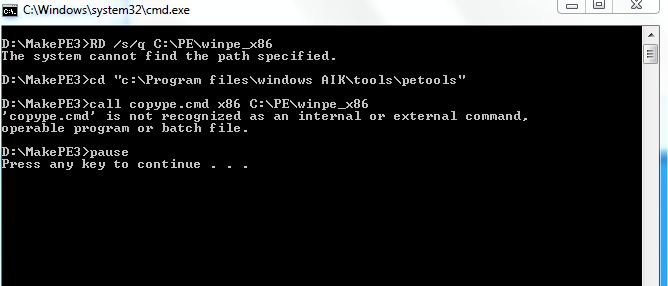
Hi All I have created this cmd file that makes a custom ghost recovery disk, however this does not work on windows 7 builds: here is teh scrip: D /s/q C:\PE\winpe_x86 cd "c:\Program files\windows AIK\tools\petools" call copype.cmd x86 C:\PE\winpe_x86 pause copy c:\PE\winpe_x86\winpe.wim c:\PE\winpe_x86\ISO\Sources\boot.wim pause cd "C:\Program Files\Windows AIK\Tools\x86\Servicing" Dism /Mount-Wim /WimFile:C:\PE\winpe_x86\ISO\Sources\boot.wim /index:1 /MountDir:C:\PE\winpe_x86\mount PAUSE Copy D:\MakePE3\Windows\System32\*.* C:\PE\Winpe_x86\Mount\Windows\System32 Copy D:\MakePE3\Icon\*.* C:\PE\Winpe_x86\ISO pause cd "C:\Program Files\Windows AIK\Tools\x86\Servicing" Dism /Unmount-Wim /MountDir:C:\PE\winpe_x86\mount /Commit PAUSE cd "C:\Program Files\Windows AIK\Tools\x86" oscdimg -n -bc:\PE\winpe_x86\etfsboot.com c:\PE\winpe_x86\ISO c:\PE\winpe_x86\winpe_x86.iso PAUSE and we get this error, see attachment please. If i manually follow the patch its all correct, so is something wrong with te commands
-
ok many thanks will try and copy yours into the a AutoUnattend.xml, and test that woks, thanks
-
just remove everything you don't want except DriverPaths and the <settings pass="offlineServicing">pass, you can remove all other '<settings pass=', drop xml on root of dvd and Win setup will place Driver folder on root of drive and the xml part points Win where to find. Thats easiest way disregard I see you using a Tool Many thanks for your reply, that will do the trick, i am just going try it out, as do not really want to use any tools, like the idea of having the drivers within a dir so that i can update them easily. thank you can not get this to work, see my xlm what is wrong please help? component name="Microsoft-Windows-PnpCustomizationsNonWinPE" processorArchitecture="Intel" publicKeyToken="31bf3856ad364e35" language="neutral" versionScope="nonSxS" <DriverPaths>OEm,/Drivers <PathAndCredentials wcm:action="add" wcm:keyValue="1"> <Path>%systemdrive%\Drivers</Path> </PathAndCredentials> </DriverPaths> </component>
-
Update Selected the correct index number = 5 ran to incluide 35 updates and 19 drivers and works. However I am going to use the prefered method of placing the drivers within OEm and call them through the xlm file, as it easier to update and manage the drivers going forward. But a really good tool, just some feedback for you by pressing the "More Info" button you get an empty folder called "DISM" on your desktop not sure what this is all about. But never the less a good tool!
-
just remove everything you don't want except DriverPaths and the <settings pass="offlineServicing">pass, you can remove all other '<settings pass=', drop xml on root of dvd and Win setup will place Driver folder on root of drive and the xml part points Win where to find. Thats easiest way disregard I see you using a Tool Many thanks for your reply, that will do the trick, i am just going try it out, as do not really want to use any tools, like the idea of having the drivers within a dir so that i can update them easily. thank you
-
Which image did you mount ? My guess is you mounted image #1, but actually meant to mount image #4 or #5 (ultimate x64,x86 respectively). x86 default to this. starter =1 home basic =2 home premium =3 pro=4 ultimae=5 x64 is different. (because it has no starter image) home basic =1 home premium =2 pro=3 ultimae=4 To verify this, try installing either starter/homebasic into your VM and see whether or not the drivers/updates worked on that image. If yes, then just repeat the process on the proper image (for ultimate it is either #4 or #5) and you will be good to go. I see i selected 1 so not seen in installed version which is 5 - so sorry , maybe put this info on post 1? thanks
-
not able to view or download your vides either
-
followed, and injected 35 updates and also 19 drivers all reported at 100% suc, then committed and un-mounted copy install.wim backto dvd over write old file, and re-installed under virtual pc, not one of the updates installed nor can i see any drivers. so what has gone wrong i wonder - maybe an issue with commit??>
-
thanks for you help, but i am not looking to injet them into the install.wim, was really looking to use the oem/drivers folder option, but just need to get windows where to find and install the drivers, see i dont want an unattended install either
-
may thanks think i will use this method, however all i need is a very simple xml to tell windows the drivers to load, how do i do this please
-
thanks for the quick reply, any tutorials about both?
-
Hi all, I am looking for a manual way to include my drivers into the original windows 7 dvd, i dont want to use any applications just want windows to install my drivers. which are: chipset, display, sound, monitor, keyboard & mouse Any ideas please?
-
Hi All, Does anyone know of any problems with Vista Formatting an external Flashdrive that is only 2GB but took 2hours and 23mins to format as FAt32 under Vista?? The same Flashdrive only took 14 mins under xp? Thanks Nick
-
This is what i used, created 32 bit, just change the folder for the 64bit version, copy below into cmd file and run after installing winpe 3.0 RD /s/q C:\PE\winpe_x86 cd "c:\Program files\windows aik\tools\petools" call copype.cmd x86 C:\PE\winpe_x86 pause copy c:\PE\winpe_x86\winpe.wim c:\PE\winpe_x86\ISO\Sources\boot.wim pause cd "C:\Program Files\Windows AIK\Tools\x86\Servicing" Dism /Mount-Wim /WimFile:C:\PE\winpe_x86\ISO\Sources\boot.wim /index:1 /MountDir:C:\PE\winpe_x86\mount PAUSE Copy D:\MakePE3\Windows\System32\*.* C:\PE\Winpe_x86\Mount\Windows\System32 Copy D:\MakePE3\Icon\*.* C:\PE\Winpe_x86\ISO pause cd "C:\Program Files\Windows AIK\Tools\x86\Servicing" Dism /Unmount-Wim /MountDir:C:\PE\winpe_x86\mount /Commit PAUSE cd "C:\Program Files\Windows AIK\Tools\x86" oscdimg -n -bc:\PE\winpe_x86\etfsboot.com c:\PE\winpe_x86\ISO c:\PE\winpe_x86\winpe_x86.iso PAUSE
-
anyone with any other ideas?
-
windows vista is the operating system and using ghost 11.5. thought i should just you something "killdisk" to clean mtf before ghosting, that i think is the solution???
-
Hi All, I have now created my master installation image using symantec ghost - No Probles works a treat. However I habe noticed that the new cumputers that have had this new image applied too, have listed deleted files that were removed from the master PC. No I suspect that the issue is that the MFT is still stoing these file names, so I am wondering what can i do to clean these out before making another image of the master PC. Dont really want to go and but a problem to do a clean, so any freeware or can anyone help..... Cheers
-
Ms Excel is also a sulution for you, you can great a simple prof looking gant chart, and also do some formating to confirm if on time = green, amber = for late but in hand, and red for show stopper....
-
Does anyone know how long Diskpart takes using the "Clean All" switch? Want to run t on a 200gig drive
-
im trying to slipstream applications i need serious help
ner replied to ledgar11's topic in Application Installs
I have posted what i use to use to install @echo off TITLE Installing Microsoft XP Media Centre Software Updates ECHO. echo =============================================================================== echo I N S T A L L I N G S O F T W A R E U P D A T E S echo =============================================================================== echo. ECHO build Date 27.10.2006 V6.3 ECHO. echo Please wait.... echo. echo. ECHO Installing Microsoft .NET Framework 1.1 start /wait dotnetfx.exe /q:a /C:"install /l /q" ECHO. ECHO Done! echo. ECHO Installing Microsoft .NET Framework 1.1 SP1 - KB867460 start /wait KB867460.EXE /Q ECHO. ECHO Done! echo. ECHO Installing Microsoft .NET Framework 2.0 start /wait dotnetfx_2.EXE /q:a /C:"install /l /q" ECHO. ECHO Done! echo. ECHO Installing Microsoft Windows Update V6 start /wait WindowsUpdate.exe /wuforce /quiet /norestart ECHO. ECHO Done! echo. ECHO. ECHO. CLS ECHO. ECHO. echo =============================================================================== echo I N S T A L L A T I O N H A S N O W F I N I S H E D echo =============================================================================== echo. ECHO All Done!! ECHO. ECHO. ECHO Press Enter To Restart Windows Now!! ECHO. ECHO. PAUSE But you will need to get the switches for each of the applications you are wanting to install and then use a cmd file or use runonce to install.. -
follow this it works 100%, happy stuff 1.Prepare another hard disk or a drive partition (Guide: Change size of existing partition in Vista). 2.Install Windows Vista RTM to the secondary partition or drive (not the main boot or system partition). The primary reason for installing a new copy of Vista in another partition or drive is to ensure that no boot associated files of that computer related to BCD and boot.ini being part of the final Vista DVD image with SP1 integrated. 3.After installation finished, Windows Vista will boot into Out of the Box Experience (OOBE), where users will come to the part after setup that requires users to set up his or her user name, password, general settings and etc. Once in the OOBE phase, type Ctrl-Shift-F3 to enter Audit mode. 4.The system will reboot into Audit mode, and a SysPrep window will pop up and show. Do not close the SysPrep window. 5.Run the Vista SP1 setup installer (e.g. Windows6.0-KB936330-X86-wave0.exe, Windows6.0-KB936330-X64-wave0.exe or Windows6.0-KB936330-X86(x64)-wave0.exe), and let the service pack installation completes. 6.Optionally, users can run a new tool comes with SP1 called Vsp1cln.exe to remove older versions of components that have been upgraded to new versions in SP1 to save disk space. To remove these older RTM files, simply run Vsp1cln.exe via Winkey+R (Run command) or via the command prompt after SP1 is installed. 7.After the completion of SP1 service pack, the users will come back at the main Vista desktop with the SysPrep window open. At the SysPrep selection dialog, select OOBE, Generalize, and then Shut Down the system. 8.Boot the system into a WinPE disk or another OS install (i.e. Windows XP). Do NOT boot back into Vista. 9.Run the following imagex command (imagex can be download here or found in WAIK). Note that GimageX (a gui front-end for imagex) is not supported. imagex /compress maximum /flags "Ultimate" /capture d: c:\install.wim "Windows Vista Ultimate" where d: is the drive Vista is installed on and c:\install.wim is the location to store the new install.wim. Replace “Ultimate” after the /flags switch with whatever edition of Vista installed (supported flags are HomeBasic, HomePremium, Starter, Ultimate, Enterprise, ServerDatacenter, ServerEnterprise and ServerStandardand, all no space between words) to slipstream SP1, and also the drive letter of where Vista is installed and location to save the generated install.wim. 10.Once the image has been built, replace the old install.wim in the Vista RTM ISO in \Sources\ with the newly created install.wim using a registered version of UltraISO (Version 8.0 or higher). Save the ISO and you’re done. You can also rebuild the ISO using vLite by extracting the contents of the Vista RTM ISO to a temporary directory, replacing the install.wim and using vLite’s Vista Burning/ISO creation features. One can also use vLite to remove unwanted features in Vista SP1. Note that the whole process above is to slipstream SP1 into a single edition of Vista. To integrate SP1 into all the editions of Vista, repeat steps above for each edition and use the imagex /append function to build an install.wim that contains all the editions of Vista, and then replace the original install.wim with install.wim with all editions or editions required in the RTM ISO image as per last 2 steps.
-
try this too... I found the Factory.wim file on the recovery partition and want to upgrade/replace the WIM file with a new (32 bit OS /w applications) image. I have extracted the image ("imageX.exe /extract d:dell\image\Factory.wim 1 e:\Factory.wim") and I am currently trying to mount the image using "imageX.exe /mount e:\Factory.wim 1 e:\image" but to no avail. All I get is: ---------------- ImageX Tool for Windows Copyright © Microsoft Corp. 1981-2005. All rights reserved. Mounting: [E:\image\newfile.wim, 1] -> [E:\tmp] Error mounting image: The system cannot find the file specified. ---------------- I am running the cmd as Administrator. SOLVED mounting problem.: I forgot to install the "wimfltr.inf" found in the same folder as the imageX.exe file. Now I can see the image.