.jpg.9546155c367e4d0091119679176333c9.jpg)
Youssef Pro
Content Type
Profiles
Forums
Events
Everything posted by Youssef Pro
-
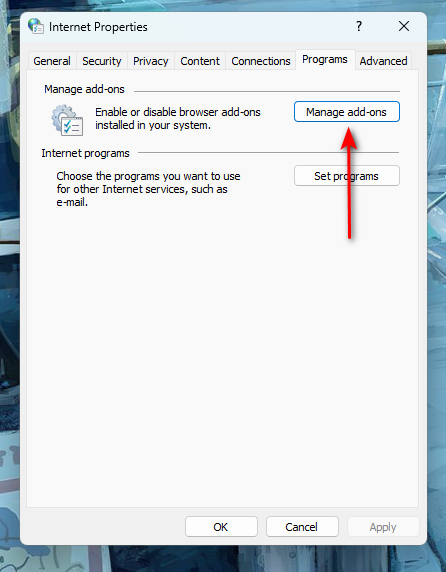
According to what Microsoft said a while ago, it has permanently deleted its old browser, Internet Explorer, but you can find the remains of its hidden roots. Of course, you will not find the browser in the system files or in the programs folder or elsewhere, but you can do some other things to show it, but there is a hidden and easy way. Just search for Internet Options in the search bar or press Win + R to open Run and type "inetcpl. cpl" Then go to the program tab and click on Manage add-ons. Then, at the bottom, click on the label link that says "Learn more about toolbars and extensions." Then the browser will open with you normally, but you cannot find the place from which you started it, whether from the task manager, but you can use it normally for any specific circumstances or work.

-
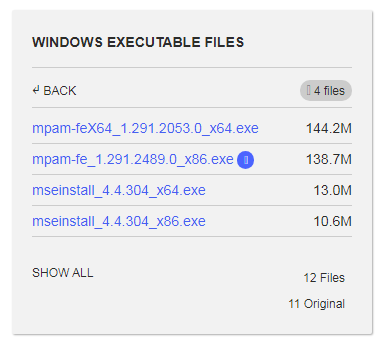
.thumb.jpg.1cc006cd4af6175c5cf3ddeea690ed09.jpg) You can download it from here: https://archive.org/details/mse-4.4.304-x86_x64
You can download it from here: https://archive.org/details/mse-4.4.304-x86_x64
-
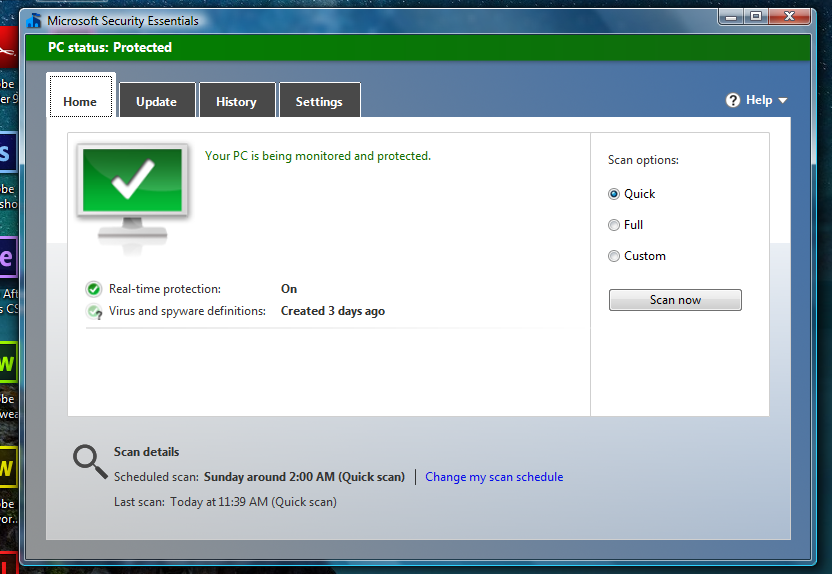
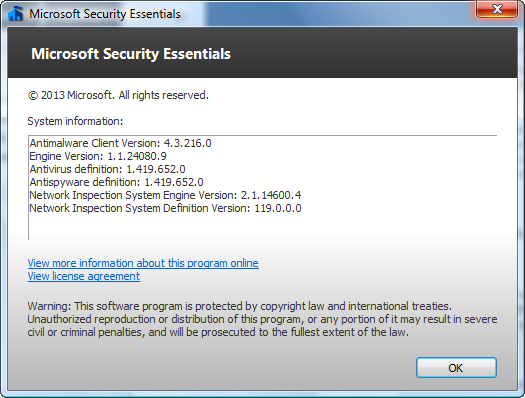
Full explanation (follow the explanation step by step to work with you correctly) First we will need some things including 1 - Microsoft Security Essentials whether you want the 2013 version or the latest (note I am working with the 2013 version and it works very well for me unlike the latest version there were some problems with the antivirus updates) Download links Microsoft Security Essentials x86 (2013 Release) Download Version - 32 Bit Microsoft Security Essentials x64 (2013 Release) Download Version - 64 Bit KB4474419 Update (x86) KB4474419 Update (x64) 2 - Windows update, which is KB4474419, which will be required to be able to work on the program First, you will download the KB4474419 update for the 32 or 64-bit system. Make sure what you have first Just click on the (Computer) icon and choose Properties to show you the information or from the control panel Then restart the device after updating the program Important note for those concerned - you can also get this update and some Windows Vista updates and other Microsoft products with Legacy Update Tool After installing the update, you must now start installing the program after installing it and opening it from the main interface, go to the (Update) tab, then update your antivirus and you will only wait a few minutes After that, congratulations, the program is ready to work with it
-
Share your Microsoft Windows Vista Experience!
Youssef Pro replied to Win10-Hater's topic in Windows Vista
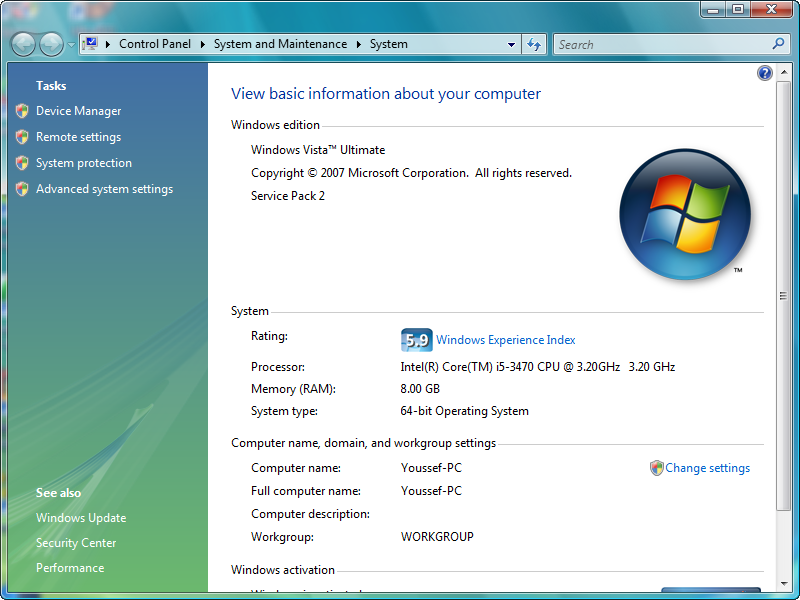
My Experience My specs: PC - HP Compaq Elite 8300 SFF Intel(R) Core(TM) i5-3470 CPU 8 GB DDR3 RAM 500 GB Western Digital Blue HDD Windows Vista Ultimate SP2 x64 My experience with Vista: I started using Vista only about 14 Years ago and before that, I knew nothing about Vista, but I immediately fell in love with it. Now I use Vista on 2 of my computers, one being the Latitude and another desktop with: Note I have a system that is running: Windows Vista Ultimate SP2 X64 and another Windows 7 Ultimate SP1 X64 Tell us your experience in comments + Good luck to everyone
-
Share your Microsoft Windows Vista Experience!
Youssef Pro replied to Win10-Hater's topic in Windows Vista
My specs: PC - HP Compaq Elite 8300 SFF Intel(R) Core(TM) i5-3470 CPU 8 GB DDR3 RAM 500 GB Western Digital Blue HDD Windows Vista Ultimate SP2 x64 build 6003 My experience with Vista: I started using Vista only about 14 Years ago and before that, I knew nothing about Vista, but I immediately fell in love with it. Now I use Vista on 2 of my computers, one being the Latitude and another desktop with:
-
Windows comes with many settings. You can control the settings through the Control Panel or from the Settings application But you can also collect all Windows 7 settings in one place by creating a “God Mode” Here are the categories of tools you'll find in God Mode: Administrative Tools AutoPlay Backup and Restore Color Management Credential Manager Date and Time Devices and Printers Ease of Access Center File Explorer Options File History Fonts Indexing Options Infrared Internet Options Keyboard Mouse Network and Sharing Center Pen and Touch Phone and Modem Power Options Programs and Features Region RemoteApp and Desktop Connections Security and Maintenance Sound Speech Recognition Storage Spaces Sync Center System Tablet PC Settings Taskbar and Navigation Troubleshooting User Accounts Windows Defender Firewall Windows Mobility Center Work Folders What is God Mode God Mode gives you access to all management features in one place and is still better than modern Windows 10 & Windows 8.1 settings. Where you can control all Windows settings and features from one place without going into many pages As you can see in the screenshot above, God Modes UI is based on the Control Panel layout and is designed to help you quickly configure Windows settings from a single screen. How to enable God mode in Windows 7 | Also applies to Windows 8 & 8.1 & 10 1 - To access God Mode in Windows 10, you need to create a special shortcut folder on your desktop 2 - On the desktop, right-click anywhere. 3 - Select the "Create a new folder" option. 4 - Right-click on the new folder. 5 - Rename the folder and copy the following command and give the folder that name GodMode.{ED7BA470-8E54-465E-825C-99712043E01C} GodMode folder
-
Show/Hide Hotkey: This option allows the user to show/hide the FPS by using the hotkey. Position Hotkey: This option allows the user to change the position of FPS by using the hotkey. Show FPS Overlay: This option allows the user to show FPS (Frames Per Second) or not. Hotkey: This option allows the user to enable or disable the FPS limit by using the hotkey. Set FPS limit to: This option enables or disables the FPS limit option. OO FPS: The user can control the FPS. (If you have a low-performance computer, reduce this FPS number from 60 to 30) Only when capturing: When this option is checked, the FPS will be restricted only when the streaming video is being recorded. On the other hand, when this option is unchecked, the recording target is restricted by the FPS number. * Tip) This [FPS] tab can be seen in 'Game Recording' mode, and it will disappear in 'Screen Recording' mode. FPS means "Frames Per Second". The FPS tab allows you to control the frames per second of the recording target.
-
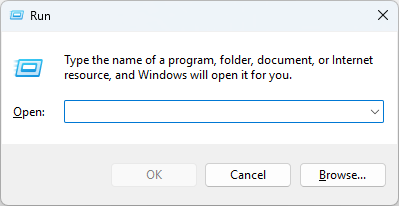
Hello my friend, I hope you are well First, open up Notepad by pressing Windows Key + R to open Run and type notepad to get a new Notepad window. Paste the following text: Windows Registry Editor Version 5.00 [HKEY_LOCAL_MACHINE\SYSTEM\WPA\PosReady] "Installed"=dword:00000001 Save the file with CTRL + S — name it whatever you like, but be sure that it ends in .reg to make it a Registry file. Double-click the new file and confirm adding it to the Registry. Now, you can restart the computer to re-enable automatic updates, or open the Start Menu and choose All Programs > Windows Update to check for updates on the web manually. You should find new updates waiting for you, despite XP not receiving any updates since 2014. It is also recommended to watch this video about (Automatic Updates for Windows XP in 2021)
-
Where is the taskbar thumbnail frame located?
Youssef Pro replied to Vistafand's topic in Windows Vista
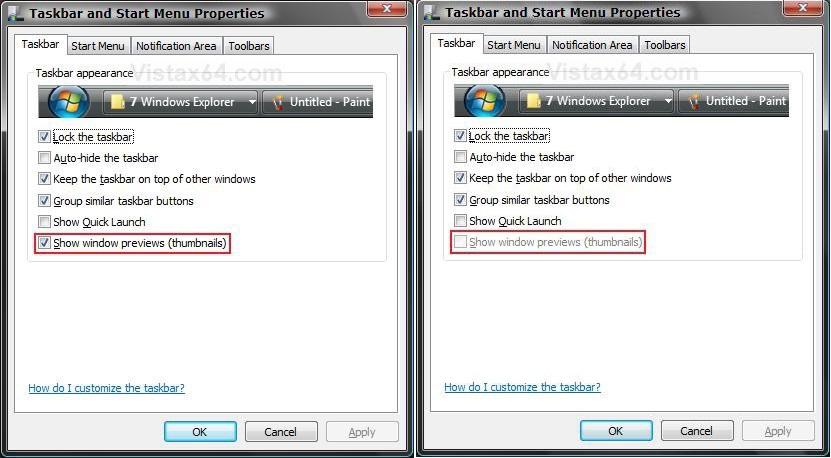
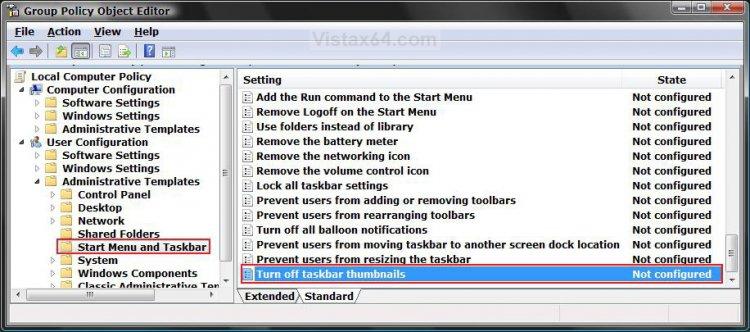
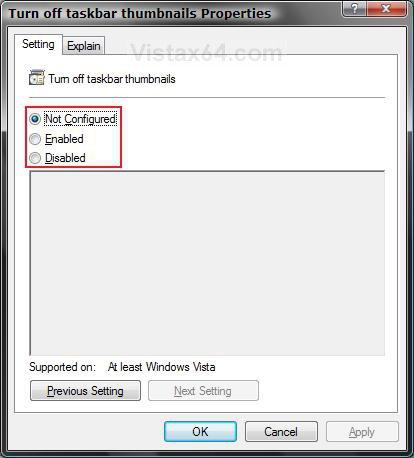
Hello my friend, I hope you are well Warning You must have the Windows Aero color scheme turned on for the Glass Transparency, Taskbar Thumbnail Previews, and Flip 3D features. HARDWARE REQUIREMENTS FOR: WINDOWS AERO See: Windows Help and Support: Troubleshoot problems with Windows Aero NOTE: The Windows Aero color scheme is not available for the Vista Home Basic edition. 1 GHz 32 bit or 64 bit CPU processor. The computer needs at least 1 GB of RAM. A graphics card with support for DirectX 9 graphics with 128 MB of memory. The graphics card must support Pixel Shader 2.0 in hardware. The graphics card driver must support Windows Vista Display Driver Model (WDDM) The computer display color depth must be set to 32 bits per pixel. EXAMPLE: Enabled and Disable "Show preview windows (thumbnails)" Option NOTE: You can see this by right clicking on the Taskbar and clicking Properties. >>head << Through the Local Group Policy Editor NOTE: This method is only available for the Vista Business, Ultimate, and Enterprise editions. See Method Two or Three below for the Vista Home Premium edition. 1. Open the all users, specific users or groups, or all users except administrators Local Group Policy Editor for how you want this policy applied. 2. In the left pane, click on User Configuration, Administrative Templates, Start Menu and Taskbar. (See screenshot below) 3. In the right pane, right click on Turn off taskbar thumbnails and click on Properties. (See screenshot above) 4. To Enable Taskbar Thumbnails A) Dot Disabled or Not Configured and click on OK. (See screenshot below step 5A) B) Go to step 6. 5. To Disable Taskbar Thumbnails A) Dot Enabled and click on OK. 6. Close the Group Policy Object Editor window. 7. Log off and log on, or restart the computer to apply the changes.
-
Cannot enable Wireless Network Connection
Youssef Pro replied to kwisomialbert's topic in Windows Vista
Hello my friend, I hope you are well The method is very easy, all you have to do is right click and click on enable -
Can I get Windows Vista fully working on this machine?
Youssef Pro replied to kenthe7's topic in Windows Vista
hello my friend how are you You can find the drivers for Windows Vista on the Driverscape website and you can download them for a system running 32 and 64-bit kernels, and this is the link for the drivers for the graphics card piece through this link + Also review this article: Compatible hardware with Windows Vista because it will help you with the issue of drivers that support Windows Vista
-
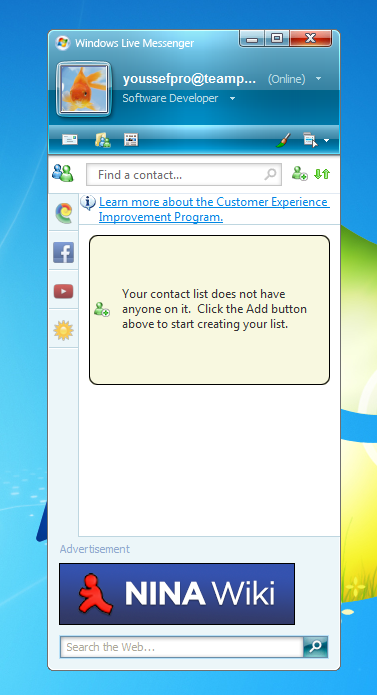
How to Install & Configuration Windows Live Messenger In 2021/2022 Tutorial The Ultimate Guide to the Escargot Chat Service! Link to download all versions of the program On Friday, 31st October, 2014, Microsoft's MSN Messenger service, then known as Windows Live Messenger, breathed its final breath. Personally, I was devastated. I bet millions of other people were, too! Do you long for the days when you'd run home from school, fire up your PC and sign straight into MSN to chat with your friends? Do you pine for those cute emojis and winks? Do you wish you could just have one more water balloon fight? Oh, and what about those sounds? Well, cry no more, my nostalgic friends! I've found the perfect solution! It's known as Escargot Chat! Escargot provides virtually all the things you loved back in those classic days, only on a different server. On the escargot site, you can download the instant Messaging clients you knew and loved back then, but they have been patched so that they connect to Escargot's constantly active servers rather than the dead servers of their original owners. They're exactly the same clients with all their original features, but they've just been slightly modified to connect to a different server. Downsides Those still using Windows XP might have difficulties signing into MSN versions higher than version 3 through Escargot in the form of an 80048821 error. this is not an issue with Escargot per se, but rather it is an issue with the way the patched MSN Messenger clients authenticate themselves with their servers. Fortunately, I have found a way to defeat this error!. If you're using Windows 7, Windows 8.1 or Windows 10, however, everything should work fine. Right now, Windows Live Messenger 2011 and 2012 are not available through Escargot. Hopefully, though, support for these clients will come in the very near future. Yahoo! Messenger 5.0 and 5.5, as well as versions of MSN Messenger prior to 5.0, use an insecure password encryption method. This means they might not be viable options for those who are paranoid about data security. On 15th November, 2020, Escargot Chat was updated to include support for the aforementioned Yahoo! Messenger, as a result, Accounts created before this date were given a random string of letters and numbers that serve as their username for Yahoo! Messenger. Unfortunately, however, these long, unfriendly usernames can't be changed at this time. Sadly, video chatting over Windows Live Messenger cannot be done through Escargot yet. I certainly hope this feature is added, though, as it was one of my favourite features of Live Messenger back in the day. The only versions of Yahoo! Messenger that are available through Escargot right now are 5.0 and 5.5. How do I sign up? First, visit this link to go to the Escargot registration page. Tab to the email address field and type your email address. Remember, it can be any email address! Tab to the password field and type a password. Make sure that you use a strong password with upper case (capital) letters, lower case letters and numbers. If you just use you're dog's name, you'll know doubt be hacked straight away. This applies to any online account you create, not just Escargot! During the registration procedure, you can decide to enable support for Yahoo! Messenger and older MSN versions prior to version 5.0. Just remember that these frontends use MD5 hashing, which is an insecure encryption method! Finally, click the create account button. Your registration is now complete! Bring it back to life! Now you've registered your account, it's time to perform the revival procedure! Visit the Escargot download page to download an IM client in your language. If you remember what client you used to use, you can download that one, or something close to it. I have a Windows XP virtual machine with Windows Live Messenger 8.5 from 2007, and installed on my physical Windows 7 PC is Windows Live Messenger 2009. I never used 2009 as a child, but I like to try and be as era appropriate as I can. Sign in with the email address and password you used when registering your account. If all your credentials are correct, you should be signed in and have full access to the Escargot Chat network! It's alive! It's alive! Please note that when installing an MSN/WLM client, I don't recommend checking any other installation boxes, such as the MSN toolbar or the Windows Live Sign-in assistant. Just leave the shortcuts option checked. It just keeps the clutter down and provides faster access to the client.
-
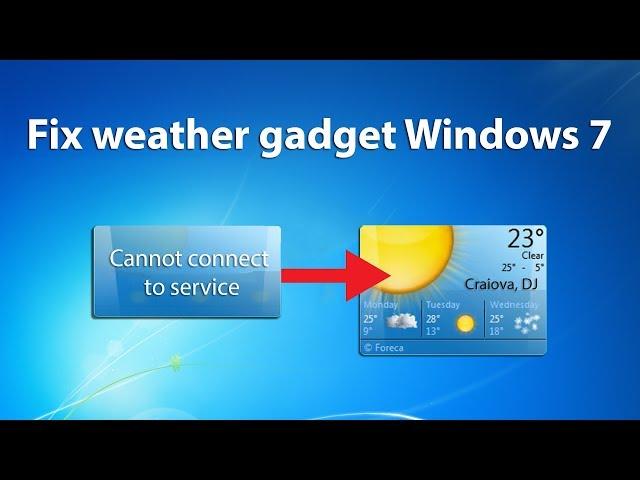
How To Fix Weather Gadget Windows Vista & 7 - Quick Fix 100%
Youssef Pro posted a topic in Windows 7
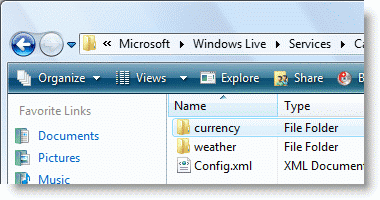
How To Fix Weather Gadget Windows Vista & 7 - Quick Fix 100% Tutorial: You don't need to download any gadgets or malicious programs! WORKING 2020!!! How to repair weather gadget default application from Windows 7. Fix cannot connect to service error! Follow my steps: Copy config.xml file to: C:\Users\USERNAME\AppData\Local\Microsoft\Windows Live\Services\Cache" and edit settings.ini to change location. Now is very easy to find location code with this site: https://weather.codes/ NEW link (config.xml)- last modified date 2017 (working without edit with notepad): File download link here (Mediafire) This completes the settings to fix the startup problem. But many users do not find the Config.xml file when they open the "Cache" folder. In this case, you need to download it from the link below, extract it from the archive and place it in the specified folder, and then perform all the manipulations with Notepad, which were discussed above. Modification After starting the tool, you need to configure its settings. Point the cursor over the "Weather" application icon. To the right of it, a block of icons will be displayed. We click on the "Parameters" icon in the form of a key.
-
Enabling Aero in Windows Vista 50xx+ x86 (VMware)
Youssef Pro replied to Youssef Pro's topic in Windows Vista
Sorry for the delay in posting links, my friend links The WDDM Display Drivers from Workstation 11. You can get an ISO that has them here https://mega.nz/file/CMQzyDTJ#rQ72sAqgHi5QnyDKrIo6s_36auV6UekHxZ-OcA5XjSk If you are using an AMD64 (x64) build, you can get the x64 drivers here: https://mega.nz/#!3FAmlIZR!fIkxmXF1X5R9GUhDWiM6yM8L2ZMhPOnOvrfEUgDuhPA -
Enabling Aero in Windows Vista 50xx+ x86 (VMware) This is a small tutorial for enabling Aero Glass in most post-reset Vista Builds, namely the builds from the 50xx range onwards. This tutorial was tested with the following builds: (Professional/Ultimate unless otherwise noted) 5048 5219 5231.0 (by ovctvct) 5231.2 (Ultimate & Enterprise Server) 5259.0 (also by fred30w and ovctvct) 5259.3 (by ovctvct) 5270 (Ultimate & Enterprise Server) (Ultimate also by ovctvct) 5381 (Home Premium) 5384 (Enterprise Server) 5456 (Home Premium & Ultimate) (Ultimate also by ovctvct) 5472 (Ultimate & Home Premium) (Ultimate also by fred30w) 5536 (Business & Ultimate) (Ultimate also by ovctvct) 5552 (Home Premium) 5600 (Datacenter Server & Ultimate) (Ultimate by ovctvct and Arths) 5728 5754 (Home Premium & Ultimate) 5757 (Datacenter Server) 6001.16406 (Enterprise Server) 6001.16510 (Web Server) 6001.17051 (x64 Web Server) You will need the following items: 1. A relatively recent version of VMware Workstation. (10 or 11 will work) 2. The WDDM Display Drivers from Workstation 11. You can get an ISO that has them here: Download - MEGA If you are using an AMD64 (x64) build, you can get the x64 drivers here: MEGA 3. The install DVD of your desired build. Builds 5381 & later: 1. First, start creating your VM, but make sure to select Custom in the first screen. 2. Set the HW compatibility to Workstation 10.0 (for 11 users). You do not need to change the compatibility in earlier versions. 3. Set the Guest OS option to 'Windows Vista'. 4. Install the build as normal, including setting the BIOS Date. 5. After installing, open regedit and browse to Computer\HKEY_CURRENT_USER\Software\Microsoft\Windows\DWM. 6. Over there, create a DWORD key named CompositionPolicy and set its value to 2. 7. Open Device Manager, browse to the 'Display Adapters' section, and right-click on the name of your display adapter. Select 'Update Driver Software' on the menu that comes up. 8. Select 'Browse my computer for driver software' and mount the ISO containing the display drivers from the 'Items you need' section. Builds 5048, 5219-5270: (Thanks to fred30w and ovctvct!) 1. Follow Steps 1-4 of the previous guide. NOTE: For 5231.X, use 'Workstation 6.0' as the compatibility mode! 2. After installing, open regedit. From here, it branches off into two different paths, depending on which build you want to use: Builds 5048, 5219 & 5231.X: Browse to HKEY_LOCAL_MACHINE\Software\Microsoft\DWM. (if the key does not exist, create it.) Over there, create a DWORD key named EnableMachineCheck and set its value to 0. Builds 5259.X & 5270: Browse to HKEY_CURRENT_USER\Software\Microsoft\DWM. (if the key does not exist, create it.) Over there, create a DWORD key named UseMachineCheck and set its value to 0. 9. Point the installer to the 'video_wddm' folder of the root of the ISO and click 'Next'. After the display driver installs, reboot the VM. 10. Aero Glass should be automatically enabled. It will be a bit slow, but it works. 3. After this, open Device Manager, browse to the 'Display Adapters' section, and right-click on the name of your display adapter. Select 'Update Driver Software' on the menu that comes up. 4. Select the options required to choose your driver manually. (Sorry, but there is no screenshot for this one as these builds use different interfaces. 5048 & 5219 use the XP-style interface while the later builds use the Vista-style.) 5. When you have to install the driver, mount the ISO you downloaded way back in the beginning and point it to the 'video_xpdm' in the root directory of the ISO. 6. You will receive an error about the drivers not being signed. Ignore it. 7. After the driver installs, reboot the computer. You should have Aero Glass enabled unless if you use 5048. 8. (Thanks to ovctvct!) If you use 5048, open services.msc and enable the 'User Experience Session Management' service by setting it to automatically start on start up. 9. After you reboot, you must log off and log on again on every startup to enable Aero. All other builds: (ones which are not listed at the top, that is) I don't know whether they work with these methods or not, as I don't have the builds themselves or they do not work for me. (5112, 5308.60 and 5365 are applicable for the second category.) If someone can provide a conclusion, I'd gladly provide credit for them. (PS: This started out as an experiment for lulz on 5456, but it turned into a reliable way to enable Aero Glass.) For more topics follow me on Microsoft Community Youssef Pro - Microsoft Community + Good luck to all
.jpg.1e7ddb5d24f04a6f2bea96a7633c11cf.jpg)