MrJinje
Content Type
Profiles
Forums
Events
Everything posted by MrJinje
-
Renaming or Disabling Admininstrator Account
MrJinje replied to senathon's topic in Unattended Windows 7/Server 2008R2
You want to use something like this in your Oobe System Pass (autounattend.xml) during Windows-Shell-Setup. But basically Adminsitrator is already disabled by default, this will create Tom Account (which is already Administrator). Can add password or leave blank. <UserAccounts> <LocalAccounts> <LocalAccount wcm:action="add"> <Password> <Value></Value> <PlainText>true</PlainText> </Password> <DisplayName>Tom</DisplayName> <Group>Administrators</Group> <Name>Tom</Name> </LocalAccount> </LocalAccounts> </UserAccounts> If you want to encrypt your password you would need to install teh W7 WAIK and use WSIM (aka Windows System Image Manager) -
removing components manually
MrJinje replied to s7even's topic in Unattended Windows 7/Server 2008R2
You right, forgot M$ make DISM snafu. Remove Package does not reduce WIM size. From Technet -
We have been having reports of DISM not being able to dis-mount an commit correctly after applying teh Install_WIM_Tweak. Who is the original author,and could they shed some light on the issue. Does this only work with Vista WAIK ImageX ?
-
removing components manually
MrJinje replied to s7even's topic in Unattended Windows 7/Server 2008R2
I think the trick is to mount/commit/dismount the image with ImageX. Then since ImageX is compatible with Install_WIM_Tweak.exe (can be found in liquidz thread), you can gets access to all the WIM packages. Then you can script DISM to remove whatever packages you like. Should work as long as you use ImageX to unmount. For some reason DISM will not commit/dismount correctly after applying the Install_WIM_Tweak, so you have to use ImageX. -
LOL, you jumped the gun, the file copying happens when the installation is under control fom Boot.wim Image 2 (i.e. the GUI that copies files, extracts, choose partition, etc...). That file extraction has not anything to do with OEM drivers, it is part of windows installation process, and being run from Windows PE - Not your OS. Just let it fully install and you will be fine. Trust me, it does work, almost 2000 downloads between MSFN and MDL, many happy customers. You OS is not actually running until the second reboot. You OEM drivers (especially Unsigned driver's that prompt for Approval), will not be installed until then. In the case of x64, you will get prompted before first login, (and I think it was before SetupComplete.cmd runs too) to install each unsigned drivers. (pop up message for each driver). As for the Pending thing, that is non-issue, it is because the image was edited offline, M$ documentation clearly describes that user added packages will be marked pending. This is because they are pending until someone actually installs the OS. To avoid the "Pending" you would need to actually install your Image, Sysprep, reseal, and the Recapture the image into a new WIM. After which they will show as installed. But that is way more trouble than is worth. EDIT: On a side note, you could integrate you Drivers into your Boot.WIM image 2, that would assist anyone having RAID driver issues. That sort of thing.
-
OK, you right, first Features.txt was definitely not Ultimate. Good Catch, future readers take note, be sure to set the correct Image Index #. That's a Deal-Breaker Ladies Let me know if it works this time.
-
According to you 7z, you integrated around 60+ Drivers and 9 Updates into your image.Can you run a Windows Update Scan and confirm that these 9 updates are still showing up as not installed. They will not show up in your list of installed updates, because they were never installed, they were integrated. Is that the source of the confusion ? As for the drivers, they should already be integrated, run a search of C:\Windows\inf\ for oem1.inf and tell me if you find the file. That is where it should appear if integrated properly, you should find you other 60 drivers in there too. (oem0.inf - oem61.inf are you drivers) Whether or not the drivers actually work with Windows 7 is a whole nother story.
-
Actually it can, but you have to mount each version separately and run Add-Packages against it. Since x86 has 5 versions, you will have to repeat the process 5 times.mmm.. Tastes Like Chicken
-
See here: http://www.boot-land.net/forums/index.php?showtopic=9113 I guess that some Registry keys need to be added. jaclaz Meh, looks like it requires Winbuilder, wouldn't want have to support that. Would be useful if converted back into a reg file / batch script. Probably could work for tacneplong if he wants to guinea pig for us.
-
We have been having issues with Non-English language packs, apparently something is affecting the sendkeys syntax in utero and the until the next release the current fix is to move the WIM to the root of the drive. Like F:\Install.wim More details here. and here For some unknown reason it is chopping off the "SO" in source from peoples install.wim paths. But only on builds using a non-english language pack ? Any ideas ? Here is the source for the Quick Mount button. Basically I read the Variables from the Text Fields, then Prompt the user OK/Cancel, and if they hit OK, if spawns a new command window and runs the DISM command via sendkeys $WIM = $SOURCE_WIM.text $MNT = $MOUNT_DIR.text $INDEX = $IMAGE_INDEX.Text $PROMPT = [Microsoft.VisualBasic.Interaction]::MsgBox("Quick Mount the WIM", 'OKCancel,Question', "Last Chance to Cancel");switch ($PROMPT) {'OK' { Invoke-Item C:\Windows\System32\WindowsPowerShell\v1.0\powershell.exe Start-Sleep 1 [System.Windows.Forms.SendKeys]::Send("c:{ENTER}CD \{ENTER}CLS{ENTER}DISM.exe /Mount-Wim /wimfile:$WIM /index:$INDEX /MountDir:$MNT{ENTER}") }'Cancel'{ }} Somehow the $WIM variable is being passed to the Sendkeys command, minus the SO in source. Can anyone re-create this error for me ? I have not been able to from English Ultimate.
-
Should just need this file. C:\Windows\System32\DISM.exe and the entire DISM folder C:\Windows\System32\DISM Probably be easiest to put both in XP System32 folder so the script can find them. This is untested, report back.
-
Error integrating updates and hotfixes with Vlite
MrJinje replied to sauron's topic in Unattended Windows 7/Server 2008R2
Give DISM Tool a shot. Put all your MSU and CAB updates into a single folder. Mount your wim file, then click Add-Packages and it will prompt you to select your folder. It will integrate each update one by one. Afterwards click Commit-WIM, then click Dis-Mount WIM. -
Post-SP2 Updates for Office 2007 (Discontinued!)
MrJinje replied to steven4554's topic in User Contributed Update Lists
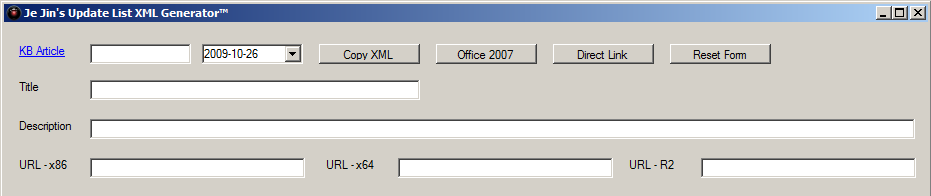
And to better answer you question (for future readers too), the way I have been doing it, is open Windows Update and run a manual scan. Then I highlight all the Updates and right click > Copy Details and paste that into a temporary text file. Each update looks like this. Security Update for Microsoft Office Publisher 2007 (KB969693) Download size: 3.9 MB You may need to restart your computer for this update to take effect. Update type: Important A security vulnerability exists in Microsoft Office Publisher 2007 that could allow arbitrary code to run when a maliciously modified file is opened. This update resolves the vulnerability so that Microsoft Office Publisher 2007 documents are handled appropriately. More information: http://www.microsoft.com/downloads/details.aspx?FamilyId=D4B0665D-5744-49C7-A3C0-F231FD08D3B8&displaylang=en Help and Support: http://support.microsoft.com/?LN=en-us From there I have links to the direct download page, KB, Description, Title, etc. Then I manually copy this information into a custom UL-XML generator to create syntax for the Update List entries. Otherwise, it can be done by hand, but is very cumbersome.
-
Post-SP2 Updates for Office 2007 (Discontinued!)
MrJinje replied to steven4554's topic in User Contributed Update Lists
@i2paq Have included all the 17 critical and 10 optional updates for Office 2007 Post SP2 in my 10/22/2009 ULZ file. Find it here. If you do not like the format I used (all updates in a single ULZ), it would be easy for someone to copy the Office specific updates into the existing ULZ (don't forget to change the Category from 7 to 1) I'm keeping this list current for MDL with W7 x86/x64 - W2K8 R2 - Office 07 SP2 - Visual Studio SP 1 support for now. But will continue to upload to MSFN as well. Here's a snip you can use to run all the Office exe's (17 critical updates). Place it in the same folder as your updates (no spaces in path) OfficeUpdates.cmd IF EXIST "%~dp0*.exe" (FOR /F "tokens=*" %%A IN ('DIR /B "%~dp0*.exe"') DO (start /wait %~dp0%%A /quiet /norestart)) -
I could possibly help out, what language are you programming in. As for the removal of packages, have an idea for that, but don't think Install_WIM_Tweak.exe is working with DISM currently, so we would either have to mount/unmount with the Vista WAIK imagex, or need re-write a new Install_WIM_Tweak.exe to work with DISM Basic idea was populate a simple tree-view / Check Box control just like vLite or WUD with the package listing from DISM /GET-PACKAGES command. What do you think ?
-
KB973874 update for vista 64 sp2 error
MrJinje replied to coromonadalix's topic in Windows Updates Downloader
Does this look better, very easy to open .ul file in Notepad and replace the bad update with this one. didn't test but assume should be working. <update id="KB973874" category="1" publishdate="2009-08-25" article="http://support.microsoft.com/?kbid=973874"> <!--http://www.microsoft.com/Downloads/details.aspx?familyid=1E65ECBF-7C62-45EE-94EB-EA8511D82104&displaylang=en--> <title>Update for Internet Explorer 8 Compatibility View List for Windows Vista x64 Edition (KB973874)</title> <description>This update helps make websites designed for older browsers look better in Internet Explorer 8</description> <filename>IE8-Windows6.0-KB973874-x64.msu</filename> <url>http://download.microsoft.com/download/4/8/3/48361472-CCF2-4293-9E3F-AF67C2F9131E/IE8-Windows6.0-KB973874-x64.msu</url> </update> -
new gif looks good, are they static or pre-populated from the /GET-FEATURES command ? How about the Packages, are you using Install_WIM_Tweak.exe or something else to enable the rest of them ?
-
Here is an updated (10-22-2009) ULZ file with Office 2007 Post SP2 support. Windows_7_Office_07_Updates_Pack_10_22_2009.7z
-
@others, thanks, hope everyone likes. @spoof - answered your question in the first post - See "Another Note" section. @gosh - It is a sendkeys hack, so save for a few commands, all the buttons should open up a new command window before running any DISM commands. Should be able to see if any errors occur there. I'll have to look into how a Remove Driver function might work (if possible) @noise - Maybe in the future, but not for now, apart from the DISM sendkeys commands it has a few re-useable functions for dialogs, msg boxes, and about 1000 lines of auto-generated windows forms code. I built a ULZ for myself (and others) that is up to date (as of 10/13/2009) so one can download all W7 x86/x64 and W2K8 R2 Updates for use with the Add-Packages feature. Here is the link
-
IMPORTANT : About Windows Updates Downloader 2.50
MrJinje replied to jcarle's topic in Windows Updates Downloader
Cool app you have. How hard would it be to make it so all categories can be downloaded via batch script, right now it only supports category 1 and 2 (or C and S) -
I built a new W7/W2K8 UL XML file for my own personal use, I imagine some of you can re-use the legwork and get a real ULZ going for W7 x86/x64 and W2K8 R2 now. I didn't follow the listed schema guideline, but it shouldn't be to hard to fix, included every update I could find and a few definitions too. EDIT: Attached batch scripted version that will download both W7 x86 and W7 x64 updates for later WIM integration. Coming Soon - Office 2007 SP 2 and XP Mode SP3 support. Windows_7_R2_Updates_Pack_10_13_2009.7z
-
Mr Jinje DISM Tool™ This is tool I whip up for mounting Install.wim to offline service Windows 7 OEM installation media. It is Free for Non-Commercial Use. Few Notes: How to create OEM DVD Recovery Disk for readers with SLIC in BIOS. 1) Click Mount Wim (choose WIM file and empty folder to mount and be sure to set image index # in combo box) 2) Press Integrate Cert, and choose you cert file 3) Copy/Paste you key into text field and push Install Key button 4) Commit WIM changes 5) Dis-Mount WIM How to Add Drivers to your Image. 1) Put all you drivers into any folder. 2) Click Mount WIM and then Add Drivers Afterwards, run the More Info button and check Drivers.txt for to see if and how it worked. Be sure to Commit WIM before hitting the dis-mount button, otherwise you will lose all your changes. Supported OS - Windows 7 only Supported WIM Type - Windows 7 Format only Unsupported WIM Type - Vista or W2K8 Format (some functions may be working but YMMV) Just thought I would share this here. Maybe some of you will find it useful. Another note - I decided to use the Commit WIM button without UnMounting the Image - Always hated having to unmount to save using other GUI's. But this means, that you first need to Commit WIM, before you can Dis-Mount the WIM, as the Dis-Mount WIM is set to Discard changes (in case you don't like the changes you made) It is programmed in Powershell, obviously you will need to enable Powershell before it can run. Greater detail on all this can be found in the original thread at MDL To enable Powershell, open Powershell Command prompt and type Set-ExecutionPolicy RemoteSigned Here is a ULZ file that is up to date so one can download all W7 x86/x64, Office 2007, and W2K8 R2 Updates for use with the Add-Packages feature. Find More Details Here DISMTOOL.7z