JesseGuthrie
About JesseGuthrie

- Birthday 09/02/1971
JesseGuthrie's Achievements
5
Reputation
-
 Thanks for the DISM command. :-)
 -
It didn't seem to install when I added it from the Windows updates downloader. I have programs that need it, so I ended up installing after I installed the new Windows image I made.
-
Hello everyone, I updated my guide to include post Update1 patches. Please listen to my instructions up until update2 comes out (Supposedly next month). I will update my instructions then to include update2. Just an FYI, whatever the Windows Update downloader doesn't include, you should download the "Patch Tuesday" updates from Microsoft. It comes in an ISO file and you have to pull out all 8.1 updates. Also in Windows updates downloader you should download both pre update1 and the one with update1. Also install then separately.
-
This guide is for the Retail (Store bought) Windows 8.1 version and the downloaded version. If you downloaded Windows 8.0 then you can trick the downloader to download Windows 8.1. You can't download 8.1 if you bought 8.0 in the store (Retail physical version).
-
Is there any folders inside the Patches folder? There should not be any folders inside the patches folder. Only updates can be inside the Patches folder.
-
Here is the May 13th 2014 Patch Tuesday ISO. This ISO assumes that you already have Update 1 already installed. http://www.microsoft.com/en-gb/download/details.aspx?id=42776
-
Some of those updates are to be installed after Update 1 (kb2919355). That is why I use Windows updates Downloader. You can't slipstream them before kb2919355. Once you install kb2919355 and the 5 other updates that make up "Update 1" then you will need to install your updated Windows 8.1 with Update one in a Virtual Machine. Once it installs and you get to the first screen where it ask for you to choose the color and name your computer, you then need to Press Ctrl+Shift+F3 to have it auto login as Admin and Auto start Sysprep. If you listen to my instructions then the virtual machine will shut down to you can "imageX" it so then you will have a wim file that you can install updates that are Post Update 1. The reason for this is because Update 1 is marked as pending because it needs to finish the install in an online session. And you need to have Update 1 fully installed before installing post Update one updates. The command: "c:\program files (x86)\windows kits\8.1\assessment and deployment kit\deployment tools\amd64\dism\Dism.exe" /Image:%~dp0WIN8 /Cleanup-Image /StartComponentCleanup /ResetBase will not work after you install Update 1 until you install your newly updated Windows 8.1 media into a virtual machine and then imageX it back to a wim file. The "ResetBase" command cleans up and deletes 500MB to 1GB which will significantly shrink the size of your wim file. I know you want to install as much as you can, but Like me, I have to read the support article to see if the update requires kb2919355 to be installed first before post update 1 updates. It would be great if you do the same. :-)
-
Well, you should use a genuine Microsoft Windows ISO and then install all updates from the "Windows Updates Downloader". Only the Security and Non-security and .Net Framework 4.5.1 updates + 3 updates from the April updates ISO (Not the update 1 updates). After that you need to install the Update 1 updates (6 of them). Then you need to install it into a virtual machine. Once it gets to the Account creation screen you push the Ctrl + Shift + F3 to auto login and auto start the sysprep process. Once it syspreps and shuts down you then use ImageX to grab the image and convert to Wim. Now you can inject all May Updates. I updated the instructions on my OneDrive. As-far-as 5.1GB, I don't know what you installed. It should be like 4.3 to 4.4GB (Excluding May Updates)
-
You're welcome. I updated my guide on my OneDrive https://onedrive.live.com/redir?resid=FF876747A444836D%2115004
-
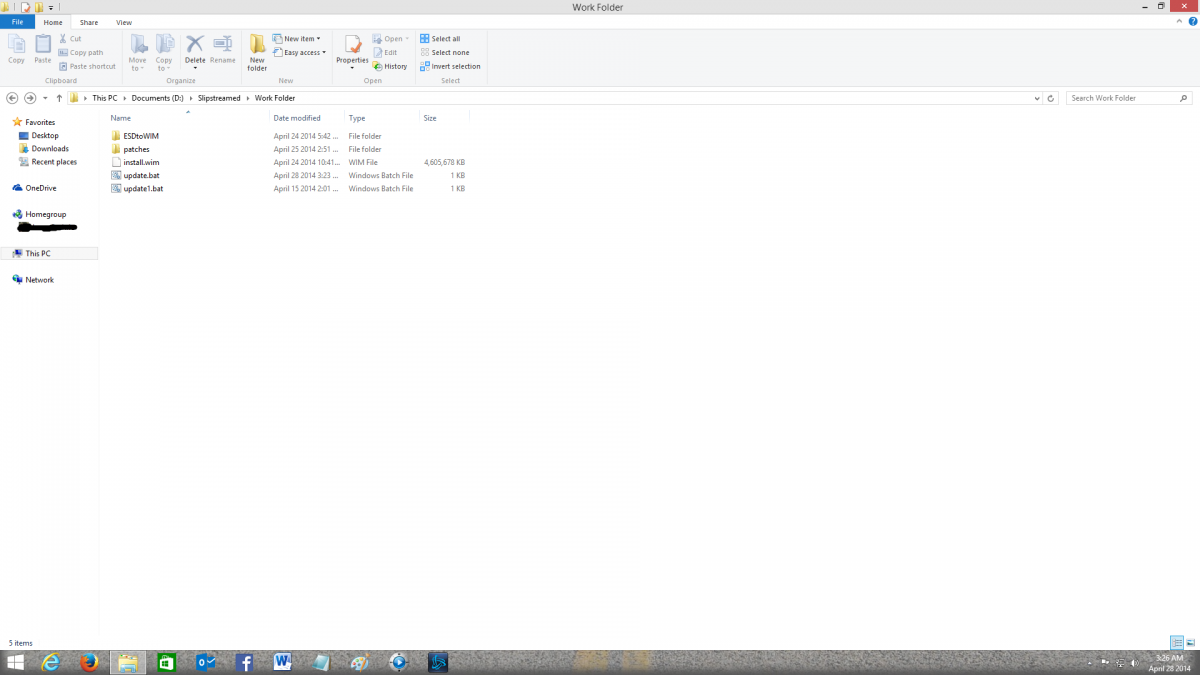
Easy and detailed instructions. This is better than those Automated Apps like WinReducer and Win Toolkit which usually are buggy. Here you Right click the batch file and choose to run as Admin and then go have coffee. It's that easy. Attached photo is the folder structure to what we will create. This guide will slipstream all updates and clean up the image and convert the image to and from ESD<--->WIM Prepare and Slipstream Updates In to a Windows 8.1 .wim or .esd Image (Including Update 1) What you need: install.wim image file from the Windows installation media. If it is an install.esd image file then you can read the instructions on page 3 of this guide to convert it to an install.wim image file or create a Virtual Machine to do it (See page 4). Your install.wim or install.esd file is in the “Sources” folder which is found in the Windows Installation Media.2 batch files called update.bat and udate1.bat (Batch Commands are on this page)Windows updates downloader: http://www.windowsupdatesdownloader.com/ProgramFiles.aspxYour main computer that you will perform this task on should be Windows 8.1. You will need to Install Windows ADK for Windows 8.1 which is found here: http://technet.microsoft.com/en-us/library/dn247001.aspx. Attached picture is the folder structure. Batch File Commands to inject the 40+ updates for update.bat MD %~dp0WIN8 "c:\program files (x86)\windows kits\8.1\assessment and deployment kit\deployment tools\amd64\dism\Dism.exe" /Mount-Wim /WimFile:%~dp0install.wim /Index:1 /MountDir:%~dp0WIN8 "c:\program files (x86)\windows kits\8.1\assessment and deployment kit\deployment tools\amd64\dism\Dism.exe" /image:%~dp0WIN8 /Add-Package /PackagePath:"%~dp0patches" "c:\program files (x86)\windows kits\8.1\assessment and deployment kit\deployment tools\amd64\dism\Dism.exe" /image:%~dp0WIN8 /Get-Packages | more "c:\program files (x86)\windows kits\8.1\assessment and deployment kit\deployment tools\amd64\dism\Dism.exe" /Image:%~dp0WIN8 /Cleanup-Image /StartComponentCleanup /ResetBase pause "c:\program files (x86)\windows kits\8.1\assessment and deployment kit\deployment tools\amd64\dism\Dism.exe" /Unmount-Wim /MountDir:%~dp0WIN8 /commit Batch File Commands to inject Update 1 for update1.bat MD %~dp0WIN8 "c:\program files (x86)\windows kits\8.1\assessment and deployment kit\deployment tools\amd64\dism\Dism.exe" /Mount-Wim /WimFile:%~dp0install.wim /Index:1 /MountDir:%~dp0WIN8 "c:\program files (x86)\windows kits\8.1\assessment and deployment kit\deployment tools\amd64\dism\Dism.exe" /image:%~dp0WIN8 /Add-Package /PackagePath:"%~dp0patches" "c:\program files (x86)\windows kits\8.1\assessment and deployment kit\deployment tools\amd64\dism\Dism.exe" /image:%~dp0WIN8 /Get-Packages | more pause "c:\program files (x86)\windows kits\8.1\assessment and deployment kit\deployment tools\amd64\dism\Dism.exe" /Unmount-Wim /MountDir:%~dp0WIN8 /commit Instructions (Page 2) We need to Download the zip file named ‘Tools U Need” from my OneDrive and extract it, it will create the folder and files structure for you. Don’t modify the file or folder names with the exception of the main folder, which can be named to whatever you want. Skip to step 4 when completed. The Batch files will already be created. OneDrive address: https://onedrive.live.com/redir?resid=FF876747A444836D%2115004 To manually create the folder structure you need to make a folder and name it to whatever you like. Open that folder and create another folder and name it: patches If you need to convert install.esd to install.wim you will need to unzip the “Tools U Need” zip file and copy and paste the ESDtoWIM folder and its contents to the folder you created. It should also be outside the patches folder. Make 2 blank text files and name each file update.bat and update1.bat. Now copy and paste the text for each batch file command from page 1 into the corresponding file. Update.bat is for the 40+ updates and update1.bat is for update 1. Place these to batch files outside the patches folder. Copy your install.wim file to the folder that was created, which will be outside the patches folder, “NOT” in the patches folder. If the original file was a .esd file then see my instructions to convert the install.esd to install.wim.. Now all you need is the updates that you will download from the “Windows Update Downloader”. Download the update list from this page: http://www.windowsupdatesdownloader.com/UpdateLists.aspx (It’s a small file). Once finished downloading you need to Double Click it to add the list to the Windows Updates Downloader. Start the Windows Update Downloader, choose the operating system update list In the Windows updates Downloader, and then choose the Security Updates, Non-Security Updates and both versions of .Net Framework. Updates in the Optional folder won’t work. Start the download. All updates MUST be in the .msu format. Once the updates are downloaded, you need to copy and paste all the updates in to the “patches” folder. Make sure that you only copy the updates to the patches folder. In other words, there should be NO folders inside the patches folder. Only .msu (update) files can be in the patches folder. You can delete the ESDtoWIM folder if you are not going to use the command line tool to convert install.esd to install.wim. Now, the Structure of the folder you are working in should have only 5 items: An ”ESDtoWIM” folder, a “patches folder”, update.bat file, update1.bat file and an “install.wim” file. All .msu updates should be in the patches folder. Now Right click the update.bat file and choose to run as Administrator. Once it installs all the updates it will ask you to hit any key. Hit any key until is shows all the updates and continues. You will have to hit any key many times until it begins the last phase. Once it is finish, you can repeat step 7 through 9 but use the update1.bat file for the Windows 8.1 update 1 .msu files (There are 6 needed downloading). Once everything is finished then you can replace the old install.wim file in the Windows install media with the new one. Again, if the original was an install.esd file then it needs to be converted first to install.wim file.File Conversion Instructions (Page 3) Convert install.esd to install.wim From the “Tools U Need” folder which can be downloaded here: https://onedrive.live.com/redir?resid=FF876747A444836D%2115004, find and open the ESDtoWIM folder Right click the file named ESD2WIM.cmd and choose “Run As Administrator” Copy and paste (or type) the complete path location of the install.esd file. Example: C:\Work Folder\install.esd Press the enter key and wait for the process to finish. The location of the install.wim file will be in the “C” drive when the process finishes. C:\install.wim Continue with step 4 on the instructions page (Page 2).Convert install.wim to install.esd If the original file was an install.esd file then you will need to convert the install.wim file back to an install.esd file. Before we begin, make sure there is no file in C:\ called install.esd. In other words delete any file in this exact path C:\install.esd Copy the install.wim file to the C:\ directory. Example: C:\install.wim Click “Start” and do a search by typing: cmd Look for a file called cmd.exe in the search results. Right click cmd.exe and choose to “Run as Administrator” A black box will open. In the black box, Copy and paste the command in step 6 below and then hit the enter key. dism /Export-Image /SourceImageFile:"C:\install.wim" /SourceIndex:1 /DestinationImageFile:"C:\install.esd" /Compress:recovery It will take a very long time and a lot of processing during the conversion. So have patients. When it’s finished you will find the file called install.esd at this location C:\install.esd JJJCongratulationsJJJ You have completed the process of slipstreaming Windows updates and update 1 in to Windows 8.1 Install media. J Good luck J Installing Windows 8.1 to a VHD and using imageX to capture back the image as install.wim (Page 4) If you prefer not to use the command to convert the install.esd file to an install.wim file then you can create a virtual machine and install windows 8.1 in to it and then capture the VHD image back to an install.wim file. Here is how you do it. What you need: Windows 8.1 ISO, DVD or USB stick made bootable with Windows 8.1Microsoft Hyper-V (included as an add-on in Windows 8.1 Pro) or Virtual BoxFor Windows 8.0 serial key users: These generic keys will allow the correct version of Windows 8.1 to be installed. You will HAVE TO activate with your purchased Windows 8.0 key once all is installed. It will work 100%.334NH-RXG76-64THK-C7CKG-D3VPT for Non-Pro versionXHQ8N-C3MCJ-RQXB6-WCHYG-C9WKB for Pro versionKnowledge of these Virtual machinesImageX which comes with the Windows ADK for Windows 8.1Knowledge of the CMD command prompt.Knowledge of “SysPrep”Instructions Create a Virtual disk. The disk should be either VHD or VHDX Install Windows 8.1 in the virtual machine Press Ctrl + Shift + F3 when the Installation gets to the screen where you create a computer name. This will log you in automatically as the Administrator and start the SysPrep process. In the SysPrep preparation tool, make sure you choose “Enter system out of box experience”, and then check the box that says “Generalize”. The next drop-down menu: choose “Shutdown”. Click OK and the Virtual machine will shut down when finished. Now locate where the Virtual Disk that has Windows 8.1 installed on it. Mount that drive and give it a drive letter Make sure you installed ImageX which comes with the Windows ADK for Windows 8.1 Click the Start button and type cmd for command prompt. In the search results choose “Deployment and Imaging Tools Environment”. A command black box will open. Type the following: imagex /compress maximum /capture F:\ C:\install.wim "Windows 8.1 Pro" (F is the drive letter you gave the virtual drive when you mounted it, change it to whatever it is) Hit Enter and wait for it to finish. Look in the C drive where you copied the virtual drive and you will also see the install.wim file. This is the file you need to inject all those updates in to. You can now delete the Virtual drive and the ESD file.

-
This way is all automated. It is very detailed and will do exactly what you asked. Just right click the batch files, Run as Admin and go have coffee. Prepare and Slipstream Updates In to a Windows 8.1 .wim or .esd Image (Including Update 1) What you need: install.wim image file from the Windows installation media. If it is an install.esd image file then you can read the instructions on page 3 of this guide to convert it to an install.wim image file or create a Virtual Machine to do it (See page 4). Your install.wim or install.esd file is in the “Sources” folder which is found in the Windows Installation Media.2 batch files called update.bat and udate1.bat (Batch Commands are on this page)Windows updates downloader: http://www.windowsupdatesdownloader.com/ProgramFiles.aspxMake sure you also download April ISO and yank the 3 updates that are NOT in the first folder inside the ISO. The first folder has the Update 1 files: http://www.microsoft.com/en-us/download/details.aspx?id=42520Your main computer that you will perform this task on should be Windows 8.1. You will need to Install Windows ADK for Windows 8.1 which is found here: http://technet.microsoft.com/en-us/library/dn247001.aspx. Batch File Commands to inject the 40+ updates - name it update.bat MD %~dp0WIN8 "c:\program files (x86)\windows kits\8.1\assessment and deployment kit\deployment tools\amd64\dism\Dism.exe" /Mount-Wim /WimFile:%~dp0install.wim /Index:1 /MountDir:%~dp0WIN8 "c:\program files (x86)\windows kits\8.1\assessment and deployment kit\deployment tools\amd64\dism\Dism.exe" /image:%~dp0WIN8 /Add-Package /PackagePath:"%~dp0patches" "c:\program files (x86)\windows kits\8.1\assessment and deployment kit\deployment tools\amd64\dism\Dism.exe" /image:%~dp0WIN8 /Get-Packages | more "c:\program files (x86)\windows kits\8.1\assessment and deployment kit\deployment tools\amd64\dism\Dism.exe" /Image:%~dp0WIN8 /Cleanup-Image /StartComponentCleanup /ResetBase pause "c:\program files (x86)\windows kits\8.1\assessment and deployment kit\deployment tools\amd64\dism\Dism.exe" /Unmount-Wim /MountDir:%~dp0WIN8 /commit Batch File Commands to inject Update 1 - name it update1.bat MD %~dp0WIN8 "c:\program files (x86)\windows kits\8.1\assessment and deployment kit\deployment tools\amd64\dism\Dism.exe" /Mount-Wim /WimFile:%~dp0install.wim /Index:1 /MountDir:%~dp0WIN8 "c:\program files (x86)\windows kits\8.1\assessment and deployment kit\deployment tools\amd64\dism\Dism.exe" /image:%~dp0WIN8 /Add-Package /PackagePath:"%~dp0patches" "c:\program files (x86)\windows kits\8.1\assessment and deployment kit\deployment tools\amd64\dism\Dism.exe" /image:%~dp0WIN8 /Get-Packages | more pause "c:\program files (x86)\windows kits\8.1\assessment and deployment kit\deployment tools\amd64\dism\Dism.exe" /Unmount-Wim /MountDir:%~dp0WIN8 /commit Instructions (Page 2) We need to Download the zip file named ‘Tools U Need” from my OneDrive and extract it, it will create the folder and files structure for you. Don’t modify the file or folder names with the exception of the main folder, which can be named to whatever you want. Skip to step 4 when completed. OneDrive address: https://onedrive.live.com/redir?resid=FF876747A444836D%2115004 To manually create the folder structure you need to make a folder and name it to whatever you like. Open that folder and create another folder and name it: patches If you need to convert install.esd to install.wim you will need to unzip the “Tools U Need” zip file and copy and paste the ESDtoWIM folder and its contents to the folder you created. It should also be outside the patches folder. Make 2 blank text files and name each file update.bat and update1.bat. Now copy and paste the text for each batch file command from page 1 into the corresponding file. Update.bat is for the 40+ updates and update1.bat is for update 1. Place these to batch files outside the patches folder. Copy your install.wim file to the folder that was created, which will be outside the patches folder, “NOT” in the patches folder. If the original file was a .esd file then see my instructions to convert the install.esd to install.wim.. Now all you need is the updates that you will download from the “Windows Update Downloader”. Download the update list from this page: http://www.windowsupdatesdownloader.com/UpdateLists.aspx (It’s a small file). Once finished downloading you need to Double Click it to add the list to the Windows Updates Downloader. Start the Windows Update Downloader, choose the operating system update list In the Windows updates Downloader, and then choose the Security Updates, Non-Security Updates and both versions of .Net Framework. Updates in the Optional folder won’t work. Start the download. All updates MUST be in the .msu format. Once the updates are downloaded, you need to copy and paste all the updates in to the “patches” folder. Make sure that you only copy the updates to the patches folder. In other words, there should be NO folders inside the patches folder. Only .msu (update) files can be in the patches folder. You can delete the ESDtoWIM folder if you are not going to use the command line tool to convert install.esd to install.wim. Now, the Structure of the folder you are working in should have only 5 items: An ”ESDtoWIM” folder, a “patches folder”, update.bat file, update1.bat file and an “install.wim” file. All .msu updates should be in the patches folder. Now Right click the update.bat file and choose to run as Administrator. Once it installs all the updates it will ask you to hit any key. Hit any key until is shows all the updates and continues. You will have to hit any key many times until it begins the last phase. Once it is finish, you can repeat step 7 through 9 but use the update1.bat file for the Windows 8.1 update 1 .msu files (There are 6 needed downloading). Once everything is finished then you can replace the old install.wim file in the Windows install media with the new one. Again, if the original was an install.esd file then it needs to be converted first to install.wim file.File Conversion Instructions (Page 3) Convert install.esd to install.wim From the “Tools U Need” folder which can be downloaded here: https://onedrive.live.com/redir?resid=FF876747A444836D%2115004, find and open the ESDtoWIM folder Right click the file named ESD2WIM.cmd and choose “Run As Administrator” Copy and paste (or type) the complete path location of the install.esd file. Example: C:\Work Folder\install.esd Press the enter key and wait for the process to finish. The location of the install.wim file will be in the “C” drive when the process finishes. C:\install.wim Continue with step 4 on the instructions page (Page 2).Convert install.wim to install.esd If the original file was an install.esd file then you will need to convert the install.wim file back to an install.esd file. Before we begin, make sure there is no file in C:\ called install.esd. In other words delete any file in this exact path C:\install.esd Copy the install.wim file to the C:\ directory. Example: C:\install.wim Click “Start” and do a search by typing: cmd Look for a file called cmd.exe in the search results. Right click cmd.exe and choose to “Run as Administrator” A black box will open. In the black box, Copy and paste the command in step 6 below and then hit the enter key. dism /Export-Image /SourceImageFile:"C:\install.wim" /SourceIndex:1 /DestinationImageFile:"C:\install.esd" /Compress:recovery It will take a very long time and a lot of processing during the conversion. So have patients. When it’s finished you will find the file called install.esd at this location C:\install.esd JJJCongratulationsJJJ You have completed the process of slipstreaming Windows updates and update 1 in to Windows 8.1 Install media. J Good luck J Installing Windows 8.1 to a VHD and using imageX to capture back the image as install.wim (Page 4) If you prefer not to use the command to convert the install.esd file to an install.wim file then you can create a virtual machine and install windows 8.1 in to it and then capture the VHD image back to an install.wim file. Here is how you do it. What you need: Windows 8.1 ISO, DVD or USB stick made bootable with Windows 8.1Microsoft Hyper-V (included as an add-on in Windows 8.1 Pro) or Virtual BoxThese generic keys are "ONLY" to allow the correct version of Windows 8.1 to be installed when you only have a Windows 8.0 key. You will have to use your purchased Windows 8.0 key to activate (It will work)334NH-RXG76-64THK-C7CKG-D3VPT for Non-Pro versionXHQ8N-C3MCJ-RQXB6-WCHYG-C9WKB for Pro versionKnowledge of these Virtual machinesImageX which comes with the Windows ADK for Windows 8.1Knowledge of the CMD command prompt.Knowledge of “SysPrep”Instructions Create a Virtual disk. The disk should be either VHD or VHDX Install Windows 8.1 in the virtual machine Press Ctrl + Shift + F3 when the Installation gets to the screen where you create a computer name. This will log you in automatically as the Administrator and start the SysPrep process. In the SysPrep preparation tool, make sure you choose “Enter system out of box experience”, and then check the box that says “Generalize”. The next drop-down menu: choose “Shutdown”. Click OK and the Virtual machine will shut down when finished. Now locate where the Virtual Disk that has Windows 8.1 installed on it. Mount that drive and give it a drive letter Make sure you installed ImageX which comes with the Windows ADK for Windows 8.1 Click the Start button and type cmd for command prompt. In the search results choose “Deployment and Imaging Tools Environment”. A command black box will open. Type the following: imagex /compress maximum /capture F:\ C:\install.wim "Windows 8.1 Pro" (F is the drive letter you gave the virtual drive when you mounted it, change it to whatever it is) Hit Enter and wait for it to finish. Look in the C drive where you copied the virtual drive and you will also see the install.wim file. This is the file you need to inject all those updates in to. You can now delete the Virtual drive and the ESD file.