coucou
Content Type
Profiles
Forums
Events
Everything posted by coucou
-
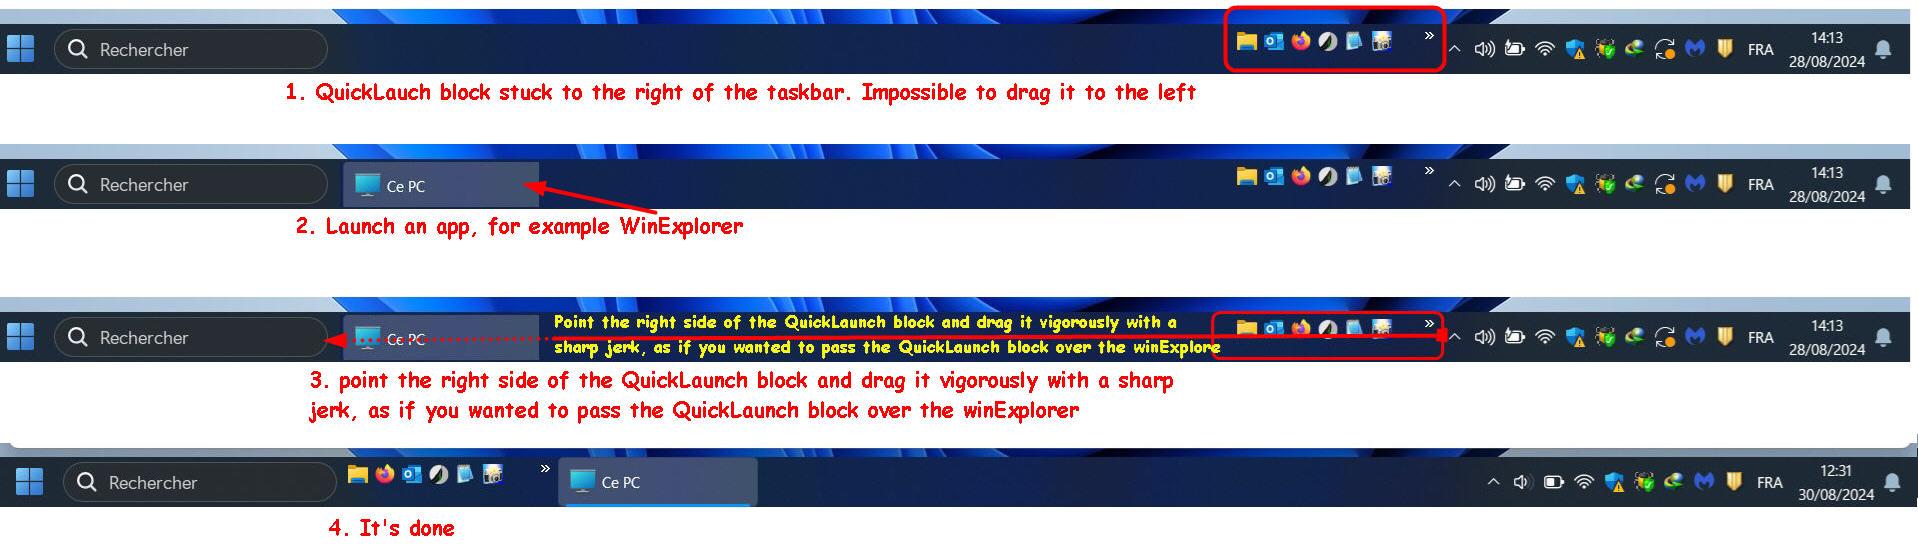
Finally I succeeded. Here's the tric: 1. Launch an application, for example WinExplorer, it is visible in the Taskbar. 2. unlock the taskbar 3. point the right side of the QuickLaunch block and drag it vigorously with a sharp jerk, as if you wanted to pass the QuickLaunch block over the winExplorer icon... It's done (see attached image)

-
That's what I already did without succes Any idea?
-
IT works TNX However, I can't move the entire QuickLaunch block to the left (see image bellow) Regards
-
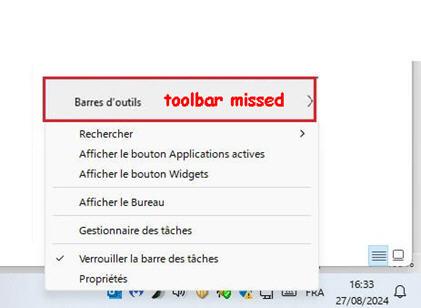
Hello, Since I installed the latest version of StartAllBack 3.8.6, my toolbar has disappeared (see attached image), and I am extremely annoyed. Indeed, this Toolbar allowed me to add an additional “Quick Launch” bar. TNX for yr help
-
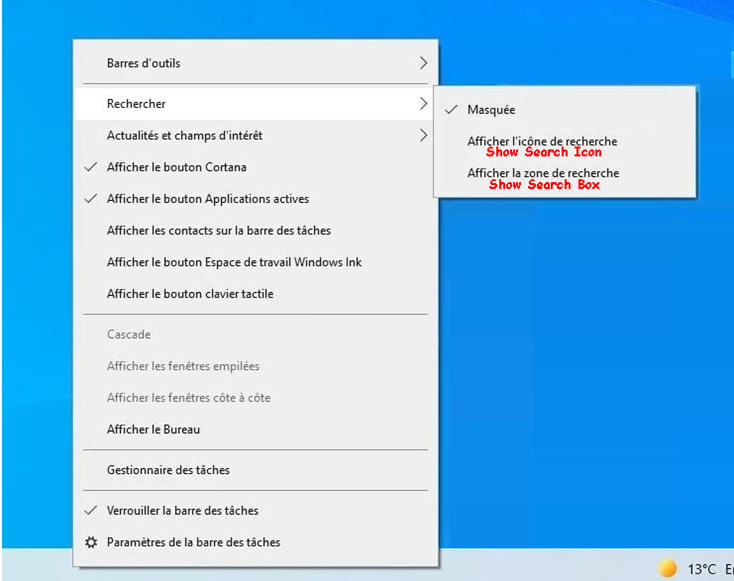
Hello, I am using Win11 22H2. Originally, Taskbar settings enable access to Search Icon and Search Box settings (see attached image). Since I installed the latest version StartAllBack 3.6.3, the Search Box settings in the taskbar is no longer available. However, I seem to have seen in the Windows Personalisation > Taskbar settings an additional option of [Search]: Hide, Show Button, Show Button+Box. Unfortunately, I can't find it. Anyone can help how to activate Search Box next to Search Button in the Taskbar? Regards
-
Wrong forum
-
Hello, I am using Win11 22H2. Originally, Windows enable access to Search Icon and Search Box in the Taskbar settings (see attached image) Since I installed the latest version StartAllBack 3.6.1, I can no longer display the Search Box in the taskbar and its settings is no longer available. Anyone can help how to activate both Icon and Search Box in the Taskbar? Regards
-
Hello, I finally installed Win10 latest version on my brand-new HP Probook 450 G7. Everything works like a charm except Quick Launch toolbar. In fact, it works until I switch OFF/ON or Restart. Then, Quick launch disappear from the Toolbar, and I have to RE-install it again. I read somewhere, that all details for all toolbars are stored in a single binary value in the registry key below. HKEY_CURRENT_USER\Software\Microsoft\Windows\CurrentVersion\Explorer\Streams\Desktop So, as I have a Desktop with almost same configuration as my Laptop, I copied that registry key from the Desktop to my Laptop. I've tested Windows Restart, the Quick Launch remain stuck. After a Win/Office Update, or switch OFF/ON Quick Launch disappear. Also, I noticed that reg key HKEY_CURRENT_USER\Software\Microsoft\Windows\CurrentVersion\Explorer\Streams\Desktop after Switch OFF/ON or updates is downsized to 2K when the original key copied from my Desktop is sized 63K. I'll appreciate any help Regards
-
Where/how do I find that log file?
-
Hello, I'm running Win7 Ultimate x64 bits and Office 2013 Pro x64. Today Windows has invited me to install the latest updates, they are 4 and all relate to Office 2013 (see image below) After some time Windows update returns "Installation failed" Code Error: 8007006E. I have restarted the installation, Windows update returns me Failed to install "Code Error: 8007006E (see image below). So I downloaded these update, They are .exe files https://support.microsoft.com/kb/3191940 Https://support.microsoft.com/kb/3191935 Https://support.microsoft.com/kb/3172501 https://support.microsoft.com/kb/3191872 When I run any of these files, I have a first "Please wait while the update detection" message and then a second message "An error occurred during the detection process" (see image below). I'll appreciate any help Regards
-
The effective one is in my post
-
Windows 7 SP1 Windows Update stuck checking for updates Tested on 2 computers... solved all the updates problems
-
Windows 7 SP1 Windows Update stuck checking for updates Tested on 2 computers... solved all the updates problems
-
Hi, Although I used the ptach in post #3 http://wu.krelay.de/en/ I was again stuck during checking for updates. Finally I find Windows 7 SP1 Windows Update stuck checking for updates Tested on 2 computers... solved all the updates problems
-
I find the solution - Go to the "Start" menu, in the "search programs and files" enter "Strategy" and click " LocalGroup Plicy Editor". Now let's expand the tree "Computer Configuration" - Click the "Computer Configuration" branch, "Administrative Templates", "Windows Components". At the bottom you will find "Windows Update". - In the right frame, you will find "Configuring the Automatic Updates". Double click. - In the lower part "Options", activate the 5th option: "Allow local admin to choose the settings." - Confirm That's all folk
-
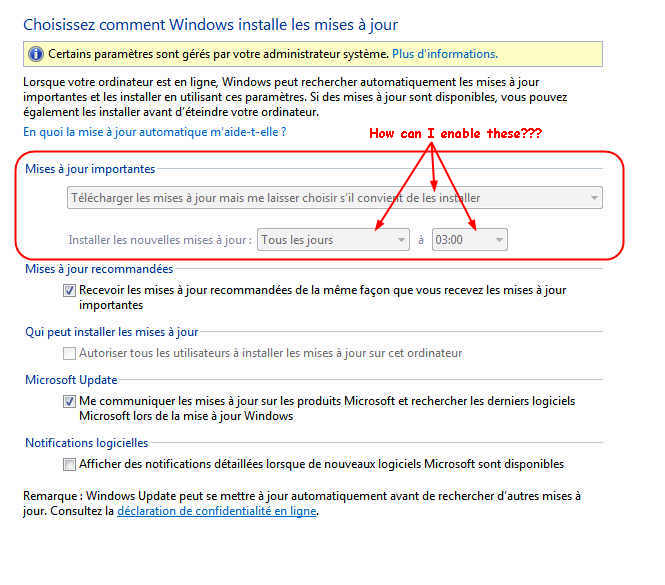
TNX for yr help, I could install manually only http://wu.krelay.de/en/ KB3168965-x64. So , I rebbot and let windows download and install the updates... In less than 20 min it was done BTW How can I modify the settings of windows update (see the image bellow)?
-
Hello, Although Windows update is correctly set "Search for the update and let me me choose to download and install...", I have updates notification, can choose the updates to install and click on Start Download... Unfortunately, after several hours no update is downloaded. I'll appreciate any help Regards
-
Did you run it elevated? YES Of course you already tried the solutions proposed in this page, right? YES Did you run sfc /scannow? If not, do it, please. If already, then download and run SFCFix, reboot, and try sfc /scannow once again. I ran -sfc /scannow here bellow the result Start of the phase of verification of the analysis of the system. 100% verification is complete. Windows resource protection found files damaged, but failed to repair them all. Details are included in the log CBS. Log windir\Logs\CBS\CBS.log. For example C:\Windows\Logs\CBS\CBS.log1 I ran Fix Windows corruption errors by using the DISM or System Update Readiness tool... works BTW, here bellow image shows when no update and when update OK Anyway, as I got many crash (blue screen) I'm going to do a new and clean installation. But I was curious to know why I had no more updates. Now I know Regards
-
TNX both for yr answers, unfortunately it doesn't help (yet). First I disabled AntiVirus and Firewall without success. @submix8c: iata_cd.exe not available anymore at Intel. I installed v12.00.49974 but not help. @dencorso: I installed WindowsUpdateAgent (x64) (couldn't run it using the /wuforce switch) By launching Windows Update, I got error C80003FA (see here bellow image 2) So, I installed Windows Update Troubleshooter it fixe some problems except "Error Windows update 0x8024402C (see here bellow image 3) I also run FixIt Automatically reset Windows Update components without success. Any idea??? Regards
-
Hello, Although Windows update is correctly set "Search for the update and let me me choose to download and install...", I have no updates notification and my Windows 7 (family premium) is not updated for some time. Moreover, when I run windows update after nearly 15 min of search, the system returns "Can't find update. Error Code 8024000E. I'll appreciate any help Regards
-
Will Windows 10 update inherit all/most Win7/8 customizations?
coucou replied to coucou's topic in Windows 10
I find the How to in French.. Here you go Obtenir Windows 10 : réserver ou annuler la réservation sous Windows 7 et 8 and Obtenir Windows 10 : comment supprimer ou masquer l'icône de la barre des tâches ? I guess even those not mastered the French readily understand -
Will Windows 10 update inherit all/most Win7/8 customizations?
coucou replied to coucou's topic in Windows 10
TNX Noel for all the infos above and your advice Above all, I keep to cancel my "reservation" and wait for the benefits of all those who rushed. Have an idea how to cancel this "reservation"? Regards -
Will Windows 10 update inherit all/most Win7/8 customizations?
coucou replied to coucou's topic in Windows 10
Let us wait for other users experience -
Hello, Currently I'm using Win7 x64 ultmate that I had installed unintended with several customizations... Addons, drivers, Lang packs, QuickLaunch and 80K of registry tweaks (Desktop, Control Panel, UAC, Explorer…). I agreed yesterday the Windows 10 update which will install in late this month. I like to know if Windows 10 update will take all my Win7 customization heritage and apply it to Win 10? Otherwise, do my Win7 RegTweaks file will be compatible and integrated if I apply it after windows 10 update? Regards