

DisabledTrucker
Content Type
Profiles
Forums
Events
Posts posted by DisabledTrucker
-
-
Like I stated earlier, the release notes for the WDM drivers (found here: http://www2.ati.com/drivers/wdm_4.05v2.html ) say, WDM first, then Display drivers. The WDM drivers can be installed through the .inf in OemPnPPath, but as Bashrat pointed out, you can't really control the order in which those go anyways.
Not if your using the full installer you don't have a choice, only when using the seperated downloads, then the proper way is still as I mentioned above.
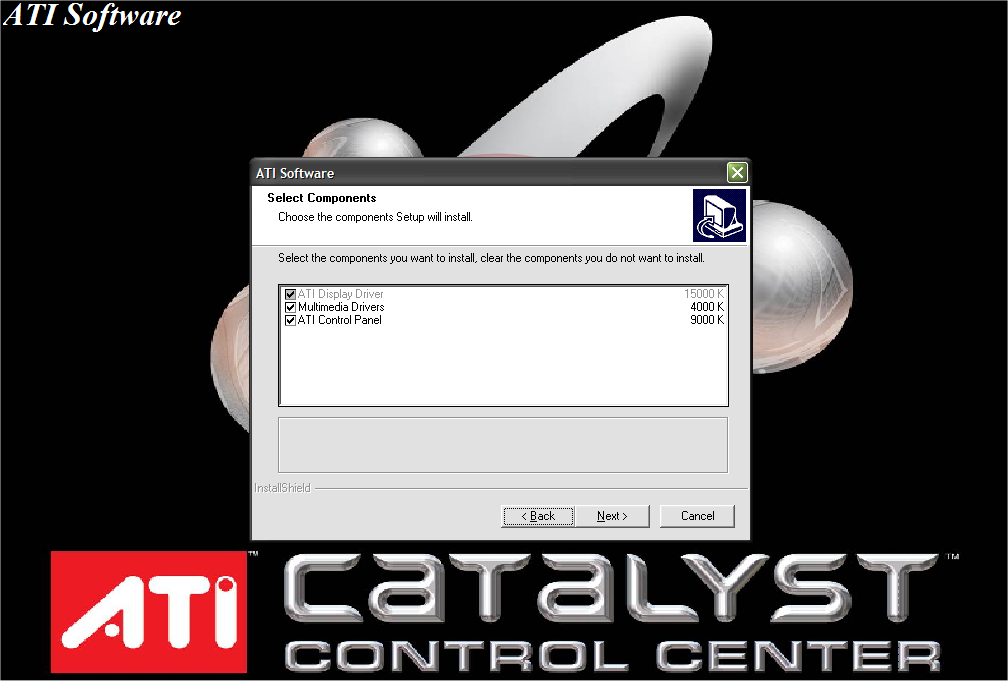
and for the new Control Center, I'm sure the installer won't complete on a system without an appropriate card, however, It'd be nice to avoid it running at all when it's not needed.It doesn't run, doesn't even show up in the selection unless the appropiate card is detected in the installation. See pic below.
 0
0 -
There are 3 parts to the Catalyst Drivers.
What I call "drivers package" is wxp-w2k-8-042-040803a-016701c.exe. You can extract these files, and include the folder with the .inf files in OemPnPDriversPath. This will install just the drivers. I include the setup.exe from this, to also install SmartGART....(edited for content)
Then there's the Control Panel package. This installs all the stuff in the control panel except for SmartGART.
The last package is the WDM Drivers. These are needed if you have an all-in-wonder or VIVO card and want to use those features. I haven't gotten around to testing these yet, but it's supposed to be installed before the display drivers (just add the WDM_XP folder to OemPnPDriversPath before 2KXP_INF) *Edited by DT*
Umm... No you actually install the WDM drivers second before the control panel, as when it's installing from the full package download. That is how it just installed on my system because I installed it to test it while writing this, (need to reboot now, but done it for sake of argument.) The order of installation went as this:
- Display
- WDM
- Control Panel
- DirectX 9 (can skip if using SP2)
- Windows Media Encoder (also can skip if using SP2)
- DAO/MDAC
- DVD Decoder
- MMC
- Here you can install the Hydravision if you want it, I personally dont use it.
- Remote Wonder
Though the new instructions show a MMC with everything but the dvd, I have yet to see this download as it's broken into three parts and is beyond the version 7 that is shown there, it's now up to version 9.x. Anyway, that was how I was personally told by ATI when I called their tech support one day to find out how to install their drivers/mmc on Windows XP, as I was having a problem with installation at one time, which has since been taken care of and was due to an O/S problem I was having at the time, needless to say, this is the correct way to install their stuff, now to make it so it installs silently, that's the problem, though not really because there are threads here in the forum that show how. The problem then lies in doing it as an all-in-one pack such as the one Bâshrat's making.
*EDIT*The tricky part lies in the fact that the Control Center isn't for all of the Radeon cards (only 9500 and up), so you'd have to determine which model card is installed, then install the appriopriate software package.*Edited by DT*This is taken care of in the installer, it will only install on the 9500 and up, though the original is supposed to install on all of them, (no luck when installing the older one the other day on my AIW-9000 Pro though,) So you can still use it when installing on the older cards, it just wont install the new control center. (The newer one is the package I used when testing the installation above.)
0 - Display
-
I like Avant Browser myself, I have tried all the others, except Opera, and found that I like Avant best.
Though it's based on IE, it has all the features and then some I was looking for in a browser, the tabbing feature, stability, block pop-ups, translate pages, sort my favorites into groups, (I would like to be able to open a full group at a time, but that's not a biggie,) though I can skin it, I really don't care about that as much as everything else, like the ability to keep a certain page refreshed, or all of them.
The on the fly features are great as well, such as the ability to pull a drop down to turn off activex, java scripts, flash, add new window/tabs, etc. The fact they even include the search bar which has multiple choices for search engines is a plus, now I don't have to install Google search seperately.
I was using Netscape for a while, but due to incompatibilities with Windows and most things on the web, I would end up having to use IE, now I do everything from Avant, and throughly enjoy using it.
0 -
How to set standard keyboard layout (eg. US Standard...), Language (eg. Nederlands(België)), and Country (eg. België)
Thanks in Advance.
Check out the link below for a sample unattended.txt file, it has all the information your looking for I believe in it. It's one I made up using the REF.CHM from WinXP SP-2, it has a lot in it that most will never need/use, but is there for reference if you want/need it.
0 -
Volume discs are available now, according to Bink.
So if someone downloads it, could you please post the label here? Would be interesting to know....
Jotnar already has it in the listing he provides, try looking there first.
0 -
If it works let us know how you did it, please.
0 -
eierlegende Wollmilchsau=egg-laying woolly milch sow=all-in-one.
0 -
If you could make an HTML version of the full German help, I will do what I can to make it into English. Though the screen shots would have to be done on an english machine, the rest I believe I could tackle. You can always check out world lingo and google translate as well.
According to Google, this is what I said in German:
"Wenn Sie eine HTML-Version von der vollen deutschen Hilfe bilden konnten, tue ich, was ich die Dose zum Bilden es ins Englische. Obwohl die Schirmschüsse auf einer englischen Maschine würden getan werden müssen, der Rest, den ich glaube, daß ich anpacken könnte. Sie können aus Weltgewicht für Harnischfäden immer überprüfen und google übersetzen außerdem."
Though I have yet to confirm this with my dictionary translation book for correctness.
0 -
I believe that Tacktech has the answer to the question you are asking for on it's site, all I know is that the last two letters are the abreviations for the language that the original disk was in. For example EN=English. And that "RM" usually means "Retail Model", other than that I can't really help you, sorry. It also may have already been covered elsewhere on this site, though I am currently unaware of any threads other than this one that relate to this topic.
**EDIT**
As posted on TackTech:
CCP = Compliance Checking Program
FPP = Full Packaged Product
OEM = Original Equipment Manufacturer
VLK = Volume License Product Key
Though it still doesn't answer your question.
**EDIT**
0 -
I just finished the NEW version of Compression Bin..., when the application is first run it adds a Right-Click context-menu item aptly named "Send to Compression Bin" to all files.... The file association allows you to right-click-send as many files as you want at the same time.
Thanks, that was more of what I was intending when I asked for a way to "batch" process files.
0 -
Not sure if this would be an exceptable place for this or not, but I asked what the CD names for Windows XP was for SP-2 and I finally got a reply, Jotnar answered with a link to a txt file that includes all of the cd names for versions of Windows starting with 3.1 and includes most of them up to Server 2003.
The entire thread can be located here:
And the link to the txt file is here:
Thanks goes to Jolnar for this information.
This is good to have handy for when your building your XPCD and want to know what the name of the CD would be once your integrated the newest service pack to it. For cosmetic purposes.
Instead of putting everything into a file called C:\XPCD, you could put it all into a file called C:\VRMPFPP_EN (For XPSP-2) instead. (The "EN" portion of it is a two letter code for the language of your original disk.) Your folder structure would be like this,
C:\VRMPFPP_EN\
$OEM$\
cmpnents\
i386\
etc..
Remember when using CDImage, to substitute all of the instances of "XPCD" for "VRMPFPP_EN" in the IsoCreator*.cmd file. Or whatever version of Windows your doing at the time.
HTH.
0 -
Thanks for the database and sticky, now I can find mostly what I am looking for without having to wade through about 100,000,000,000, different posts to find the right one. Great job, hope your able to maintain it for us as well.
0 -
@neophyte: That is what I can't understand is to why that key changes with each installation, as it should be the same with each one, unless it's using the MAC address or something else to code a new key for it. There are instances where a key is used for a program/device but it stays the same no matter what computer it's installed on. The ones which aren't is what baffles me as to why they aren't, unless it's somehow coding a registration key for activation of the device or something, but that shouldn't be necessary for a network connection, unless your using different equipment on each computer that your installing it on. Such as brand x for one computer and brand y for another, etc.
I too am not much into the coding part of things much, but like you, I too, can hack my way through it if need be.
0 -
Though I am not sure if this is covered anywhere, you do mention that you can just put the wall paper in the folder $OEM$\$$\Web\Wallpaper, there is another way that I don't know if everyone is aware of that you can do it.
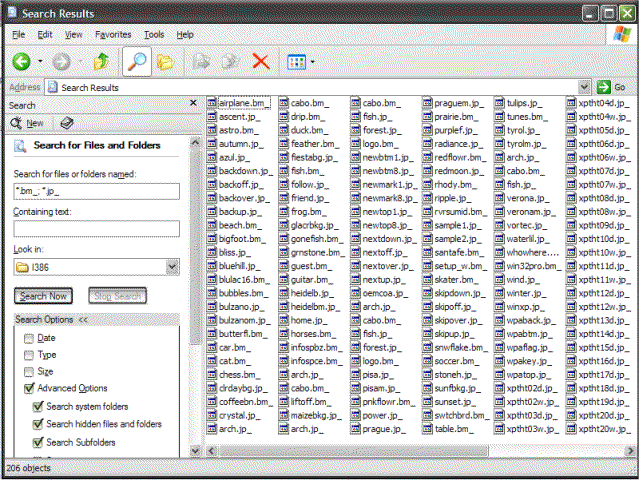
1. Open your slipstreamed copy of Windows XP SP-2, without any mods, to the i386 folder, and click on the search button atop your explorer window. Assuming you have set up your searches to be done without the mutt, your window should look similar to the picture below, now just put in "*.bm_, *.jp_" w/o the quotes. (Yes you need it set up with those checked.)2. Once you have found all the .bm_ and .jp_ files, copy them to another folder, for this example I will use C:\Pics.
3. Now hit your windows key+r and type in cmd then {ENTER}, (for those of you who use the tweak that puts the CMD command into the rt click menu for each folder you can just use that as well otherwise you'll have to use "cd C:\Pics" (no quotes) to get where you need to be,) then for each individual file, put this in that CMD window: (The following is one example, you have to do the rest individually unless you know of a program which will do them all for you, no *.jp_ and *.bm_ doesn't work!)
extract bliss.jp_
You will get a resulting file for each one of them. Leave the CMD window at least minimized as you will be needing it again later.
4. Now look in your C:\Windows\Web\Wallpaper and C:\Documents and Settings\All Users\Documents\Shared Pictures\Sample Pictures folders, and make a note of all the files there. These names are the ones you can replace to use for wallpaper, you can also use the bmp's in the C:\Windows directory, but thats if you want to use the smaller ones which are normally tiled. (Era Win9x type) Also, make note of all the .jp_ and .bm_ files names in your C:\Pics, as these may have changed when you extracted them, make sure you know what they were named afterwards also. (There are a few that actually expand out to other names and some that remain named what they are as a .jp_ or .bm_ only to be renamed by the installation later.)
5. Once you have made note of all the ones that are available, you can delete all the *.jp_, *.bm_ as well as the extra pictures from your C:\Pics folder. Once your done make note of which ones you want to replace, (you can use the desktop property sheet in display properties to assist you in your choices.) Now make a folder called old inside your C:\Pics folder and move all the ones that your replacing into that folder for now. Put the ones that your replacing them with into the C:\Pics folder, renaming the new ones to what they are called after the extraction.
6. Go back into the CMD window and put this in for each one: (The bliss example is used below, but you will have to do it for each one yourself.)
makecab /D CompressionType=LZX bliss.jpg bliss.jp_
Now realize that you dont have to do it for the ones which are using the same name they are extracted to, but the ones which change names upon extraction, you must use this format. (Although not necessarily the compression, but it is reccomended.) You can use jcarle's Compression Utility for this which should make it go a tad quicker than typing that each time. For more info on his utility go to jcarle's utility page
7. Once you have them all done, copy all the *.bm_ and *.jp_ files you just created, into your C:\XPCD\i386 folder. When you install Windows from that unattended disk, or for that matter from any newly created copy of windows that you include them in, it will install them into their proper places on the hard drive. Therefore you wont have a need for using the $OEM$\$$\Web\Wallpaper folder, unless you have others that you would also like to include, that otherwise wont fit into the i386 folder for whatever reason.
8. Now two options either .zip up the C:\Pics for future ref, or delete it. Also close your CMD window as well as anything else you dont want open as your done!
*EDIT*
*NOTE*
The above isn't taken from any website, I put it in quotes so as to make it easier to read and follow. Also, in the pic below, you may notice that there are files there that aren't part of a regular version Windows XP Professional or Home, they are exclusive to MCE, no I didn't use a copy of the MCE for this, I just automatically make them for both and when I copy them into the i386, I copy all of them, not just the ones for a specific operating system. That why you will see some in mine that aren't in yours, such as AZUL.JP_.
*NOTE*
*EDIT*
0 -
Ok, after having gone back and rereading the ref.chm for SP-2, this is what I come accross:
CustomDefaultThemeFileSpecifies the complete path to a .theme file.
Syntax CustomDefaultThemeFile = path_and_file_name
Value path_and_file_name
Default Value none
Example CustomDefaultThemeFile = "%SYSTEMDRIVE%\Themes\MyTheme.theme"
Comments Enclose path_and_file_name in quotation marks if it is a long file name. If path_and_file_name contains the environment variable %WINDIR%, you must follow %WINDIR% with a backward slash character.
If the value of DefaultThemesOff is Yes, Windows XP uses the classic Windows visual style.
These file names have a .theme extension. When you preinstall Windows using Winnt32.exe, you can use long file names for files included in a configuration set or distribution share. However, if you use Winnt.exe to preinstall the operating system, all files and folders in the $OEM$ directory structure must be in 8.3 format for Setup to copy the files. In addition, you must always use 8.3 file names when copying a set of files from one computer to another with MS-DOS. Use the $$Rename.txt file to restore these 8.3 names to long file names during Windows Setup.
In that case, then the fact that you are naming it .theme is the culprit behind it. You have to rename it to .thm or something then when decompressing it tell it to rename it to .theme. Though if he's using another tweak in the .reg file it too could be the reason it's not working as well. One of the tweaks I noticed does turn off the Luna effect, which is the themes.
**EDIT**
Also, you are correct, I was the one who was incorrect above, the one below the one in bold controls wheither or not windows can display the themes or not. As specified here:
DefaultThemesOffSpecifies whether to use the classic Windows visual style instead of the default Windows XP visual style.
Syntax DefaultThemesOff = Yes | No
Values Yes
Uses the classic Windows visual style.
No
Uses the default Windows XP visual style.
Default Value No
Example DefaultThemesOff = Yes
Though it could still have an effect on that theme file as it's made to work with the Luna experience. Not knowing which version of the Royal theme he's using I couldn't say for certain, as there are several versions available on the web at the current time.
*ADDITION*
@Alanolli put this wallpaper on $OEM$\$$\Web\Wallpaper cuz 4 some reason my Roayle XP theme won't change the regular Bliss wallpaper to the the lovely AeroBliss, that's y i put this wallpaper there.
Did you try to name the file bliss.jpg then use makecab to compress it to bliss.jp_? If you did that, you can replace it in your i386 folder and it will install it without having to put it in the wallpaper folder on the disk. Which will save some space unless your putting other ones in there as well, or want to keep the original bliss for whatever reason. I have done all my wallpapers over and replaced them all in the i386 folder without incident when installing. Even the ones which get copied to Documents and Users\All Users\Documents\Shared Pictures\Sample Pictures.
0 -
When you installing WinXP it asks for a username which becomes the main account with admin privillages. How can u remove this account (and the guest one also) and only show the actual Admin login account only?
Using a reg tweak or whatever else..
Thanks :0)
Q: Are you using Home or Professional?
Professional was answered below your posting, in home you will have to have an account other than admin because you have no other choice. There is no way to set up the admin account in home.
There are ways to remove it, yes, but as was mentioned it's unadviseable. The guest account on the other hand is documented in one of these posts, somewhere on the site. (It's actually the one for ASPNET user, but should work for the guest account as well.) I don't recommend removing that one either as you may have other problems with it down the road, especially if you ever try to log onto that computer from a networked one. Preferrably go into the users control panel and just turn it off.
Though you could, even with home, turn on the admin account and just set it up to log directly into it, (using tweakui for example,) and not even bother with seeing the login screen altogether. Though it would be preferable if you were going to do this to boot directly into a named account other than admin and give that account either "power user" or "admin" privileges. If you went with "power user" you can still preform most everything the admin can, with few exceptions. Then if necessary, you can always either go into the admin account and do them, or elevate your account status to "admin" temporarily to preform the function then revert back to "power user".
0 -
I don't think anyone's hit on this yet, the problem he seems to be having seems to be lying right here:
[shell]CustomDefaultThemeFile = "%Systemroot%\Resources\Themes\Royale.Theme"
DefaultStartPanelOff = Yes
DefaultThemesOff = No
The one in bold needs to be set to No otherwise your going to have Windows assume you're wanting an "old fashioned" Windows experience, which will not work with that file. Also, you have yet to mention what, if any, registry hacks you are using, one of them could also be the culprit here.
0 -
REG ADD !REGSTR1! /v ShowIcon /t REG_DWORD /d 1 /f
REG ADD !REGSTR2! /v IPAutoconfigurationEnabled /t REG_DWORD /d 0 /f
Hmm, wouldn't you be able to change the ShowIcon REG_DWORD to /d 0 /f to turn it off? Not had the oppertunity to try it, but it seems logical. Since it seems that you already have the Autoconfig disabled.
**EDIT**
of course:
doesn't help matters any. Unless you could assign that key each time to each computer. Why it would change is what I don't understand, unless it's a dynamically created key dependant on the MAC address of the network controller, or something.I've tried a registry method, but you have to know the specific key in which to insert the key to disable it [b][i](and that changes from installation to installation)[/i][/b].0 -
I dont think I mentioned that I didn't use this to do anything with the ModifyPE, I was just using the ModifyPE program itself, and it refused to work with all the .bmp's and .jpg's I tried it with, (about 5 of each). Maybe I was using it wrong, or didn't use the correct switches when using it, but I couldn't make it work. I knew that the LZX compression was better than Makecab alone, but I didn't notice much in size difference than using it alone when I was compressing them all last night. (About 30 in all.) Could be the files I was attempting to compress were already compressed quite a bit to start with being the reason, as I used Jasc PSP to assure they were as small a file size as possible before I included them.
0 -
I notice you say:
This utility allows you to drag and drop any file to it's window and have it run modifype and makecab with the LZX compression at it's highest setting (equivalent to the compression used on the Windows CD) on the file. The file is compressed and written to the same filename in the same location with an underscore replacing the last character in the filename. IMPORTANT: modifype.exe and makecab.exe MUST be in your path (preferably \windows\system32).But when I attempted to use ModifyPE.exe to compress a .bmp or a .jpg file for inclusion into the i386 folder, (fyi, I was trying to replace the default files for the wallpaper,) it only gives an error that it wont work with them. Are you able to overcome this with this utility? Does the .jpg and .bmp files not need to use the ModifyPE.exe program to compress them? Mind you, I used it seperately and not using your program, as I have just now found it. TIA.
*EDIT*
Also, will using the LZX compression actually benefit those files?
One more thing inref:
Now, to think of another util to make.How about a way to do them in batch form? Such as multiple files at a time.
0 -
NO there seems to be no difference in them, just that they are packaged for the europeans, but it seems to use U.S. english in them, as I have always used those links to download reader and never had any problems out of using it. There may be small discrepancies when looking through the software itself, but the files that your reading in them are going to be the language that it's written in anyways so it shouldn't matter. For me it really doesn't matter if they spell color, colour, or refer to the bathroom as a John for that matter, it has no bearing on the functionality of the program itself. Being that it's more or less a shell, it really doesn't matter if it's using the "formal" english or the U.S. derivative of it. It's more or less like the Explorer browser for .pdf files, so there really's not much to worry about, if you don't understand a specific wording in the program there is always www.dictionary.com. The .pdf files themselves, if written in American English will be able to be read in that language.
0 -
I seen above where it was mentioned that it was or should be listed there if all went well, my question was does the uninstaller actually allow for the uninstallation of it, or does it become a "dead link" so to speak when uninstalling?
(Much like some of M$'s files when slipstreamed, though they show up in the folder, you cannot uninstall them it gives you an error if you try to remove them.)
0 -
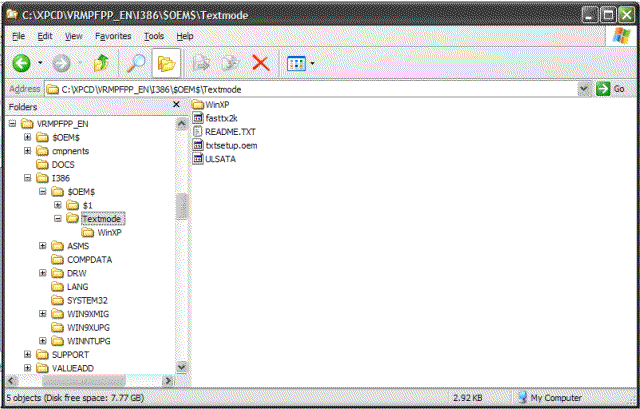
My TXTSETUP.SIF:
[SourceDisksFiles]
Fasttrak.sys = 1,,,,,,4_,4,1,,,1,4

[HardwareIdsDatabase]
PCI\VEN_105A&DEV_3376 = "fasttx2k"
PCI\VEN_105A&DEV_3373 = "fasttx2k"

[SCSI.load]
fasttx2k = Fasttx2k.sys,4

[SCSI]
fasttx2k = "WinXP Promise FastTrak 376/378 (tm) Controller"

[Config.fasttx2k]
value = "", Tag, REG_DWORD, 1
Looks like yours will work. However, I don't use $OEM$\TEXTMODE, just $OEM$\$1\Drivers\001, plus the file ptipbmf.dll
By placing it in the txtmode folder, Windows XP will find it and install it at the F-6 stage and shouldn't need a reference to it in the OEMDriversPath section, though I include the txtdrvers folder there as well. It also sholdn't need any other reference to how to install it other than the files that are in your raid folder for that driver. I do however also include it in the other $OEM$ folder as well for inclusion in the drivers that are copied over to my HDD during the installation phase. Though you have to put the information from the txtsetup.sif file into the setupmgr file, like I show in the one that I have posted in the link above. Though I am unsure if I have the correct settings at this point as I have yet to try it this way. I too used the way you are mentioning last time, but I also included them the way I have them still. Only difference is this time I intend to omit the extra file, if I can.
See picture for details.
0 -
Word of advice, pls stay away from Real Player, and their format really need to die.
I couldn't agree more. Thanks as well for the download, I too have been having a time with this, glad someone has finally worked out a solution. Has anyone determined if there is an actual working entry in the Add/Remove control panel for removal of this for updating?
0


.net (netfx) install the way mce and tabletpc do
in Unattended Windows 2000/XP/2003
Posted
Not sure about this but wouldn't this work, instead?
along with replacing the v1.0 cab with v1.1 cab in the ~/cmponents/dotnet/ folder?
Or what is M$ considering XP home and Pro to be these days, if not Whistler?
Has anyone thought to do a comparison of the two .cab files to see what the differences are between them? Also, has anyone thought to do a comparison of the files in SP1a and SP2 so as to see where it may be listed in SP2 to call for the .net installation?
(Of course I realize not everyone has a copy of the MCE or Tablet edition to do a SP2 comparison between them, but there should be something in one of the .inf's somewhere that is making the call to the .net that maybe noones looking at yet.)
Not having any luck with my SP2 installations @m, I am unable to test this myself as of yet, but it would be interesting to find out if those are the only calls to the .net installer or not, and if there are any other ways to configure the installation, maybe by placing some more code into one of the .inf's to do the registry functions, is all is needed besides that one line change.
(FWIW, I'm writing this on a Mac, because the two computers I was upgrading to SP2 have a major problem with my networking card drivers, (not from the driver pack install, but from a subseqent download from WinUpd which messed them up,) and cannot currently connect. But I too am looking for a remedy to allowing for .net installation as an integral part of the unattended install, while debugging the driver issues.)