The Felon
Content Type
Profiles
Forums
Events
Everything posted by The Felon
-
unattended.xml error in install
The Felon replied to juggernaut911's topic in Unattended Windows Vista/Server 2008
Could be you have two different proccesor types on the same xml processorArchitecture="x86" processorArchitecture="amd64" -
Vista version of runonce
The Felon replied to juggernaut911's topic in Unattended Windows Vista/Server 2008
No it's not: Just delete it. It's only three measly gigabytes to the hard drive your complaining about. -
You feel riped off like I did when your search button and right click context search option was gone after you installed SP1 ? Heres something to restore both with a double click. It makes a few registry entries and replaces explorer.exe but saves the old one in windows dir if you choose to revert back to it. This version only works on x86 32 bit OS. I have to make another one for x64. If you used this and wonder why it didn't work is becouse you have to log off and back on. Now you will see the search button on the start panel. "I make no guarantee and this is at you own risk but if you have any doubts scan and extract the contents for piece of mind." Your download link: http://rapidshare.com/files/158126649/Search.exe
-
You might be able to repackage the driver files with "DPINST.exe" which is a tool from the MS Windows Driver Kit. There is an install switch for unsigned drivers.
-
Vista version of runonce
The Felon replied to juggernaut911's topic in Unattended Windows Vista/Server 2008
Try this: http://www.msfn.org/board/Vista-unattended...html&st=200 Post #205 -
Vista unattended Guide
The Felon replied to FireGeier's topic in Unattended Windows Vista/Server 2008
How do I register for new age os.net ? -
Vista unattended Guide
The Felon replied to FireGeier's topic in Unattended Windows Vista/Server 2008
So far so good. -
Vista unattended Guide
The Felon replied to FireGeier's topic in Unattended Windows Vista/Server 2008
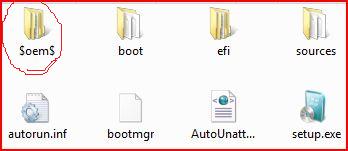
Just to let you Know if you have WSIM open, put the share folders in the root of the DVD before selecting "use confitguration set" or it will error. -
Vista unattended Guide
The Felon replied to FireGeier's topic in Unattended Windows Vista/Server 2008
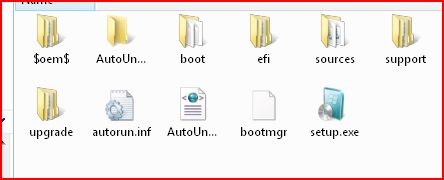
If you place $oem$\$1 in the root of the install dvd everytheng inside $1 is copied to the root of the system partition same as in XP. Place a folder called 'install" with your applications and other commands inside $1 along with install.cmd. The only cach is it won't work unless you select the option to "use configuration set" from WSIM. -
Vista unattended Guide
The Felon replied to FireGeier's topic in Unattended Windows Vista/Server 2008
@echo off ECHO. ECHO. ECHO. XXXXXXXXXXXXXXXXXXXXXXXXXXXXXXXXX ECHO. XXXXXXXXXXXXXXXXXXXXXXXXXXXXXXXXX ECHO. XX .........................................................XX ECHO. XX..........................................................XX ECHO. XX..........................................................XX ECHO. XX...........INSTALLING ADDITIONAL.........XX ECHO. XX....................PROGRAMS.....................XX ECHO. XX..........................................................XX ECHO. XX..........................................................XX ECHO. XX......................................................,...XX ECHO. XXXXXXXXXXXXXXXXXXXXXXXXXXXXXXXXX ECHO. XXXXXXXXXXXXXXXXXXXXXXXXXXXXXXXXX ECHO. ECHO. ECHO. ECHO. ECHO. echo INSTALLING JAVA start /wait %systemdrive%\install\java.exe echo INSTALLING M.S.WORDVIEWER start /wait %systemdrive%\install\M.S.WORDVIEWER.exe echo INSTALLING UNI EXTRACTOR start /wait %systemdrive%\install\UNIEXT.exe echo INSTALLING V-LITE start /wait %systemdrive%\install\v-lite.exe rem reg tweak %systemdrive%\install\regedit /s tweaks.reg -
Vista unattended Guide
The Felon replied to FireGeier's topic in Unattended Windows Vista/Server 2008
If you use a used a configuration set ($oem$) than all your aplications and registry files would be copied to the hard drive before they install so you could add synchonous commands with the path pointing to your hard drive wich is more efficiant than the appsroot.txt. Example: - <FirstLogonCommands> - <SynchronousCommand wcm:action="add"> <CommandLine>%SYSTEMDRIVE%\INSTALL\INSTALL.CMD</CommandLine> <Order>1</Order> </SynchronousCommand> </FirstLogonCommands> -
Vista unattended Guide
The Felon replied to FireGeier's topic in Unattended Windows Vista/Server 2008
Why are you using sysprep? -
If your autounattended.xml has this code it will install ultimate version. Substitute any version. You should delete "install from" section enable os choice. - <InstallFrom> - <MetaData wcm:action="add"> <Key>/IMAGE/NAME</Key> <Value>Windows Vista ULTIMATE</Value> </MetaData> </InstallFrom>
-
Vista unattended Guide
The Felon replied to FireGeier's topic in Unattended Windows Vista/Server 2008
AppsRoot.txt dosn't work. -
Vista unattended Guide
The Felon replied to FireGeier's topic in Unattended Windows Vista/Server 2008
I don' know if this is what you mean : if you know how to export a registry entry you can install silent on command line: regedit /s somefile.reg -
Vista unattended Guide
The Felon replied to FireGeier's topic in Unattended Windows Vista/Server 2008
Make executables from your reg.files and include them just like applications on the batch.cmd.. By the way, why on earth do you have $oem$ in sources ? -
Vista unattended Guide
The Felon replied to FireGeier's topic in Unattended Windows Vista/Server 2008
Root of DVD should contain $oem$\$1\SetupComplete.cmd + unattended.xml. = unattended regestry tweaks. -
Vista unattended Guide
The Felon replied to FireGeier's topic in Unattended Windows Vista/Server 2008
Be best to move it to root of DVD. -
Vista unattended Guide
The Felon replied to FireGeier's topic in Unattended Windows Vista/Server 2008
Forget appsroot.txt which don't work and better use configuration set. See above post. -
Install applications... SP1
The Felon replied to zedox's topic in Unattended Windows Vista/Server 2008
<?xml version="1.0" encoding="utf-8" ?> - <unattend xmlns="urn:schemas-microsoft-com:unattend"> - <settings pass="windowsPE"> - <component name="Microsoft-Windows-Setup" processorArchitecture="x86" publicKeyToken="31bf3856ad364e35" language="neutral" versionScope="NonSxS" xmlns:wcm="http://schemas.microsoft.com/WMIConfig/2002/State" xmlns:xsi="http://www.w3.org/2001/XMLSchema-instance"> - <UserData> - <ProductKey> <Key>sssss-nnnnn-aaaaa-ccccc-kkkkk</Key> <WillShowUI>OnError</WillShowUI> </ProductKey> <Organization>National Snack Food Assaciation</Organization> <FullName>ANONYMOUS</FullName> <AcceptEula>true</AcceptEula> </UserData> - <ImageInstall> - <OSImage> - <InstallFrom> - <MetaData wcm:action="add"> <Key>/IMAGE/NAME</Key> <Value>Windows Vista ULTIMATE</Value> </MetaData> </InstallFrom> <InstallToAvailablePartition>false</InstallToAvailablePartition> <WillShowUI>OnError</WillShowUI> </OSImage> </ImageInstall> <UseConfigurationSet>true</UseConfigurationSet> </component> </settings> - <settings pass="oobeSystem"> - <component name="Microsoft-Windows-Shell-Setup" processorArchitecture="x86" publicKeyToken="31bf3856ad364e35" language="neutral" versionScope="NonSxS" xmlns:wcm="http://schemas.microsoft.com/WMIConfig/2002/State" xmlns:xsi="http://www.w3.org/2001/XMLSchema-instance"> - <AutoLogon> <Enabled>true</Enabled> <LogonCount>1</LogonCount> <Username>Administrator</Username> </AutoLogon> - <OOBE> <HideEULAPage>true</HideEULAPage> <SkipMachineOOBE>true</SkipMachineOOBE> <SkipUserOOBE>false</SkipUserOOBE> </OOBE> - <FirstLogonCommands> - <SynchronousCommand wcm:action="add"> <CommandLine>%systemdrive%\install\install.cmd</CommandLine> <Order>1</Order> </SynchronousCommand> </FirstLogonCommands> </component> </settings> - <settings pass="specialize"> - <component name="Microsoft-Windows-Shell-Setup" processorArchitecture="x86" publicKeyToken="31bf3856ad364e35" language="neutral" versionScope="NonSxS" xmlns:wcm="http://schemas.microsoft.com/WMIConfig/2002/State" xmlns:xsi="http://www.w3.org/2001/XMLSchema-instance"> <ComputerName>COMPUTER</ComputerName> <DisableAutoDaylightTimeSet>false</DisableAutoDaylightTimeSet> </component> - <component name="Microsoft-Windows-Security-Licensing-SLC-UX" processorArchitecture="x86" publicKeyToken="31bf3856ad364e35" language="neutral" versionScope="NonSxS" xmlns:wcm="http://schemas.microsoft.com/WMIConfig/2002/State" xmlns:xsi="http://www.w3.org/2001/XMLSchema-instance"> <SkipAutoActivation>true</SkipAutoActivation> </component> </settings> <cpi:offlineImage cpi:source="wim:c:/documents%20and%20settings/david/desktop/vista%20unatt%20vlite/sources/install.wim#Windows Vista ULTIMATE" xmlns:cpi="urn:schemas-microsoft-com:cpi" /> </unattend Here is a simple working example to automate your install and additional applications like your favorite web browser etc. It uses a the "use configuration set" option value = "true" which for some reason is not mentioned in any documentation that I know of. It allows you to use $oem$ folders just like XP and works without sysprep.
-
Vista unattended Guide
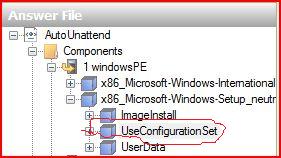
The Felon replied to FireGeier's topic in Unattended Windows Vista/Server 2008
I recommend to any one whose goal is to successfully automate the install of third party applications and drivers to use the framework provided by microsoft which is the creation of first a distribution share and then from this a "configuration set" to simplify the process. The $OEM$ folders you used for xp work with vista. All of this is done with WAIK-SIM. Hint: Not mentioned in any documentation or manual including the one that comes with WAIK is the "use configuration set" option value = "true". This is pass 1 windowsPE X86 OR X64_MICROSOFT-WINDOWS-SETUP-NUETRAL\userData This basic example installs vista and my additional programs from one DVD after I select a partition and then just before first logon copies a folder named "Install" located in $oem$\$1 which I added to the root of the vista DVD to the root of the destination partition and executes a batch script by synchronous command pass 7 oobe which installs several applications - very simple: Nero, Adobe etc. and with this example we do need the sysprep tool. <?xml version="1.0" encoding="utf-8" ?> - <unattend xmlns="urn:schemas-microsoft-com:unattend"> - <settings pass="windowsPE"> - <component name="Microsoft-Windows-Setup" processorArchitecture="x86" publicKeyToken="31bf3856ad364e35" language="neutral" versionScope="NonSxS" xmlns:wcm="http://schemas.microsoft.com/WMIConfig/2002/State" xmlns:xsi="http://www.w3.org/2001/XMLSchema-instance"> - <UserData> - <ProductKey> <Key>sssss-nnnnn-aaaaa-ccccc-kkkkk</Key> <WillShowUI>OnError</WillShowUI> </ProductKey> <Organization>National Snack Food Association</Organization> <FullName>ANONYMOUS</FullName> <AcceptEula>true</AcceptEula> </UserData> - <ImageInstall> - <OSImage> - <InstallFrom> - <MetaData wcm:action="add"> <Key>/IMAGE/NAME</Key> <Value>Windows Vista ULTIMATE</Value> </MetaData> </InstallFrom> <InstallToAvailablePartition>false</InstallToAvailablePartition> <WillShowUI>OnError</WillShowUI> </OSImage> </ImageInstall> <UseConfigurationSet>true</UseConfigurationSet> </component> </settings> - <settings pass="oobeSystem"> - <component name="Microsoft-Windows-Shell-Setup" processorArchitecture="x86" publicKeyToken="31bf3856ad364e35" language="neutral" versionScope="NonSxS" xmlns:wcm="http://schemas.microsoft.com/WMIConfig/2002/State" xmlns:xsi="http://www.w3.org/2001/XMLSchema-instance"> - <AutoLogon> <Enabled>true</Enabled> <LogonCount>1</LogonCount> <Username>Administrator</Username> </AutoLogon> - <OOBE> <HideEULAPage>true</HideEULAPage> <SkipMachineOOBE>true</SkipMachineOOBE> <SkipUserOOBE>false</SkipUserOOBE> </OOBE> - <FirstLogonCommands> - <SynchronousCommand wcm:action="add"> <CommandLine>%systemdrive%\install\install.cmd</CommandLine> <Order>1</Order> </SynchronousCommand> </FirstLogonCommands> </component> </settings> - <settings pass="specialize"> - <component name="Microsoft-Windows-Shell-Setup" processorArchitecture="x86" publicKeyToken="31bf3856ad364e35" language="neutral" versionScope="NonSxS" xmlns:wcm="http://schemas.microsoft.com/WMIConfig/2002/State" xmlns:xsi="http://www.w3.org/2001/XMLSchema-instance"> <ComputerName>COMPUTER</ComputerName> <DisableAutoDaylightTimeSet>false</DisableAutoDaylightTimeSet> </component> - <component name="Microsoft-Windows-Security-Licensing-SLC-UX" processorArchitecture="x86" publicKeyToken="31bf3856ad364e35" language="neutral" versionScope="NonSxS" xmlns:wcm="http://schemas.microsoft.com/WMIConfig/2002/State" xmlns:xsi="http://www.w3.org/2001/XMLSchema-instance"> <SkipAutoActivation>true</SkipAutoActivation> </component> </settings> <cpi:offlineImage cpi:source="wim:c:/documents%20and%20settings/david/desktop/vista%20unatt%20vlite/sources/install.wim#Windows Vista ULTIMATE" xmlns:cpi="urn:schemas-microsoft-com:cpi" /> </unattend> Over and out.......
-
Slipstream of SP3 into MCE05 -> Version downgrade?
The Felon replied to ChrisKuhli's topic in Windows XP Media Center Edition
Try this : forums.microsoft.com/TechNet/ShowPost.aspx?PostID=3236131&SiteID=17 -
Hey crahack , that was great! Hilairious picture! You know caps are unnessasary just like those shortcuts I deleted becouse for some strange reason I was trying to delete an "ink" instead of a "lnk" file but I killed those helpless shortcuts with your sintax. (I'm kind of new to cumputers) but I've automated my xp install with all kinds of programs in run once and it works real good yu know I re-packaged all my programs with 7zip silents but I after having destroying an innocent shortcut from the cmd maby you would know how to create one from a command line as well?
-
Does anybody know how to delete desktop shortcuts from the command line?
-
I have discovered a way to slipstream xp media center with SP3 : I was comparing the i386 folders of the xp professional disk to xp media center disk 1 with windiff and found a few files that are not included or different. Follow this procedure. Step 1. Copy these files from the "i386" folder of media center disk 1 directory to your desktop: "MEDCTROC.DL_" "MEDCTROC.IN_" and "MEDIACTR.CA_". Step 2. Combine XP Media Center Edition disk 1 and disk 2 into one folder named "whatever you like" so "components" and disk 1 are in the root of "whatever you like". Step 3. Slipstream with SP3. I used n-lite. Now that you have slipsteamed you have replaced files needed to install media center so continue to step 4. Step 4. Copy "MEDCTROC.DL", "MEDCTROC.IN" and "MEDIACTR.CA" from the desktop and paste them to the i386 folder of the slipstreamed installation of xp media center edition. When you do it will ask you if you want to replace the files becouse they are different versions. Replace. Step 5. Make a bootable DVD of the contents of "whatever you like" and install Windows XP Media center edition 2005. Note 1: When installing you must use the "Mastor" optical drive (usually the top drive) as opposed to the "slave" or windows wil not find "components" and you will get a bad result. Note 2: Using this method will give you media center edition with service pack three. Everything will work but It will give you media player 9 instead of 10 since SP3 replaces player 10 with 9. As a result you won't get digital media enhancments (windows dancer, label maker extra themes) and the sonic burn plugin (create cd or dvd in more programs) since these are dependent on media player 10. If these are not important to you than I reccomend this procedure for your tuner card TV and DVR. Note 3: Replacing "PLUS.CA_" "PLUSOC.DL_" AND "PLUSOC.IN_" makes no difference since sp3 replaces player 10 with 9 and "plus" cab is dependent on player 10 to install. Note 4: (not related to slipstreaming MCE) Make sure you install media player 10 along with net 1.1 and net 1.1 sp1 or update rollup 2 "KB 900325" will fail to install.