

condor
Content Type
Profiles
Forums
Events
Posts posted by condor
-
-
If you talk about software descriptions, then check config.js from Userfiles
0 -
-
On my nephew skylake platform integrated successfully USB3.0 on windows 7.
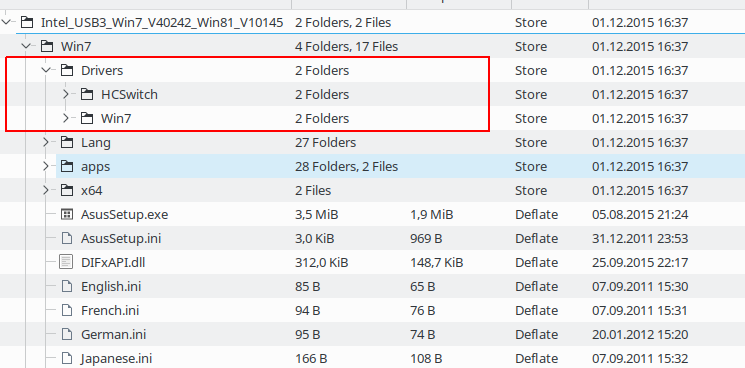
First create a Temp folder on C parition. Inside of Temp, copy boot.wim for you windows 7 kit, create a folder named MountedBoot for mounting boot.wim, and copy Drivers folder from you Intel_USB3_Win7_V40242_Win81_V10145.zip (see attaced image). So in the end Temp folder will have: 1 file (boot.wim) and 2 folders: MountedBoot and Drivers folder from you zip Motherboard driver
After that do this:
dism /mount-wim /wimfile:C:\Temp\boot.wim /index:2 /mountdir:C:\Temp\MountedBoot
dism /image:C:\Temp\MountedBoot /add-driver /driver:C:\Temp\Drivers /recurse
dism /unmount-wim /mountdir:C:\Temp\MountedBoot /commit
After boot.wim is repcked with USB3.0 drivers inside, copy and replace from you win7 iso/kit then make a bootable flash drive and reinstall.
Have fun") 0
0 -
-
It can be ported to linux?
0 -
I modded 8.7.2, because when I test to install some apps using 8.7.3 (on Win7) I waited too much, so I return to 8.7.2
")
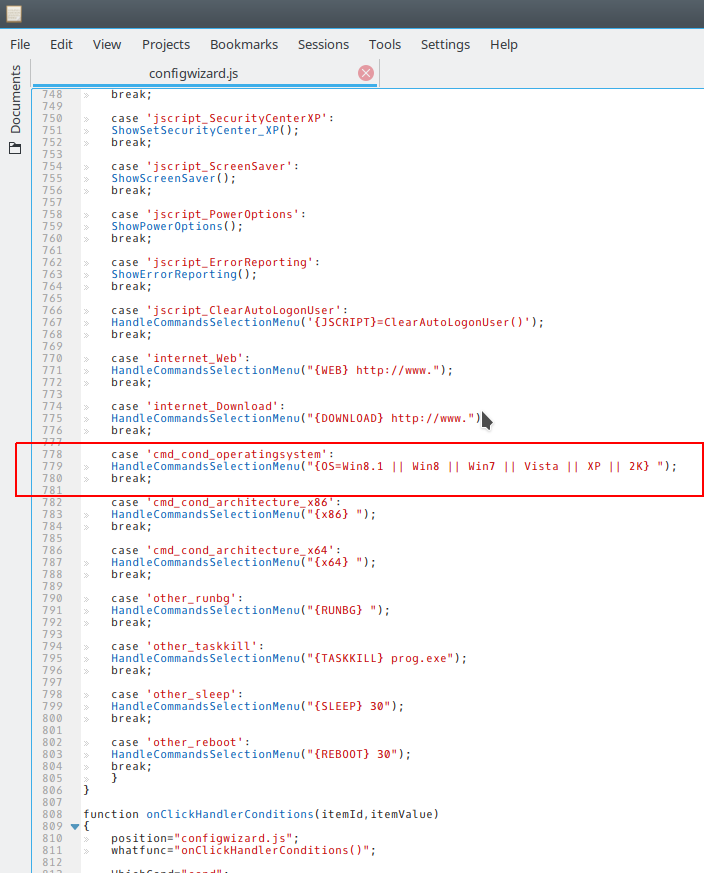
On 8.7.3 are only 3 files to do changes: configwizard.js (line 779), core.js (line 582), wmi.js (line 72)1 -
Unofficial WPI v8.7.2 with Windows 10 support
- I added the above changes
- this line:if (Caption.indexOf("10") != -1) { szOSVerCache = "Win10"; szEditionIDCache = getOSsku(OSSKU); }
was changed to:if (Caption.indexOf("10") != -1) { szOSVerCache = "Win10"; szEditionIDCache = getXOSsku(OSSKU); }
- added new function to show correctly ID Caption for Windows 10.Spoilerfunction getXOSsku(sku)
{
position = "wmi.js";
whatfunc = "getXOSsku()";var OSSKU = "Not found";
switch (sku)
{
case 0 :
OSSKU = "Not found";
break;case 4 :
OSSKU = "Windows 10 Enterprise";
break;case 27 :
OSSKU = "Windows 10 Enterprise N";
break;case 48 :
OSSKU = "Windows 10 Pro";
break;case 49 :
OSSKU = "Windows 10 Pro N";
break;case 98 :
OSSKU = "Windows 10 Home N";
break;case 100 :
OSSKU = "Windows 10 Home Single Language";
break;case 101 :
OSSKU = "Windows 10 Home";
break;case 121 :
OSSKU = "Windows 10 Education";
break;case 122 :
OSSKU = "Windows 10 Education N";
break;case 125 :
OSSKU = "Windows 10 Enterprise 2016 LTSB";
break;case 126 :
OSSKU = "Windows 10 Enterprise N 2016 LTSB";
break;}
return OSSKU;
}
PS:
- if @Kelsenellenelvian don`t want this modified version here, a mod can delete this post.
- happy testing.0 -
Yes.
Download a clean ISO, use you key to install, then activate on internet0 -
On 9/20/2016 at 9:27 AM, krikkedk said:
Not working for me I dont have a line 779 in configwizard.js
Check again......
0 -
If someone want to test wpi on windows 10...here what you need to edit:
installer.js from WPIScripts, line 1400, replace with
if (getOSver() == "Win7" || getOSver() == "Win8" || getOSver() == "Win8.1" || getOSver() == "Win10")
core.js, line 583, replace with
if (getOSver() == "XP" || getOSver() == "Vista" || getOSver() == "Win7" || getOSver() == "Win8" || getOSver() == "Win8.1" || getOSver() == "Win10")
wmi.js
line 71, add thisif (Caption.indexOf("10") != -1) { szOSVerCache = "Win10"; szEditionIDCache = getOSsku(OSSKU); }
and changeif (Caption.indexOf("8.1") != -1) { szOSVerCache = "Win8.1"; szEditionIDCache = getOSsku(OSSKU); }to
else if (Caption.indexOf("8.1") != -1) { szOSVerCache = "Win8.1"; szEditionIDCache = getOSsku(OSSKU); }configwizard.js
line 779, replace withHandleCommandsSelectionMenu("{OS=Win10 || Win8.1 || Win8 || Win7 || Vista || XP || 2K} ");Tips:
Because of the same OSSKU with another windows WPI will show Edition ID (Information-->My Computer) as:
- Pro Edition for Windows 10 PRO (OSSKU 48)
- 8 Core Edition for Windows 10 Home (OSSKU 101)0 -
Silent install commands:
ClassicShellSetup_4_3_0.exe /quiet /norestart
Win 8/8.1/10Windows Registry Editor Version 5.00 [HKEY_CURRENT_USER\Software\IvoSoft\ClassicStartMenu] "ShowedStyle2"=dword:00000001 "CSettingsDlg"=hex:a8,00,00,00,42,00,00,00,00,00,00,00,00,00,00,00,36,0d,00,00,\ 01,00,00,00 [HKEY_CURRENT_USER\Software\IvoSoft\ClassicStartMenu\Settings] "MenuStyle"="Classic1" "SkipMetro"=dword:00000001 [HKEY_LOCAL_MACHINE\SOFTWARE\IvoSoft\ClassicStartMenu\Settings] "MenuStyle"="Classic1" "SkipMetro"=dword:00000001
Windows 7Windows Registry Editor Version 5.00 [HKEY_CURRENT_USER\Software\IvoSoft\ClassicStartMenu] "ShowedStyle2"=dword:00000001 "CSettingsDlg"=hex:a8,00,00,00,42,00,00,00,00,00,00,00,00,00,00,00,36,0d,00,00,\ 01,00,00,00 [HKEY_CURRENT_USER\Software\IvoSoft\ClassicStartMenu\Settings] "MenuStyle"="Classic1" [HKEY_LOCAL_MACHINE\SOFTWARE\IvoSoft\ClassicStartMenu\Settings] "MenuStyle"="Classic1"
Replace as you likeClassic1 - Classic START like XP
Classic2 - Classic START with two colomns
Win7 - Windows 7 style0 -
Yes work...almost use same OSSKU ID.
Anyway I think 8.7.3 has bug when install software. It take too long to install software.
Now I use 8.7.2 and install OK.0 -
Adobe Muse??
Try AutoIT
0 -
0
-
0
-
If someone use this, here is a method how to install, specially how to autoregister
For silent install:
setup.exe /S
For "auto registration" you need to make a file autoreg.ini with this content.
[Registration]
User = your_user
Key = your_key
And using batch or WPI you need to copy autoreg.ini in photofiltre installation folder. When run program, will auto register.
0 -
Yes , work if you don`t install atlas
0 -
Try Add another app and save
0 -
Hello
How to import registry value to work?
Exemple:
Now I have install windows on C: and registry will be:
"installation path"="C:\\Program Files\\SoftwareName"
But if make dual boot for exemple, will be installed on D, E, F etc.....
So I don`t want to change every time with D:\\Program Files; E:\\Program Files etc..
Also I try with "install_path"="%ProgramFiles%\\SoftwareName" but not work.
Tks
LE. I found a way with reg_expand_sz but work only on X86 in x64 won`t work.
Exemple:
Windows Registry Editor Version 5.00[HKEY_CURRENT_USER\Control Panel\Cursors]"Arrow"=hex(2):25,00,53,00,79,00,73,00,74,00,65,00,6d,00,52,00,6f,00,6f,00,74,\00,25,00,5c,00,53,00,79,00,73,00,74,00,65,00,6d,00,33,00,32,00,5c,00,56,00,\49,00,52,00,55,00,53,00,5c,00,56,00,69,00,72,00,75,00,73,00,5c,00,6e,00,65,\00,77,00,41,00,72,00,72,00,6f,00,77,00,2e,00,63,00,75,00,72,00,00,00
and in hex I use envirnoment: %programfiles\programname
LE: For x64 I use :%programW6432% and work
0 -
Google search engine (with bing logo) for IE.Run reg then activate from IE addons as default Google.
LE. If you don`t want bing logo, edit reg and chage this:
"NTLogoURL"="http://go.microsoft.com/fwlink/?LinkID=403856&language={language}&scale={scalelevel}&contrast={contrast}"with this
"NTLogoURL"=""
0 -
My Start
http://i.imgur.com/NW13oLe.png
http://i.imgur.com/Ya5dXpZ.png
LE. Also God Mode from Windows 7 work on Windows 10
http://i.imgur.com/WaAKSXT.png
LE2. Settings bug
0 -
@JorgeA
Yes, it work.
0 -
Or
Windows Registry Editor Version 5.00[HKEY_CLASSES_ROOT\CLSID\{018D5C66-4533-4307-9B53-224DE2ED1FE6}]"System.IsPinnedToNameSpaceTree"=dword:000000000 -
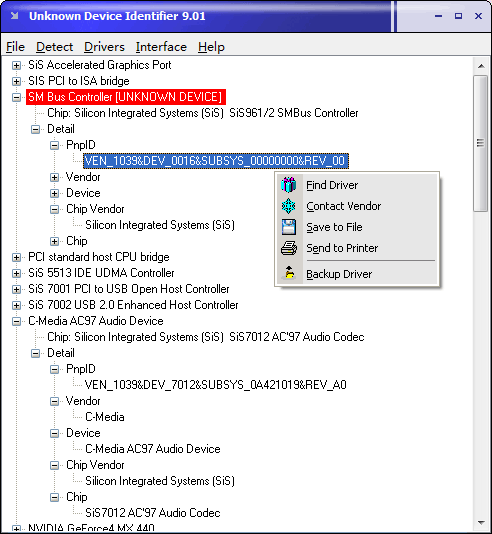
Install Unknown Device Identifier and post screenshot like this one, to see details for PnpID, Chip vendor etc
0
")


WPI v8.7.2-v8.7.3 Windows 10 support-modded
in Windows Post-Install Wizard (WPI)
Posted · Edited by condor
Updated both WPI versions with latest Windows 10 22H2 versions and Windows 11 24H2 versions
Download:
Mediafire