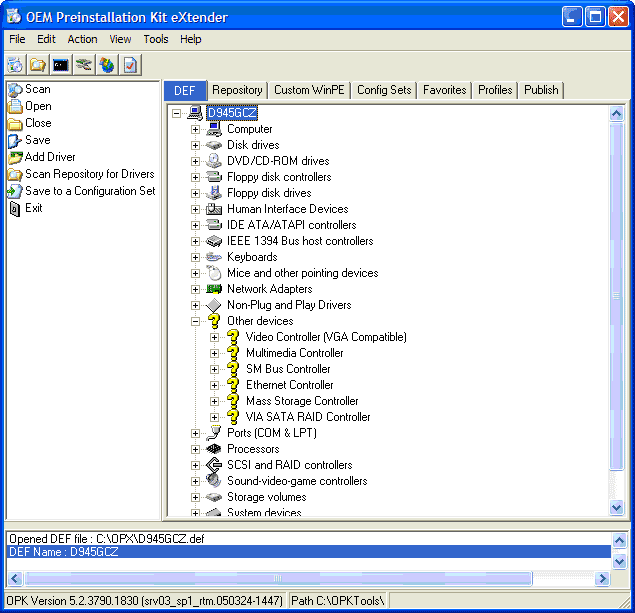
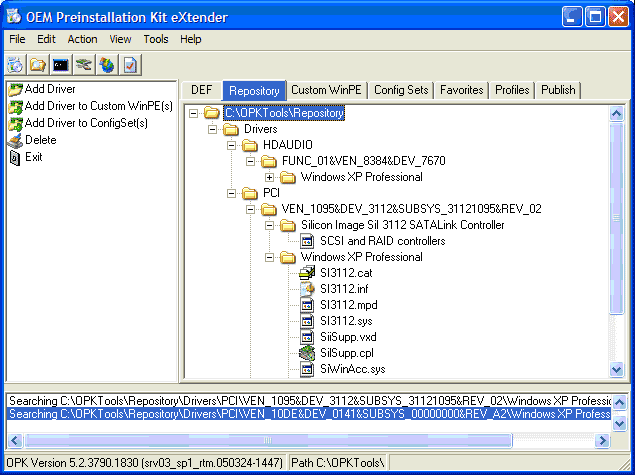
New powertoy from Microsoft! Current version: Beta 1 (0.0.1.62) Date: January 24, 2006 The OPK eXtender is a powertoy for the Windows® OEM Preinstallation Kit (OPK) that adds system builder-specific features to the OPK. OPX extends the functionality of the OPK in two ways: • Automating many of the manual OPK tasks. • Adding new features designed to meet the needs of system builders. OPX adds a management layer to the preinstallation infrastructure that you create with the OPK. With the graphical user interface (GUI) of OPX, you can run the most frequently used command-line OPK tools and manage the configuration sets created by the OPK. You can use OPX to manage all the software resources that you use to build new PCs--Windows SKUs, product keys, out-of-box drivers, Windows updates, your company logos, your support information, and so on. This makes it easier for you to automate the process of building a Windows PC, using either the network-based or CD-based method. With the OPK and OPX together, you can build new Windows PCs--customized with your branding, support information, extra drivers, and Windows updates--faster than by hand or by using the standard OPK techniques. This lowers your manufacturing costs. By adding your branding and support info, you build a better relationship with your customers by delivering more that just a “whitebox”. OPX features OPX adds these new features to the OPK: • A reinstall CD solution for your customers: This is a solution that restores the PC to the state that you sold it in. Use OPX to create a CD image (.iso) containing the out-of-box drivers for the PC to burn to CD, as well as a Winnt.sif that adds your branding and runs Sysprep. With that CD and a floppy containing the Winnt.sif and some OPX files, your customer can boot the PC with the hologram Windows CD and Winnt.sif and the OPX files will automate the reinstallation of Windows with your customizations. The next release of OPX will add update and applications support to the reinstall solution. • The “one-off” preinstallation: When you take an order for a single PC, use this method to extend the standard CD-based preinstallation. You can use OPX to build a custom Winnt.sif that adds your branding and support info to the new PC and reseals it with Sysprep. This method works for Windows XP, Windows Server 2003, and Windows versions that require two CDs for installation such as Windows Media Center Edition 2005, Windows XP Tablet PC Edition, and Windows Server 2003 R2 Edition. It also adds F6 support for custom mass-storage drivers, and optional WSUS integration for adding Windows updates. • Driver scanning of new PCs: The Scan command analyzes the hardware of a new PC and identifies any missing drivers. The results of the scan are listed in a driver enumeration file (.def) and displayed in the DEF tab. You can load that DEF in the OPX install on your technician computer and use it to add the missing drivers to your repository and then to one or more configuration sets. • A repository of out-of-box drivers: As you build PCs, whenever you add hardware that uses an out-of-box driver you can add that driver to the OPX repository. When you have a repository, you can use OPX to scan a new PC to identify the missing drivers, and automatically update configuration sets to add those drivers from the repository. OPX modifies all answer files for you, including Txtsetup.oem for mass-storage drivers. Then, you run the network-based preinstall using the updated configuration set and Windows is installed with the out-of-box drivers. • System builder profiles: A profile is the set of information that you use to brand a new PC: your logos, a desktop background, your support info, IE home page, and so on. You can automatically update one or more configuration sets with a profile. If you build PCs for another system builder, you can add their profile to config sets to create PC branded with your partner’s branding. OPX automates these standard OPK tasks: • Updating configuration sets to add support for out-of-box drivers: Once you’ve used the Scan command to identify the missing drivers on the new PC, and you’ve added those drivers to the repository, you can use OPX to automatically add those drivers to a configuration set. OPX copies the drivers to the $OEM$ directories and edits the answer files accordingly. This includes mass-storage drivers as well. • Creating customized Windows PE builds and ISOs: OPX provides a GUI to the Windows PE build tools (Mkimg and Oscdimg) to make it simple for you to create custom Windows PE builds. You can also add drivers from your repository to your Windows PE builds, including mass-storage drivers. • Creating a UFD that boots with Windows PE: The Server 2003 SP1 OPK added the ability to create bootable USB flash devices (UFD) that can boot Windows PE. If you have the Server 2003 SP1 OPK installed, you can use OPX to create the bootable UFD from your custom Windows PE build. • Adding Windows Server Update Services (WSUS) integration: If you have a WSUS server, you can automatically use it with your configuration sets or CD-based installations to add Windows Updates to your preinstallation process. OPX configures the Windows Update Agent (WUA) service to access Windows Server Update Services (WSUS) for updates. • Running the Mkimg, Oscdimg, Drvinst, and Formatufd commands: The OPX GUI makes it easy for you to run these OPK command-line tools without needing to open a command prompt and remember the syntax of each command. Edit fields are available if you need to edit the command-line options. • Checks answer files for common errors: OPX checks the answer files in a configuration set for common errors such as missing disk configuration, support information or driver signing policy. Some screensots in attachments... http://search.microsoft.com/results.aspx?q...n-US&FORM=QBME1] http://search.microsoft.com/results.aspx?q...n-US&FORM=QBME1 At the end - bad news: now accessible only by Microsoft registred systembuilders