swain90
About swain90

swain90's Achievements
0
Reputation
-
[SOLVED] PXE Boot Different Subnets Microsoft WDS Server
swain90 replied to swain90's topic in Windows PE
Finally got it working! My DHCP Pool: option 67 parameter was wrong on the switch, i've changed it to DHCP Pool: option 67 ascii Boot\x64\wdsnbp.com and then also changed the TFTP block size in the WDS manager to 1024 and everything has sprung into life. -
Hi All, I was wondering if you could help....? I've setup a Microsoft Server 2016 WDS Server at LocationA, and on the local LocationA LAN it works fine. Local PCs get a DHCP address from the local switch, the PC PXE boot finds the WDS server and the imaging works fine. Note, there is no DHCP configuration on the WDS server. At LocationB, the LAN is on a different subnet, however routing is working between the two locations (A and B) and I can ping the WDS server from LocationB LAN switch, as well as LocationB PCs logged into Windows, so the routing appears to be OK. When I try and PXE Boot from LocationB, the PXE PC gets the correct IP and Default Gateway Information from the LocationB LAN/DHCP pool, however once the PC has downloaded the boot file i then get "TFTP download failed". I can see the download has been successful is the WDS Event Viewer. In order to get this far, I've had to set the TFTP block size to 512. Changing this value to anything else causes my PC at LocationB to get a TFTP Timeout error during the PXE boot. My configuration on the LocationB switch is.... DHCP Pool: option 66 ip <LocationA WDS IP Address> DHCP Pool: option 67 ascii Boot\x64\pxeboot.com DHCP Pool: next-server <LocationA WDS IP Address> Any help would be apprieciated Cheers Swain90
-
Hi All, I've just activated my Server 2008R2 RDS server and I'm ready to install device cals from my open license agreement. When I right click on my server in RD Licensing Manager and select Install Licenses I'm presented with the Install Licenses Wizard, however the License Program states it's set to "License Pack (Retail Purchase)". I could have sworn in the past I've been presented with an option to select the type of license agreement I have. If someone could offer some help that'd be much appreciated. Cheers, Swain90
-
Hi, I'm currently using 2 different Windows Server 2008R2 ISOs to deploy on two different types of machines we have. The reason for this is due to one machine having 4 physical disks (2 of those are in RAID 1, so essentially 3 disks as far as the OS is concerned) and the other just having 1. Both setups have this XML line in them under disk configuration within the AutoUnattend.xml. <WillShowUI>OnError</WillShowUI> If I removed this XML and then ran the 3 disk configuration AutoUnattend on the PC which has just 1 hard disk, would I still get an error or would setup continue as normal? I'm trying to avoid having 2 separate image files. Cheers, Swain90
-
Hi All, I encountered an issue with my AutoUnattend.xml file when booting from a USB Stick the other day, this was the error "Setup was unable to create a new system partition". Below is a copy of my script, is there anything in there which could be causing the problem. Note- this has only happened on one machine so far, others have been OK but they're not 100% identical. <?xml version="1.0" encoding="utf-8"?> <!--This answer file generated by RT Seven Lite--> <unattend xmlns="urn:schemas-microsoft-com:unattend"> <settings pass="windowsPE"> <component name="Microsoft-Windows-International-Core-WinPE" processorArchitecture="amd64" publicKeyToken="31bf3856ad364e35" language="neutral" versionScope="NonSxS" xmlns:wcm="http://schemas.microsoft.com/WMIConfig/2002/State" xmlns:xsi="http://www.w3.org/2001/XMLSchema-instance"> <SetupUILanguage> <UILanguage>en-US</UILanguage> </SetupUILanguage> <InputLocale>0809:00000809</InputLocale> <UserLocale>en-GB</UserLocale> <UILanguage>en-US</UILanguage> <SystemLocale>en-US</SystemLocale> </component> <component name="Microsoft-Windows-Setup" processorArchitecture="amd64" publicKeyToken="31bf3856ad364e35" language="neutral" versionScope="NonSxS" xmlns:wcm="http://schemas.microsoft.com/WMIConfig/2002/State" xmlns:xsi="http://www.w3.org/2001/XMLSchema-instance"> <DiskConfiguration> <WillShowUI>OnError</WillShowUI> <Disk> <DiskID>0</DiskID> <WillWipeDisk>true</WillWipeDisk> <CreatePartitions> <CreatePartition> <!-- Create the system partition--> <Order>1</Order> <Type>Primary</Type> <Size>100</Size> </CreatePartition> <!-- Create the Windows partition and fill the rest of the hard disk --> <CreatePartition> <Order>2</Order> <Type>Primary</Type> <Extend>true</Extend> </CreatePartition> </CreatePartitions> <ModifyPartitions> <!-- Modify the system partition--> <ModifyPartition> <Order>1</Order> <PartitionID>1</PartitionID> <Format>NTFS</Format> <Label>System</Label> <Letter>Z</Letter> </ModifyPartition> <!-- Modify the Windows partition --> <ModifyPartition> <Order>2</Order> <PartitionID>2</PartitionID> <Format>NTFS</Format> <Label>Windows</Label> <Letter>C</Letter> </ModifyPartition> </ModifyPartitions> </Disk> <Disk> <DiskID>1</DiskID> <WillWipeDisk>true</WillWipeDisk> <CreatePartitions> <!-- Use Whole Disk --> <CreatePartition> <Order>1</Order> <Type>Primary</Type> <Extend>true</Extend> </CreatePartition> </CreatePartitions> <ModifyPartitions> <!-- Modify the Windows partition --> <ModifyPartition> <Order>1</Order> <PartitionID>1</PartitionID> <Format>NTFS</Format> <Label>LOGGING</Label> <Letter>D</Letter> </ModifyPartition> </ModifyPartitions> </Disk> <Disk> <DiskID>2</DiskID> <WillWipeDisk>true</WillWipeDisk> <CreatePartitions> <!-- Use Whole Disk --> <CreatePartition> <Order>1</Order> <Type>Primary</Type> <Extend>true</Extend> </CreatePartition> </CreatePartitions> <ModifyPartitions> <!-- Modify the Windows partition --> <ModifyPartition> <Order>1</Order> <PartitionID>1</PartitionID> <Format>NTFS</Format> <Label>DB</Label> <Letter>E</Letter> </ModifyPartition> </ModifyPartitions> </Disk> </DiskConfiguration> <ImageInstall> <OSImage> <InstallFrom> <MetaData wcm:action="add"> <Key>/IMAGE/NAME</Key> <Value>Windows Server 2008 R2 SERVERSTANDARD</Value> </MetaData> </InstallFrom> <InstallTo> <DiskID>0</DiskID> <PartitionID>2</PartitionID> </InstallTo> <InstallToAvailablePartition>false</InstallToAvailablePartition> <WillShowUI>OnError</WillShowUI> </OSImage> </ImageInstall> <UserData> <ProductKey> <Key>HMG6P-C7VGP-47GJ9-TWBD4-2YYCD</Key> <WillShowUI>OnError</WillShowUI> </ProductKey> <Organization>Company</Organization> <FullName>System</FullName> <AcceptEula>true</AcceptEula> </UserData> </component> </settings> <settings pass="oobeSystem"> <component name="Microsoft-Windows-Shell-Setup" processorArchitecture="amd64" publicKeyToken="31bf3856ad364e35" language="neutral" versionScope="NonSxS" xmlns:wcm="http://schemas.microsoft.com/WMIConfig/2002/State" xmlns:xsi="http://www.w3.org/2001/XMLSchema-instance"> <FirstLogonCommands> <SynchronousCommand wcm:action="add"> <Order>1</Order> <Description>Extract Drivers</Description> <CommandLine>%systemdrive%\Install\Extract.bat</CommandLine> </SynchronousCommand> <SynchronousCommand wcm:action="add"> <Order>2</Order> <Description>Install Graphics Driver</Description> <CommandLine>%systemdrive%\Install\GFX\Install.bat</CommandLine> </SynchronousCommand> <SynchronousCommand wcm:action="add"> <Order>3</Order> <Description>Install Intel Management Engine</Description> <CommandLine>%systemdrive%\Install\IntelME\Install.bat</CommandLine> </SynchronousCommand> <SynchronousCommand wcm:action="add"> <Order>4</Order> <Description>Change Security Policy</Description> <CommandLine>%systemdrive%\Install\SecPol.bat</CommandLine> </SynchronousCommand> <SynchronousCommand wcm:action="add"> <Order>5</Order> <Description>Final Configuration</Description> <CommandLine>%systemdrive%\Install\UnattendedConfig.exe</CommandLine> </SynchronousCommand> <SynchronousCommand wcm:action="add"> <Order>6</Order> <Description>Remove System Drive Letter</Description> <CommandLine>%systemdrive%\Install\Cleanup.bat</CommandLine> </SynchronousCommand> </FirstLogonCommands> <UserAccounts> <AdministratorPassword> <Value>Password1</Value> <PlainText>true</PlainText> </AdministratorPassword> </UserAccounts> <AutoLogon> <Password> <Value>Password1</Value> <PlainText>true</PlainText> </Password> <Enabled>true</Enabled> <!--<LogonCount>3</LogonCount>--> <Username>Administrator</Username> </AutoLogon> <OOBE> <NetworkLocation>Work</NetworkLocation> <HideWirelessSetupInOOBE>false</HideWirelessSetupInOOBE> <SkipMachineOOBE>true</SkipMachineOOBE> <SkipUserOOBE>false</SkipUserOOBE> </OOBE> <DisableAutoDaylightTimeSet>false</DisableAutoDaylightTimeSet> <TimeZone>GMT Standard Time</TimeZone> </component> </settings> <settings pass="specialize"> <component name="Microsoft-Windows-Shell-Setup" processorArchitecture="amd64" publicKeyToken="31bf3856ad364e35" language="neutral" versionScope="NonSxS" xmlns:wcm="http://schemas.microsoft.com/WMIConfig/2002/State" xmlns:xsi="http://www.w3.org/2001/XMLSchema-instance"> <ComputerName>SSER</ComputerName> </component> <component name="Microsoft-Windows-Security-Licensing-SLC-UX" processorArchitecture="amd64" publicKeyToken="31bf3856ad364e35" language="neutral" versionScope="NonSxS" xmlns:wcm="http://schemas.microsoft.com/WMIConfig/2002/State" xmlns:xsi="http://www.w3.org/2001/XMLSchema-instance"> <SkipAutoActivation>true</SkipAutoActivation> </component> </settings> </unattend>
-
From the start... I downloaded this ISO; https://www.microsoft.com/en-gb/download/details.aspx?id=11196 and trialed it on a virtual box VM, that ISO works fine. I've then used various tools to extract the boot loader from that ISO, checked the MD5 hashes each tool extracts the same boot file. Once the iso has been built and I start the VM all I get is this; I've found some tools which will allow me to add my unattended file to the iso and save, the ISO then boots up fine, however the setup process won't launch; https://i.imgur.com/KFktGSe.png [/img] I have no idea why it's not working :-\
-
I don't even get the windows xp boot screen so it's not an issue with unattended file. I'll post some pictures/videos on Monday when I'm back at work.
-
I've used a few programs to extract and the MD5 hashes always come back the same. I've tried a couple of utilities where I've added my answer file to the image and saved, the ISO works for booting but it seems to corrupt the install and I can't run the setup files.
-
Hi Jaclaz, cd.img is 2,048 bytes
-
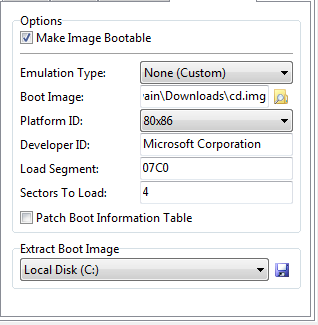
I have downloaded the Windows Pos 2009 Embedded trial CD and gone through the installation fine. I've taken a copy of the Microsoft sample unattended file and I'm trying to make a new ISO with the embedded file, however I can't for the life of me work out how to build a new bootable ISO. I've use WinISO to extract the boot image, and I'm using imgburn (image attached). Where am I going wrong? Cheers Swain90

-
This Microsoft link https://support.microsoft.com/en-us/kb/558124 may help you if you want to get the S/N, not quite sure you'd be able to incorporate it into the AutoUnattend.xml however nothing wrong with using PowerShell to rename the computer name?
-
Hi All, Having a bit of a strange issue. I'm using the RunOnceEX method to install some applications, however the title of the RunOnceEx box is only getting set once. So the first time I use ROEx it sets the title correctly but then the two times after this the title bar just says Windows Update. I am setting the title key but for some reason it doesn't change the title bar? Anyone have any ideas? Cheers Swain90
-
MANY THANKS!!!!! It now reads as this and works; <DiskConfiguration> <Disk wcm:action="add"> <CreatePartitions> <CreatePartition wcm:action="add"> <Order>1</Order> <Size>200</Size> <Type>Primary</Type> </CreatePartition> <CreatePartition wcm:action="add"> <Order>2</Order> <Size>20000</Size> <Type>Primary</Type> <Extend>False</Extend> </CreatePartition> <CreatePartition wcm:action="add"> <Order>3</Order> <Type>Primary</Type> <Extend>True</Extend> </CreatePartition> </CreatePartitions> <ModifyPartitions> <ModifyPartition wcm:action="add"> <Active>true</Active> <Format>NTFS</Format> <Label>System</Label> <Order>1</Order> <PartitionID>1</PartitionID> </ModifyPartition> <ModifyPartition wcm:action="add"> <Active>true</Active> <Format>NTFS</Format> <Label>Windows</Label> <Order>2</Order> <PartitionID>2</PartitionID> </ModifyPartition> <ModifyPartition wcm:action="add"> <Format>NTFS</Format> <Label>Backup</Label> <Order>3</Order> <PartitionID>3</PartitionID> </ModifyPartition> </ModifyPartitions> <DiskID>0</DiskID> <WillWipeDisk>true</WillWipeDisk> </Disk> </DiskConfiguration> <ImageInstall> <OSImage> <InstallTo> <DiskID>0</DiskID> <PartitionID>2</PartitionID> </InstallTo> <WillShowUI>OnError</WillShowUI> </OSImage> </ImageInstall>
-
Ahhhh i shall try this and report back, thanks!
-
I was hoping it would fill up the rest of the drive space the HDD is 25GB, 200mb for System, 20GB for Windows Install and i was wanting the 3rd Partition to use the remaining of the drive Edit: I've also tried setting the 3rd Partition to 1GB <Size>1000</Size> and this has made no difference