

Rico.JohnnY
Content Type
Profiles
Forums
Events
Posts posted by Rico.JohnnY
-
-
This tweak works fine for me
;IE10 - Disable first run wizard: 1 to homepage, 2 to welcome page, to enable just to remove the value
[HKEY_CURRENT_USER\Software\Policies\Microsoft\Internet Explorer\Main]
"DisableFirstRunCustomize"=dword:00000001
[HKEY_LOCAL_MACHINE\SOFTWARE\Policies\Microsoft\Internet Explorer\Main]
"DisableFirstRunCustomize"=-
[HKEY_LOCAL_MACHINE\SOFTWARE\Wow6432Node\Policies\Microsoft\Internet Explorer\Main]
"DisableFirstRunCustomize"=-
0 -
Not sure if this tweak has been posted before since it's a bit different from the one of Office 2010, I saw this tweak from Office 2013 Administrative Templates(admx) days ago.
For Office 2013
; Disable Office First Run
[HKEY_CURRENT_USER\Software\Microsoft\Office\15.0\FirstRun]
"BootedRTM"=dword:00000001
; Disable First Run movie
"disablemovie"=dword:00000001

; Disable First Run Opt-in Wizard
[HKEY_CURRENT_USER\Software\Microsoft\Office\15.0\Common\General]
"shownfirstrunoptin"=dword:00000001

;Trust Center - Privacy Options - "Sign up for the Customer Experience Improvemet Program" - Disabled
[HKEY_CURRENT_USER\Software\Microsoft\Office\15.0\Common\PTWatson]
"PTWOptIn"=dword:00000000
[HKEY_CURRENT_USER\Software\Microsoft\Office\15.0\Common]
"qmenable"=dword:00000000
For Office 2010
; Disable First Run Opt-in Wizard
[HKEY_CURRENT_USER\Software\Microsoft\Office\14.0\Common\General]
"shownfirstrunoptin"=dword:00000001
"FirstRun"=dword:00000000

;Trust Center - Privacy Options - "Sign up for the Customer Experience Improvemet Program" - Disabled
[HKEY_CURRENT_USER\Software\Microsoft\Office\14.0\Common\PTWatson]
"PTWOptIn"=dword:00000000
[HKEY_CURRENT_USER\Software\Microsoft\Office\14.0\Common]
"qmenable"=dword:00000000
Personally I prefer using config.xml for Office 2013 deployment to the method of using OCT, due to its scriptable and fast-editing capability, here's the sample of config.xml for those who are intereted.
To invoke, navigate to Office install source and run
setup.exe /config config.xml
As for me, a batch is used to implement multi-architecture deployment based on computer name.
CD /D "%~dp032bit"
IF /I %PROCESSOR_ARCHITECTURE% == amd64 CD /D "%~dp064bit"
setup.exe /config "%~dp0%COMPUTERNAME%.xml"
config.xml
<Configuration Product="ProPlusr">

<Display Level="basic" CompletionNotice="no" SuppressModal="yes" AcceptEula="yes" />

 <AddLanguage Id="en-us" ShellTransform="yes"/>

 <AddLanguage Id="zh-cn" />

 <!-- <Logging Type="standard" Path="%temp%" Template="Microsoft Office Professional Plus Setup(*).txt" /> -->

 <USERNAME Value="blah" />

 <COMPANYNAME Value="blah" />

 <PIDKEY Value="Office product key with no hyphen" />

 <!-- <INSTALLLOCATION Value="%programfiles%\Microsoft Office" /> -->

 <!-- <LIS CACHEACTION="CacheOnly" /> -->

 <!-- <LIS SOURCELIST="[/size][url="file://\\server1\share\Office;\\server2\share\Office"][size="2"]\\server1\share\Office;\\server2\share\Office[/size][/url][size="2"]" /> -->

 <!-- <DistributionPoint Location="[/size][url="file://\\server\share\Office"][size="2"]\\server\share\Office[/size][/url][size="2"]" /> -->

 <!--Access-->
 <OptionState Id="ACCESSFiles" State="absent" Children="force" />
 <!--Excel-->
 <OptionState Id="EXCELFiles" State="local" Children="force" />
 <!--InfoPath-->
 <OptionState Id="XDOCSFiles" State="local" Children="force" />
 <!--Lync-->
 <OptionState Id="LyncCoreFiles" State="absent" Children="force" />
 <!--OneNote-->
 <OptionState Id="OneNoteFiles" State="local" Children="force" />
 <!--Outlook-->
 <OptionState Id="OUTLOOKFiles" State="local" Children="force" />
 <!--PowerPoint-->
 <OptionState Id="PPTFiles" State="local" Children="force" />
 <!--Publisher-->
 <OptionState Id="PubPrimary" State="absent" Children="force" />
 <!--SkyDrive Pro-->
 <OptionState Id="GrooveFiles2" State="local" Children="force" />
 <!--Visio Viewer-->
 <OptionState Id="VisioPreviewerFiles" State="absent" Children="force" />
 <!--Word-->
 <OptionState Id="WORDFiles" State="local" Children="force" />
 <!--Shared Files-->
 <OptionState Id="SHAREDFiles" State="local" Children="force" />
 <!--Tools-->
 <OptionState Id="TOOLSFiles" State="local" Children="force" />

 <Setting Id="SETUP_REBOOT" Value="never" />

 <!-- <Command Path="%windir%\system32\msiexec.exe" Args="/i [/size][url="file://\\server\share\my.msi"][size="2"]\\server\share\my.msi[/size][/url][size="2"]" QuietArg="/q" ChainPosition="after" Execute="install" /> -->

</Configuration>
0 -
New script released.
0 -
1. Download TUU setup file from official site, and install once
2. Go to "C:\Windows\Installer" (Installer folder is hidden by default) , sort files by "Date modified" in descent order, copy the top two MSI files to a workplace. The smaller one "f21114.msi" is language file whose size is 2.69MB(en-US), the other one "f2111e.msi" is main setup file and size is 22.9MB, filenames may differ in your case.
3.setup commands:
MsiExec /norestart /qn /i f21114.msi
MsiExec /norestart /qn /i f2111e.msi LANGSTRING=en-US PIDKEY=xxxxxx-xxxxxx-xxxxxx-xxxxxx-xxxxxx-xxxxxx AUTOUPDATE=0 CHECKUPDATE=0 PINONTASKBARW7=0 PINONTASKBAR=0 LAUNCHTUU=0 INSTALLINTEGRATORDESKTOP=1 INSTALLONECLICKDESKTOP=1 INSTALL_DSE_SHELLEXT=1 INSTALLSHELLEXT=1
PINONTASKBARW7: pin TUU to Taskbar (win7)
PINONTASKBAR: quicklaunch shortcut switch(not sure)
LAUNCHTUU: launch TUU after installation
INSTALLINTEGRATORDESKTOP: TUU desktop icon
INSTALLONECLICKDESKTOP: 1-Click Maintenance desktop icon
INSTALL_DSE_SHELLEXT: TUU Disk Space Explorer shell extension
INSTALLSHELLEXT: TUU other shell extesions, such as TuneUp Shredder,TuneUp Undelete etc.
0 -
or apply this to affect the global.
; Disable the "Open file - Security Warning"
[HKEY_CURRENT_USER\Software\Microsoft\Windows\CurrentVersion\Policies\Associations]
"LowRiskFileTypes"=".bat;.cmd;.exe;.msi;.reg;.vbs;"
0 -
Updated to Nero 11.
0 -
Here's mine:
setup.exe -s -l 0009 -res 1280x800x32x60 -overwriteand registry tweak,apply it before install the setup.exe.
[HKEY_CURRENT_USER\Software\Intel\Display\igfxcui\igfxtray\TrayIcon]
"ShowTrayIcon"=dword:00000000

[HKEY_CURRENT_USER\Software\Intel\Display\igfxcui\hkcmd\resources]
"UserLangID"="ENU"
0 -
sorry, can't make it work. After unlock uninstall, the shell unlocker entry doesn't come back and your setup.cmd requires the assistant which I don't need.
Bug fixed, sorry for the inconvenience. Remember to reboot the system after uninstallation to get the deletion of in-use-files to take effect.
If u don't need the UnlockerAssistant.exe, just commend out the lines from "INSTALL_UNLOCKER.inf" as follows:
;UnlockerAssistant.exe = 1

;UnlockerAssistant.exe,,,0x10009

;HKLM,SOFTWARE\Microsoft\Windows\CurrentVersion\Run,UnlockerAssistant,,"%16422%\%PROGRAM_FLDR%\UnlockerAssistant.exe"
and change the line
ProfileItems = Shortcut.Readme.txt, Shortcut.Unlocker.exe, Shortcut.Assistant.exe, Shortcut.Unlocker.urlto
ProfileItems = Shortcut.Readme.txt, Shortcut.Unlocker.exe, Shortcut.Unlocker.url0 -
Bug fixed.
0 -
Thanks for the guide. I've remembered that you had a thread for Winamp custom installer in the past (can't find it right now). Do you plan to work again on it ?
Edit: here
4 years have passed...
I am considering making some improvement in the source script and sharing it.
0 -
yes the switch /s is valid.
but We dont want the addonds & toolbars.
Can any one help us ?
This script will install unlocker without any addonds & toolbars.
0 -
It couldn't find the path however, when I typed the path to myuser and profile manually, it worked without a flaw. Any ideas?
Maybe the error was caused by the exclamation from the path "C:\!custom\moveshl.cmd", try renaming it and retrying.
I also wanted to ask you about junctions points. Let's say i want to move program files from the drive C to D. Would one junction suffice or do I have make a junction to every system sub-folder under program files (common files for example)?Theoretically speaking, you only need to add junction point to the top level folder if all its sub-folders inherit permissions from its parent.
0 -

Changelog:
2012-2-22: Update to 1.9.1, resolve the issue that shell extension couldn't be unregistered.
Installation:
1. Install unlocker using official installer.
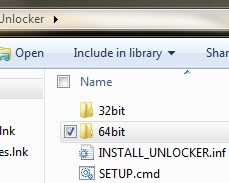
2. Grab all files(exclude uninst.exe) within "%programfiles%\unlocker", then place them in 32bit/64bit folder according to current system architecture.
3. Uninstall unlocker, then run "setup.cmd" with elevated privilege to re-install.
4. To change unlocker's display language, open "setup.cmd" with notepad, change the second line "SET LANG=1033" to your prefered language ID(default is 1033).
Uninstallation:
Go to control panel and use the "Add/remove programs".
0 -
Would this also work for folders such as appdata, local appdata, program files and programdata?
Currently not. I am considering adding support to such folders in the future , but now i need more test to ensure no side effects will arise by doing this.
0 -
My host is down because of too much traffic, pictures have been re-uploaded, sorry for the inconvenience.
0 -
1. Grab all nero setup source files (from official dvd, or from %tmp% directory after launching the official single compressed installer) and place them in a folder , let's say "d:\nero11"
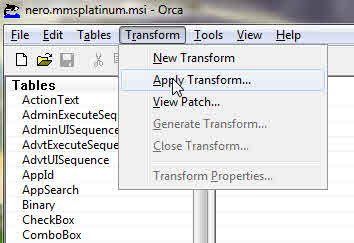
2. Download Orca(available in the WinSDK) from Microsoft, install and run.
3. In Orca main GUI, click open button, locate to" d:\nero11" and open "nero.mmsplatinum.msi",
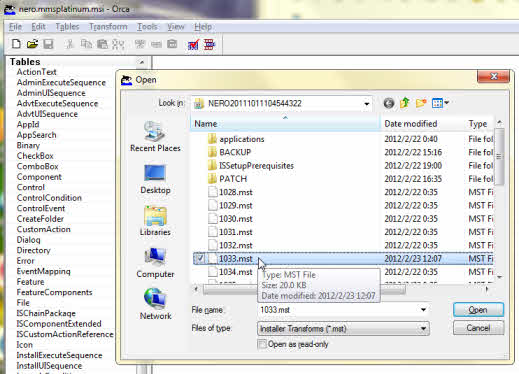
4. Under "Transform" dropdown menu, select "Apply Transform...", locate to "d:\nero11", open the language-specific transform file(.mst) based on the target system language where you plan to install nero11, let's say en-US, the corresponding .mst file is 1033.mst,
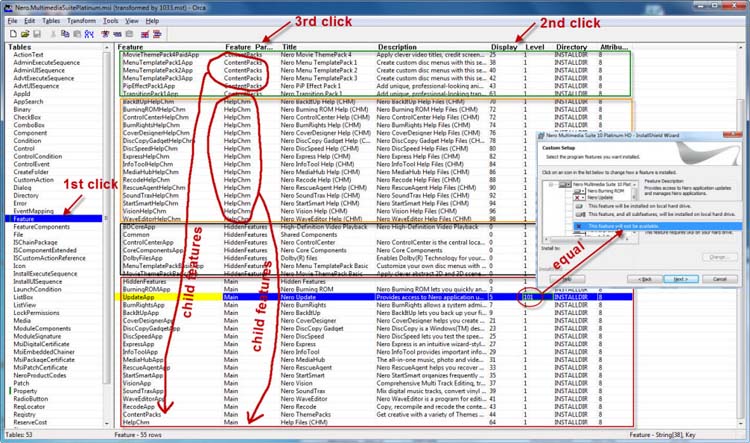
5. Click the "Feature" field on the left panel, then on the right panel, click "Display" column tab, then click "Feature Parent". Now focus on the "main" group, disable any of the main features by specifying a number greater than 100 to the "Level" field, which will do the same job as selecting "This feature will not be available" in the "Custom setup" page of GUI installation.
All child features will be disabled if you disable the parent, which means, if to disable all "ContentPacks", you only need to change the level number of main feature "ContentPacks" to 101.
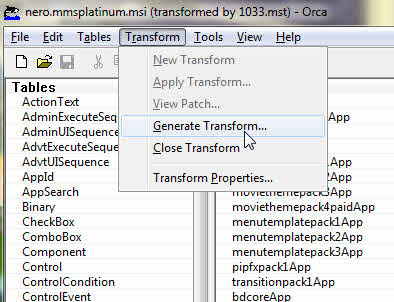
6. Under the "Transform" menu, choose "Generate Transform...", save the new "1033.mst" file to another place, now you need to delete the original "d:\nero11\1033.mst" (make a backup first in case you need to restore it in the furture), after that copy the new 1033.mst back to "d:\nero11",
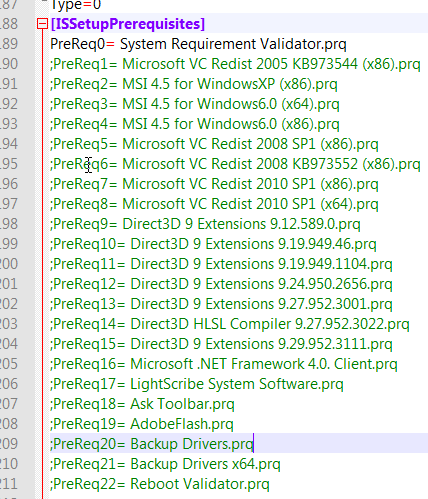
7. Now open "d:\nero11\setup.ini", scroll down to the bottom, in the "[iSSetupPrerequisites]" section, remove any of the prerequisites you don't need by adding a semicolon to the beginning of each line. Then go to "d:\nero11\ISSetupPrerequisites", delete the folders accordingly.
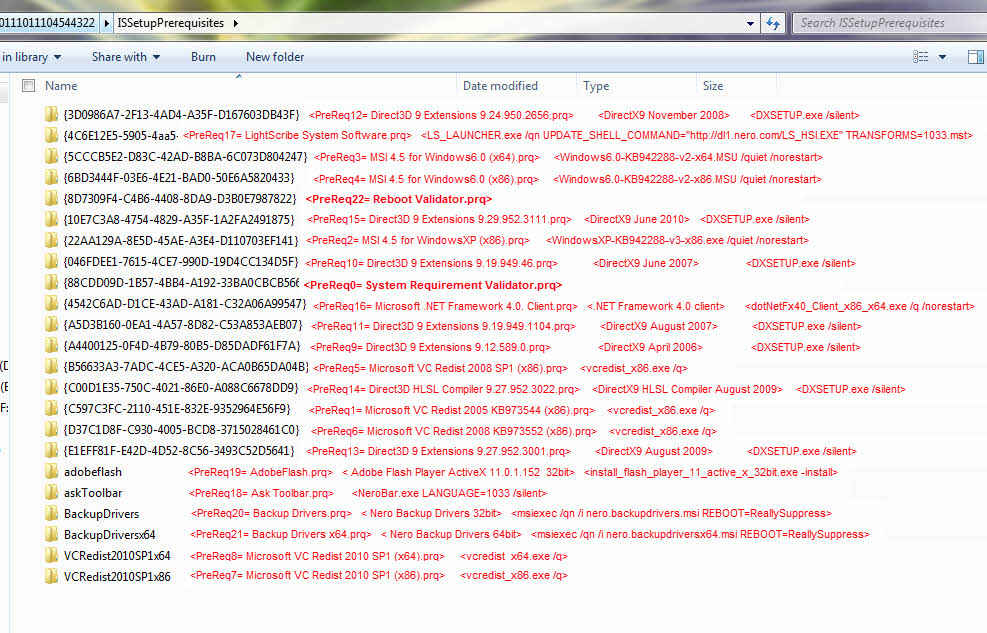
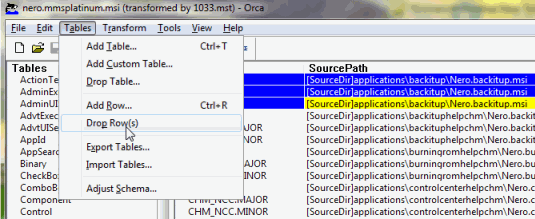
As the prerequisites install logic has been changed since Nero11, either removing/commenting out part of the lines from "[iSSetupPrerequisites]" section or deleting any of the files from within "ISSetupPrerequisites" folder may lead to install failure of latter prerequisites, thus halt the whole install process. You need to commend out all of the lines (excluding the "PreReq0= System Requirement Validator.prq")and install the required prerequisites using your own script instead. Related silent switches have been provided in the following image.
8. Shrinking.
Thanks to Sonic's pointing out.
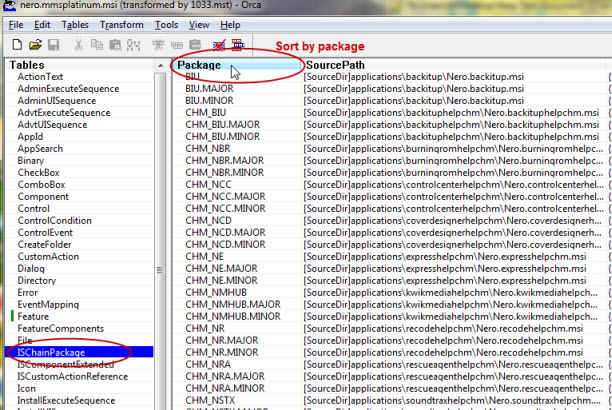
Click the "ISChainPackage" field on the left panel, then on the right panel, click "Package" column tab to sort by package, shift + left click to select the packages you don't need according to the features you have disabled in step 5, and go to "Tables" menu, choose "Drop Rows".
Finally, (backup and) delete the folders within "d:\nero11\applications" and the prerequisites you don't need within "d:\nero11\applications\ISSetupPrerequisites" accordingly.
9. Run d:\nero11\setup.exe with your serial number to perform silent installation, change 1033 to the your own language id.
setup.exe /L1033 /S /v"/qn NERO.INCLUDED_KEY=xxxx-xxxx-xxx-xxxx-xxxx-xxxx-xxxx-xxxx"0 -
here's the official guide
http://www.oracle.co...ent-136552.html
and here's my install batch code for java6 update 24
@ECHO off
SET LANG=1033
IF /I "%COMPUTERNAME%" EQU "GT3" SET LANG=2052

CD /D "%~dp0"
IF /I "%PROCESSOR_ARCHITECTURE%" EQU "x86" GOTO inst86

:inst64
REM Sun Java 6 update 24 (x64)
jre-6u24-windows-x64.exe /lang=%LANG% /s

:inst86
REM Sun Java 6 update 24 (x86)
jre-6u24-windows-i586-s.exe /lang=%LANG% /s
0 -
Script has been rewrited, bug fixed, see the changelog.
0 -
Here's the guide:
1. create an xml file as follow, save it as "whatever.override" format, don't forget to replace the "xxxxxxxxxxxxxxxxxxxxxxxxxx" with your serial number(without any separator)
for 32-bit CS5
<?xml version="1.0" encoding="utf-8"?>
<Configuration>
<Payload adobeCode="{7DFEBBA4-81E1-425B-BBAA-06E9E5BBD97E}">
  <Data key="Serial" protected="0">xxxxxxxxxxxxxxxxxxxxxxxxxx</Data>
  <Data key="Registration">Suppress</Data>
  <Data key="EULA">Suppress</Data>
  <Data key="Updates">Suppress</Data>
</Payload>
</Configuration>
for 64-bit CS5
<?xml version="1.0" encoding="utf-8"?>
<Configuration>
<Payload adobeCode="{667C8B6C-3EAF-4646-A8EC-D85CCC4D3D84}">
  <Data key="Serial" protected="0">xxxxxxxxxxxxxxxxxxxxxxxxxx</Data>
  <Data key="Registration">Suppress</Data>
  <Data key="EULA">Suppress</Data>
  <Data key="Updates">Suppress</Data>
</Payload>
</Configuration>
2 .create a deployment answer file, save it as "Deployment.xml", for other languages other than en-us, refer to the examples within "Deployment" folder of CS5 setup media.
for 32-bit en-US CS5
<?xml version="1.0" encoding="utf-8"?><Deployment>
  <Properties>
    <!--Note that the INSTALLDIR value is machine specific.  The value below is a suggested default value but may need to be overriden.-->
    <Property name="INSTALLDIR">C:\Program Files\Adobe</Property>
  <Property name="mediaSignature">{15FEDA5F-141C-4127-8D7E-B962D1742728}</Property><Property name="driverAdobeCode">{15FEDA5F-141C-4127-8D7E-B962D1742728}</Property><Property name="installLanguage">en_US</Property></Properties>
  <Payloads>
    <Payload adobeCode="{15FEDA5F-141C-4127-8D7E-B962D1742728}">
      <Action>install</Action>
    </Payload>
  <Payload adobeCode="{7DFEBBA4-81E1-425B-BBAA-06E9E5BBD97E}">
      <Action>install</Action>
    </Payload></Payloads>
</Deployment>
for 64-bit en-US CS5
<?xml version="1.0" encoding="utf-8"?><Deployment>
  <Properties>
    <!--Note that the INSTALLDIR value is machine specific.  The value below is a suggested default value but may need to be overriden.-->
    <Property name="INSTALLDIR">C:\Program Files\Adobe</Property>
  <Property name="mediaSignature">{15FEDA5F-141C-4127-8D7E-B962D1742728}</Property><Property name="driverAdobeCode">{15FEDA5F-141C-4127-8D7E-B962D1742728}</Property><Property name="installLanguage">en_US</Property></Properties>
  <Payloads>
    <Payload adobeCode="{15FEDA5F-141C-4127-8D7E-B962D1742728}">
      <Action>install</Action>
    </Payload>
  <Payload adobeCode="{667C8B6C-3EAF-4646-A8EC-D85CCC4D3D84}">
      <Action>install</Action>
    </Payload></Payloads>
</Deployment>
3. now use the following command line to silently install your cs5
Set-up.exe --mode=silent --deploymentFile="your Deployment.xml file path" --overrideFile="your .override file path"
4. If you want to install CS5 from removable media, create a folder named "Adobe CS5" under the root of media, and place all of the CS5 setup source files (including folders "Deployment", "packages", "payloads", "resources" and Set-up.exe file) into it.
5. Most official CS5 updates and plugins can be install silently with "--mode=silent" switch, but I don't figure out how to install them directly from removable media, currently I need to copy them to harddisk and delete them after installation.
0 -
2013-03-14
Added: license status check before backup
Added: prompt for saving product key of Office2013(if activated) in the Windows8/2012 backup scenario.
2013-03-09
Previous "LicRestore.cmd" now deprecated, the codes recently rewritten with the new script name "mslmgr.cmd", now supports NT6.1+(7,server08r2,8,server2012) and Office12+(2007,2010,2013), since new programming logic and folder structure have been involved, those who used to use the old script now need to redo the backup with the new one on an ACTIVATED running OS, sorry for the inconvenience.
Script supports on-screen interactive mode for both backing up and restoring operation and silent mode only for restoring, which needs running with administrative rights. In addition, it aims at working for multiple versions of products on diffferent computers (backup info stored in different folders alongside the script based on computer name/product name/version, while restoring the script itself can match the appropriate one).
Silent switches currently available are:
mslmgr.cmd rw (for restoring Windows activation)
mslmgr.cmd ro (for restoring Office activation)
Both the above are case-insensitive, sequence-independent, with no quotation marks.
IMPORTANT:
Since the activation info storing method for Office2013 has been changed on NT6.2 platforms(Win8 & Server2012), which now merged into the one for Windows, to prevent messing up, this script is by design not to support either backing up or restoring Office2013 activation directly on such platforms, but you can still accomplish these tasks by backing up/restoring Windows activation instead, in other words, to use the "rw" switch instead of "ro" if you intend to restore Office2013 activation on Win8/Server2012.
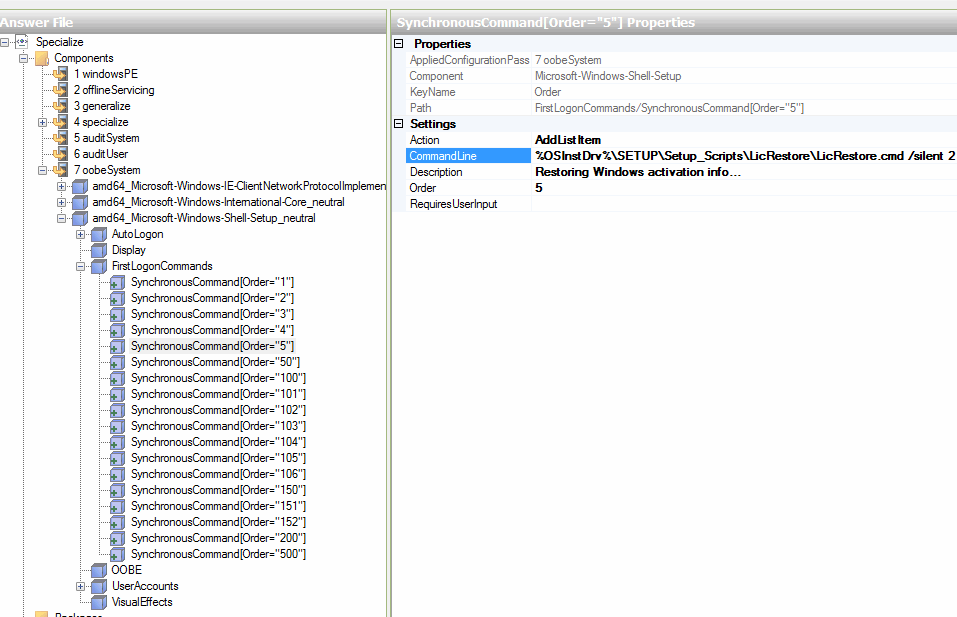
The script can be executed from "oobeSystem configuration pass | FristLogonCommands" to restore the activation info, here's the example
Please report me back if you find any issue, Cheers
0 -
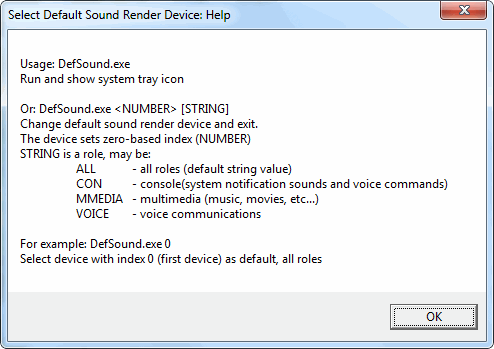
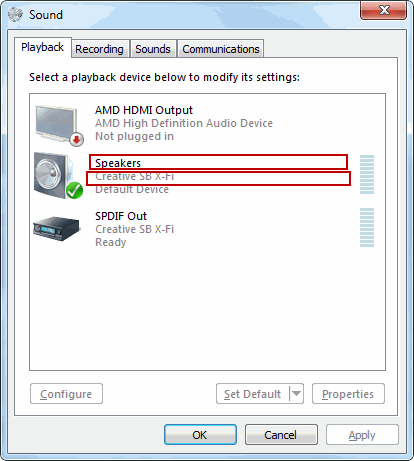
It can be used via GUI(run and show system tray icon) or command line, only works for Win7/Server08 R2, not yet tested under vista.
Command Line Usage:
1.using device index:
example: defsound-x64.exe 0 ALL
2. using device name:
example: DefSound.cmd "Creative SB X-Fi - Speakers" ALL
0 -
seems it needs to be removable disk, not hard disk, according to waik manual
0 -
@ECHO OFF
SET str_AllDriveLettersList=C: D: E: F: G: H: I: J: K: L: M: N: O: P: Q: R: S: T: U: V: W: X: Y: Z:
FOR %%I IN (%str_AllDriveLettersList%) DO (
 DIR %%I >NUL 2>NUL && IF EXIST "%%I\bootmgr" (SETX OSInstDrv "%%I" /M)
)
DEL /F "%~f0"
1. Save it as "SetOsInstMedia.cmd"
2. Place the script under "vista/win7 install media root:\sources\$OEM$\$$\System32\"
3. Using WAIK, Insert a "RunSynchronousCommand" in specialize configuration pass to run the script once. (after that, it will delete itself)
4. After backward configuration pass("audituser" or "oobesystem"), you can use the %OSInstDrv% variable in your command to point to win7/vista install media drive.
Note: It's "SETX", not just "SET"
0 -
It's a combination of using reparse points and registry tweak, better than just resgistry tweak, which may be unrecognized by some apps and may be result in some unexpected compatibility issues, Camtasia Studio (also Snagit) is an example, it still save files under c:\users\username\Documents even if you have changed the documents path in registry. The advantage of using reparse points is that for application itself it did not know the actual path has been changed.
To clarify I didn't simply delete the shell folders, i replaced them with junction points, which could be treated as and "visual folder".
And, this is a batch script, not vbs
0


[How To] Disable Office 2013 First Run registry tweak, plus config.xml
in Application Installs
Posted
Feature IDs corrected.