

radigast
Content Type
Profiles
Forums
Events
Posts posted by radigast
-
-
Alternatively, you could use a program such as Repackager (a part of the InstallShield suite) to monitor the installation and convert it to a .msi. Be sure to deselect Ask Toolbar during the monitored install. I have successfully done this multiple times on different versions of DFX (including 9.210).
0 -
Much appreciated. Thanks a lot!
0 -
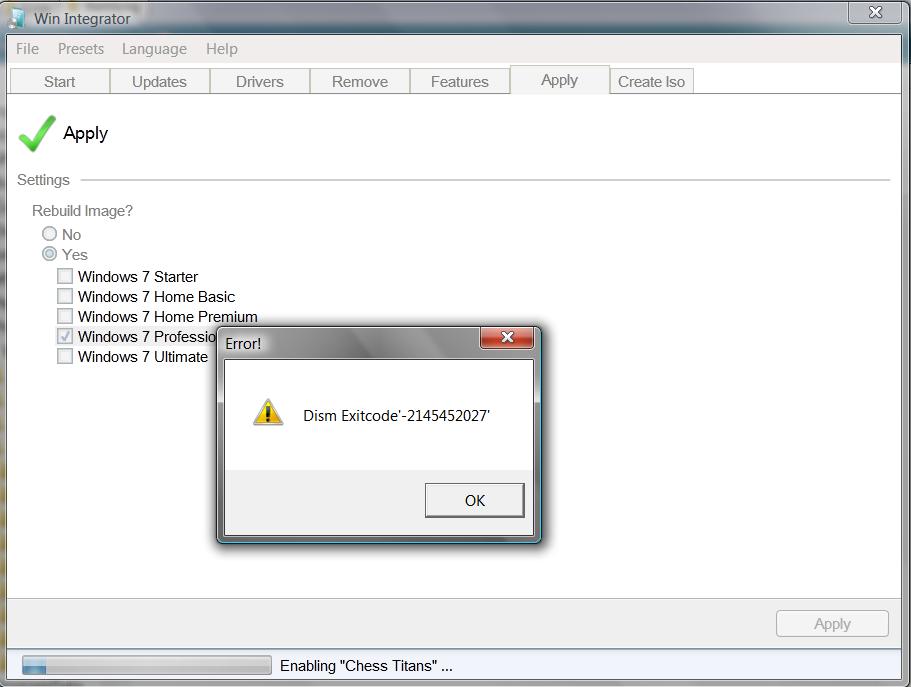
Now I'm getting the following problem. All I am doing to an unmodified image is enabling the pre-included games (Chess, etc...) to the Windows 7 Professional image. Again, I have installed WAIK for Windows 7 and the most recent .net 4 Beta. My host computer is running Vista SP1.
Log file:
WinIntegrator.2009_11_28T21_04_24.txt
Windows Integrator Error:

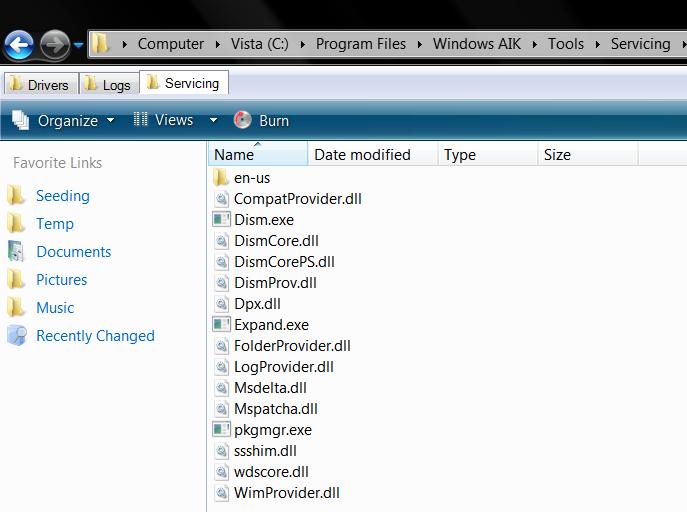
Servicing Directory Screenshot in WAIK:
Anyone provide any insight on this one?
0 -
I figured out why there was a problem. When I copied the folders from the DVD, they all were copied over with Read-Only permission. Prior to running Win Integrator, I had unchecked the Read-Only box for the install folder and applied this to all of its contents. However, apparently this was not enough, as a few stubborn files still retained their Read-Only status. I had to manually go into each file, and check to see if it was Read-Only. The *.elg files were a few of the culprits.the log says, that you don't have the permissions to file E:\Temp\Windows7\Modified\sources\install_Windows 7 STARTER.clg and E:\Temp\Windows7\Modified\sources\ei.cfg. The access is denied.
I am simply integrating an update pack I found over at WinCert (by George King). I'll check the technet articles and see what each hotfix does...but, as I haven't installed Windows 7 on my mainbox, I guess I can't really be sure of the issues it will have yet.And why do you integrate those leaked test updates (KB1xxxxx, 6xxxxx)? Look for the KB articles and if they fix an issue you have, request them.Thanks for the response
Edit: I wasn't even aware that KB1xxxxx and KB6xxxxx were test updates. I'll remove them from my slipstream. Again, thanks for the info!
0 -
A really nice feature to include would be the ability to integrate/slipstream .cab files! The .msu integration has worked flawlessly for me. However, all of the LocalPacks that are available for Windows 7 are .cab files, and 7customizer is unable to integrate them.
A couple other tools allegedly integrate .cab files (stefanRTR's WinIntegrator, Legolash2o's Windows7Toolkit, and George King's Update.exe). These might provide insight into enabling .cab file integration.
0 -
Your program is a great idea. However, when I used it to try and integrate updates/localpacks and enable built-in games, errors have closed the program. Kind of frustrating, as the process took about 1.5 hours before the program closed down.
I am integrating into a vanilla Windows 7 image copied directly from DVD, and have selected Windows 7 Professional as the image to update. I have installed WAIK for Windows 7, and (obviously) the latest .net4 Beta. My host machine runs Vista SP1.
I hope the attached log file helps.
0 -
Final link
MD5: FA715AD2EB1D9952F092C4BBB747B0AF
can you reupload it or to another server i can't download it anymore
and thx
Same here please.
0 -
I just wanted to thank you for your continued work on this program. I just successfully used it to slipstream some updates, and everything went flawlessly.
I'm looking forward to checking this thread in a month or so to see what sort of new features have been implemented, and to read of all the bugs that you've patched.
Great work! Your efforts are much appreciated! Thanks again!
0 -
if i get the time ill edit the registry tweaks to add more about what each tweak does..
Thanks for the list of tweaks. More documentation would be very helpful so everyone would know exactly what each tweak does, and can make better decisions about which tweaks to include.
0 -
Hey Shark:
The links to flashplayer on your file repository are no longer correct.
Here are the correct urls:
I can't find the URL for Mozilla Plugin in EXE format. At the time I checked, changing the .msi to .exe didn't work.
Thanks for all the work you do! I use your installers all the time! Keep it up!
0 -
Thanks for your willingness...but I found the problem. I was installing VMWare tools silent installer as one of my First Logon commands. However, the "/norestart" switch was not included in the silent install, so after installing like a good boy, the computer restarted. Anyhow, I just added the appropriate switch and all is good.
0 -
it's the #2 image of boot.wim,u have to chage winpe.bmp der.
Hmmm...I can't seem to find this second boot.wim you are referring to. Care to give any more details about where exactly to find it?
Thanks for the help!
**Edit**I figured out what you mean. Edit the boot.wim, but mount image 2...not image 1. Thanks!!
0 -
Nice additions. Keep up the great work!
One suggestion I'll make is that this whole thread would be better moved to the "Unattended Vista" section, as none of the tweaks here apply to Vlite. It is still very useful, but more people might find it if moved to the appropriate section.
In regards to the guide, I have a few questions about this part:
*Changing OOBE Background:Those who are not so familiar with Vista will undoubtedly ask...what tha heck is OOBE?.It is Out Of Box Experience.The system responsible for user creation in the end of Vista install.But during that the background is just lame right?.Say you want to make the background look the same as your logonscreen or desktop?.This can be easily done by converting your own background to JPG format(resolution doesent matter) and naming it to oobe.jpg replacing the default file in C:\Windows\System32\oobe.jpg .Modifying this file (oobe.jpg) only changes the install screen AFTER the contents of the DVD have been moved to the hard drive. The same holds true if you modify spwizimg.dll (both in Sources and in install.wim: windows\system32). There MUST be a file in boot.wim that can be modified to change the install screen you immediately see, but I have examined EVERY .dll in boot.wim to no effect. I have also changed the winpe.bmp (in boot.wim: windows\system32) to my own custom bitmap to no avail.
My question: How can you change the install background you immediately see as the DVD boots and the first "Installing Windows" window comes up?
--radigast
0 -
Can you rename the administrator account?
Renaming the Administrator Account, HOW TO
I've used these steps exactly, and it worked flawlessly.
0 -
Yeah. No offense meant either, but for being the first sticky in this forum, it is a mess.
0 -
I am also looking forward to the "No prompt" non-WHQL driver update. Also, I am looking forward to see how exactly you managed to change the default install background. Modifying spwizimg.dll does not change the install when booted off of DVD. Keep it up.
0 -
If you only have the five language sp1, search for "Windows6.0-KB936330-X86-wave0.exe" on your hard drive.
If you have the more-than-five language one, search for "Windows6.0-KB936330-X86-wave1.exe" (I think...not sure, since I don't use the multi-language SP1).
--radigast
0 -
Change only this one :
2. In install.wim - "%windir%\System32\"
I have changed this one, and only ever see my images after the computer has restarted and begins reading off the hard drive. I want to see them both when Vista installs from the DVD and when it restarts and finishes installing off my hard drive.
Where are the ones that are read off of the DVD during the install? I have scoured boot.wim, but that doesn't have spwizimg.dll.
0 -
First, let me say that I HATE!! doing this Vista unattended installation. What a pain in the *ss. So many quirks and stupid bugs.....
Alright. I am attempting to call WPI out of a first logon command, and the computer restarts just after the desktop is configured. Both my first logon commands and setupcomplete.cmd executed successfully, but WPI doesn't start at all because the computer restarts before the desktop loads for the first time.
Here is the .cmd file called during the first logon command run:
FirstLogon.cmd
cmdow.exe @ /HID
@ECHO OFF
::VMWare Tools drivers
start /wait %systemdrive%\Install\VMWareTools.exe
::Apply registry tweaks
regedit /S %systemdrive%\Install\Tweaks.reg
::Vista clean-up
start /wait %systemdrive%\Install\Cleanup.cmd
::Run WPI
start %systemdrive%\Install\WPI.cmd
Here is the script executed in First Logon that calls WPI:
WPI.cmd
cmdow.exe @ /HID
@ECHO OFF
::Runing Windows Post Installer
::Locate CD-Rom Drive and assign it a variable
for %%i in (C D E F G H I J K L M N O P Q R S T U V W X Y Z) do if exist %%i:\sources\install.wim set CDROM=%%i:
::Run WPI
start %CDROM%\WPI\wpi.hta
exit
According to the logfile (setupact.log), the First Logon Commands are successful and the OOBE pass successfully completed with no restart requested.
[shell Unattend] LogonCommands: Set command '%systemdrive%\Install\FirstLogon.cmd'...
[shell Unattend] Exiting 'oobeSystem' pass with status 0x00000000
[oobeldr.exe] [Action Queue] : process exit code = 0
[oobeldr.exe] [Action Queue] : Unattend action returned operation complete.
[oobeldr.exe] [Action Queue] : ProcessActionQueue finish (hr = 0x0)
[oobeldr.exe] Successfully completed execution of GC queue
I KNOW that my .cmd file was successfully read because VMWare tools, which is called by the first line of the script, installs perfectly.
In the next pass, my setupcomplete.cmd is succesfully found and executed.
Setupcomplete.cmd
cmdow.exe @ /HID
@ECHO OFF
::Rename administrator account and set admin options
CMD /C secedit /configure /db %systemroot%\security\database\unattend.sdb /cfg %systemroot%\security\templates\unattend.inf /log %systemroot%\security\logs\unattend.log /overwrite /quiet
::Apply registry tweaks
regedit /S %systemdrive%\Install\Tweaks.reg
::Vista clean-up
start /wait %systemdrive%\Install\Cleanup.cmd
::Vista Ultimate Sound Schemes
start /wait %systemdrive%\Install\VistaUltimateSoundSchemes.exe
Found script at [C:\Windows\Setup\Scripts\SetupComplete.cmd]; executing with UI hidden...[windeploy.exe] RunUserProvidedScript: Successfully executed script; (returned with exit code 0x0)
I know this is properly read because I have a Windows Vista Ultimate sound pack that is called and successfully installed from this script.
BUT...as said...WPI never begins because right after the "Windows is configuring your desktop" screen. The computer restarts. Why?
Here is my autounattend.xml:
Autounattend.xml
<?xml version="1.0" encoding="utf-8"?>
<unattend xmlns="urn:schemas-microsoft-com:unattend">
    <settings pass="specialize">
        <component name="Microsoft-Windows-Shell-Setup" processorArchitecture="x86" publicKeyToken="31bf3856ad364e35" language="neutral" versionScope="nonSxS" xmlns:wcm="http://schemas.microsoft.com/WMIConfig/2002/State" xmlns:xsi="http://www.w3.org/2001/XMLSchema-instance">
            <Display>
                <ColorDepth>32</ColorDepth>
                <HorizontalResolution>1024</HorizontalResolution>
                <VerticalResolution>768</VerticalResolution>
            </Display>
            <WindowsFeatures>
                <ShowInternetExplorer>true</ShowInternetExplorer>
                <ShowMediaCenter>false</ShowMediaCenter>
                <ShowWindowsMail>false</ShowWindowsMail>
                <ShowWindowsMediaPlayer>false</ShowWindowsMediaPlayer>
            </WindowsFeatures>
            <RegisteredOwner>Radigast</RegisteredOwner>
            <RegisteredOrganization>MicroShaft</RegisteredOrganization>
            <ComputerName>Winblowz</ComputerName>
            <TimeZone>SE Asia Standard Time</TimeZone>
        </component>
        <component name="Microsoft-Windows-Security-Licensing-SLC-UX" processorArchitecture="x86" publicKeyToken="31bf3856ad364e35" language="neutral" versionScope="NonSxS" xmlns:wcm="http://schemas.microsoft.com/WMIConfig/2002/State" xmlns:xsi="http://www.w3.org/2001/XMLSchema-instance">
            <SkipAutoActivation>true</SkipAutoActivation>
        </component>
    </settings>
    <settings pass="windowsPE">
        <component name="Microsoft-Windows-International-Core-WinPE" processorArchitecture="x86" publicKeyToken="31bf3856ad364e35" language="neutral" versionScope="NonSxS" xmlns:wcm="http://schemas.microsoft.com/WMIConfig/2002/State" xmlns:xsi="http://www.w3.org/2001/XMLSchema-instance">
            <SetupUILanguage>
                <UILanguage>en-US</UILanguage>
            </SetupUILanguage>
            <InputLocale>0409:00000409</InputLocale>
            <UserLocale>en-US</UserLocale>
            <UILanguage>en-US</UILanguage>
            <SystemLocale>en-US</SystemLocale>
        </component>
        <component name="Microsoft-Windows-Setup" processorArchitecture="x86" publicKeyToken="31bf3856ad364e35" language="neutral" versionScope="nonSxS" xmlns:wcm="http://schemas.microsoft.com/WMIConfig/2002/State" xmlns:xsi="http://www.w3.org/2001/XMLSchema-instance">
            <UserData>
                <Organization>MicroShaft</Organization>
                <FullName>Radigast</FullName>
                <AcceptEula>true</AcceptEula>
                <ProductKey>
                    <Key>XXXXX-XXXXX-XXXXX-XXXXX-XXXXX</Key>
                </ProductKey>
            </UserData>
        </component>
    </settings>
    <settings pass="oobeSystem">
        <component name="Microsoft-Windows-Shell-Setup" processorArchitecture="x86" publicKeyToken="31bf3856ad364e35" language="neutral" versionScope="nonSxS" xmlns:wcm="http://schemas.microsoft.com/WMIConfig/2002/State" xmlns:xsi="http://www.w3.org/2001/XMLSchema-instance">
            <UserAccounts>
                <AdministratorPassword>
                    <Value>Some password</Value>
                </AdministratorPassword>
            </UserAccounts>
            <AutoLogon>
                <Enabled>true</Enabled>
                <LogonCount>3</LogonCount>
                <Username>Some user</Username>
                <Password>
                    <Value>Some password</Value>
                    <PlainText>true</PlainText>
                </Password>
            </AutoLogon>
            <OEMInformation>
                <Logo>c:\windows\system32\oem\sager_120x120.bmp</Logo>
                <Manufacturer>Sager Midern Computer, Inc.</Manufacturer>
                <SupportHours>8:30am to 5:30pm PST</SupportHours>
                <SupportPhone>1-626-964-4849</SupportPhone>
                <SupportURL>http://www.sagernotebook.com</SupportURL>
                <Model>Notebook Computer</Model>
            </OEMInformation>
            <OOBE>
                <HideEULAPage>true</HideEULAPage>
                <NetworkLocation>Home</NetworkLocation>
                <ProtectYourPC>3</ProtectYourPC>
                <SkipMachineOOBE>true</SkipMachineOOBE>
                <SkipUserOOBE>true</SkipUserOOBE>
            </OOBE>
            <FirstLogonCommands>
                <SynchronousCommand wcm:action="add">
                    <CommandLine>%systemdrive%\Install\FirstLogon.cmd</CommandLine>
                    <Order>1</Order>
                    <Description>Customize Settings/Install Programs/Cleanup Windows</Description>
                </SynchronousCommand>
            </FirstLogonCommands>
        </component>
        <component name="Microsoft-Windows-PerfCenterCPL" processorArchitecture="x86" publicKeyToken="31bf3856ad364e35" language="neutral" versionScope="nonSxS" xmlns:wcm="http://schemas.microsoft.com/WMIConfig/2002/State" xmlns:xsi="http://www.w3.org/2001/XMLSchema-instance">
            <WindowsExperienceIndexOemInfo>
                <Logo>c:\windows\system32\oem\Sager-130x50.bmp</Logo>
            </WindowsExperienceIndexOemInfo>
        </component>
     </settings>
    <cpi:offlineImage cpi:source="wim:c:/vista/x86/install.wim#Windows Vista ULTIMATE" xmlns:cpi="urn:schemas-microsoft-com:cpi" />
</unattend>
Again, why does the computer restart just after "Windows load my desktop for the firs time"? Any help would be GREATLY appreciated!
0 -
Also let me know if you confirm that disabling automatic activation does not turn off your OEM activation.
So, does checking this box disable OEM activation?
0 -
spwizimg.dll is located in 5 places on an extracted WinVista SP1 cd:
1. ".\Sources\"
2. In install.wim - "%windir%\System32\"
3. In install.wim - "%windir%\winsxs\x86_microsoft-windows-s..on-wizard-framework....6.0.6000.16386_none_b652e536179397f"
4. In install.wim - "%windir%\winsxs\x86_microsoft-windows-s..on-wizard-framework....6.0.6001.18000_none_b41c233a548e28ab"
5. "\.Sources\Support\MIGWIX"
I've edited the appropriate .bmp resources in EVERY spwizimg.dll in ALL locations using reshack, and none of the install screen .bmps are changing. I've made sure that the .bmp files I am using to replace are the EXACT same resolution as the ones ialready in the .dll file.
Are there any more copies that also need to get edited? What program are you using to edit and replace .bmps in the .dll file? You are replacing them with 24-bit .bmps, right? Did you do anything special to get the images to appear?\
0 -
google "shell32.dll, -21799". This should give you some more info...
0 -
What file did you edit in order to change the "Install Windows" and "Checking Performance" screen?
0 -
How's the new driver been working for ya?
0

Final ESU Updates for Windows 7 SP1 (Retired!)
in User Contributed Update Lists
Posted
Thanks for the 32-bit and 64-bit updates. Much appreciated!