

Fernando 1
Content Type
Profiles
Forums
Events
Posts posted by Fernando 1
-
-
So even if I am using SATA Raid I will still need to copy the nvatabus.inf from the PATARAID folder?
Yes!
Otherwise the necessary driver NVATABUS.SYS would not be installed and your system would not work after the installation.
0 -
This is confusing (sorry if I'm an id*** but this really is not clear)...
You've clarified that nvatabus.inf must come from PATARAID folder (even for a SATA RAID array which makes no sense but I will trust you on this)... What about the other two files (idecoi.dll and nvatabus.sys)? Does it matter where they come from?
Also, When you say "integrate the latest NVIDIA Sata/Raid drivers as textmode drivers" ... What freakin directory are you integrating in nLite?
- \PATARAID or \SATARAID?
Why are you using PATARAID drivers to setup a SATA RAID Array?
You are right - it seems to be confusing, but this exactly is the trick of the method I described here in this thread. The [OemInfFiles] method enforces the installation of the needed, but still not WHQL-certified driver NVATABUS.SYS and prevents, that Windows XP installs the wrong MS Standard-IDE-Controller driver.
When you have a SATA RAID system, you have to integrate the files of the subfolder SATARAID as TEXTMODE driver by nLite. (When you have a PATA RAID system, you have to take the files from the subfolder PATARAID.)
Nevertheless you have to copy the file nvatabus.inf from the subfolder PATARAID into the fresh created subfolder OEMDIR. This file is not a driver, but it is needed to give MS informations how to install the driver NVATABUS.SYS. When you look into the subfolder SATARAID, you can find the needed driver NVATABUS.SYS, but no information file for this driver (NVATABUS.INF). That is the reason, why you have to take the one from the PATARAID subfolder.
Hoping, that I did not confuse you more than before
Fernando
0 -
Yes I have tried with both versions.
I have also done the manual installs by editing txtsetup.sif and winnt.sif, which didnt work either.
I suppose, that you have done something wrong.
You can make a lot of mistakes by editing the TXTSETUP.SIF. That is why I searched for an easier method.
Try it again with nLite 1.0 Beta4 and follow exactly the instructions given by me in the first post of this thread.
Good luck!
Fernando
0 -
2. Copy the following files (you find them in the IDE\WINXP folder of your NVIDIA chipset driver package) into the just created folder "OEMDIR":
idecoi.dll
nvatabus.inf
nvatabus.sys
Hi, Thanks Fernando for your work, but can you clarify something...
nvatabus.inf is only found in this nForce4 folder... IDE\WinXP\PATARAID
I want to install SATA RAID which I assume should come from... IDE\WinXP\SATARAID where the only INF file is called nvraid.inf (not nvatabus.inf)
Can you clarify what INF and directory I should be using to slipstream drivers for a SATA RAID drive array?
Thanks.
Thats right! You have to take the nvatabus.inf file from the folder PATARAID.
I will clarify this in my first post.
CU
Fernando
0 -
are you using the newest driver to test it?
nForce4 AMD Edition (6.66) - Windows XP Professional x64
Version: 6.66
Release Date: July 15, 2005
WHQL Certified
International
File Size: 38 MB
WHQL Certified
Yes, I tested it with these drivers from the chipset package 6.66 (32-bit on Windows XP and 64-bit on Windows XP x64 Edition).
The package is published as WHQL-certified, but the drivers, which make the biggest problems integrating them into a CD, the NVATABUS.SYS (32-bit) and NVATAX64.SYS (64-bit) are not!
0 -
This does not work on my SN95G5 Shuttle NForce 3 board.
This one gets the furthest, but I just get caught in a reboot loop after it finishes installing.
Did you use the new nLite Version 1.0 Beta5?
If yes - try it with the "old" Version 1.0 Beta4!
Look here:
http://www.msfn.org/board/index.php?showto...ndpost&p=355895
0 -
@ all users with a NVIDIA nForce RAID or AHCI system:
Important information for all users, who are here for the first time
This thread has got a big volume with a lot of sites and hundreds of replies. There is no reason to waste time and to read them. All you need to know is laid down in this first post. If I get any new information, which might be important or useful, I will edit it into this post!
So this first post will always be up-to-date!
Last update: 04/05/2012
Changelog:
- updated: modded 32/64bit "Actual nForce Driverpacks for XP" (now v9.0)
- updated: modded 32/64bit "Non-AHCI nForce Performance Packs for XP" (now v9.0)
- updated: modded 32/64bit "Special MCP65-67 nForce Driverpacks for XP" (actual: v9.0)
- updated: modded 32/64bit "nForce LEGACY Remix Packs" (now v9.0a resp. v9.0)
- changed: all download links (all files now hosted at a quick ftp server)
Introduction
The problem:
None of the Pre-Vista Windows Operating Systems do support the S-ATA Controller features RAID ("Redundant Array of Independent Disks") and AHCI ("Advanced Host Controller Interface"). Unless the suitable nForce Sata/PataRAID or AHCI drivers are separately presented by the user, the OS installation fails, because the OS Setup doesn't find the related RAID/AHCI drives and their partitions.
The traditional method to provide the needed drivers by F6/floppy has some severe disadvantages:
- A floppy drive is needed, but not available at many actual desktop computers and notebooks.
- Floppy disks are the worst data storage media regarding the file integrity. Bad floppy disks are the main reason for corrupted driver files.
- The F6/floppy method doesn't work at all with some "LEGACY mode" nForce RAID systems. Even if the user loads the correct nForce drivers and the RAID is detected by Windows Setup, the OS installation may end with a BSOD and endless reboot loops.
The better alternative is the integration of the needed textmode drivers into a bootable OS CD. Only this way the user can be sure to succeed with the installation of the OS onto an nForce RAID or AHCI system. Nevertheless the developers of the driver integration method had to solve the above specified problem (see point 3). Until 2005 the correct installation of the nForce S-ATA/P-ATA Controllers and drivers needed addtional manual work of the user. They only succeeded after having created special folders and edited some SIF and/or OEM files.
The solution:
The safest and easiest way to get the problematic nForce textmode drivers properly installed is to integrate them by using a tool like nLite. All actual versions of nLite (Since v1.0 Final) have incorporated a special method, which guarantees the successful OS installation onto any nForce RAID or AHCI system (if the user observes some rules layed down below). The replacement of the correct nForce Controllers and drivers by the "wrong" MS IDE ones will be prevented by the built-in suppression of the MS IDE drivers during the hardware detection part of the OS installation.
Advantages:
- fully automatic method (without creating new directories or editing SIF or OEM files)
- support of not digitally signed textmode drivers
- without restriction of any kind during the use of nLite
Who needs to load/integrate which nForce IDE driver subfolder?
You can get NVIDIA nForce chipset deskop computers and laptops with the following variations:
- non-RAID/AHCI nForce systems (RAID/AHCI not supported or disabled):
Users with such system don't have to load/integrate any nForce IDE drivers. - nForce RAID systems (SataRAID or PataRAID):
NForce Users with enabled RAID settings within the BIOS need to load/integrate the LEGACY (for NF2-4 chipsets) or the SATARAID subfolder of the suitable nForce chipset driverpack as TEXTMODE driver. Users with an old "LEGACY mode" nForce RAID system, who want to integrate the SATARAID subfolder, additionally have to integrate the SATA_IDE subfolder as PnP driver to prevent a BSOD at the end of the OS installation. - nForce AHCI systems (S-ATA Controllers set to AHCI mode):
The actual nForce chipsets (MCP65 and up) do support the enhanced features (NCQ etc.) of the new S-ATA standard AHCI. If the NVIDIA nForce S-ATA Controllers are set to "AHCI mode" (instead of "IDE mode") within the BIOS, users have to load/integrate the suitable SATA_IDE subfolder as TEXTMODE driver. Only the new generation of nForce S-ATA drivers named "NVGTS" do support the AHCI features and can be integrated as textmode driver. Suitable SATA_IDE subfolders contain a TXTSETUP.OEM file.
Here is the way how to do it:
Integration of NVIDIA's nForce RAID and AHCI drivers
by using nLite
Guide for Windows XP and Windows Server 2003 (32/64bit)
A. Integration of the nForce RAID drivers
(if the OS will be installed onto any RAID partition)
Short form guide
(for hasty users, who want a quick result)
If you want to create a bootable OS CD, which will detect your RAID and be successfully installed onto it, you should do the following:
- Get the actual nLite version from here and install it (.NET Framework 2.0 or equivalent is needed).
- Download and unzip one of the following already prepared drivers (the choice depends on the OS, which shall be installed, and the nForce chipset of the destination desktop/laptop):
a. Windows XP or Windows Server 2003 (32bit)- for nForce2/3/4 SataRAID and nForce2/3/4/5 PataRAID systems:
>32bit nForce LEGACY drivers v6.99 mod by Fernando (download link)< - for nForce 560/520 (MCP65) and nForce 630a (MCP67) SataRAID systems:
>32bit nForce SATARAID drivers v10.3.0.46 WHQL (download link)< - for all other nForce SataRAID systems:
>32bit nForce SATARAID drivers v11.1.0.43 WHQL (download link)<
- for nForce2/3/4 SataRAID and nForce2/3/4/5 PataRAID systems:
b. Windows XP x64 or Windows Server 2003 x64:
- for nForce3/4 SataRAID and nForce 3/4/5 PataRAID systems:
>64bit nForce LEGACY drivers v6.99 mod by Fernando (download link)< - for nForce 560/520 (MCP65) and nForce 630a (MCP67) SataRAID systems:
>64bit nForce SATARAID drivers v10.3.0.46 WHQL (download link)< - for all other nForce SataRAID systems:
>64bit nForce SATARAID drivers v11.1.0.43 WHQL (download link)<
[*]Create a folder named "nLiteCD" (or similar) somewhere and copy the whole content of the original OS CD into it.
[*]Start nLite > point to the content of the just created folder as source > hit the buttons "Drivers" and "Bootable ISO".
[*]When the task "Drivers" comes > hit "Insert" > choose "Single driver" > point to the prepared SATARAID resp. LEGACY driver folder.
[*]Click onto any of the shown INF files > a popup window will come up.
[*]Both shown "required" NVIDIA products should be highlighted (already done by nLite) > hit "OK".
[*]Only needed for some NF4-5 RAID systems after the integration of the SATARAID drivers: integrate additionally the SATA_IDE folder as PnP driver.
[*]Let nLite burn the Image directly onto an empty CD ("General" > "Mode" > "Direct Burn").
[*]Boot off the created CD, choose the destination partition, do a quick NTFS formatting and install the OS.
[*]Have fun!
Detailed RAID drivers integration guide
(for users, who want the best possible results or who ran into problems)
Important Requirements:
You only will succeed with the integration of the nForce Pata/SataRaid drivers, if you have
- a correctly created nForce RAID array (shown as "healthy" and set as bootable, for further information look here)
- an up-to-date mainboard and nVRaid BIOS (= MediaShield IDE ROM), which is part of the mainboard BIOS. Actual nVRaid drivers may need a Raid Bios v4.81 (NF3) resp. v5.60 (NF4) or higher.
- a stable system (proper RAM modules and stable BIOS settings)
- an original (=untouched) OS CD as source (don't use or reuse a source, which has already been processed by nLite!)
- a proper working IDE-connected CD or DVD drive (a S-ATA connected optical drive should not be connected with an nForce S-ATA Controller which are set to RAID or AHCI mode)
- an enabled ACPI power management (within BIOS, don't disable it by nLite settings).
Tips:
- You can see the nVRaid BIOS (=MediaShield) version of your system on the second boot screen. If you can't get a Raid BIOS version v. 4.81 or higher after having flashed the latest mainboard BIOS, you might get problems with the integration of the latest nForce Pata/SataRaid drivers.
- The successful integration of the nForce Pata/SataRaid drivers into a bootable OS CD requires the presence of the latest available Service Pack (SP) of the used OS. If your OS CD does not contain any or the last SP, you should integrate the latest SP as first step, when you are going to create your nLited CD with integrated nForce Sata/PataRaid drivers.
- XP 32bit (x86) only: If possible don't slipstream SP3 into an XP SP1 or SP2 CD. In this case it's better to take an original ("Gold"/RTM) OS CD without any SP as source for slipstreaming SP3 and the nForce Raid drivers. Otherwise you may get problems during the installation of the nLited CD.
- It is a good idea to unplug all unnecessary external hardware devices during the installation of the OS with integrated nVRaid drivers.
- If you have any hard disk drive outside your RAID array or a plugged-in USB stick, you may get the problem, that the MS Setup routine tries to install the master boot record (MBR) onto that non-RAID device, although you have set the RAID array as first bootable hard disk drive within BIOS. The only sure way to prevent this is to unplug these non-RAID devices during the installation of the OS. After the successful installation they can be reconnected without any problems.
1. Preparation and driver choice
If you are not already running the latest version of nLite, you should download it here and install it (.NET Framework 2.0 or equivalent is needed).
The next step is the preparation of the nForce textmode driver for the later integration. The choice of the "best suitable" nForce IDE driver version and subfolder mainly depends on the nForce chipset details, the RAID configuration (SataRAID or PataRAID) and maybe on the nVRaid BIOS version of the destination desktop/laptop.
NVIDIA is offering for all nForce chipsets complete driverpacks with included nForce SataRAID drivers. You will find them, if you go here, choose "nForce" (NF5 and up) or "LEGACY" (NF1-4) as "Product Type" and then choose your special nForce chipset and the OS you are going to install. Unfortunately NVIDIA's official nForce driverpacks are not always the best choice for nForce RAID users. Either they do not work at all (example: NF4 RAID), they are outdated (example: NF2-3 RAID) or they don't provide the best possible performance (valid for nearly all NF chipsets).
Since January 2008 I am offering alternative nForce drivers and driverpacks, which are actual, but maybe better than NVIDIA's official ones (for details you may look here). The used drivers themselves (=SYS files) were developed and released by NVIDIA, but for unknown reasons the manufacturer didn't add the HardwareID's of all supported nForce IDE devices. That is why I customized the associated INF/OEM files to make them compatible with as many nForce chipsets as possible. This modification doesn't touch the driver's function and the loss of Microsoft's digital signature (WHQL) has no impact on the driver's installation (thanks to nLite's built-in textmode driver integration method).
For the later integration I recommend to prepare the following actual and approved nForce textmode drivers, which are optimized for being used with nForce RAID systems:
a. Windows XP or Windows Server 2003 (32bit)
- for nForce2/3/4 SataRAID and nForce2/3/4/5 PataRAID systems:
>32bit nForce LEGACY drivers v6.99 mod by Fernando (download link)<
This LEGACY textmode driver package contains the newest non-AHCI capable nForce IDE drivers v6.99 dated 14th May 2007. Since I have added all needed HardwareID's, this package will support all "LEGACY Mode" nForce2-5 RAID systems ("LEGACY Mode" means, that the NVIDIA nForce RAID Controllers of the mainboard do support Pata- and Sata-RAID simultaneously). - for nForce 430/410 (MCP51), nForce 590/570/550/680i/650i/780i/750i (MCP55) and nForce 430/405/400 (MCP61) SataRAID systems:
>32bit nForce IDE drivers v9.99.09 mod by Fernando (download link)<
Within the small package you will find the nForce IDE drivers v9.99.09 dated 01/17/2008, which have been customized by me to make them compatible with all NF4-7 chipsets. These drivers will give your nForce RAID system the best possible performance. Usually only the SATARAID driver folder will be needed for the later integration, but some users with a LEGACY Mode nForce RAID system may have to integrate both included driver subfolders (SATARAID as textmode and SATA_IDE as PnP driver). - for nForce 560/520 (MCP65) and nForce 630a (MCP67) SataRAID systems:
>32bit nForce SATARAID drivers v10.3.0.46 WHQL (download link)<
These are NVIDIA's latest nForce IDE drivers, which do fully support MCP65 and MCP67 chipsets. - for all other nForce SataRAID systems:
>32bit nForce SATARAID drivers v11.1.0.43 WHQL (download link)<
These are NVIDIA's latest WHQL certified nForce IDE drivers v11.1.0.43 dated 04/09/2010. I recommend to use these new drivers for users with a SataRAID system and an MCP73-79 chipset mainboard. Users with an MCP51, MCP55 or MCP61 chipset mainboard may take them too, but I am not sure, that they will get a better performance than with the modified nForce SATARAID drivers v9.99.09.
b. Windows XP x64 or Windows Server 2003 x64
- for nForce3 250/nForce4 SataRAID and PataRAID systems:
>64bit nForce LEGACY drivers v6.99 mod by Fernando (download link)<
The package contains the newest natively 64bit nForce IDE drivers, which have been customized by me to make them usable with all "LEGACY Mode" nForce RAID systems from nForce3 up. Even MCP51, MCP55 and MCP61 PataRAID systems are supported by them. - for nForce 430/410 (MCP51), nForce 590/570/550/680i/650i/780i/750i (MCP55) and nForce 430/405/400 (MCP61) SataRAID systems:
>64bit nForce IDE drivers v9.99.09 mod by Fernando (download link)<
Within the package you will find the nForce IDE drivers v9.99.09 dated 01/17/2008, which have been customized by me to make them compatible with all NF4-7 chipsets. These drivers will give your nForce RAID system the best possible performance. Usually only the SATARAID driver folder will be needed for the later integration, but some users with a LEGACY Mode nForce RAID system may need both included driver subfolders (SATARAID as textmode and SATA_IDE as PnP driver). - for nForce 560/520 (MCP65) and nForce 630a (MCP67) SataRAID systems:
>64bit nForce SATARAID drivers v10.3.0.46 WHQL (download link)<
These are NVIDIA's latest nForce IDE drivers, which do fully support MCP65 and MCP67 chipsets. - for all other nForce SataRAID systems:
>64bit nForce SATARAID drivers v11.1.0.43 WHQL (download link)<
These are NVIDIA's latest WHQL certified nForce IDE drivers v11.1.0.43 dated 04/09/2010. I recommend to use these new drivers for users with a SataRAID system and an MCP73-79 chipset mainboard. Users with an MCP51, MCP55 or MCP61 chipset mainboard may take them too, but I am not sure, that they will get a better performance than with the modified nForce SATARAID drivers v9.99.09.
After having downloaded the suitable driverpack and unzipped it with a tool like WinRAR or 7-Zip everything is prepared for the later integration procedure.
2. Processing with nLite:
This is what you should do, before you start nLite:
- Create a new folder somewhere on any available hard disk drive and name it as you like (for example "nLiteCD") .
- Copy the whole content of the original OS CD into the just created folder. Don't use or reuse any already nLited or modded source.
- Check, if you have already running the latest nLite version. If not, download and install it.
Now you can begin with the nLite processing:
- Start nLite.
- Choose your language > hit "Next"
- Hit the "Browse" button, find the path to your just created folder "nLiteCD" (or similar) > click onto the folder name. Now you can see the OS details inclusive the eventually already integrated Service Pack version > hit "Next".
- Don't import or enable any presets > hit "Next".
- Now you will get the Task Selection page.
You can enable all offered tasks (not recommended for newbees), but you have to enable the tasks "Integrate Drivers" and "Create Bootable ISO".
Recommendations:- You should additionally choose the task "Integrate Service Pack", if the OS SP version is not actual.
- Don't enable any other tasks, unless you are already familiar with nLite and nearly sure, that the nLite CD will work with your system (the more you are adding, tweaking or removing, the more difficult is the search for the reason, if the OS installion should fail).
- You should additionally choose the task "Integrate Service Pack", if the OS SP version is not actual.
> hit "Next"
[*]When you get the "Drivers Integration" page > hit "Insert" > choose the "Single driver" option > point to the prepared SATARAID or LEGACY folder with the suitable nForce Sata/PataRAID drivers > hit onto any of the shown INF files (=files with the suffix ".inf").
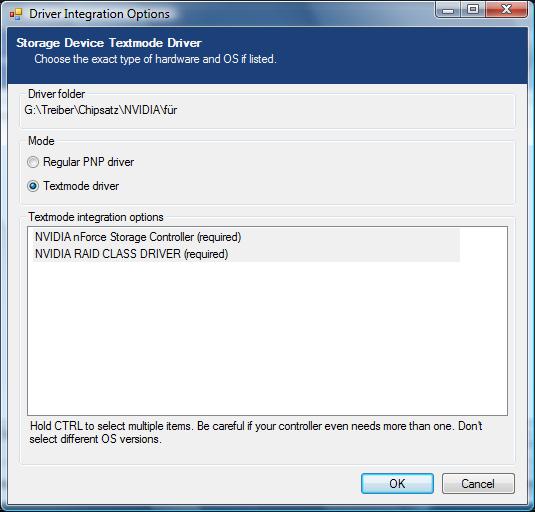
[*]Now you will get the following popup window:

Both listed "required" NVIDIA products ("NVIDIA RAID CLASS DRIVER" and "NVIDIA nForce Storage Controller") have to be enabled. Usually nLite has already highlighted both of them and set the integration mode to "TEXTMODE" (if not, you should do it manually) > hit "OK"
Important: Users with an NF3-5 chipset RAID system, who had just integrated the SATARAID folder, may need to additionally integrate the content of the SATA_IDE subfolder of the same driverpack as PnP driver to get the OS properly installed.
If you have integrated all needed nForce Sata/PataRAID drivers > hit "Next"
[*]Let nLite start its processing > hit "Yes"
[*]After the successful nLite processing > hit "Next"
[*]As last step you will get the "Create Bootable ISO" page. Within the "General" section you can choose the "Mode".
You have the options "Direct Burn" (burns the image directly onto an empty CD/DVD), "Burn Image" or "Create Image" (default setting).
If you don't want, that nLite burns the Image itself, you should let nLite create the ISO file by hitting the "Make ISO" button.
After having chosen the storage place and -if applicable - a special name for the ISO file > hit "Store".
[*]At this point nLite has finished its work.
If nLite hasn't already burnt the Image onto a CD, you have to burn the stored ISO file as bootable Image by using a burning tool.
You will get the best results with Nero Burning ROM, when you choose the options "Recorder" (on top task bar) > "Create Image...." > point to the ISO file nLite has created > hit "Burn".
Tip: Burn at no more than 8x(DVD) or 24x(CD) and choose the "Verify" option of Nero to avoid any burning errors!
At the end you will have a bootable 32bit or 64bit Windows OS CD with integrated NVIDIA Sata/PataRaid drivers - no F6 and no floppy will be necessary.
Tips for the Installation of the OS:
- Make sure that your BIOS settings are ok. You will only be able to install the OS by booting off your nLited CD, when the CD-ROM device with your nLited CD is set as first bootable device.
- Before you begin with the installation of the OS by using your nLited CD, make sure that there is no floppy within your floppy drive, no USB stick within any USB port and no Memory Card within your Card Reader.
- If you are using more than 2 GB of RAM, it is a good idea to remove 1-2 sticks during the OS installation (otherwise you may get a lot of errors during the OS Setup). Once the OS is up, they can be reinserted.
- Don't hit F6 and don't insert a driver floppy if you install an OS by using a CD with integrated nForce SataRaid drivers!
Good luck!
B. Integration of the nForce AHCI drivers
(only valid for AHCI supporting nForce mainboards with enabled AHCI)
Actual nForce chipsets (MCP65 and up) do support the advanced S-ATA-Features (z.B. NCQ) of the AHCI standard. Users of such systems usually have the BIOS option to set the nForce S-ATA Controllers to "AHCI Mode" instead of the "IDE Mode" (which doesn't require any separate textmode drivers). If AHCI is enabled, Windows Setup will not detect the S-ATA hdd('s) unless the needed AHCI drivers will be loaded (F6) or have been integrated into the OS CD.
If you try to get Windows XP or Server 2003 (32/64bit) installed onto a non-RAID nForce chipset system and should realize, that Windows Setup doesn't find any hard drive, the following procedure will be successful for nearly all users:
- get the actual version of nLite from here and install it (.NET Framework 2.0 required)
- depending on your nForce chipset and the OS you are going to install, download and unzip one of the following drivers:
- a. for Windows XP or Windows Server 2003 (32bit):
- for nForce 630i/620i/610i (MCP73), nForce 730a/720a/710a (MCP78) and nForce ION (MCP79) chipset mainboards (AHCI enabled):
>32bit nForce SATA_IDE driver v11.1.0.43 WHQL (download link)< - for nForce 560/520 (MCP65) and nForce 630a (MCP67) chipset mainboards (AHCI enabled):
>32bit nForce SATA_IDE driver v10.3.0.46 WHQL (download link)<
- for nForce 630i/620i/610i (MCP73), nForce 730a/720a/710a (MCP78) and nForce ION (MCP79) chipset mainboards (AHCI enabled):
- a. for Windows XP or Windows Server 2003 (32bit):
[*]b. for Windows XP x64 or Windows Server 2003 x64:
- for nForce 630i/620i/610i (MCP73), nForce 730a/720a/710a (MCP78) and nForce ION (MCP79) chipset mainboards (AHCI enabled):
>64bit nForce SATA_IDE driver v11.1.0.43 WHQL (download link)< - for nForce 560/520 (MCP65) and nForce 630a (MCP67) chipset mainboards (AHCI enabled):
>64bit nForce SATA_IDE driver v10.3.0.46 WHQL (download link)<
[*]create a folder named "nLiteCD" or similar and copy the whole content of the OS CD into that folder
[*]start nLite > point to the just created "nLiteCD" folder as source
[*]choose the tasks "Integrate Drivers" and "Create Bootable ISO"
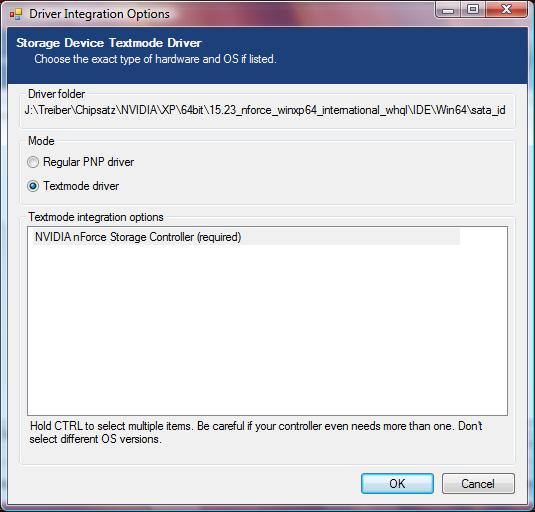
[*]when the "Driver Integration" task comes up > hit "Insert" > choose "Single driver" > point to the prepared SATA_IDE subfolder
[*]check any of the shown INF files
[*]now you see the following popup window:
let the "NVIDIA nForce Storage Controller (required)" enabled > hit "OK"
[*]let nLite burn the Image directly onto an empty CD/DVD
[*]boot of the just created CD > choose the destination partition > do a quick NTFS formatting > install the OS
[*]have fun!
C. Most common problems during the OS installation
If you have followed my guide until this point, you can be rather optimistic, that you will get the OS perfectly installed onto your nForce RAID or AHCI system, but the success is not guaranteed.
These are the most common mistakes/errors, which will cause a failure of the OS installation:
- The prepared CD doesn't boot. ("Hit any key to boot off CD/DVD" message is missing).
Reason: Either you haven't set the correct boot device order within the BIOS or you didn't burn the ISO file correctly.
Solution: The CD/DVDROM device has to be set as 1st bootable device and the ISO file has to be burnt as bootable Image (see above). - Windows Setup doesn't detect the RAID or the SATA drives, which were set to "AHCI Mode".
Reason: You obviously didn't integrate the "suitable" textmode drivers or didn't choose the needed Controllers during the integration procedure.
Solution: Check the exact chipset name of your mainboard, the BIOS settings and the sort of the S-ATA Controllers, where your hdd's are connected (example: you can't get Silicon Image S-ATA Controllers working with nForce drivers and vice versa).
After having found the "correct" textmode drivers you have to restart the integration procedure from scratch (don't reuse the nLited source again!). - You get a message like "The file NVxxx.SYS is corrupt."
Reason: You obviously mixed the 32/64bit textmode driver version or you didn't use a clean source.
Solution: Start the nLite processing again from scratch with a clean source and integrate the correct 32/64bit textmode driver version. XP, W2k and W2k3 can only be installed by using 32bit textmode drivers, whereas the 64bit Operating Systems (XP x64/W2k3 x64) need 64bit drivers.
You get an error message like "Cannot find file NVxxx.SYS".
Reason: You either didn't integrate the textmode driver or you tried to additionally load it by F6/floppy method.
Solution: Don't hit F6 when prompted, if you have integrated the textmode driver. - The OS installation fails at last reboot with a short BSOD and endless reboots.
Reason: You either didn't choose the correct driver integration method or your optical drive is connected to a S-ATA port, which is set to RAID or AHCI.
Solution:Connect the optical drive to a non-RAID/non-AHCI S-ATA port or take an IDE connected CD/DVDROM drive for the OS installation.
Aside from the previously mentioned problems there are some other sources of error:
- not correctly configurated RAID or wrong BIOS settings regarding RAID/AHCI
- wrong BIOS settings regarding the "HARD DISK BOOT PRIORITY" (solution: the RAID/AHCI drive has to be set as first bootable hard disk)
- presence of additional hdd's outside the RAID/AHCI device (solution: disconnect all non-RAID/non-AHCI hdd's during the OS installation)
- plugged-in USB sticks, floppys, memory cards etc. (solution: unplug them all before you start with the OS installation)
- faulty RAM sticks, overclocking or > 3 GB of RAM (solution: check the RAM with Memtest, no OC'ing, removal of RAM sticks during the OS installation)
- hardware malfunction (broken or not really connected S-ATA cables, poor PSU etc.)
D. After the successful OS installation
Once the OS is up, you should install the complete "suitable" nForce chipset driver set. The best suitable driverpack is that one, which contains the same version of nForce IDE drivers as the integrated ones (v6.99, v9.99.09 or 11.1.0.33, if you had followed my advices).
Here are the download links to the related complete nForce chipset driver packs:
a. XP/W2k3 (32bit)
- for NF2/NF3/NF4 Intel PataRAID/SataRAID systems and NF4 AMD/MCP51/MCP55/MCP61 PataRAID systems (with nForce IDE v6.99 mod):
>Fernandos nForce LEGACY Remix Driverpack v9.0a for XP 32bit (download link)< (for details look >here<) - for NF4 AMD/MCP51/MCP55/MCP61 SataRAID systems (with nForce IDE v9.99.09 mod):
>Fernandos non-AHCI nForce Performance Pack for XP 32bit v9.0 (download link)< (for details look >here<) - for MCP65 and MCP67 RAID or AHCI systems (with nForce IDE v10.3.0.46 WHQL):
>Fernandos Special MCP65-67 nForce Driverpack for XP 32bit v9.0 (download link)< (for details look >here<) - for MCP73-79 RAID or AHCI systems (with nForce IDE v11.1.0.43 WHQL):
>Fernandos Actual nForce Driverpack for XP 32bit v9.0 (download link)< (for details look here)
b. XP/W2k3 (64bit)
- for NF3 250/NF4 Intel PataRAID/SataRAID systems and NF4 AMD/MCP51/MCP55/MCP61 PataRAID systems (with nForce IDE v6.99 mod):
>Fernandos nForce LEGACY Remix Driverpack for XP 64bit v9.0 (download link)< (for details look here) - for NF4 AMD/MCP51/MCP55/MCP61 SataRAID systems (with 64bit nForce IDE v9.99.09 mod):
>Fernandos non-AHCI nForce Performance Pack for XP 64bit v9.0 (download link)< (for details look here) - for MCP65 and MCP67 RAID or AHCI systems (with nForce IDE v10.3.0.46 WHQL):
>Fernandos Special MCP65-67 nForce Driverpack for XP 64bit v9.0 (download link)< (for details look >here<)] - for MCP73-79 chipset RAID or AHCI systems (with 64bit nForce IDE v11.1.0.43 mod):
>Fernandos Actual nForce Driverpack for XP 64bit v9.0 (download link)< (for details look here)
That's all - I hope, that you will succeed with the integration of the drivers and with the installation of the OS onto your nForce RAID or AHCI system.
Good luck!
Fernando
Important notice:
This guide contains a lot of links to drivers, which have been modified by me to make them usable for nForce chipset users. As you certainly understand, I cannot overtake any warranty for the function and the quality of the drivers. You may use them nevertheless, but at own risk.
Annex I
MediaShield/Raidtool installation guide
The easiest way to get the Raidtool installed is by running the SETUP.EXE of the associated nForce chipset driver package, but by doing this all nForce IDE drivers of the package will be installed too (and maybe replace the better and currently working ones).
In these cases you have to use another way to get full access to the MediaShield/RAID software (NVIDIA Control Panel) after having completed the OS installation.
Here is the guide for the manual installation of the nForce Raidtool (on the basis of a post from nForcersHQ forums member TheMaxx32000):
- Run your just installed OS.
- Create a new folder named "RAIDTOOL" somewhere within your currently running OS partition (for example within the directory "\Program Files")
- Search for the RAIDTOOL folder of the actual 32bit/64bit XP/W2k/W2k3 nForce chipset driver package
- Extract the RAIDTOOL.cab into the just created RAIDTOOL folder of your OS partition
- Open the RAIDTOOL folder with the extracted files
- Doubleclick the REGRAID.BAT (you will find it in older Raidtools) or REGRAIDSEDONA.BAT (actual file name of the Sedona type Raidtool) to register the Raidtool Services
- Run the NVRAIDMAN.EXE (normal MediaShield) or NVCPLUI.EXE (Sedona type NVIDIA Control Panel)
Now you will see the MediaShield Control Panel. It should also appear as NVIDIA Control Panel within the Vista Control Panel, but if it doesn't, try to install nTune on top.
For further information about the abilities of the NVIDIA MediaShield software you should open the MediaShield help file (as .chm or .pdf), which you will find within the extracted raidtool files.
Suggestion: You should create shortcuts to the .EXE files of the RAIDTOOL folder and put them into your Startmenu folder. This way you will get an easy access to all services of the MediaShield/Raidtool.
Annex II
Tips for users with a SATA RAID array outside the OS partition
Here are some advices for such users:
- Users with an nForce Sata-RAID array, who are going to install any OS onto an IDE or non-AHCI S-ATA drive, which is outside the RAID, should not integrate any nForce SataRaid drivers. They will be able to get the OS installed without any problems.
- Once the OS is up, you should run the installer of the suitable nForce chipset driver package. After the reboot, the RAID array normally will be detected by the OS.
- If the OS should not show the RAID device and their partitions, you should do the following:
- Open the Device Manager and check, if you see the "NVIDIA nForce RAID Controller" within the "SCSI and RAID Controllers" section. If not, you haven't enabled the NVIDIA RAID Controllers within the BIOS.
- If you see the "NVIDIA nForce RAID Controller", you have to open the "IDE ATA/ATAPI Controllers" section and look for the "Standard Dual Channel PCI IDE Controllers", where your RAIDed SATA hdd's are connected to.
- Right click onto these Controllers and do a driver software "update" until you see the compatible devices.
- Choose the "NVIDIA nForce Serial ATA Controllers", if they are shown as compatible.
- After the reboot your OS will see and will be able to work with the datas of the RAID array.
- Open the Device Manager and check, if you see the "NVIDIA nForce RAID Controller" within the "SCSI and RAID Controllers" section. If not, you haven't enabled the NVIDIA RAID Controllers within the BIOS.
0 - updated: modded 32/64bit "Actual nForce Driverpacks for XP" (now v9.0)
-
I have possibly detected the reason for all the troubles I have described in this thread.:
The new version of nLite 1.0 Beta5 does not work with the integration of nForce4 Sata/Raid drivers!
After a lot of frustrating tests and many hours of work I found out the following:
1. It is impossible to integrate nForce4 Sata/Raid drivers into a bootable Windows XP or Windows XP x64 CD fully automaticly by using nLite (neither with v. Beta 4 nor with v. Beta 5).
2. It seems to be totally impossible to integrate these drivers with the new version 1.0 Beta5, even when you make several manual changes (I tried nearly everything inclusive the [OemInfFiles] method - at the end there were endless reboots).
3. The [OemInfFiles]-method I have described already for the 64-Bit version of Windows XP, runs perfect even on the 32-bit Version of Windows XP, when you use the "old" version of nLite (1.0 Beta4). I tried it with the NVIDIA chipset packages 6.66 and 7.13.
The last finding is the best, because the method to integrate these awfull nForce Sata/Raid drivers is much easier than the method I described 2 posts above.
I will open a new thread this evening and explain the few things which you have manually to do.
CU
Fernando
0 -
see now I don't know what to do. I hear differnet things from different people. I want to be able to integrate the SATA RAID drivers via textmode in nlite WITHOUT having to make any changes. When I had Silicon Image and Promise RAID I never had an issue like I do with this nvidia raid. If there is no way to do it without making changes then I guess I am SOL UNLESS Fernando you would be so kind as to send me any modified files you used and let me know where to put them so I can have no further troubles. If 6.66 doesn't work no matter what but you know that 6.53 works in at least one way please drop me a PM with detailed instructions so as to not clutter this thread anymore than it is. I really would appreciate it as I have useless windows running now and don't want to format unless I know its going to work. I would like to have the best install possible as I don't do it often. Thanks.
As you can see, it's not easy with these awfull NVIDIA drivers. You are not the only user waiting for an easy resolution!
That is the reason why we are testing all around.
You will not be happy, when you try to install your SATA/RAID drivers as TEXTMODE with nLite without any handmade changes.
Why don't you install the drivers by F6/floppy? I am sure, that works with the drivers from the packet 6.53.
If you want to use nLite, you may not choose the install of the SATA/RAID drivers as TEXTMODE, but as "normal" drivers. But when you take this way, you have to integrate the drivers NVATABUS.SYS and NVRAID.SYS by hand and to edit some things in TXTSETUP.SIF.
Here are the details of my instructions:
Integration of nForce SATA/RAID drivers into an unattended bootable Windows XP CD with nLite1. Run nLite and create a full unattended mode CD. Integrate the SATA/RAID drivers as normal (not as Textmode) drivers. Then you can do everything nLite offers (integrate other drivers and hotfixes, remove not needed languages and Services, make Tweaks and so on). Let nLite finish his processing, but do not create the Iso file at this time.
2. Search for the file TXTSETUP.SIF . You will find it in the subfolder I386 of the folder, where the nLited CD-files are.
3. Open TXTSETUP.SIF with the editor and search (there is a search function on top of the Editor) for the sections with the headlines [sourceDisksFiles], [HardwareldsDatabase], [sCSI.Load] and [sCSI]
Copy the following fat printed lines and paste them into the suitable sections of the TXTSETUP.SIF:
[sourceDisksFiles]
nvatabus.sys = 1,,,,,,4,4,1,,,1,4
nvraid.sys = 1,,,,,,4,4,1,,,1,4
[HardwareIdsDatabase]
PCI\VEN_10DE&DEV_008E = "nvatabus"
PCI\VEN_10DE&DEV_0085 = "nvatabus"
PCI\VEN_10DE&DEV_00D5 = "nvatabus"
PCI\VEN_10DE&DEV_00EE = "nvatabus"
PCI\VEN_10DE&DEV_00E3 = "nvatabus"
PCI\VEN_10DE&DEV_00E5 = "nvatabus"
PCI\VEN_10DE&DEV_0035 = "nvatabus"
PCI\VEN_10DE&DEV_0036 = "nvatabus"
PCI\VEN_10DE&DEV_003E = "nvatabus"
PCI\VEN_10DE&DEV_0053 = "nvatabus"
PCI\VEN_10DE&DEV_0054 = "nvatabus"
PCI\VEN_10DE&DEV_0055 = "nvatabus"
*_NVRAIDBUS = "nvraid"
GenNvRaidDisk = "nvraid"
[sCSI.Load]
nvatabus = nvatabus.sys,4
nvraid = nvraid.sys,4
[sCSI]
nvatabus = "NVIDIA NForce Storage Controller"
nvraid = "NVIDIA RAID CLASS DRIVER"
4. At least you have to copy the following SYS-files from the IDE\WINXP folder of the nForce chipset package into the nLited folder I386: NVATABUS.SYS , NVRAID.SYS and maybe (if it's in the package) NVCCHFLT.SYS . It's not necessary to compress them.
5. Now you can make the ISO file by nLite and burn your bootable CD.
Good luck!
Fernando
0 -
Hi Fernando 1,
so if you feel 6.66 is a bad driver from Nvidia are you agreeing with blank that the RAID drivers from 6.53 pack will integrate properly with Nlite?
Yes, he might be right.
Have you successfully done so with the drivers from 6.53 yourself without issue?Yes, but yet not fully automaticly as TEXTMODE drivers by nLite. I made some changes in TXTSETUP.SIF
I'm just going to try the package 7.13, wait a few minutes ......
EDIT: It does not work with nLite 1.0 b5. Result: endless reboots!
I tried it without any handmade changes. The SATA/Raid drivers were integrated from the folder SATARAID as TEXTMODE drivers. Additionally I added the content of the folder PATARAID as "normal" driver (to have the NVATABUS.INF).
But the failure might be due to the fact, that the package 7.13 is designed for nForce4 Sli Intel.
0 -
thank you for the reply blank. Did you integrate drivers normally through nlite to get it to work or was there something else you did? Perhaps it is just 6.66. I will try 6.53 later and hope for better results. Anyone else have success with latest build of nlite and 6.53 nvidia raid drivers on NF4 setup? I am using DFI Lanparty NF4 Ultra-D.
I have the same mainboard and probably the same problems as you.
The longer I test the stronger is my thinking, that especially the driver package 6.66 is just bad built by NVIDIA.
If you have any trouble integrating the 64-bit nForce SATA/Raid drivers into Windows XP x64 Edition, try it the way I described here:
http://www.msfn.org/board/index.php?showto...ndpost&p=352404
Good luck!
Fernando
0 -
Not at the moment, sorting bug reports, gonna contact you when I'm ready.
i try nvraid 6.66 on xp 64 and adibg lines on winnt.sif; and i get a error message at windows stup that the drivers nvraid.sys in not for that OS
i don't care if drivers are whql or not ...In this case MS was right: The driver NVRAID.SYS from the chipset package 6.66 is really not designed for Windows XP x64 Edition. The correct driver should be named NVRDX64.SYS!
I suppose, that you took the 32-bit package.
CU
Fernando
0 -
That's true and with this driver signature thing they really annoy me.
However since that sif method works lets go that way...I won't patch this method any more, it works for some, for some it won't no mather what.
I just have tested the [OemInfFiles] method, which is working like charme with 64-bit systems and nLite Beta4, with the 32-bit drivers of the NVIDIA chipset package v. 6.66 (using this time nLite Beta5) - and it failed!
So there is still a lot of work to do.........
@ Nuhi:
Do you have any advice?
0 -
The problems with integrating the NVIDIA nForce SATA/RAID drivers into a bootable Windows XP CD (32-bit) are not totally resolved by nLite 1.0 Beta5.
I am owner of an nForce4 mainboard with 2 SATA hard disks connected by NVIDIA Raid0 array. When I try to integrate the NVIDIA Sata-Raid driver (from new official and WHQL certified package v.6.66 ) into the German version of Windows XP Professional (32-bit) by using the new build of nLite, I get the same endless reboots as with 64-bit systems.
The integration has been done as TEXTMODE and I tried 2 different methods:
1) taking the folder IDE\WINXP\SATARAID and
2) taking the folder IDE\WINXP\PATARAID from the driver package.
In both cases the integration of the mass controller driver failed.
When I opened the SETUPAPI.LOG from that partition into which I just had installed the system, I found the following sequence about the installation of the NVIDIA SATA controller driver:
[2005/07/17 14:32:31 276.1454 Driver Install]
#-019 Searching for hardware ID(s): pci\ven_10de&dev_0055&subsys_cb8410de&rev_a3,pci\ven_10de&dev_0055&subsys_cb8410de,pci\ven_10de&dev_0055&cc_010185,pci\ven_10de&dev_0055&cc_0101
#-018 Searching for compatible ID(s): pci\ven_10de&dev_0055&rev_a3,pci\ven_10de&dev_0055,pci\ven_10de&cc_010185,pci\ven_10de&cc_0101,pci\ven_10de,pci\cc_010185,pci\cc_0101
#-199 Executing "I:\WINDOWS\system32\setup.exe" with command line: setup -newsetup
#I022 Found "PCI\VEN_10DE&DEV_0055" in I:\WINDOWS\nldrv\nvatabus.inf; Device: "NVIDIA nForce4 Serial ATA Controller"; Driver: "NVIDIA nForce4 Serial ATA Controller"; Provider: "NVIDIA Corporation"; Mfg: "NVIDIA Corporation"; Section name: "Crush11_Inst".
#I087 Driver node not trusted, rank changed from 0x00002001 to 0x0000a001.
#I023 Actual install section: [Crush11_Inst.NTx86]. Rank: 0x0000a001. Effective driver date: 05/17/2005.
#I393 Modified INF cache "I:\WINDOWS\inf\INFCACHE.1".
#I022 Found "PCI\CC_0101" in I:\WINDOWS\inf\mshdc.inf; Device: "Standard-Zweikanal-PCI-IDE-Controller"; Driver: "Standard-Zweikanal-PCI-IDE-Controller"; Provider: "Microsoft"; Mfg: "(Standard-IDE-ATA/ATAPI-Controller)"; Section name: "pciide_Inst".
#I023 Actual install section: [pciide_Inst]. Rank: 0x00003006. Effective driver date: 07/01/2001.
#-147 Loading class installer module for "IDE-Controller".
#E360 An unsigned or incorrectly signed file "I:\WINDOWS\system32\SysSetup.Dll" for driver "IDE-Controller" will be installed (Policy=Ignore). Error 0x800b0100: Es war keine Signatur im Antragsteller vorhanden.
#-148 Loading coinstaller modules for "IDE-Controller".
#E360 An unsigned or incorrectly signed file "I:\WINDOWS\system32\SysSetup.Dll" for driver "IDE-Controller" will be installed (Policy=Ignore). Error 0x800b0100: Es war keine Signatur im Antragsteller vorhanden.
#-166 Device install function: DIF_SELECTBESTCOMPATDRV.
#I063 Selected driver installs from section [pciide_Inst] in "i:\windows\inf\mshdc.inf".
#I320 Class GUID of device remains: {4D36E96A-E325-11CE-BFC1-08002BE10318}.
#I060 Set selected driver.
#I058 Selected best compatible driver.
#-124 Doing copy-only install of "PCI\VEN_10DE&DEV_0055&SUBSYS_CB8410DE&REV_A3\3&2411E6FE&0&40".
#-166 Device install function: DIF_REGISTER_COINSTALLERS.
#I056 Coinstallers registered.
#-148 Loading coinstaller modules for "Standard-Zweikanal-PCI-IDE-Controller".
#E360 An unsigned or incorrectly signed file "I:\WINDOWS\system32\SysSetup.Dll" for driver "Standard-Zweikanal-PCI-IDE-Controller" will be installed (Policy=Ignore). Error 0x800b0100: Es war keine Signatur im Antragsteller vorhanden.
#-166 Device install function: DIF_INSTALLINTERFACES.
#-011 Installing section [pciide_Inst.Interfaces] from "i:\windows\inf\mshdc.inf".
#I054 Interfaces installed.
#-166 Device install function: DIF_INSTALLDEVICE.
#I123 Doing full install of "PCI\VEN_10DE&DEV_0055&SUBSYS_CB8410DE&REV_A3\3&2411E6FE&0&40".
#W100 Query-removal during install of "PCI\VEN_10DE&DEV_0055&SUBSYS_CB8410DE&REV_A3\3&2411E6FE&0&40" was vetoed by "IDE\DiskSAMSUNG_SP2004C_________________________VM100-31\R30534737314A5930303438313330202020202020" (veto type 6: PNP_VetoDevice).
#W104 Device "PCI\VEN_10DE&DEV_0055&SUBSYS_CB8410DE&REV_A3\3&2411E6FE&0&40" required reboot: Query remove failed (install) CfgMgr32 returned: 0x17: CR_REMOVE_VETOED.
#I121 Device install of "PCI\VEN_10DE&DEV_0055&SUBSYS_CB8410DE&REV_A3\3&2411E6FE&0&40" finished successfully.
That certifies, that Microsoft XP takes the wrong driver (Standard-Dual Channel-PCI-IDE-Controller) in the GUIMODE part of the installation procedure, because the OS (XP Pro) does not trust the correct driver from NVIDIA!
After this experience I will test, if the method I have described for the 64-bit version of Windows XP is even usefull for the 32-bit version of the OS. There would be only small modifications necessary.
CU
Fernando
0 -
On a 32bit OS. Do I need to do that same editing WINNT as I do for x64?
Normally those settings I described in the first topic of this thread are only necessary with 64-bit drivers. But you can try it neverless - you cannot do anything wrong with it, when you take the correct drivers for your system.
If you have an nForce4 chipset, I would recommend the new WHQL-certified official NVIDIA driver package v. 6.66.
To give you a more detailed answer I should know your hardware details (chipset, Sata or Pata drives, sort of Raid array etc).
CU
Fernando
0 -
Tried integrating the 32bit 7.13 drivers without doing any editing like you explained here. And windows install hangs on the "installing devices" part.
If you try to install 32bit drivers into a 64bit OS, that won't work!
0 -
I have just tried to integrate the new WHQL-certified NVIDIA Raid drivers from the chipset package 6.66 into a XP x64 CD with the brand new version nLite 1.0 b5 without making any changes I described above.
The integration failed and ended with endless-reboots!
So the new version does not fix the problem with the installion of nForce x64 drivers on boards with a NVIDIA Raid array.
But the solution is on page 1 of this thread .............
CU
Fernando
0 -
These are the latest versions that I now have.
NForce4 x64 Chipset v7.13
Audio driver version 4.62 (WHQL)
Audio utility version 4.51
Ethernet NRM driver version 4.82 (WHQL)
Network management tools version 4.85
SMBus driver version 4.48 (WHQL) with updated uninstaller files
Installer version 4.77
WinXP IDE PATARAID driver version 5.35
WinXP IDE SATARAID driver version 5.35 (WHQL)
WinXP IDE SATA_IDE driver version 5.35 (WHQL)
WinXP RAIDTOOL application version 5.35
So hopefully you can now test with these latest versions. Your work is very appreciated.
Although the newest NVIDIA x64 chipset package v. 7.13 is specially designed for nForce4 boards with Intel CPU, I tested these drivers with my DFI Lanparty NF4 D-Ultra (with AMD Athlon64 CPU).
The integration of these drivers into a bootable CD with nLite 1.0 b4 works like charme, when you are doing, what I have written above.
Attention: The way to integrate these x64 Raid-drivers is easier than I thought, when I opened this topic. Meanwhile I certified by a couple of tests, that there is no need to make any changes in TXTSETUP.SIF!
0 -
Ok I'm not sure if I have the same drivers as you. These are the chipset drivers I have to integrate.
Audio driver version 4.62 (WHQL)
Audio utility version 4.51
Ethernet NRM driver version 4.82 (WHQL)
Network management tools version 4.85
SMBus driver version 4.48 (WHQL) with updated uninstaller files
Installer version 4.77
WinXP RAIDTOOL application version 4.82
WinXP IDE PATARAID driver version 5.33
WinXP IDE SATARAID driver version 5.33
WinXP IDE SATA_IDE driver version 5.33
I am pretty sure they are most recent, perhaps could you test these and see if they work?
The NVIDIA 64-bit chipset driver package v. 6.66, that I just testet, contains the following components:
Audio driver version 4.62 (WHQL)
Audio utility version 4.51
Ethernet NRM driver version 4.82 (WHQL)
Network management tools version 4.85
SMBus driver version 4.48 (WHQL)
Installer version 4.77
WinXP IDE PATARAID driver version 5.34
WinXP IDE SATARAID driver version 5.34 (WHQL)
WinXP IDE SATA_IDE driver version 5.34 (WHQL)
WinXP RAIDTOOL application version 4.82
So they are a little more recent.
Nevertheless you can try those you have. You only have to look, if they are the right ones for the chipset you have on your motherboard (nForce3 or nForce4).
EDIT: The chipset driver package you have seem to be the v. 7.12 Intel Editition.
0 -
Has anyone tested this yet? Could be very useful to me.
I just have tested it again with different drivers. In this case I used the NVIDIA chipset package 6.66. The result: It works like a charme.
This time I did not do any changes in TXTSETUP.SIF. So it seems to be easier than I described above.
Can anybody certify this?
0 -
Attention:
Recently I have totally revised and unified my instructions and tips regarding the integration of the nForce RAID and S-ATA drivers. Instead of 2 different guides for 32bit and 64bit Operating Systems you will get all needed informations within one single guide usable for XP, XP x64, W2k3, W2k3 x64 and W2k.
You will find the actual pooled guide here.
If you have any questions or comments regarding the integration of nVRaid drivers into XP x64 or W2k3 x64, please post it into the linked thread.
Thanks!
Fernando
Here is the old guide, which will not be updated anymore:
Integration of the nVRaid drivers into
Windows XP x64 or Windows Server 2003 x64
Introduction:
Many users with a NVIDIA Raid system on their computer know about the problems, when they try to install Windows XP x64 or W2k3 x64:
Even if they have a floppy drive and integrate the newest nForce SataRaid or PataRaid drivers by the F6-method, they get bluescreens or endless reboots at the end of the installation. The reason for this strange behaviour is the fact, that the actual NVIDIA Raid drivers are still not correctly digitally signed with the consequence, that the XP installation routine does not trust them. During the second (GUIMODE) part of the installation the correct (but uncertified) NVIDIA drivers are replaced by wrong (not working) Microsoft PCI-IDE standard drivers.
The only chance to prevent these problems is to create an Unattended Install CD with integrated nVRaid drivers using a method to enforce the installation of the correct NVIDIA drivers.
After a lot of tests with nLite I have found 2 different methods to enforce the installation of the correct x64 nForce Raid and nForce S-ATA drivers und to prevent endless reboots at the end of the XP setup:
1. Method by directly enhancement of the x64 NVIDIA drivers (OemInfFiles-Method)
and
2. Method by suppression or removal of other interfering drivers (Driver-Suppression/Removal-Method)
New and very easy method with nLite
The actual versions of nLite (v. 1.0 or higher) offer the safest and easiest way to integrate the nVRaid drivers.
Advantages:
- fully automaticly method (without creating new directories or editing SIF or OEM files)
- without restriction of any kind during the use of nLite
Here is the way to do:
Attention: The following guide is only useful for users with an nForce Raid array!
Description of the Driver-Integration-Method
by using nLite
(valid for v. 1.0.1 or higher)
Important Requirements:
You only will succeed with the integration of the nForce SataRaid drivers, if you have
- an up-to-date mainboard BIOS (actual nVRaid drivers may need a Raid Bios v. 4.84 or higher)
- a stable system (proper RAM modules and stable BIOS settings, no overclocking!)
- an original or perfectly created Windows XP x64 or Windows Server 2003 x64 CD
- a proper working IDE-connected CD or DVD drive
- an enabled ACPI power management (within BIOS, don't disabe it by nLite settings).
Tips:
- You can see the nVRaid BIOS version of your system on the second boot screen. If you can't get a Raid BIOS version v. 4.84 or higher unless having flashed the latest mainboard BIOS, you might get problems with the integration of the latest nForce SataRaid drivers. In this case you should take the old 64-bit nForce chipset driver package 6.56, which is not native 64-bit and usable with an older RAID BIOS.
- It is a good idea to unplug all unnecessary extern hardware devices during the install of the OS with integrated nVRaid drivers.
- If you have any hard disk drive outside your RAID array or a plugged-in USB stick, you may get the problem, that the MS Setup routine tries to install the master boot record (MBR) onto that non-RAID device, although you have set the RAID array as first bootable hard disk drive within BIOS. The only possibility to prevent this is to unplug these non-RAID devices during the installation of the OS. After the successful installation they can be reconnected without any problems.
Brandnew method:
Integration of the actual WHQL certified 64-bit nForce SataRaid drivers
The above mentioned and approved methods to integrate the nForce SataRaid drivers into a bootable XP x64 or W2k3 x64 CD were primarily documented by me in July 2005. Meanwhile NVIDIA has released a lot of new 64-bit nForce chipset driver packages with WHQL certified nForce Sata and Raid drivers. You can find them within the SATARAID and SATA_IDE subfolders. The problem was, that users with an nForce SataRaid system obviously could not use them during the installation (to avoid BSOD's or endless reboot loops at the end of the OS installation). They had to take the not digitally signed LEGACY drivers.
After a lot of new tests with the current version of nLite I figured out, that I got the newest WHQL certified 64-bit nForce SataRaid drivers installed onto an nForce SataRaid system, when I used a special combination of the nForce SataRaid driver integration:
- Integration of the SATARAID subfolder (from the suitable 64-bit nForce chipset driver package) as TEXTMODE driver and additionally
- Integration of the SATA_IDE subfolder (from the same nForce chipset driver package) as PnP driver!
At the end of the successul OS installation I had a flawlessly running XP x64 or W2k3 x64, all nForce IDE drivers (the SATA and RAID ones) were WHQL certified.
Advantages of the WHQL driver integration method:
- A running Windows XP x64 is optimally prepared for a later upgrade with Vista, when it has WHQL certified SataRaid drivers from scratch (The WHQL stamp is a must for Vista x64, the Setup routine looks for the drivers which were installed first of all during the XP x64 installation).
- By using this new method you will get the MS IDE drivers installed instead of the NVIDIA P-ATA (=IDE s/w) ones (A lot of nForce users have reported about troubles with the NVIDIA P-ATA driver). Remark: If you don't want the MS IDE drivers, you can easily replace them by the NVIDIA IDE driver after the end of the OS installation.
These findings might be a big step forward for all users with an nForce SataRaid system, but - as I could only test it with my nForce4 system - the new method has to be confirmed by users with other nForce chipsets. Nevertheless I am very optimistic, that the method works with every nForce chipset (maybe except nForce3).
1. nVRaid Driver Choice and Preparation:
Although nLite allows the correct integration of the actual nForce SataRaid drivers and prevents the installation of the wrong MS IDE standard drivers, the biggest problem is the creation of the optimal nVRaid driver prepackaging. The choice of the best driver version and combination depends on the system (Chipset details and Raid BIOS version). NVIDIA has complicated all this, because they often change the composition of their driver packages and even the names of the files for not understandable reasons. Nevertheless I found solutions, which should enable nearly everyone to get XP x64 or W2k3 x64 installed onto their nForce SataRaid system.
A. Preparation for the WHQL driver integration method:
- Normal option for mainboards with an nForce4, nForce4xx, nForce5xx or nForce6xx chipset:
The preparation is very easy, because all you need is the actual 64bit nForce chipset driver package, which NVIDIA has designed for the specific nForce chipset of your motherboard. If you don't know the exact name of the chipset, look into your mainboard manual or google for it. Then go here, search for the nForce chipset driver package suitable for your chipset, choose the 64bit OS you want to install, download the driver package and unpack it by using a tool like WinRar or 7-zip.
That is all you need for the later nForce SataRaid driver integration.
Warning: Users, who want to integrate the nForce4 chipset drivers v. 6.69 into Windows 2003 x64, should pay attention, that they get the correct driver package named "nForce4_amd_6.69_winserver200364_english_whql.exe". NVIDIA additionally offers a package named "nForce4_amd_6.69_winserver2003_64_english_whql.exe", which is not usable for W2k3 x64, because it doesn't contain any 64bit drivers. - Brandnew alternative option for mainboards with an nForce4 (SataRaid and PataRaid), nForce4xx or nForce5xx chipset:
Users, who want to install XP x64 or W2k3 x64 with the newest 64bit WHQL signed nForce S-ATA and Raid drivers v.6.99 dated 05/15/2007, can take the SATARAID drivers from here and the SATA_IDE drivers from here.
Unpack both packages and store them somewhere. You will need them both for the later driver integration. The extracted "SATA_RAID F6 driver disk 64Bit" folder contains the SATARAID textmode drivers (has a TXTSETUP.OEM file), whereas the "SATA DRIVER 64Bit" folder is similar to the "SATA_IDE" folder (contains just the nForce S-ATA driver as PnP driver).
B. Preparation for the traditional LEGACY driver integration method:
- Brandnew:Get the newest 64bit nForce IDE drivers even with nForce3 chipset mainboards:
It is possible to get the newest 64bit nForce SataRaid drivers v.6.99 even with an "old" nForce 3 chipset mainboard, if you take the actual 64bit nForce Unified Remix package 11.16 built by nForcersHQ forum member squall_leonhart69r (for a detailed description of Squall's Remix package and a download link to the whole package look here). Squall's latest nForce chipset driver Package contains the customized brandnew 64it nForce SataRaid drivers v.6.99 dated 05/15/2007 (identical with the above mentioned WHQL signed drivers), but with customized INF files to make them usable with nForce3 chipsets. To reduce the size of the package and to make the preparation of the nForce IDE drivers (as LEGACY folder) easier for you, I have extracted Squall's package, revised and repacked just the LEGACY mode 64it nForce IDE drivers and uploaded them to RapidShare. You can download this special packagehere.
Unzip the package by using a tool like WinRar or 7-zip and store the LEGACY folder somewhere. - If you have an nForce3 or nForce4 SataRaid system and get problems with the integration of WHQL certified drivers (endless reboots at the end of the installation, even after booting in safe mode), you should take one of the available x64 NVIDIA nForce chipset driver packages v. 6.67. For the integration into an XP x64 CD you should take the one you get here, whereas users, who want to create a W2k3 x64 CD, should take the one, which is specially designed for W2k3 x64 (you may download it here). Just unzip the suitable package. Fortunately NVIDIA has established within both packages a subfolder named LEGACY. This subfolder contains all necessary files for a successful integration, no other files or IDE subfolders are needed.
- Users with an nVRaid BIOS version lower than 4.84 may have to take the old and not natively 64-bit nForce package 6.56 (downloadable here). Just unzip the package.
- Users with an nForce3 mainboard, who get problems with the 6.99 and 6.67 drivers, should take the nForce chipset package v. 6.25, which you can download here. Just unzip the package for the later driver integration.
2. Processing with nLite:
- Open nLite and do what you want, but you must choose the button "Integrate Drivers".
- During the "Integrate Drivers" part of nLite you have to integrate the suitable nForce SataRaid drivers as textmode drivers (depending on the driver integration method you are going to use).
- If you are using the new WHQL driver integration method, you have to integrate the SATARAID subfolder of your prepared nForce chipset driver package as textmode driver and additionally the SATA_IDE subfolder of the same package as PnP driver. You will find them within the IDE\WinXP directory of the package.
Don't be astonished if nLite gives a message, that it is already done. nLite v. 1.2 adds the content of the SATA_IDE subfolder automaticly, if you present the SATARAID subfolder of a complete nForce chipset driver package. This is not an error, but a new feature of nLite to make it easier for you! - Users, who are using the traditional LEGACY driver integration method, have to integrate the LEGACY subfolder of their prepared driver package (see above). They should not integrate any other IDE subfolder (neither SATARAID nor SATA_IDE).
Attention: nLite v. 1.2 adds automaticly the content of the SATA_IDE subfolder as PnP driver, if you integrate the LEGACY subfolder of a complete chipset driver package. You should prevent this by copying the LEGACY subfolder to a place outside the chipset driver package prior to the integration (so nLite will not find the SATA_IDE subfolder). Alternatively you can delete the wrongly integrated PnP driver within nLite's "Driver Integration" section before you start the nLite processing.
If you are going to use one of the the old packages 6.56 and 6.25, you have to integrate just the content of the IDE\WinXP directory (these packages don't have any subfolders). - During the integration of the textmode drivers you have to take all nForce Sata/Raid Controller drivers nLite shows within a popup window as "required". To make it easier for you, nLite has already enabled both needed drivers.
- Since nLite v. 1.0 RC7 you have the choice between a single driver or a multiple driver folder integration. You should integrate the nForce SataRaid drivers with the single driver option. Only this way you can be sure, that nLite integrates the correct driver subfolder which you have prepared earlier.
- Then you can integrate the other nForce drivers (SMBus, Ethernet etc.) as "normal" PnP drivers. In most cases you can take them out of the same NVIDIA chipset package you have used for the integration of the SataRaid drivers. Users with an nForce3 system may search for better or newer drivers (inclusive GART) than those NVIDIA offers within their 6.25 package.
- Tip: If you want to integrate any graphic adapter driver, take a WHQL-certified version.
3. nLite Finishing and CD-Creation:
- Create the ISO file by nLite und burn it as a bootable Image with a burning software as Nero (just choose "Recorder" > "Burn Image" and point to your just created ISO file).
At the end you will have a bootable Windows XP x64 or Windows Server 2003 x64 CD with integrated NVIDIA Sata/Raid drivers - no F6 and no floppy will be necessary.
That's all!
Tips for the Installation of the OS:
- Make sure, that your BIOS settings are ok. You only will be able to install the OS by booting off your nLited CD, when the CD-ROM device with your nLited CD is set as first bootable device.
- Before you begin with the installation of the OS by using your nLited CD, make sure, that there is no floppy within your floppy drive, no USB stick within any USB port and no Memory Card within your Card Reader.
- Don't hit F6 and don't insert a driver floppy, if you install an OS by using a CD with integrated nForce SataRaid drivers!
Good luck!
CU
Fernando
0 - You can see the nVRaid BIOS version of your system on the second boot screen. If you can't get a Raid BIOS version v. 4.84 or higher unless having flashed the latest mainboard BIOS, you might get problems with the integration of the latest nForce SataRaid drivers. In this case you should take the old 64-bit nForce chipset driver package 6.56, which is not native 64-bit and usable with an older RAID BIOS.
-
That is to say you just copy the ISO to CD ,then it can bootbable?Open my burnt CD there is an ISO,is that the problbem?ON the CD,what should i see an ISO or all the unziped ISO?
Answer to question 1: NO! You shall not burn a copy, but the files, that are packed in this ISO-file.
Answer to question 2: YES, that is your problem. You just burnt a copy of that iso-file.
Answer to question 3: You should see the (visible) unzipped files.
When you use Nero Burning ROM, you have to do the following:
1. Put an empty CD into your CD burning device.
2. Open Nero.
3. Shut the small window, which opens at the beginning.
4. Select in the top menue of Nero "recorder" and then klick "burn image".
5. Choose the ISO-file you want to burn.
6. Burn.
- Done! -
Good luck
Fernando 1
0
 i don't care if drivers are whql or not ...
Integration of nvRaid drivers into XPx64 and W2k3x64
in nLite
Posted
As I have written in first post, I have only tested this method with my nForce4 chipset, but I am nearly sure, that it works on nForce3 systems too. My tests with the integration of the Sata/Raid drivers from the NVIDIA driver package v. 6.66 (64-bit version) were without any issue.
Are you sure, that you have taken the 64-bit versions of the chipset driver package 6.66? I ask this, because NVIDIA gave the wrong download link for a while with the result, that many users tried to install 32-bit drivers onto a 64-bit system. That won't work!
Please let me know the results of your further tests.
CU
Fernando