online789
Content Type
Profiles
Forums
Events
Everything posted by online789
-
Jaclaz, Firstly, I owe you an apology as I was supposed to provide you results of my search for the NTFS and FILE0 after scanning my HDD, but never did. You were able to correctly identify the location of the $MFTmirror (I believe) and I was able to save it to a file. This was fantastic, thank you. I wasn't able to find the NTFS entry, however. This has everything to do with me and nothing to do with the actual tool you had recommended. Indeed, I did use Windows based version of DMDE as you had suggested. But lack of my understanding of the innerworkings of NTFS file structure I didn't exactly know how to look for the right sector. Additionally, I used the other tool (not DMDE) to locate the NTFS entry and it found the sector. I was actually able to write the boot record back to sector 0. My challenge was I didn't know what to do with the $MFTmirror and what sector to write to. Again, I think this had to do with not knowing how the filesystem is organized. Second, I fully agree that recovery would have been possible without use of a commercial 'recovery' tool. And DMDE (or any other disk editor) seems to have been the right tool had I known how to use it. Having said point 1 and 2, I would think the average person who has a similar problem as I, most probably doesn't have the expertise required in this type of forensic recovery using disk editor. For this reason my person suggestion is to use a commercial 'recovery' tool that automatically discovers and restores both NTFT as well as the $MFT. It would have saved me a tremendous amount of time if I had started that way instead of searching for sectors and strings and going with disk editor. Again, this is due to lack of knowlege of the underlying file system and no fault of the DMDE (or any other disk editor) tool. It is just a matter of judgement considering the expertise needed and the time and effort required to do the right thing. To recap.... ...if you are looking for a solution to the problem of flashing IMG file to the wrong HDD (instead of USB/SD card), the best method for me was: 1. Clone the 'damaged' HDD using a Linux tool called "dd" (available in most Linux/FreeBSD distros). Most other tools (such as CloneZilla) will only copy the partition and not the disk bit by bit (sector by sector). 2. If TestDisk (either Windows, Linux, or MacOS) doesn't find the lost paritions (in my case it didn't since the IMG changed boot sector and geometry of the drive), use a commercial 'recovery' tool that is capable of doing a deep analysis and discovery of NTFS. 2.a. I don't know what tools might be available to solve other file system types (for example, FAT32, Rieser, HFS, EXT4, ZFS, etc.). Thanks again to Jaclaz for his devotion to this board and continued support.
-
Update..... I had to objectives that needed to be met in order to make this work: 1. Clone the 'damaged' drive 2. Repair the 'cloned' drive to get to my files + directories From my previous posts, you will see I had trouble with both. Alas, I have solved both issues. 1. Cloning: In order to clone the drive, I used the trusty 'dd' command in Linux. I downloaded the latest Ubuntu 13.10 USB in 64 bit (64 bit since my computer could support it and I needed all the horsepower). Ubuntu was run as in "Live" mode. I installed 'pv'. A program that helped me gauge the time it takes for dd to finish cloning my drive. PV is a tools that measures the "pipe" transfer from A to B. It also has a 'progress bar' in addition to ETA and Time elapsed. Really useful if you are trying to clone a huge drive like mine (3TB mind you). Word of caution: be very careful with dd as if you get the name of physical drives wrong, there is no way to undo writing the wrong drive. (ie, don't mess up the 'source' and 'target'). The command for cloning drive sda to sdb with pv is: sudo dd if=/dev/sda bs=4M | pv -s 3000G | sudo dd of=/dev/sdb bs=4M Where bs=4M gives you the read ahead block size to 4MB. Supposedly this makes things go faster 3000G is the size of my drive, this is needed to tell pv the size to copy such that it can track progress /dev/sda = was my source /dev/sdb = was my target 2. Recovery: After reading (for days on end...) all various sources as how to recover my $MFT and $MFTmirror (as well as the boot sector), I just gave up! I tried several (including one that was recommend on this post) but I couldn't find a "free" disk editor that could actually find these two important blocks. Granted it could have been my noob status with these tools (like I don't know the difference between offset and sector), but I ran out of patience. So, I did the next best thing...I used a commercial Windows based software. In this case I used Active@ NTFS partition recovery by LSoft. But I am sure there are many other tools out there that could do this. I am not trying to advertise for these guys. It's only $money and after it showed me that it saw the directories I decided to get the full version. The free version didn't allow me to restore, but the paid license let me do this. So now I have my cloned drive with all the directories and files appearing as they were before the initial screw up. A few notes for others benefit: -While it is true that $MFTmirror only contains the few sectors of $MFT with info on directories and file information (Master File Table), somehow in combination with the tool I used it did aid in finding the directory structure. -TestDisk kept thinking this is a FAT32 file syste. Which it clearly wasn't. The IMG was FAT32, but the original FS should have been NTFS. TestDisk (both quick and in depth) thought it had the wrong geometry. Even after correcting the geometry of my drive (from pictures that I posted), it wasn't able to find the file system. -CloneZilla doesn't really do a drive clone, it only wanted to clone the partition it saw. I needed a drive clone. -Ubuntu is a kick-arse OS, definitley try it (ok, this is besides the point) Thanks to all for your help...please post your questions, perhaps my experience can help you resolve your problems.
-
Thanks again for your detailed explanation and help. One more question... What is the best disk editor that you would recommend? I am interested only in Linux version. I used Active@ Disk Editor but I'm not happy with its ability to search range of sectors.
-
I ran into a little trouble trying to clone the 'damaged' drive using CloneZilla. This might be a noob problem. CloneZilla only copies the 500MB 'partition', even if I ask it to do a sector by sector copy in Adanced Menu. I know there are Windows based disk cloning tools, but I don't have much experience with any of them and rather stick with a bootable USB based solution. Could anyone recommend a method to clone the entrie 'damaged' drive to the 'spare' drive? Could dd method work? (as in sudo dd if=/dev/sdc of=/dev/sdd) Mind you: The two drives are exactly the same make and model, Seagate BackupPlus 3TB Both are 3TB in size and have the same exact geometry/attributesSince they are 3TB, I believe they are not MBR drives and are GPT (GUID Partition Table)The 'damaged' drive was written over with a bootable image (.img file)This IMG was to create an Android based bootable SD card, with boot sector and MBR and all that jazzIt created a 500MB partition and the rest of the 'damaged' drive is considered raw (and it seems CloneZilla ignores it)Thanks in advance for your help.
-
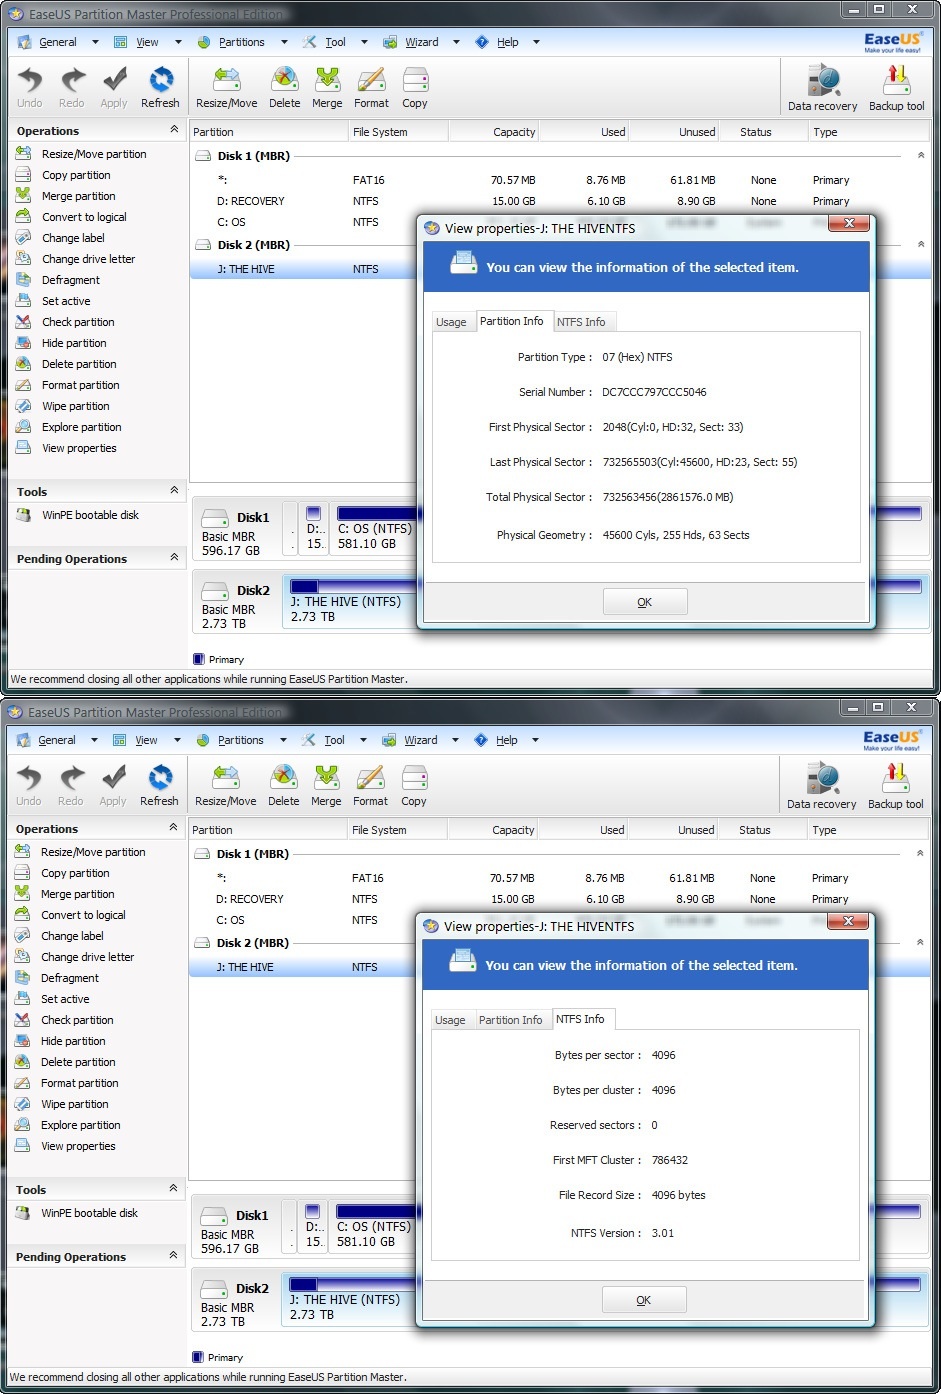
Thanks jaclaz. Here is an image of the details of this drive model from another forum. This isn't my drive, but the same exact model and capacity. The image provides all the details of this drive (clusters, blocks, etc.). Permit me a few hours to report back as I need to create another clone. The clone on the 'spare' drive has been messed around with too much.

-
PS. I also want to point out that I have read the following posts on this site, the situations others had were similar, but not same. The solutions offered by jaclaz were spot on for these situations, but aren't specific to my case (as I only had one NTFS partition and also a MUCH larger drive). I have read the following posts: http://www.msfn.org/...howtopic=141687 http://www.msfn.org/...howtopic=141448 http://www.msfn.org/...howtopic=140675 http://www.msfn.org/...howtopic=133933
-
Hi, I was attempting to write an .img file (akin to .iso image) to my SD card using Win32diskimager (found here: http://sourceforge.net/projects/win32diskimager/files/?source=navbar) By mistake I wrote the image to my external HDD (Seagate BackupPlus 3TB). BTW, as you can read from SourceForge page, many others have made same mistake. The HDD was not modified and had the factory setting; that is, it had one partition and was NTFS file. The content of IMG file were no more than 73MB, but it created a FAT32 partition of 500MB. My Linux and Win8 machines both see (but don't mount) the 500MB partition and show the rest as "unallocated" or "raw". Windows wants to reformat this space. I have access to another drive that is just like this (I bought two orginally) - that is, I have another spare 3TB Seagate BackupPlus that is empty. Using CloneZilla I have copied (bit-for-bit, or sector by sector) a clone of the 'damaged' drive to the 'spare' drive. I will be using this clone for all recovery purposes and will leave the 'damaged' disk in a safe place. TestDisk doesn't find any partitions (both quick and deep scan). My understanding is that NTFS writes a copy of partition at the end of the sector (or was it copy of MBR to the end?). Considering that TestDisk is not finding this partition (or for that matter vloume/FS); how can I recreate a partition? Also, I think the files might be 'carved' or 'recovered', but this would imply I lose both the original file names as well as the directory structure. If the partition recovery is a lost cause, is there a way to recover the files and directories with their original intact names? Thanks in advance....I do know that I have done something really stupid and blame is all on me.