

Arrow22
Content Type
Profiles
Forums
Events
Posts posted by Arrow22
-
-
Looks like another attempt to control/spy on your local system.
I miss the old days where games were local only.
0 -
Tinker
My Wife loves that little guy
0 -
Hands down, Avast.
Great silent installer as well.
Most Home users like the notifications as well.
0 -
I did not realize how big the file is.
Almost 60mb!!!
0 -
I used to love this program but I never trusted Windows Live.
So, with the info provided by "Listener", Rick and Seemaan,
I wrote a new interface that keeps everything local and off the iNet.
I wrote this for Windows 7 so not sure if it will work on Xp or Vista.
Post a msg here if you have problems on those platforms.
It is issued with a semi-Silent installer that shows progress but needs no input.
Hard Core peeps can tear it apart and mess with it as you like (and probably will).
Source code is available upon request but written for Borland C++ 2010(Embarcadero).
Tinker is FREE so Digital Rights crap from Microsoft should not be an issue
unless they are complaining about not being able to scan your system as they like.
0 -
is ghost 2003 a stand-alone image maker or does it need to be installed on the OS
before it can create an image?
The Image maker I have must not be 2003 as it does not accept SATA
0 -
Ghost 2003 IS a great program if you want stand-alone...
Warning, it does not recognize SATA drives or RAID arrays
(Both of which I use)
Email me if you want a copy of the floppy maker.
0 -
Ghost is my vote.
Been using for years with a test environment and a programming environment.
Takes 8 minutes to switch between or to start over.
0 -
I do not know anything about the timeline as I slipstream and integrate everything natively.
I would suspect it is your drivers.
When you follow the directions above, do you see the OEMx.inf files?
If not, then the drivers are not installed.
0 -
I went to a number of places to validate my beliefs but
as many that supported me, others said I was wrong.
I really doubt that this thread will solve the debate but
EVERYONE said scrap the Windows defragger, and I am sure all here will agree.
In the end, it comes down to personal beliefs.
Note:
Cnet was saying that Vista Defrags every week,
I have not seen this on any of my systems.
Can anyone here verify this?
0 -
Arrow22
Nice tutorial. however i must confess that i've tried both ways [updating one image and both] and the result was the same... Nvidia drivers don't install during setup... everything else installed fine...
i' triyng to use winpeshl.ini as some sort of trigger to install the exe version of Nvidia drivers... still no results...
Is there any other file/way to do that?? Excluding SetupComplete of the $OEM$ folder...
Se7eN
For adding SATA/RAID drivers to Vista, I have not had a problem.
Are you adding the 64bit or the 32bit version?
Boot.wim is 32bit and will not recognize the 64bit versions.
(Took me 2 weeks to figure that out - Forest for the Trees thing)
0 -
No Disrespect Is Intended...
I was going by my personal experience.
Been doing this well over a decade
Maxtor has been the worst.
Most defrag companies will not state that thier program
will lower the life expectancy of a drive.
Defrag usually lasts much longer than a few minutes.
If it is that short a time, Drive probably does not need it.
Here is a nice discussion on it
This info does not count for win98 and lower OSs
Only the Newer OSs where most software is composed of MANY files that are located everywhere anyway.
<>
A real good article from Cnet
0 -
you may want to start out by doing a search on your Qs
0 -
Explaination of Playstation Game Copy Protection.
Sony has a very effective way of protecting their disks,
but it requires a hardware patch for both the reading and writing of the disk.
One of the sectors is 1024 bytes long (2 sectors joined together)
The hardware reads this sector and the string "Sony Corporation Of America"
is spanned across the break.
The hardware reads this sector and if the string is corrupted(copied disk) it rejects it.
To recreate this, you must rewrite the hardware code for the burner (NOT EASY AT ALL)
and even then, the disk can be copied and used unless similar code checks for this sector.
This is just one example, there are many others but the jist is that the Burner Hardware Code
will need to be tampered with in order to create the disks.
0 -
Keep in mind that the average life expectancy of a hard drive is 5 years.
Whenever you defrag, you shave about 3 months use from that drive.
0 -
Here is a Borland C Code Example:
I did not write the algorithm but translated the seq from
The Microsoft Knowledge Base articles for Borland/Codegear
//---------------------------------------------------------------------------

String __fastcall TfrmMain::GetCDKey(void) {
	byte bKeyChars[] = { 'B', 'C', 'D', 'F', 'G', 'H', 'J', 'K', 'M', 'P', 'Q', 'R', 'T', 'V', 'W', 'X', 'Y', '2', '3', '4', '6', '7', '8', '9' };

	String 	sCDKey = "";
	int 	Stat;

	byte   bDigitalProductID[200];
	byte   bProductKey[14];

	TRegistry *Registry = new TRegistry(KEY_READ);
//  int KEY_WOW64_64KEY = l256;

  try  {
	if(!bWin2k) Registry->Access = 0x100 | KEY_READ;

	Registry->RootKey = HKEY_LOCAL_MACHINE;
	String KeyPath = "SOFTWARE\\Microsoft\\Windows NT\\CurrentVersion";
	String KeyName = "DigitalProductId";
	int	KeySize = 164;

	if(Registry->OpenKeyReadOnly(KeyPath)) {
	  Stat = Registry->ReadBinaryData(KeyName, bDigitalProductID, KeySize);
	  if(Stat == KeySize) {
		for(int x = 52; x < 67; x++)  bProductKey[x - 52] = bDigitalProductID[x];
		for(int ilByte = 24;  ilByte > -1; ilByte--)  {
		  int nCur = 0;
		  for(int ilKeyByte = 14;  ilKeyByte > -1; ilKeyByte--)  {
			nCur = nCur * 256 ^ bProductKey[ilKeyByte];
			bProductKey[ilKeyByte] = int(nCur / 24);
			nCur = div(nCur, 24).rem;
			}
		  String K =  char(bKeyChars[nCur]);
		  sCDKey = K + sCDKey;
		  if(ilByte != 0) if(div(ilByte, 5).rem == 0)  sCDKey = "-" + sCDKey;
		  }
		}
	  else { sCDKey = "No DigitalProductId: " + String(Stat); }
	  }
	else { sCDKey = "No Registry Access: " + String(Stat); }
	}
  __finally
  {
	delete Registry;
  }

  return(sCDKey);
}

//---------------------------------------------------------------------------
0 -
Are we not allowed to show the code sequence for decrypting a key for XP/Vista?
Is this against the rules?
0 -
the thing that controls that(in xp you had that runonce key but in visat/7 its something else)
thanks in advance
RunOnce is also in Vista
but I know what phase of boot you are talking about.
When an update is installed and
Needs to complete after the next Reboot
Can you specify an update so I can test that?
I am currently testing my Vista x86 installation disk and
as I will be reinstalling Multiple times over the next 3 days,
I would like to see if I can figure that out.
0 -
Is this an official Service Pack?
Slipstreaming Service Packs is usually quite easy scripting...
0 -
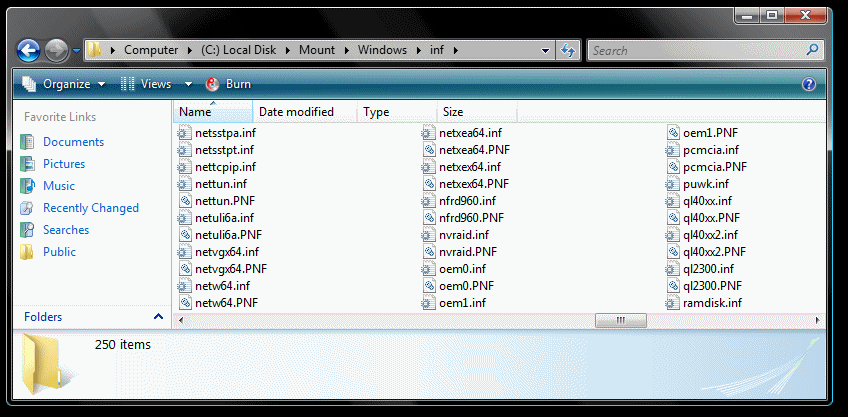
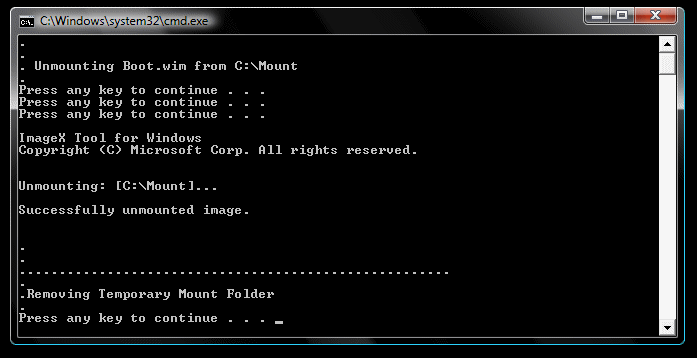
Step 3 - Unmount the Image
For me, I like to verify my work...
Here is what the inf folder looked before the slipstream

And like this after the batch file is run
and here is the image now...
Note the OEM0.inf and OEM1.inf
So we are good, now create this batch file
_3. UnMount Image.bat
echo off
cls

set __EXPAND="%Programfiles%\Windows AIK\Tools\amd64\Servicing\Expand.exe"
set __PEIMG="%ProgramFiles%\Windows AIK\Tools\PETools\peimg.exe"
set __IMAGEX="%ProgramFiles%\Windows AIK\Tools\amd64\Imagex.exe"
set __PKGMGR="%ProgramFiles%\Windows AIK\Tools\amd64\Servicing\pkgmgr.exe"
set __Mount=C:\Mount

Echo Off
Cls
Echo .
Echo .
Echo . Unmounting Boot.wim from %__Mount%
Echo .

pause 2
pause 1
pause 0


%__IMAGEX% /commit /unmount "%__Mount%"
Echo .
Echo .
Echo ......................................................
Echo .
Echo .Removing Temporary Mount Folder
Echo .
RmDir /S /Q "%__Mount%"
pause
this is what it looks like
How was that.
If modifying boot.wim, do both images
1 -
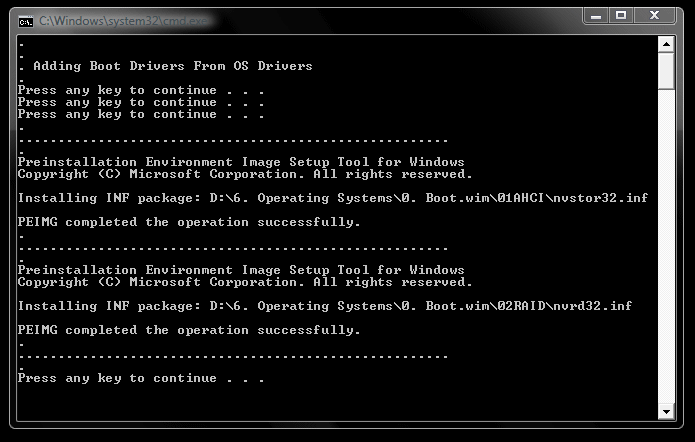
Step 2 - Fold in Drivers
There are a number of things that you can do to the image while its mounted.
I use it mainly to preinstall my drivers.
I need the MediaShield RAID drivers for boot.wim to see my drives.
This is how I slipstream them in.
Create this batch file
_2. Fold In Drivers.bat
echo off
cls

set __EXPAND="%Programfiles%\Windows AIK\Tools\amd64\Servicing\Expand.exe"
set __PEIMG="%ProgramFiles%\Windows AIK\Tools\PETools\peimg.exe"
set __IMAGEX="%ProgramFiles%\Windows AIK\Tools\amd64\Imagex.exe"
set __PKGMGR="%ProgramFiles%\Windows AIK\Tools\amd64\Servicing\pkgmgr.exe"
set __Mount=C:\Mount

Echo Off
Cls
Echo .
Echo .
Echo . Adding Boot Drivers From OS Drivers
Echo .

pause 2
pause 1
pause 0

Echo .
Echo ......................................................
Echo .
%__PEIMG% /inf=".\01AHCI\nvstor32.inf" "%__Mount%\Windows"
Echo .
Echo ......................................................
Echo .
%__PEIMG% /inf=".\02RAID\nvrd32.inf" "%__Mount%\Windows"
Echo .
Echo ......................................................
Echo .

pause
As I posted in another thread, boot.wim is 32-bit (I have yet to see a 64-bit)
Do not attempt to slipstream in 64-bit drivers, 32-bit OS will not understand them.
1 -
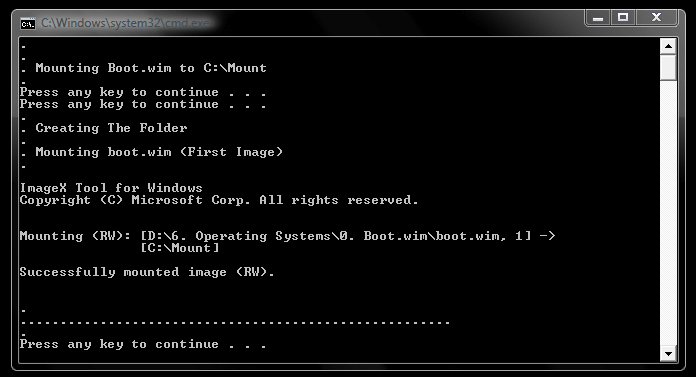
Step 1: Mount The Image
Create this batch file
_1. Mount Image.bat
echo off
cls

set __EXPAND="%Programfiles%\Windows AIK\Tools\amd64\Servicing\Expand.exe"
set __PEIMG="%ProgramFiles%\Windows AIK\Tools\PETools\peimg.exe"
set __IMAGEX="%ProgramFiles%\Windows AIK\Tools\amd64\Imagex.exe"
set __PKGMGR="%ProgramFiles%\Windows AIK\Tools\amd64\Servicing\pkgmgr.exe"
set __Mount=C:\Mount

Echo Off
Cls
Echo .
Echo .
Echo . Mounting Boot.wim to %__Mount%
Echo .
pause 1
pause 0
Echo .
Echo . Creating The Folder
mkdir "%__Mount%"
Echo .
Echo . Mounting boot.wim (First Image)
Echo .
%__IMAGEX% /mountrw ".\boot.wim" 1 "%__Mount%"
Echo .
Echo ......................................................
Echo .
pause
The 2 pauses are there in case you execute this script by accident.
The mount folder can be changed to anything you want but
besure to change it in the other batch files as well.
If you are using a 32-bit OS while preping the image,
change \amd64\ in the paths to \x86\
as in ="%ProgramFiles%\Windows AIK\Tools\x86\Imagex.exe"
Vista's boot.wim has 2 images, both images should be changed the same way.
I have not yet tried just updating image 2.
Image selection is controlled by the image number
%__IMAGEX% /mountrw ".\boot.wim" 1 "%__Mount%" <-- for image 1
%__IMAGEX% /mountrw ".\boot.wim" 2 "%__Mount%" <-- for image 2
You can also use names but it must be exact. Numbers are easier.
Ghost 12 has only 1 image.
this is what it looks like
1 -
To Prepare:
Install the WAIK
You will need the basic routines that the kit contains
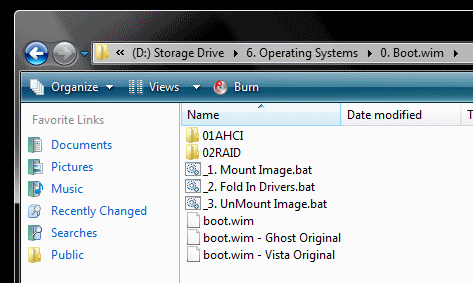
This is what My Environment looks like
1 -
Just a note, the WinPE image(s) in boot.wim are 32-bit
(including Ghost 12+)
Knuckle-Head Me had to have ALL64BIT and spent 2 days trying to fold in 64bit drivers...
Call this the Joke-Of-The-Day but we have all done dumb things
Note: fold the 64-bit drivers into install.wim and they will over-ride the 32-bit ones.
0

How to download Microsoft Tinker?
in Windows Vista
Posted
I used to love this program but I never trusted Windows Live.
So, with the info provided by "Listener", Rick and Seemaan,
I wrote a new interface that keeps everything local and off the iNet.
I wrote this for Win7(x86) so not sure if it will work on Xp, Vista or 64-bit platforms.
Post a msg here if you have problems on those platforms.
It is issued with a semi-Silent installer that shows progress but needs no input.
Hard Core peeps can tear it apart and mess with it as you like (and probably will).
Source code is available upon request but written for Borland C++ 2010(Embarcadero).
Tinker is FREE so Digital Rights crap from Microsoft should not be an issue
unless they are complaining about not being able to scan your system as they like.
With the Directx installers and the VcRedist package, its almost 60mb.