

valkyrio
Content Type
Profiles
Forums
Events
Posts posted by valkyrio
-
-
Quite honestly I'd use (and have used) the serial converter (TTL to USB) it's the easiest method imo.
I'm just not too keen on soldering wires, never done it before and I don't want to mess anything up.
You don't need to solder anything. Either do the Nokia cable one or look at this:
and this one:
0 -
Hi there,
I've been reading through this massive thread as recently my Seagate hard drive just stopped working. No longer recognized in BIOS, like it doesn't exist. I have a Seagate Barracuda 7200.11 ST3500320AS 500gb HD. This is my one and only hard drive on the desktop so its the one I use to boot the OS (Windows XP).
I've read through many posts and I'm a bit overwhelmed with all the information. I would like to use the SchmartBoard approach in order to avoid the soldering as I don't have the iron and feel uneasy using it on wires (no experience doing this at all). Is one method better than the others (Phone cable vs Serial converter vs SchmartBoard)?
What steps from the original post change if using the SchmartBoard? I tried finding the answer while reading through the posts but as you can imagine 126 pages of posts makes this quite difficult.
Would Frys be the only place to get this SchmartBoard? I assume I probably couldn't pick it up at the local computer hardware store.
Thanks.
Quite honestly I'd use (and have used) the serial converter (TTL to USB) it's the easiest method imo.
0 -
thanks for all the support...
however, lastly since the drive doesn't show up in "My Computer" or "Disk Management" would you conclude that the problem (assuming its one of the two mentioned here) is the BSY issue? Would an external drive connected to PC via USB show up in the BIOS (assuming it was working).
Since it doesn't show up, I'm thinking it's the BSY problem. With the other problem I think the drive still showed up.
0 -
when you say "insulate" what did you use? Electrical Tape?
Yep. Mine just happened to be yellow.
0 -
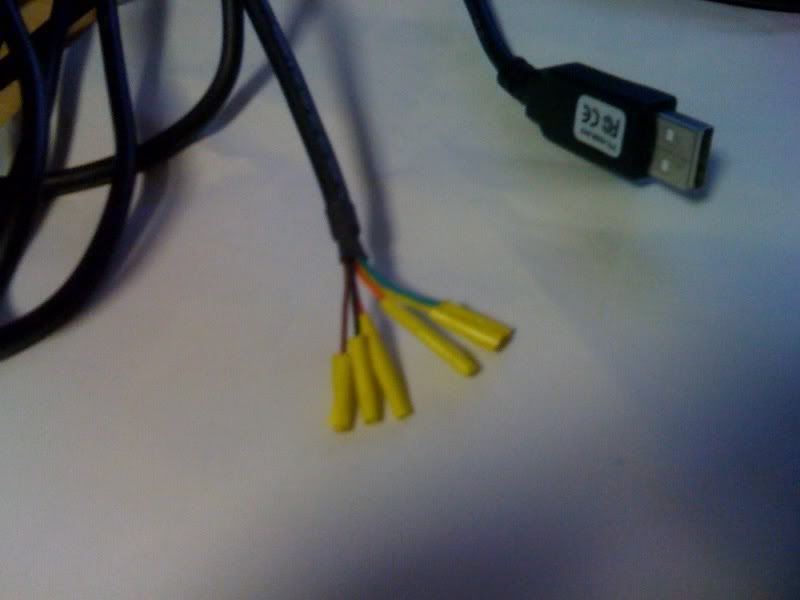
This USB<->TTL cable has 6 wires. Only 3 are connected to the Seagate PCB. Of the remaining 3 wires, 2 are joined together and the final one is unused.
USB<->TLL Cable Connections:
- Orange (TXD) - Connected to 1st terminal pin on PCB (closest pin to SATA adapter)
- Yellow (RXD) - Connected to 2nd terminal pin on PCB (2nd closest pin to SATA adapter)
- Black (GND) - Connected to 3rd terminal pin on PCB (3rd closest pin to SATA adapter).
- Brown (CTS) and Green (RTS) are tied to each other and nothing else (for flow control). I would have thought this was unnecessary - but I did it to be sure.
- Red Wire (VCC) is not used.
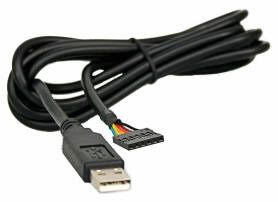
my question is using the cable (picture attached) am i cutting off the serial connector and soldering the correct wires to the correct parts of the PCB? (is there a better way to connect the wires w.o soldering?)
then following the hyper terminal steps and attaching the sata power from my pc power supply when necissary?
Also, the drive that has bricked was being used as an external (i bought the drive and placed it within an enclosure), my pc is old so my MOBO doesnt support sata, however the power supply (which is fairly new)has sata leads. Anyway, my question is the drive doesnt show up under "my computer" or Disk Manager anymore, it doesnt make any clicking noises. Other than it not showing up it seems to be fine. I figure since it doesnt show up under Disk Management its most likely BSY issue (if its either of the two) but, is there a way to find out if the issue is 0lba or BSY without hooking it up to the MOBO directly and checking the BIOS?
Soldering?! You don't have to solder at all.
check that for instructions. This is how my cable was when I finished:

And just to make sure, I left the contacts there:
I didn't take that part out. All I discarded of was the plastic. This makes it so that it's easy to connect the cables to the drive. Just make sure they're well insulated and make sure you have the right cables hooked up to the right contacts. (You can check the manufacturer's guide for the cable, google them if the link isn't in the post with all the instructions.)
0 -
Hm. I powered down for sixty seconds. Don't know if that makes a difference.
0 -
Did you do anything crazy to the drive while it was knocked out? like, punching it, freezing it, etc?
Because tbh it just sounds like it's damaged. I got that error on HDs that were dropped one time too many.
Also, I'm not sure if you answered this or not but did you try accessing the hard drive from another drive? (i.e. setting it as secondary)
And finally, you may have to find help elsewhere, as this no longer sounds like a firmware issue.
0 -
Actually Kling, covering either contact seems to work.
For example, on youtube someone used the nokia cable (or whatever it is) and they covered the contacts near the top of the PCB.
I myself used a similar cable and covered the motor contacts
Both of us were successful. According to one guide I read, it seems you can do either, but not both.
I prefer covering the motor contacts because you don't have to take off the whole pcb in order to interrupt the contact. You can just slide in a piece of paper that can be slid out and then the screw re-tightened instead of having to put the whole pcb back on it.
0 -
I didn't notice any data loss, and I did two drives.
0 -
Will this work if there are different OSs in all three drives? Say disk 2 = ubuntu, disk 3 = vista?
Or will I have to use grub4dos in that case?
0 -
looool...
Sorry. I was half asleep when I read that. I'll try it in a bit. Thanks!
0 -
Do I add it to the drive that is currently booting up as default? Or do I add it to all three?
0 -
K, bit of a quick write up but more descriptive than the last one.
In order to get my drives running again (from the BSY error) I did the following.
Obtained a USB to TTL cable. I got the TTL - 232R-3V3. I believe there's also a 5V version.
Also, a torx 6 screw driver (labeled as T6 when I bought it.)
You will need access to a SATA power cable (wish I knew this before I started, since it meant moving everything and almost damaging one of my drives while moving my tower onto my desk and in a proper place to get the SATA power cable out.)
First thing I did was loosen the screw directly above the motor contacts. You do NOT have to take off the whole PCB board. I would suggest against it. I loosened the screw and inserted a piece of thin card board to interrupt contact between the circuit board and the motor contacts. I practiced a lot, making sure that the contacts were not touching. To insert the paper I loosened a couple of other screws, but once I was sure the contacts weren't touching I tightened all of them except for the one directly above the contacts. I left this one a little lose, so that when I took out the paper it would come out a little easier.
Next I prepared the cable - I took all of the contacts out of the connector (by pulling back the little black tab that is directly below the exposed part of the contacts in the connector) and then proceeded to insulate all of them.
Once that was done, I hooked up the appropriate ones to the HD. In my case, orange was RXD, yellow was TXD, and black was GND. Since you have to connect the PC TXD to the drive's RXD, I connected the orange to the pin on the right (with the PCB facing up) the yellow to the one immediately left of it, and the GND to the second pin from the left. (The first pin from the left is not used at all.) Make sure your contacts are properly insulated with electrical tapes so you don't risk frying anything.
Next I connected the SATA power cable to the drive. Then I connected the USB to the computer. It'll come up as a new device, and you have to install the drivers for it. The ones you'll want to use are the VCP (Virtual COM Port) drivers. For the FTDI 232 cables, the drivers are here: http://www.ftdichip.com/Drivers/VCP.htm It's the very first one on the list. The device is labeled as FT232R. I believe it'll show up as a Serial Bus Converter or something along those lines in your Ports section of the Device Manager (to go there, right click on My Computer, then Properties, then click on the Hardware tab and click Device Manager.)
Note what COM number the device is installed as. For me it showed Serial Bus (COM3).
From there on out, I followed the Gradius/Carter in Canada guides. The Carter guide is far easier to read, IMO. http://www.mapleleafmountain.com/seagatebrick.html I think it's been linked here before.
I connected in the hyperterminal using the COM number listed under the Device Manager.
The first time around I didn't get a response, but I both restarted and switched the RXD and TXD cables, after that it worked perfectly. I suggest doing one of these, and then the other if you don't get a response either.
I didn't run into any problems, so I can't give any more preemptive advice. Just make sure you're careful after every step, and triple check the commands you input. Also, make sure you have the contacts properly in place as well as properly insulated. I weighed down my TTL cable to make sure the contacts wouldn't slip off.
Anyways, yeah, prolly add some pictures sometime later on and host it somewhere else.
0 -
So, I just recently repaired two of my drives that were bricked due to a firmware bug.
My issue now is that I have three drives, all of which have an OS already installed on it. All three of them work perfectly fine, and are running Windows XP
How can I change the boot order without having to go into the BIOS? I know Linux has some handy programs that run at boot, and let you pick which partition you want to run on. Is there any equivalent for windows? Or will I have to change the boot order every time?
P.S. Not sure if this is the right forum, but this is the one that seemed the most appropriate.
0 -
Yes MCQ, as Kling pointed out, you only use the TXD/RXD/GND cables. The power you will get from your computer's power supply. I'll write out a more specific description of what I did, later today
Also: if you're in the east coast, I would strongly suggest ordering from Adafruit Industries. They packaged the item half an hour after I got my order - and because they're in NY and I'm in MD, I got it the next day (and I paid for the cheapest shipping too.)
0 -
Jaclaz, I meant adapter, not cable. In his first post he said he's building the adapter because he can't buy one as they don't ship to his country
Why make or even buy an adapter when you can just buy a USB to TTL cable?
0 -
To jaclaz : I am sorry, I wish I could provide you with more info, but I was never passionate about electronics (kinda hits me in the face now, though). My friend suggested that I buy five 35V 10uF capacitors because he said something like there's gonna be 12V + 12V on that thing which equals 24V. I couldn't find 35V 10uF capacitors but I found 25V 10uF capacitors so I figured they would work. He wasn't exactly pleased, but he said they should do the job.
Anyway, if it doesn't work, I'm not gonna give up. Gonna keep trying with your schematics, jaclaz
Thank you once again for your delightful insight on the issue!
Love&Peace!
Exactly where did you try buying the cable from?
Because you can do it with some cellphone cables...as well as USB to TTL. Are you absolutely sure you actually have to go through all this?
0 -
Sounds like your data has been damaged, Luyz.
Last time I got that message, it was on a laptop hard drive that got dropped one too many times.
Thanks Valkyrio i really hope i can recover all my data.
You should check out what Jaclaz posted.
I booted both of my hard drives up once I updated the firmware, but that's because I knew both of them were okay other than the firmware. Try what Jaclaz said (booting another drive up and checking if you can access the drive you restored as secondary.)
0 -
Sounds like your data has been damaged, Luyz.
Last time I got that message, it was on a laptop hard drive that got dropped one too many times.
0 -
IT WORKED
Hooray!!!!!!
Since this was a much simpler way of setting it up, I'll outline my steps:
I bought the USB to TTL cable from http://www.adafruit.com/index.php?main_pag...oducts_id=70%29
I took out all the cables from the 6 way connector.
I wrapped all the connectors in electrical tape.
I hooked up the connectors to the pins (RXD, TXD, and GND, black, yellow, orange and black respectively)
I hooked up the sata power to my drive.
I plugged in the USB. Installed the driver from the manufacturer (http://www.ftdichip.com/Drivers/VCP.htm) VCP stands for virtual com port.
Once it was installed, checked what com it was on my PC (showed up as Serial Bus, COM 3)
After that, followed the directions to the letter. Ran the Hyperterminal using COM 3, with all the other settings. Ran the commands, etc.
Did that for both my drives, worked perfectly. It was amazing. I will probably rewrite this once I'm finished setting up all of my drives, but for now this will work. If anyone has any questions email me at j_tarraga(at)hotmail(dot)com. I'm also currently on MSN so if you want to add me, that's fine as well.
0 -
Yep, and should be fine for power - the USB supplies 3.3/5v.
I'm assuming all the cables are coded using the same colors as the others. But I'm not hooking anything up yet until I get a definite answer from the person who recommended this cable to me
Edit:
Oh that was beautiful. I just pulled the little black tab backwards and the cable slid right off, thanks! I'm in need of some electrical tape now, or I could split the connector in three and then re-insert the appropriate contacts.
Now just gotta make sure that the cables are color-coded the same.
Editing edit: Crap, well, the connector's far too thick. Will have to get electrical tape.
Anyone know if any old tape will work for this? or must it be -absolutely- electrical
Editing the edited edit:
Found electrical tape and the mechanical details. Apparently orange and yellow = TXD and RXD. Anyone know if those are synonymous with the TX/RX in Gradius' guide?
0 -
Sad to hear.
I'm still waiting to find out how to go on. x_x
0 -
Did you isolate the connectors before or after powering on?
0 -
So I've got a little issue
I ordered a USB to TTL cable, but all the jumpers, contacts, whatever are joined together
It looks like this:
Should I try and cut them apart and then connect the individual ones?
0

The Solution for Seagate 7200.11 HDDs
in Hard Drive and Removable Media
Posted
Of course you upgrade the firmware! That's the firs thing that you should be doing right after fixing your hard drive.
I have heard that people get their data salvaged for free if you send it to Seagate and explain what happened. It's a known bug, so you don't have to pay for the data recovery.