Search the Community
Showing results for tags 'windows'.
-
 If you want to use Wi-Fi on Windows 2000, you have to use the configurator that comes bundled with your driver, like Intel PRO/Set for example. Trouble is, these configurators aren't always great, and seem to overcomplicate simple things, like having the system connected to its appropriate network by the time it reaches the logon screen at startup. I would like to be able to use the Wireless Zero configurator from Windows XP on Windows 2000. I'm not really sure where to start, but I think at least two services (Wireless Zero Configuration and NDIS Usermode I/O Protocol) need to be installed on Windows 2000 and probably some system files too. Has anyone else tried this before? A Google search didn't return anything related.
 -
 So I'm having this issue with the UniFi controller software, I'd like to be able to login and see the status of my access point and upgrade it too, but I can never do that because each time I restart my computer, the software gets removed for some reason. I don't know what is going on. All settings are still on my computer and the AP continues to work just fine, I just can't manage it. There is a folder in the application menu, but all what is there is "Uninstall UniFi"..there was several items there before I restarted Windows and now its just that. Someone told me that it has something to do with Java and 64 Bit..but not sure what has to do with it. Running Windows 7 64 Bit. Hopefully I can get this problem fixed.
 -
hello guys i have aero everything works fine just 1 problem it does not autostart on reboot why.. the Status stays at Queued how come in Task Scheduler any fix for this cause i have to go to task scheduler to run the aero everytime..
-
Hi ! I need your help ! I wanted to have aero efects on win8.1 but when I installed aeroglass I got This . Please someone tell me how to get back square corners. Please <3
-
Back in 2010 I wanted to do this. I searched high and low on the interweb, trying to find someone else that had done it before. Unfortunately it seemed to be one of those things that confused a lot of people. People on forums and what not seemingly didn't realise that there was a difference between the Classic Theme, and the Luna theme without the actual visual style applied (what you get when you disable the Themes service). Well, there is. What I'm about to cover is the method that I've discovered of changing the theme on the Windows XP classic style logon screen to use the Windows 2000 style Windows Classic Theme. Why on earth would you want to do such a thing? If you prefer to use the Windows 2000 style Windows Classic Theme and the Windows 2000 style classic logon screen on Windows XP, you'll notice that there is a change in appearance between reaching the logon screen, and then reaching the desktop after logging in. There is really only one reason to change the theme on the logon screen in my case: because I want everything to match. There ya go. I'm really not sure if it would make anything faster. Though it certainly does look nicer over a remote connection, such as RDP. I have discovered two different ways of doing this. Both require accessing the SYSTEM account in different ways. There really is no way around it. If it can be done in the registry, I don't know where to look. One of the methods requires messing with sethc.exe in the System32 folder (the sticky keys executable), and the other involves pulling a trick with Command Prompt. I'll be showing the latter. _________________________ The first thing you want to do is, log on to an administrator account. If a domain administrator account is what you have, that should work just the same. Then open Command Prompt and enter: at 10:41 /interactive “cmd.exe” Where "10:41" is a time just after the current time. If it's 19:17 (7:17PM), enter 19:18 or 19:19 for example. I think the time does need to be entered in the 24-hour format, though I'm not sure. That command will schedule a new task, for Command Prompt to open. And because the system is taking care of that task, Command Prompt will open under the SYSTEM account. Once the system opens Command Prompt for you, you'll need to open the Task Manager and "kill" explorer.exe. The taskbar and desktop icons should disappear. Warning: Do not confuse the two open Command Prompt windows. Make sure to close the one used to schedule the task, and you should be left with the one opened by the system. Then you go to your system Command Prompt window and enter: explorer.exe You should see some activity. Running explorer.exe should log on to the SYSTEM account. Once it does, you can check the start menu and you should see the SYSTEM username. Now it's just a simple matter of changing the theme. It should be the default Luna blue with the bliss background (even though the background is not present on the logon screen, I think if you change it, it will be set there). You don't have to change it to the Classic Theme. Literally what ever style you want should work. This method may even work on Windows 2000 to change its logon screen theme appearance. Warning #2: Remember, this is the SYSTEM account. It's the most powerful account in any Windows NT install. It has control over everything. I would advise just to set the theme the way you want and leave. Changing the start menu style and things like that don't make any difference to the way the logon screen will look anyway. And I would advise against running any software or accessing any network resources. So once you've got the SYSTEM account looking the way you want, simply open the start menu and click "Log off". Once you do, it should log off of the SYSTEM account and go back to the logon screen. Sort of "logonception". And once you get to the logon screen, you should be greated with your custom theme style! Oh, happy days. "And that's that."
-
It would seem that the Windows/Microsoft Update site is a little bit broken. I noticed this recently and first thought that it was just a problem with Windows 2000. But it seems to be affecting Windows XP and Windows Server 2003 as well. All of the affected OS's give that same error message, with IE6 and Microsoft Update on Windows 2000, and IE8 and Microsoft Update on XP and Server 2003. Strangely enough, it would seem that the older (I think) Windows Update client still works, at least that is the case on my main computer running Windows XP x64. Has anyone else noticed this issue?
-
The ability to lock the taskbar was introduced in Windows XP. I would like to be able to do that in Windows 2000. Is it as easy as changing or adding some registry value? I really have no idea how it works. I'm guessing that there are resources that need to be added to system files and everything. Maybe someone with more technical knowledge can shed some light on the situation. All I know is that I'm forever accidentally modifying parts of the taskbar: Accidentally make it double-height, accidentally changing the order of the quick launch icons and even somehow grabbing the quick launch bar and putting it on the other side of the taskbar, by the clock.
-
Does there exist a guide for installing the unofficial Windows 2000 updates? I've been experimenting and using Windows 2000 with the unofficial updates for a while now, and I'm still not 100% sure in which order the updates should be installed in. Not only that, but I'm also curious about what other updates there may be, and the Unofficial Service Pack 5 and how useful it really is when you already have a Windows 2000 with all of the official updates from Microsoft. I have learned already that tomasz86's and BlackWingCat's packages should not be installed together. For example, installing Unofficial Update Rollup and then BlackWingCat's extended kernel files will make Windows blue screen at the desktop. Or at least in my experience it has. I'm still kinda wondering what benefit exactly the Unofficial Service Pack 5 has now. The way I see things: back in the day (2006, I think), having all of those post-SP4 updates incorporated into one package would've been advantageous. But now, as long as Windows 2000 is already up to date when the unofficial packages are installed, what's the point? Maybe I'm missing something, I'm just assuming that USP 5 was designed with update convenience in mind. If you have experimented with the unofficial updates for Windows 2000, I kindly ask you to share your experiences. What worked for you? What didn't work for you? It'd be nice to know what is recommended and what should be avoided, so that newcomers such as myself have a better grip on the process from the beginning.
-
 Hey all, I am here for advice/help on getting Windows 98se to work on a Compaq Presario SR1090NX Desktop. I seem to be able to find all the drivers I need for getting everything to work, but I am having an issue where the IDE controller is having a resource conflict, this doesn't happen in Windows XP SP3. The reason this is a issue is because it leads to the system not being able to detect either optical drive. It seems no amount of fiddling with the settings in the bios does anything. It also seems that when I get all the drivers installed, the system will lock up at random times, sometimes it will give me control again, sometimes it won't. Also, is this computer "too new" to run 98se correctly? I'll give a rundown of the specs in-case it helps. CPU: AMD Athlon 64 3400+ Processor @2.20 GHZ Ram: 1GB DDR PC-2700 Chipset: Nvidia nForce 3 (Drivers: http://www.nvidia.com/object/nforce_udp_win9x_4.27.html ) Video Card: Nvidia GeForce FX 5200 (Drivers: http://www.nvidia.com/object/win9x_81.98 ) HDD: 200GB Western Digital (40GB for Win98se) Also some generic modem, USB card reader (works with USB driver), 1394 port (works out of the box), a 1.44MB floppy drive, a DVD/CD-RW and CD-Rom. I'll try to provide more info if needed.
 -
why windows and other operating systems(linux,ubuntu,FreeBsd...) stopped at 64 bits.If they continued their innovative journey,are we going to see 128 bits windows,linux.and moving further,are we gonna see 256,512 bits windows etc.i think if they r there,then they would be faster.
-
 I want to make my programs compatible with all versions of Windows from Windows 95 to Windows 8. I'm currently working on a small word processor and I need to have working open and save file requesters. However, I can't seem to get the GetOpenFileName function to work properly. This is the code for a simple bitmap viewer program I made. It runs fine on Windows 98, XP, Vista, and 7, but on Windows 95, GetOpenFileName fails, and CommDlgExtendedError() returns error code 1 (CDERR_STRUCTSIZE). Now, I specified sizeof(ofn) for ofn.lStructSize, which should be valid, and it is on other Windows versions. Any ideas why this happens? #include <windows.h>#include <stdio.h>#include <commctrl.h>#define MSGBOX_ERROR(MESSAGE) MessageBox(NULL, MESSAGE, NULL, MB_OK|MB_ICONERROR)#define COMMAND_EXIT 9000#define COMMAND_OPEN 9001#define COMMAND_STRETCH 9002LRESULT CALLBACK MainWndProc(HWND hwnd, UINT msg, WPARAM wParam, LPARAM lParam){ static BOOL IsStretched; static HBITMAP hBmp; switch(msg) { case WM_PAINT: { if(hBmp==NULL) //Leave WM_PAINT to DefWindowProc if no bitmap is loaded. goto defwndproc; RECT client_rect; GetClientRect(hwnd,&client_rect); BITMAP bmp; PAINTSTRUCT ps; HDC hdc = BeginPaint(hwnd, &ps); HDC hdcmem = CreateCompatibleDC(hdc); HBITMAP hbmOld = SelectObject(hdcmem, hBmp); GetObject(hBmp,sizeof(bmp),&bmp); if(IsStretched) StretchBlt(hdc,0,0,client_rect.right-client_rect.left,client_rect.bottom-client_rect.top,hdcmem,0,0,bmp.bmWidth,bmp.bmHeight,SRCCOPY); else BitBlt(hdc,0,0,bmp.bmWidth,bmp.bmHeight,hdcmem,0,0,SRCCOPY); SelectObject(hdcmem, hbmOld); DeleteDC(hdcmem); EndPaint(hwnd, &ps); break; } case WM_CREATE: { HMENU hMenuBar = CreateMenu(); HMENU hFileMenu = CreatePopupMenu(); HMENU hViewMenu = CreatePopupMenu(); AppendMenu(hFileMenu,MF_STRING,COMMAND_OPEN,"&Open"); AppendMenu(hFileMenu,MF_SEPARATOR,0,NULL); AppendMenu(hFileMenu,MF_STRING,COMMAND_EXIT,"&Exit"); AppendMenu(hViewMenu,MF_STRING|MF_UNCHECKED,COMMAND_STRETCH,"&Stretch to fit window"); AppendMenu(hMenuBar,MF_STRING|MF_POPUP,(UINT)hFileMenu,"&File"); AppendMenu(hMenuBar,MF_STRING|MF_POPUP,(UINT)hViewMenu,"&View"); SetMenu(hwnd,hMenuBar); IsStretched = FALSE; break; } case WM_SIZE: if(IsStretched) InvalidateRect(hwnd,NULL,FALSE); break; case WM_COMMAND: switch(LOWORD(wParam)) { case COMMAND_OPEN: { OPENFILENAME ofn; char szFile[MAX_PATH]; ZeroMemory(&ofn,sizeof(ofn)); ofn.lStructSize = sizeof(ofn); ofn.hwndOwner = hwnd; ofn.lpstrFile = szFile; ofn.lpstrFile[0] = '\0'; ofn.nMaxFile = sizeof(szFile); ofn.lpstrFilter = "Windows Bitmap (*.bmp)\0*.bmp\0All Files\0*.*\0"; ofn.nFilterIndex = 1; ofn.lpstrFileTitle = NULL; ofn.nMaxFileTitle = 0; ofn.lpstrInitialDir = NULL; ofn.Flags = OFN_PATHMUSTEXIST|OFN_FILEMUSTEXIST; GetOpenFileName(&ofn); //Testing to see if GetOpenFileName worked if(fopen(ofn.lpstrFile,"r")==NULL) { char errorbuf[20]; sprintf(errorbuf,"Failed to open a file. Error code: %hu",(unsigned short)CommDlgExtendedError()); MSGBOX_ERROR(errorbuf); return 0; } hBmp = LoadImage(NULL,szFile,IMAGE_BITMAP,0,0,LR_LOADFROMFILE); if(!hBmp) MSGBOX_ERROR("Failed to load bitmap."); InvalidateRect(hwnd,NULL,FALSE); UpdateWindow(hwnd); break; } case COMMAND_EXIT: goto close; case COMMAND_STRETCH: IsStretched = !IsStretched; InvalidateRect(hwnd,NULL,TRUE); break; } break; case WM_CLOSE: close: ExitProcess(0); default: defwndproc: return DefWindowProc(hwnd,msg,wParam,lParam); } return 0;}int WINAPI WinMain(HINSTANCE hInst, HINSTANCE hPrevInstance, LPSTR lpCmdLine, int nCmdShow){ InitCommonControls(); WNDCLASS rwc; rwc.style = 0; rwc.lpfnWndProc = MainWndProc; rwc.cbClsExtra = 0; rwc.cbWndExtra = 0; rwc.hInstance = hInst; rwc.hIcon = NULL; rwc.hCursor = LoadCursor(NULL, IDC_ARROW); rwc.hbrBackground = (HBRUSH)(COLOR_APPWORKSPACE+1); rwc.lpszMenuName = NULL; rwc.lpszClassName = "yo mama"; RegisterClass(&rwc); HWND hMainWnd = CreateWindow("yo mama", "Bitmap Viewer", WS_OVERLAPPEDWINDOW, CW_USEDEFAULT, CW_USEDEFAULT, 450, 450, 0, 0, hInst, 0); ShowWindow(hMainWnd,nCmdShow); UpdateWindow(hMainWnd); MSG msg; msgloop: GetMessage(&msg,NULL,0,0); TranslateMessage(&msg); DispatchMessage(&msg); goto msgloop;}
 -
Yesterday, midway through a skype call, skype suddenly stopped working, so I tried to reopen it. My computer screen then went black to be followed by a blue screen with SYSTEM_SERVICE_EXCEPTION at the top. I have read numerous posts about this with no set solution, so here is a link to the dump file: https://drive.google.com/file/d/0B8IfJMTnm6ShcmtjUGJ5SDJIbDQ/edit?usp=sharing I uninstalled Skype, and I tried to reinstall it. The blue screen came up mid-way the install. This happens every time I try to install it. If anyone has a solution, it would be greatly appreciated.
-
Hello, Can I use Windows Embedded POSReady 2009 as my everyday OS. For internet, games and listening to music? Or can I only use Windows XP Home Edition/Professional for that?
-
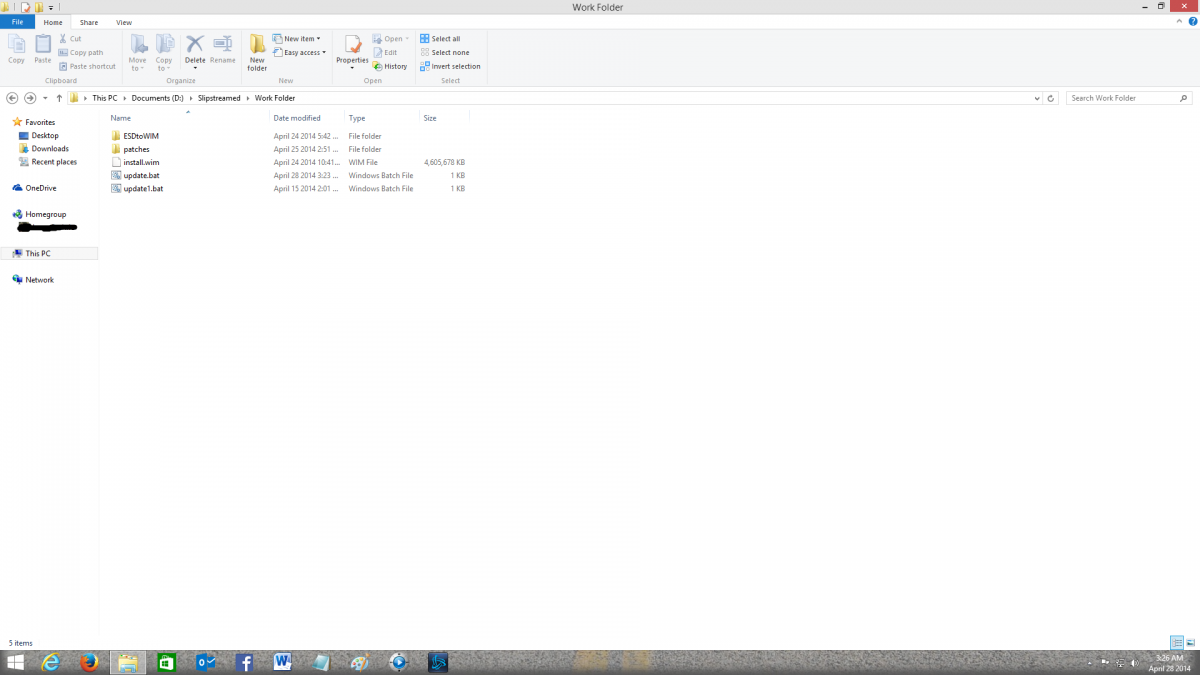
 Easy and detailed instructions. This is better than those Automated Apps like WinReducer and Win Toolkit which usually are buggy. Here you Right click the batch file and choose to run as Admin and then go have coffee. It's that easy. Attached photo is the folder structure to what we will create. This guide will slipstream all updates and clean up the image and convert the image to and from ESD<--->WIM Prepare and Slipstream Updates In to a Windows 8.1 .wim or .esd Image (Including Update 1) What you need: install.wim image file from the Windows installation media. If it is an install.esd image file then you can read the instructions on page 3 of this guide to convert it to an install.wim image file or create a Virtual Machine to do it (See page 4). Your install.wim or install.esd file is in the “Sources” folder which is found in the Windows Installation Media.2 batch files called update.bat and udate1.bat (Batch Commands are on this page)Windows updates downloader: http://www.windowsupdatesdownloader.com/ProgramFiles.aspxYour main computer that you will perform this task on should be Windows 8.1. You will need to Install Windows ADK for Windows 8.1 which is found here: http://technet.microsoft.com/en-us/library/dn247001.aspx. Attached picture is the folder structure. Batch File Commands to inject the 40+ updates for update.bat MD %~dp0WIN8 "c:\program files (x86)\windows kits\8.1\assessment and deployment kit\deployment tools\amd64\dism\Dism.exe" /Mount-Wim /WimFile:%~dp0install.wim /Index:1 /MountDir:%~dp0WIN8 "c:\program files (x86)\windows kits\8.1\assessment and deployment kit\deployment tools\amd64\dism\Dism.exe" /image:%~dp0WIN8 /Add-Package /PackagePath:"%~dp0patches" "c:\program files (x86)\windows kits\8.1\assessment and deployment kit\deployment tools\amd64\dism\Dism.exe" /image:%~dp0WIN8 /Get-Packages | more "c:\program files (x86)\windows kits\8.1\assessment and deployment kit\deployment tools\amd64\dism\Dism.exe" /Image:%~dp0WIN8 /Cleanup-Image /StartComponentCleanup /ResetBase pause "c:\program files (x86)\windows kits\8.1\assessment and deployment kit\deployment tools\amd64\dism\Dism.exe" /Unmount-Wim /MountDir:%~dp0WIN8 /commit Batch File Commands to inject Update 1 for update1.bat MD %~dp0WIN8 "c:\program files (x86)\windows kits\8.1\assessment and deployment kit\deployment tools\amd64\dism\Dism.exe" /Mount-Wim /WimFile:%~dp0install.wim /Index:1 /MountDir:%~dp0WIN8 "c:\program files (x86)\windows kits\8.1\assessment and deployment kit\deployment tools\amd64\dism\Dism.exe" /image:%~dp0WIN8 /Add-Package /PackagePath:"%~dp0patches" "c:\program files (x86)\windows kits\8.1\assessment and deployment kit\deployment tools\amd64\dism\Dism.exe" /image:%~dp0WIN8 /Get-Packages | more pause "c:\program files (x86)\windows kits\8.1\assessment and deployment kit\deployment tools\amd64\dism\Dism.exe" /Unmount-Wim /MountDir:%~dp0WIN8 /commit Instructions (Page 2) We need to Download the zip file named ‘Tools U Need” from my OneDrive and extract it, it will create the folder and files structure for you. Don’t modify the file or folder names with the exception of the main folder, which can be named to whatever you want. Skip to step 4 when completed. The Batch files will already be created. OneDrive address: https://onedrive.live.com/redir?resid=FF876747A444836D%2115004 To manually create the folder structure you need to make a folder and name it to whatever you like. Open that folder and create another folder and name it: patches If you need to convert install.esd to install.wim you will need to unzip the “Tools U Need” zip file and copy and paste the ESDtoWIM folder and its contents to the folder you created. It should also be outside the patches folder. Make 2 blank text files and name each file update.bat and update1.bat. Now copy and paste the text for each batch file command from page 1 into the corresponding file. Update.bat is for the 40+ updates and update1.bat is for update 1. Place these to batch files outside the patches folder. Copy your install.wim file to the folder that was created, which will be outside the patches folder, “NOT” in the patches folder. If the original file was a .esd file then see my instructions to convert the install.esd to install.wim.. Now all you need is the updates that you will download from the “Windows Update Downloader”. Download the update list from this page: http://www.windowsupdatesdownloader.com/UpdateLists.aspx (It’s a small file). Once finished downloading you need to Double Click it to add the list to the Windows Updates Downloader. Start the Windows Update Downloader, choose the operating system update list In the Windows updates Downloader, and then choose the Security Updates, Non-Security Updates and both versions of .Net Framework. Updates in the Optional folder won’t work. Start the download. All updates MUST be in the .msu format. Once the updates are downloaded, you need to copy and paste all the updates in to the “patches” folder. Make sure that you only copy the updates to the patches folder. In other words, there should be NO folders inside the patches folder. Only .msu (update) files can be in the patches folder. You can delete the ESDtoWIM folder if you are not going to use the command line tool to convert install.esd to install.wim. Now, the Structure of the folder you are working in should have only 5 items: An ”ESDtoWIM” folder, a “patches folder”, update.bat file, update1.bat file and an “install.wim” file. All .msu updates should be in the patches folder. Now Right click the update.bat file and choose to run as Administrator. Once it installs all the updates it will ask you to hit any key. Hit any key until is shows all the updates and continues. You will have to hit any key many times until it begins the last phase. Once it is finish, you can repeat step 7 through 9 but use the update1.bat file for the Windows 8.1 update 1 .msu files (There are 6 needed downloading). Once everything is finished then you can replace the old install.wim file in the Windows install media with the new one. Again, if the original was an install.esd file then it needs to be converted first to install.wim file.File Conversion Instructions (Page 3) Convert install.esd to install.wim From the “Tools U Need” folder which can be downloaded here: https://onedrive.live.com/redir?resid=FF876747A444836D%2115004, find and open the ESDtoWIM folder Right click the file named ESD2WIM.cmd and choose “Run As Administrator” Copy and paste (or type) the complete path location of the install.esd file. Example: C:\Work Folder\install.esd Press the enter key and wait for the process to finish. The location of the install.wim file will be in the “C” drive when the process finishes. C:\install.wim Continue with step 4 on the instructions page (Page 2).Convert install.wim to install.esd If the original file was an install.esd file then you will need to convert the install.wim file back to an install.esd file. Before we begin, make sure there is no file in C:\ called install.esd. In other words delete any file in this exact path C:\install.esd Copy the install.wim file to the C:\ directory. Example: C:\install.wim Click “Start” and do a search by typing: cmd Look for a file called cmd.exe in the search results. Right click cmd.exe and choose to “Run as Administrator” A black box will open. In the black box, Copy and paste the command in step 6 below and then hit the enter key. dism /Export-Image /SourceImageFile:"C:\install.wim" /SourceIndex:1 /DestinationImageFile:"C:\install.esd" /Compress:recovery It will take a very long time and a lot of processing during the conversion. So have patients. When it’s finished you will find the file called install.esd at this location C:\install.esd JJJCongratulationsJJJ You have completed the process of slipstreaming Windows updates and update 1 in to Windows 8.1 Install media. J Good luck J Installing Windows 8.1 to a VHD and using imageX to capture back the image as install.wim (Page 4) If you prefer not to use the command to convert the install.esd file to an install.wim file then you can create a virtual machine and install windows 8.1 in to it and then capture the VHD image back to an install.wim file. Here is how you do it. What you need: Windows 8.1 ISO, DVD or USB stick made bootable with Windows 8.1Microsoft Hyper-V (included as an add-on in Windows 8.1 Pro) or Virtual BoxFor Windows 8.0 serial key users: These generic keys will allow the correct version of Windows 8.1 to be installed. You will HAVE TO activate with your purchased Windows 8.0 key once all is installed. It will work 100%.334NH-RXG76-64THK-C7CKG-D3VPT for Non-Pro versionXHQ8N-C3MCJ-RQXB6-WCHYG-C9WKB for Pro versionKnowledge of these Virtual machinesImageX which comes with the Windows ADK for Windows 8.1Knowledge of the CMD command prompt.Knowledge of “SysPrep”Instructions Create a Virtual disk. The disk should be either VHD or VHDX Install Windows 8.1 in the virtual machine Press Ctrl + Shift + F3 when the Installation gets to the screen where you create a computer name. This will log you in automatically as the Administrator and start the SysPrep process. In the SysPrep preparation tool, make sure you choose “Enter system out of box experience”, and then check the box that says “Generalize”. The next drop-down menu: choose “Shutdown”. Click OK and the Virtual machine will shut down when finished. Now locate where the Virtual Disk that has Windows 8.1 installed on it. Mount that drive and give it a drive letter Make sure you installed ImageX which comes with the Windows ADK for Windows 8.1 Click the Start button and type cmd for command prompt. In the search results choose “Deployment and Imaging Tools Environment”. A command black box will open. Type the following: imagex /compress maximum /capture F:\ C:\install.wim "Windows 8.1 Pro" (F is the drive letter you gave the virtual drive when you mounted it, change it to whatever it is) Hit Enter and wait for it to finish. Look in the C drive where you copied the virtual drive and you will also see the install.wim file. This is the file you need to inject all those updates in to. You can now delete the Virtual drive and the ESD file.
-
Official website: http://www.reactos.org/
-
Hi there, I have trouble with windows' builtin file-protection. When activated, it keeps asking for the original XP-CD and won't accept my modified nlite-disk. During unattended installation WFP is turned off to speed-up the process. With a reg-file I re-enabled WFP and got described problem. For deactivation I used the option in nlite before compiling the disk. I already found out on microsoft's homepage that the two files IMS.inf and fp40ext.inf are responsible for that behavior. Does anybody know how to change them so WFP will work as usual with a nlite-cd? Forum-search didn't give me any results. Edit: The reg-file used to re-enable WFP: Windows Registry Editor Version 5.00[HKEY_LOCAL_MACHINE\SOFTWARE\Microsoft\Windows NT\CurrentVersion\Winlogon]"SfcQuota"=dword:ffffffff"SFCDisable"=dword:00000000It needs a reboot to work.
-
Hey guys, I'm new here & this is my first post. I really hope this hasn't been brought up before because I already searched the forum & found nothing useful... Prologue: I'm trying to build a very small & basic installation of Windows 2000 that doesn't even have network support, it will be used primarily for games & some other programs. I will put it in a VHD (Virtual Hard Disk) file then copy that file to a USB Stick, that file will then be loaded into RAM (yep, the whole VHD file) & Windows will be started & used directly from there. I'm following THIS guide if anyone wants to know. SO, I've already used nLite to make several "lite" builds of 2000 before but this time it looks like I stripped the install folder too much to cause some problems. Note that that these problems that I'm about to mention never happened before & only happened with my latest, super stripped build so it's certainly something that I REMOVED that caused them... Here we go: 1. Setup can't find drivers for things like Battery, Volume (NOT audio) & something called "hdc" besides some other things, I'm pretty sure I didn't remove any drivers related to those, especially Battery, you can check my .INI file at the bottom. 2. Serial Key no longer works; I tried my personal one many times & even tried different ones from the Internet, no luck. So that's about it for now, the Serial Key prompt is the farest I've went into setup anyway, any help is appreciated... BTW I'm using a Windows 2000 SP4 CD as my base, you can view & download my settings file HERE (Also attatched in this document). Cheers! Stripp3d.ini
-
I remember that, back in 2006, when Microsoft discontinued support for Windows 98SE, there was an Autopatcher program created to deal with problems in Windows 98SE. It was a really elegant program that even created extra features for the OS never dreamed of by Microsoft. I was wondering if anyone was planning to do the same thing for XP?
-
Official website: http://www.reactos.org/ Download: http://www.reactos.org/download-reactos Changelog: http://www.reactos.org/wiki/ChangeLog-0.3.16 Enjoy !
-
Hello! There are many similar topics regarding Windows 8 deployment... I tried to google and check out as many as I could. Wasn able to solve my issue though. I'm writing here, hoping that someone might be able to help me out. I am trying to deploy Windows 8 put problems with starting it. I have new Samsung laptop, where I have installed Windows 8 Pro. Iinstalled programs, created user-accounts etc.Then I bootel laptop from USB WinPE media and captured C:\ drive as a *.WIM file. So far everyting OK. I got second laptop (same model). Booted it also from Winpe USB media and used Diskpart to clean-create partition and format it as NTFS. I created just this one partition. On that partition I applyed the wery-same image that I previously created. Image was applyed and then started problems. --> bcdboot c:\windows is not working. --> Failure when attemting to copy boot files. --> I also tried bcdboot c:\windows /s c: --> Boot files successfully created. But after this OS isnt booting, still. Anyway, this is where I got stuck. Please help me out.
-
Hi everyone, I'm new on this forum . I've got an untouched ISO of Windows XP SP0, the RTM version, build 2600, without any service packs. I would like to install it on my PC, but because I've got SATA hard disk, and IDE mode can't be enabled from BIOS (there isn't such option) I must slipstream drivers with nLite. I slipstreamed my SATA drivers "ICH9M-E/M SATA AHCI Controller", and the process was succesfully. Then I made an ISO file and burned it with nLite. When I boot from cd, you know there's the first "MS-DOS like" setup part, and in the lower bar it shows the components loaded, like "Loading <Kernel Debugger DLL> and other things... well... it doesn't load iaStor.sys! And I get then a 0x0000007B bsod. Any helps? Thanks in advance!
-
 I have windows 7 ultimate that i bought last year, and now i want to format my computer but i want to make an unattended version for my one and to include the security updates on that version. Is there a place that i can find and download easly windows 7 updates? I search on microsoft windows 7 update and find this: http://search.microsoft.com/en-us/DownloadResults.aspx?q=Security%20Update%20for%20Windows%207&ftapplicableproducts=%5eWindows&first=241&FORM=PEME8 I search for updates that start from 1.5.2012 until today. How and where can i easly find and download them? Where can i find them?