klinsmann
About klinsmann

klinsmann's Achievements
0
Reputation
-
Invalid Partition Table on my 500GB HDD
klinsmann replied to klinsmann's topic in Hard Drive and Removable Media
No. You must have very clear the scope of what you do. IF you do it because: it's fun it may eventually help someone else it is a very good thing . Otherwise, you have to understand how there is simply NO point in recovering a disk. You can have a new 2.5" 500 Gbdisk for around 70 bucks, it is simply not worth the time to try and make again a broken disc functional again unless of course the EXACT cause is found and the APPROPRIATE fix is applied. In the best case what we can find is a way (through something that is nothing much more "technical" or "scientific" than white magic or voodoo) to *somehow* reset it. What you have back (still in the best case) is NOT a fully functional disk drive (tested and certified, for what is worth, i.e. nothing BTW ) what you get is a disk that is apparently functioning (nothing more). I do understand how in their simplicity (and until disaster strikes ) "common users" are likely to actually rely on a hard disk drive to hold data (that aren't also backed up - twice - on other media), but insisting on it, and particularly on a disk that already failed is what I like to call (in highly specialized technical terms ) "pure folly". At the most ( and still if everything goes in the best possible way) you can use that drive, if revived, as tertiary backup media. This said, you need to get yourself a RS232 (or USB) to TTL adapter, go to the 7200.11 Read-me-first as first step: then search for a suitable adapter (and or browse the huge7200.11 thread to find links to surely working ones). Once you have this needed piece of hardware we can start to experiment. jaclaz Thanks a lot jaclaz for your time, I'll give this a try and try to find a suitable adapter. I'll get back to you as soon as I have it with me -
Invalid Partition Table on my 500GB HDD
klinsmann replied to klinsmann's topic in Hard Drive and Removable Media
Hmmm. We have taken it to "level 3", i.e. the "lowest level" we actually have (a little) knowledge about. Basically we have four levels: Logical <- normal operation of OS disk/filesystem drivers Physical <- dd, dsfok, hex/disk editor, etc. ATA standard commands <- HDAT2, MHDD, hdparm, etc. Manufacturer firmware <- terminal commands (disk model specific, in practice no real docs) It will be tricky (if possible at all) to use a "level 4" approach. It is a 5400.6 drive and as thus terminal commands will be similar to those for the 7200.11. The TTL connections should be the same as the earlier 5400.2: http://forum.hddguru.com/serial-terminal-pins-ide-5400-t16559.html http://forum.hddguru.com/download/file.php?id=2402 9600-8-N-1 But this is more or less the only "safe" kind of data I have. Most probably right now a pro with professional tools can flash to it a new "module" (*whatever* it is) or anyway fix the corrupted parts, but if you go ahead it is likely that there will be "no way back". See also: If I were you I would run the Seagate diagnostic tools (just to confirm that *something wrong* is detected) then think a lot about the value you attribute to the data that are still not recovered. If this value is US $ 500 or more, contact a professional recovery firm. If it is less than that (or if you are a gambler) we may try to go ahead with a terminal session. Remember, that a good gambler knows what to do and when to do it : http://lyrics.wikia.com/Gracenote:Kenny_Rogers:The_Gambler I was lucky enough to recover most of the valuable data, as it was located on those 137 GB. So let's go "all-in". I'm guessing this terminal session might not let me recover all the data but it will still let me recover the whole Hard Drive in order to format it and get it back to work, right? -
Invalid Partition Table on my 500GB HDD
klinsmann replied to klinsmann's topic in Hard Drive and Removable Media
You try looking at the "failed" HD with HDAT2, AFTER having read (even if briefly) the DOCs/FAQs on the HDAT2 site. (a good idea, to make sure that you don't by mistake "touch" anything else would be to disconnct all other hard disks) http://www.hdat2.com/hdat2_faq.html (ALL of them) Particularly: http://www.hdat2.com/hdat2_faq.html#q6 Possibly you should try (at your leisure) the "Demo" version to get familair with the "look and feel" BEFORE doing anything with the "real" program. Check also the Screenshots: http://www.hdat2.com/preview.html jaclaz So right now this is the situation: I have read all the FAQs, and I've been running smoothly the HDAT2 bootable USB disc. The problem is that the "original" drive is shown by HDAT2 as LBA28 with "!SET MAX: NOT_SUPPORTED", "!DCO: NOT_SUPPORTED" and "!SECURITY: NOT_SUPPORTED". This means I cannot follow the instructions on FAQ#6. I'm looking for solutions on that as we speak, do you happen to know how to solve this issue? Let me thank you once again, you're being SUPER helpful! Edit: I managed to access what seems to be the original MBR, with all the partitions listed. I saved it as a .txt, could that be of any use? -
Invalid Partition Table on my 500GB HDD
klinsmann replied to klinsmann's topic in Hard Drive and Removable Media
Hmmm. It is possible that the tool (being a bit old) simply does not compute the 500 Gb size. As a matter of fact (I am notoriously an optimist ) it could be a good sign that a diffference (even if negative) is found between "declared" and "actual" capacity. When the going gets tough... http://en.wikipedia.org/wiki/When_the_Going_Gets_Tough,_the_Tough_Get_Going Can you (in the sense you know how to) make a DOS bootable flopppy image (and from it a CD-ROM, as I presume you haven't a floppy dirve on that machine)? Or a bootable USB stick? If yes, start getting this: http://www.hdat2.com/ If no, post what you have available and any doubts you may have in creating a DOS bootable environment. And/or get MHDD instead (it does come as a bootable .iso): http://hddguru.com/software/2005.10.02-MHDD/ jaclaz No problem with that! I've managed to create a bootable USB disc with HDAT2. What should I do now? -
Invalid Partition Table on my 500GB HDD
klinsmann replied to klinsmann's topic in Hard Drive and Removable Media
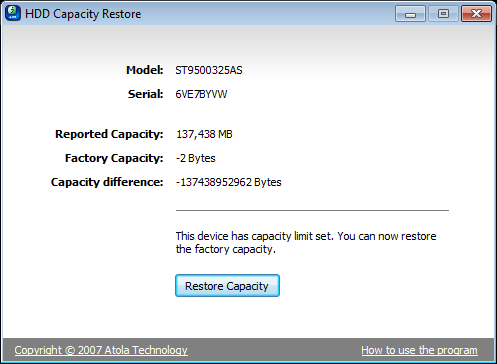
Yep, that's the tricky part. See what the Atola tool has to say, first thing (remember that it is just a "semi-random guess" that the drive self-capped ). http://blog.atola.com/restoring-factory-hard-drive-capacity/ whether tool will work under 7 and particularly under 7 x64 is up to you to find out. jaclaz OK, so I managed to make the Atola tool work (had to try on a 32-bit version of Windows 7). Things seem to be getting trickier by the minute...
-
Invalid Partition Table on my 500GB HDD
klinsmann replied to klinsmann's topic in Hard Drive and Removable Media
Run CHKDSK /R Then, try accessing the disk with TESTDISK. The partition should show "normally" (it might protest about the backup of the bootsector, but that is irrelevant), then by pressing "p" you should be able to access (and copy) files (with "c"). You most probably cannot access the files directly because of NTFS permissions, since we are into "living dangerously" you can try faking to be "System", here: http://reboot.pro/17501/ try using RunasSystem to launch a file manager (like 7-zip) or a command console and see if you can copy the files to another disk (or you may create another partition on the rest of the 1 Tb disk).. jaclaz CHKDSK /R has taken a while, it's been deleting register segments and some other stuff I don't really understand. TestDisk is working alright, so the backup is on its way (or at least it looks like it is). Now I'm guessing we're done with the "easy" part, is there a chance for me to recover the rest of the data on the "original" drive (the 500 GB one)? -
Invalid Partition Table on my 500GB HDD
klinsmann replied to klinsmann's topic in Hard Drive and Removable Media
Cannot say. Another "queer" behaviour of Winddows 7? Post a screenshot of Disk Management... jaclaz Managed to solve this just as you replied. dsfi working as we speak, "new" disk should be ready in 20-30 minutes So that's done! I now have the 1 TB drive with the .dd image on it. I've run CHKDSK /F on that drive, and I've managed to access the data on that drive. So far Windows 7 is letting me access the data but not letting me copy it to another drive. I've attached a screenshot of how the 1 TB drive looks like right now. This is looking good, what's next?
-
Invalid Partition Table on my 500GB HDD
klinsmann replied to klinsmann's topic in Hard Drive and Removable Media
Cannot say. Another "queer" behaviour of Winddows 7? Post a screenshot of Disk Management... jaclaz Managed to solve this just as you replied. dsfi working as we speak, "new" disk should be ready in 20-30 minutes -
Invalid Partition Table on my 500GB HDD
klinsmann replied to klinsmann's topic in Hard Drive and Removable Media
That's an actual stupid thing of Windows Vista and later that - probably for the first time - turned around as a good thing . You imaged a DISK (or \\.\PhysicalDrive) you have to restore the image to a DISK (or \\.\PhysicalDrive) NOT to a DRIVE (or \\.\LogicalDrive). In my example: you use the line with the RED drive letter to identify the GREEN parent and you supply it (the parent or the GREEN BOLDED one) to dsfi.... DISK=PhysicalDrive=bigger container=starts at absolute sector 0 LBA=what you see in Disk management in the lower pane, on the left DRIVE=LogicalDrive=Primary Partition (or Logical Drive inside Extended Partition) contained inside DISK=starts at whatever sector is addressed for it in the MBR or in the EPBR=what you see in the top pane in Disk Management (and has normally a Drive letter assigned or in the lower pane on the right as part of the DISK The good MS guys made their best to confuse the matter, rest assured that you are not the first one (and unfortunately not even the last one ) to fall for this misunderstanding. jaclaz Problem is Tiny Hexer is (don't know why) not showing info the way it did before (check attached image on my previous post). Any idea on how to fix that? All I want is to find out the PHYSICALDRIVE I need to use as DESTINATION for dsfi. Edit: Problem solved! -
Invalid Partition Table on my 500GB HDD
klinsmann replied to klinsmann's topic in Hard Drive and Removable Media
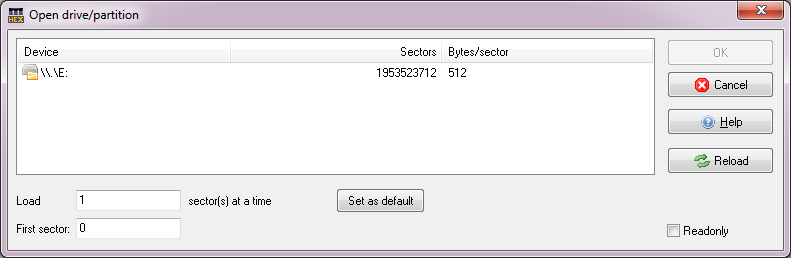
Well, what most people tend to confuse is file format with file extension. What you made with datarescue.dd is a RAW (file format) image, i.e. an exact, byte-by-byte, sector-by-sector, image of the source hard disk. You can give it *any* name, and as well *any* extension, like .dd or .img, it will still remain a RAW image. If you prefer the extension given to a filename has two scopes: be a "mnemonic" to quickly know what file format it is (of course only useful if you give appropriate extensions) be useful for associating those files to a given program for all it matters you could name the image mynicespreadsheet.xls (only Excel will choke if you attempt double clicking on the file ). So that's done Which process? If you dd the 137 Gb image to the 1 Tb disk you need NOT the original disk connected. On the other hand if you already recovered most of the files from the "capped" hard disk or from the dd image, you may want to "skip" this part (you already have the image, so if needed you can do this later) and check just the "failed" disk with the Atola tool. Unless *somehow* we change something in the failed disk, the accessible data will still remain the 137 Gb you already imaged. "Restoring" the dd image to the "new" disk is simply an approach that allows the use of CHKDSK and TESTDISK on a "full sized" space, which may (or may not) help to fix the filesystem/access the files IF you did not managed to already save them (anything beyond the image size will remain anyway "a suffusion of yellow"). By "the process" I meant this whole thing. OK, so original Hard Drive is right now disconnected. Easiest? Create a small partition on the disk and format it. Open tiny hexer, FIle->Disk->Open Drive, you wil normally see something like (example): The right PHYSICALDRIVE is the "parent" of the drive letter assigned to the newly created partition. jaclaz I seem to be having an issue I did not have last time I used Tiny Hexer (check atteached image). Thanks (as usual) jaclaz! Edit: dsfi is denying acess when I try dsfi \\.\e: 0 0 SOURCE (SOURCE being of course the actual source file I renamed to .img)
-
Invalid Partition Table on my 500GB HDD
klinsmann replied to klinsmann's topic in Hard Drive and Removable Media
So, I finally found the time to fully get into this and get it solved ASAP. I imaged the disk with DataRescue DD, however the images is a .dd file. How can I turn it into a .img? I have saved almost everything in those 137 GB, but as you predicted, some partial data is damaged (a few random files are shown as corrupted). This is how I've set up the PC for the process: a 1 TB SATA Hard Drive connected through USB, and the "corrupted" Hard Drive we are trying to save directly plugged into the MB. Is that alright? What should I do now? Edit: Forgot to ask, what's the safest way to know which PhysicalDrive is the 1 TB drive I'll be using with dsfi? -
Invalid Partition Table on my 500GB HDD
klinsmann replied to klinsmann's topic in Hard Drive and Removable Media
Basically, yes. The issue may be that it is possible (a number of factors are involved) that the NTFS filesystem driver will "choke" on partial data (or when you try accessing files that are not there) and force or require a NTFSCHK. It is possible that you will need anyway to run TESTDISK on the "newly made" disk to fix the second copy of the bootsector, but I seem to remember that it won't be needed. Once you (hopefully) got back the "main" files (the ones within the first 137 Gb imaged), and ONLY then, we will try to see what can be done on the original HD. A guess (educated , but still a guess) could be that *somehow* the original disk "self-capped" to 137 Gb. It is something that can happen "generically", I haven't been able to find substantial reports about this issue affecting particularly this specific disk model. You can try using this: http://blog.atola.com/restoring-factory-hard-drive-capacity/ I think that the disk must be connected "directly" (NOT through the USB converter) for this kind of tools to work. The above is a "simplified" user friendly specific tool, a "pro" would most probably use HDAT2: http://www.hdat2.com/ or a similar "lower level" tool, but the good thing is that the Atola tool will either work or fail completely, but shouldn't make things worse if it fails. jaclaz I will let you know how this works out, I've been quite busy over the weekend -
Invalid Partition Table on my 500GB HDD
klinsmann replied to klinsmann's topic in Hard Drive and Removable Media
Sure, that should do nicely. (of course all data - if any - currently on the 1 Tb disk will be lost) If you need help to dd the 137 Gb image to the disk, ask, but if you use dsfi (part of the dsfok toolkit): http://members.ozemail.com.au/~nulifetv/freezip/freeware/ it should be easy unless the Windows 7 - for any reason - creates issues. Be VERY careful about WHICH PhysicalDrive n to use AND be aware that the dsfi (being a complement to dsfo) uses a "reversed" logic in command line: i.e. Good, it should be a "normal" BIOS (seeing the disk as having 255x63 HS geometry) the issue would have been if the BIOS )like many HP's and Lenovo) see the disk internally connected as 240x63 (the USB connected are always seen as 255x63). jaclaz So basically, once this is done I should have full access to the "first" 137 GB and we'll work on how to access the rest of the data, am I right? -
Invalid Partition Table on my 500GB HDD
klinsmann replied to klinsmann's topic in Hard Drive and Removable Media
Let's try and answer all the questions: Image saved and I already managed to save all the necessary info on those 137 GB. I'm guessing the missing data will be located on the "ghost" sectors on that partition. No problem about that, I have a 1TB drive I can use for this purpose (is it OK if I just use this one?). 1. HDD is a Seagate ST950032 5AS (2.5" SATA drive) 2. Laptop is an ASUS-X52J (Core i5) 3. This happened last friday, I started looking for solutions on monday and so far I've managed to save 137 GB of data (which counts for about 60-70% of the vital data stored on that drive). 4. I am currently accesing the drive through a USB to SATA adapter connected to a desktop PC with Windows 7. Tried connecting the drive directly into the PC motherboard through SATA but the LBA48 issue with TestDisk was still there. Thanks jaclaz, let me know what else you might need