Kiavik
About Kiavik

Kiavik's Achievements
0
Reputation
-
Automatic disk partitioning in Autounattend.xml
Kiavik replied to Kiavik's topic in Unattended Windows 7/Server 2008R2
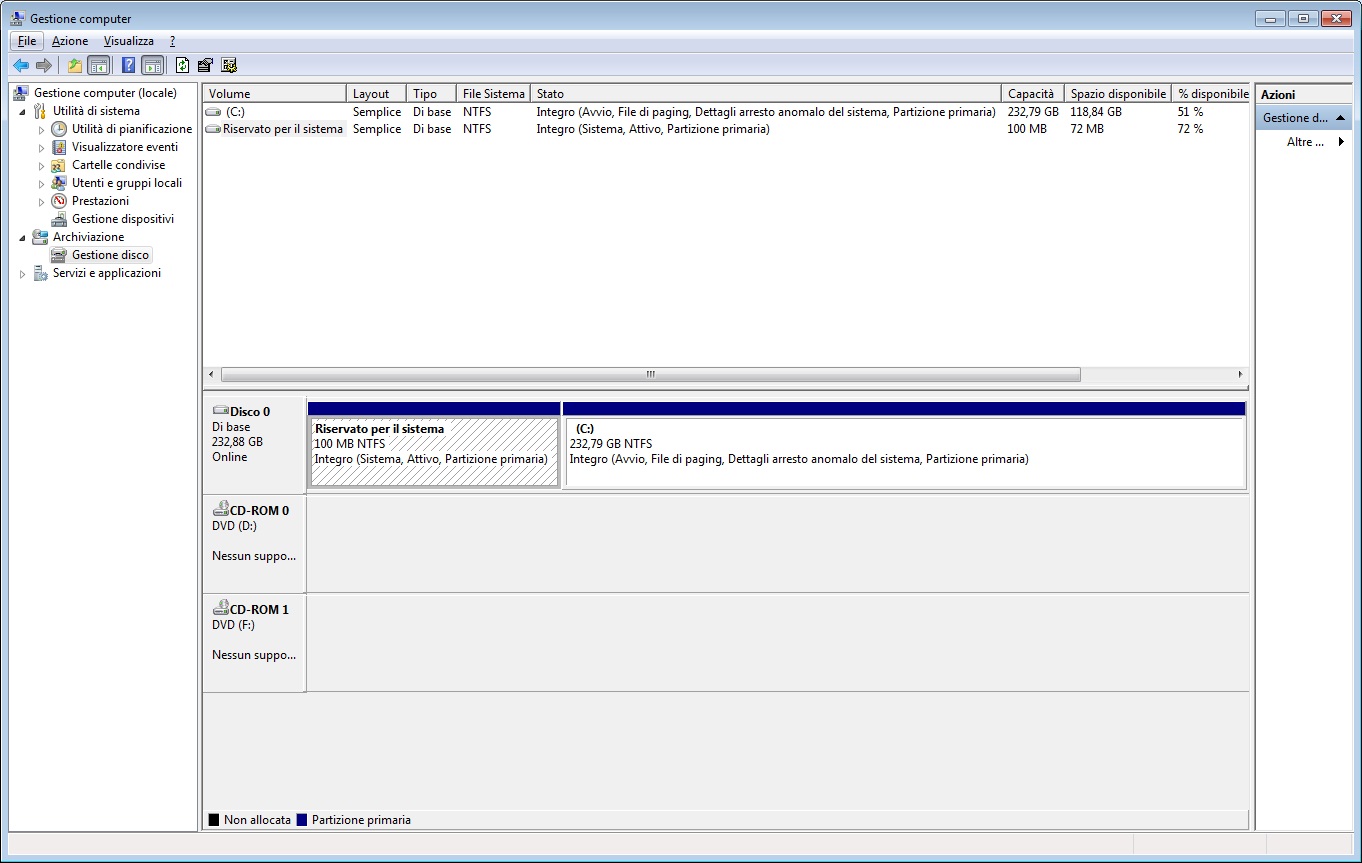
Thank you! I think I found out what was causing the misbehaviour: <ImageInstall> <OSImage> <InstallToAvailablePartition>true</InstallToAvailablePartition> <WillShowUI>OnError</WillShowUI> </OSImage> </ImageInstall> I suppose that setting InstallToAvailablePartition to true caused the setup to try to install the OS in the 100MB System partition assigning it a letter and showing it in My computer. With this xml instead, <component name="Microsoft-Windows-Setup" processorArchitecture="x86" publicKeyToken="31bf3856ad364e35" language="neutral" versionScope="nonSxS" xmlns:wcm="http://schemas.microsoft.com/WMIConfig/2002/State" xmlns:xsi="http://www.w3.org/2001/XMLSchema-instance"> <DiskConfiguration> <WillShowUI>OnError</WillShowUI> <Disk wcm:action="add"> <CreatePartitions> <CreatePartition wcm:action="add"> <Order>1</Order> <Size>100</Size> <Type>Primary</Type> </CreatePartition> <CreatePartition wcm:action="add"> <Order>2</Order> <Extend>true</Extend> <Type>Primary</Type> </CreatePartition> </CreatePartitions> <ModifyPartitions> <ModifyPartition wcm:action="add"> <Active>true</Active> <Format>NTFS</Format> <Label>System</Label> <Order>1</Order> <PartitionID>1</PartitionID> </ModifyPartition> <ModifyPartition wcm:action="add"> <Format>NTFS</Format> <Label>Win7Ent</Label> <Letter>C</Letter> <Order>2</Order> <PartitionID>2</PartitionID> </ModifyPartition> </ModifyPartitions> <DiskID>0</DiskID> <WillWipeDisk>true</WillWipeDisk> </Disk> </DiskConfiguration> <UserData> <AcceptEula>true</AcceptEula> <Organization>Pippo</Organization> </UserData> <ImageInstall> <OSImage> <InstallToAvailablePartition>false</InstallToAvailablePartition> <WillShowUI>OnError</WillShowUI> <InstallTo> <DiskID>0</DiskID> <PartitionID>2</PartitionID> </InstallTo> </OSImage> </ImageInstall> </component> it created both partitions leaving the 100MB hidden with the correct attributes like the DiskOK.jpg picture I posted before. Thanks for the help! -
Automatic disk partitioning in Autounattend.xml
Kiavik replied to Kiavik's topic in Unattended Windows 7/Server 2008R2
I suspected that but I gave it a shot anyway. It seems there is no way to recreate the 100 mb partition the same way the attended setup creates it using the unattended setup. Either you don't create it at all or you create something that is not the same thing. -
Automatic disk partitioning in Autounattend.xml
Kiavik replied to Kiavik's topic in Unattended Windows 7/Server 2008R2
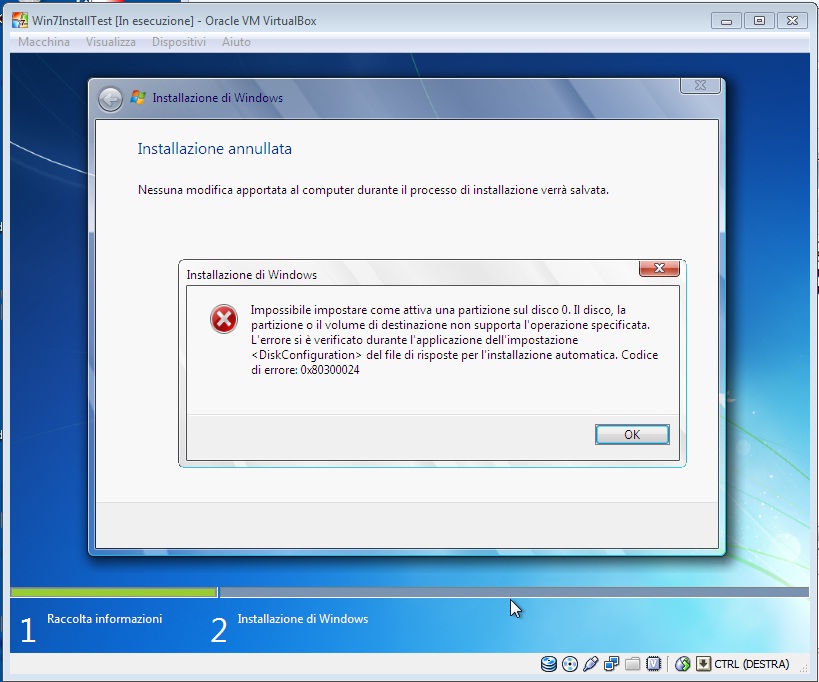
The first working Autounattend.xml file I was able to make was like yours but it didn't create the 100 MB System Reserved partition. This is my pc's disk configuration (installed manually) which has the 100 MB System Reserved partition: I tried this xml: <DiskConfiguration> <WillShowUI>OnError</WillShowUI> <Disk wcm:action="add"> <CreatePartitions> <CreatePartition wcm:action="add"> <Extend>true</Extend> <Type>Primary</Type> <Order>2</Order> </CreatePartition> <CreatePartition wcm:action="add"> <Order>1</Order> <Size>100</Size> <Type>MSR</Type> </CreatePartition> </CreatePartitions> <ModifyPartitions> <ModifyPartition wcm:action="add"> <Active>true</Active> <Format>NTFS</Format> <Label>Win7Ent</Label> <Letter>C</Letter> <Order>2</Order> <PartitionID>2</PartitionID> </ModifyPartition> <ModifyPartition wcm:action="add"> <Active>true</Active> <Format>NTFS</Format> <Label></Label> <Order>1</Order> <PartitionID>1</PartitionID> <TypeID>e3c9e316-0b5c-4db8-817d-f92df00215ae</TypeID> </ModifyPartition> </ModifyPartitions> <DiskID>0</DiskID> <WillWipeDisk>true</WillWipeDisk> </Disk> </DiskConfiguration> but it's a mix between BIOS and UEFI unattended file so I get this error: which means "Unable to set as active a partition on disk 0. The destination disk, partition or volume doesn't support the specified operation. The error occurred while applying the <DiskConfiguration> section of the answer file." I also tried to set the TypeID in the ModifyPartition tag to 0x27 which means Utility Partition (the help says it's used for "Recovery tools such as Windows RE and other system utilities."), the resulting partition was hidden but didn't have the same attributes as the partition in the DiskOK.jpg picture. I really have no idea how to recreate the 100mb partition that is automatically created while performing an attended setup and can't find any info about it...
-
Automatic disk partitioning in Autounattend.xml
Kiavik replied to Kiavik's topic in Unattended Windows 7/Server 2008R2
I have bios based systems but I tried the xml you gave me on a virtual machine and it created the D: partition. In case I am wrong, how can I see if a system is UEFI-based? -
Automatic disk partitioning in Autounattend.xml
Kiavik replied to Kiavik's topic in Unattended Windows 7/Server 2008R2
Thanks for your reply but unfortunately the xml you proposed works only partially, it does create the system partition but it shows up in My Computer as a D: drive and in disk management it says "System D: (Healty, Primary Partition)" while on my workstation (installed manually) it shows up as "System Reserved (Healty, System, Primary Partition)". When you install windows manually and you repartition the drive the setup automatically creates the System Reserved partition which doesn't show up in My Computer. Has anyone been able to recreate the standard setup behaviour in an unattended setup? -
Hello! I'm trying to make an fully unattended Windows 7 Enterprise DVD but I'm already struggling in the first steps like the disk partitioning... Since I'll be using this dvd to install Win7Ent on different HW, I don't know the size of the disk thus I just want the unattended setup to create a single partition that fills the whole disk; the xml file I've created is as follows: <settings pass="windowsPE"> <component name="Microsoft-Windows-Setup" processorArchitecture="x86" publicKeyToken="31bf3856ad364e35" language="neutral" versionScope="nonSxS" xmlns:wcm="http://schemas.microsoft.com/WMIConfig/2002/State" xmlns:xsi="http://www.w3.org/2001/XMLSchema-instance"> <DiskConfiguration> <WillShowUI>OnError</WillShowUI> <Disk wcm:action="add"> <CreatePartitions> <CreatePartition wcm:action="add"> <Extend>true</Extend> <Type>Primary</Type> <Order>1</Order> </CreatePartition> </CreatePartitions> <ModifyPartitions> <ModifyPartition wcm:action="add"> <Active>true</Active> <Extend>true</Extend> <Format>NTFS</Format> <Label>Win7Ent</Label> <Order>1</Order> </ModifyPartition> </ModifyPartitions> <DiskID>0</DiskID> <WillWipeDisk>true</WillWipeDisk> </Disk> </DiskConfiguration> <UserData> <AcceptEula>true</AcceptEula> <Organization>Contoso</Organization> </UserData> <ImageInstall> <OSImage> <InstallToAvailablePartition>true</InstallToAvailablePartition> <WillShowUI>OnError</WillShowUI> </OSImage> </ImageInstall> </component> <component name="Microsoft-Windows-International-Core-WinPE" processorArchitecture="x86" publicKeyToken="31bf3856ad364e35" language="neutral" versionScope="nonSxS" xmlns:wcm="http://schemas.microsoft.com/WMIConfig/2002/State" xmlns:xsi="http://www.w3.org/2001/XMLSchema-instance"> <SetupUILanguage> <UILanguage>it-IT</UILanguage> </SetupUILanguage> <UILanguage>it-IT</UILanguage> <UserLocale>it-IT</UserLocale> <SystemLocale>it-IT</SystemLocale> <InputLocale>it-IT</InputLocale> </component> </settings> Does anyone knows how to make it work? Thanks to all who can help
-
RT Seven Lite - RC build 1.7.0 and Beta build 2.6.0
Kiavik replied to bensam56's topic in Unattended Windows 7/Server 2008R2
You can also read post #1435 http://www.msfn.org/board/topic/142382-rt-seven-lite-rc-build-170-and-beta-build-260/page__st__1420 Cheers. Thanks for the replies, I managed to make an OS only self installing DVD, now I was trying to automatically install Office 2010, 7-zip and adobe reader but the only one I was able to install was 7-zip. The office was not installed because the only file that was put in the image was the setup.exe... How can I tell RT Seven Lite to put in the DVD ISO all the office related files? Another question: after I create an image all the controls for customizing the image are disabled and I have to quit and reopen, doing so I have to reload all the files from the original Win7 cd and reintegrate the SP1 which takes alot of time, is thereanother way to resume from where it was left? I realize I may be asking dumb question but I wasn't able to find a manual for this program, there is one out there? Thanks for your patience -
RT Seven Lite - RC build 1.7.0 and Beta build 2.6.0
Kiavik replied to bensam56's topic in Unattended Windows 7/Server 2008R2
Hello, I have a stupid question about RT Seven Lite, I've tried to look in the faq on their website but the question still remains... In the Features Removal section, on the Default Features side on the right, if the checkbox are checked does it mean that they are enabled? Or by checking them I disable them? Both in the help and on the website it's not specified wether selected means disabled or enabled... On the website it says: "Default Features: Right side section shows you the complete list of windows default features which you can see after windows installation from Control Panel. You can either Enable or Disable a windows feature but this will not remove permanently from windows." But it's not clear if selecting enables or disables... So if I select Telnet Client will I enable or disable it? Thanks