About Rico.JohnnY

- Birthday 10/20/1981
Contact Methods
-
Website URL
http://
Profile Information
-
OS
Windows 7 x64
Recent Profile Visitors
Rico.JohnnY's Achievements
1
Reputation
-

Deploying IE 10 for Windows 7
Rico.JohnnY replied to gotenks98's topic in Unattended Windows 7/Server 2008R2
This tweak works fine for me ;IE10 - Disable first run wizard: 1 to homepage, 2 to welcome page, to enable just to remove the value [HKEY_CURRENT_USER\Software\Policies\Microsoft\Internet Explorer\Main] "DisableFirstRunCustomize"=dword:00000001 [HKEY_LOCAL_MACHINE\SOFTWARE\Policies\Microsoft\Internet Explorer\Main] "DisableFirstRunCustomize"=- [HKEY_LOCAL_MACHINE\SOFTWARE\Wow6432Node\Policies\Microsoft\Internet Explorer\Main] "DisableFirstRunCustomize"=- -
Not sure if this tweak has been posted before since it's a bit different from the one of Office 2010, I saw this tweak from Office 2013 Administrative Templates(admx) days ago. For Office 2013 ; Disable Office First Run [HKEY_CURRENT_USER\Software\Microsoft\Office\15.0\FirstRun] "BootedRTM"=dword:00000001 ; Disable First Run movie "disablemovie"=dword:00000001 ; Disable First Run Opt-in Wizard [HKEY_CURRENT_USER\Software\Microsoft\Office\15.0\Common\General] "shownfirstrunoptin"=dword:00000001 ;Trust Center - Privacy Options - "Sign up for the Customer Experience Improvemet Program" - Disabled [HKEY_CURRENT_USER\Software\Microsoft\Office\15.0\Common\PTWatson] "PTWOptIn"=dword:00000000 [HKEY_CURRENT_USER\Software\Microsoft\Office\15.0\Common] "qmenable"=dword:00000000 For Office 2010 ; Disable First Run Opt-in Wizard [HKEY_CURRENT_USER\Software\Microsoft\Office\14.0\Common\General] "shownfirstrunoptin"=dword:00000001 "FirstRun"=dword:00000000 ;Trust Center - Privacy Options - "Sign up for the Customer Experience Improvemet Program" - Disabled [HKEY_CURRENT_USER\Software\Microsoft\Office\14.0\Common\PTWatson] "PTWOptIn"=dword:00000000 [HKEY_CURRENT_USER\Software\Microsoft\Office\14.0\Common] "qmenable"=dword:00000000 Personally I prefer using config.xml for Office 2013 deployment to the method of using OCT, due to its scriptable and fast-editing capability, here's the sample of config.xml for those who are intereted. To invoke, navigate to Office install source and run setup.exe /config config.xml As for me, a batch is used to implement multi-architecture deployment based on computer name. CD /D "%~dp032bit" IF /I %PROCESSOR_ARCHITECTURE% == amd64 CD /D "%~dp064bit" setup.exe /config "%~dp0%COMPUTERNAME%.xml" config.xml <Configuration Product="ProPlusr"> <Display Level="basic" CompletionNotice="no" SuppressModal="yes" AcceptEula="yes" /> <AddLanguage Id="en-us" ShellTransform="yes"/> <AddLanguage Id="zh-cn" /> <!-- <Logging Type="standard" Path="%temp%" Template="Microsoft Office Professional Plus Setup(*).txt" /> --> <USERNAME Value="blah" /> <COMPANYNAME Value="blah" /> <PIDKEY Value="Office product key with no hyphen" /> <!-- <INSTALLLOCATION Value="%programfiles%\Microsoft Office" /> --> <!-- <LIS CACHEACTION="CacheOnly" /> --> <!-- <LIS SOURCELIST="[/size][url="file://\\server1\share\Office;\\server2\share\Office"][size="2"]\\server1\share\Office;\\server2\share\Office[/size][/url][size="2"]" /> --> <!-- <DistributionPoint Location="[/size][url="file://\\server\share\Office"][size="2"]\\server\share\Office[/size][/url][size="2"]" /> --> <!--Access--> <OptionState Id="ACCESSFiles" State="absent" Children="force" /> <!--Excel--> <OptionState Id="EXCELFiles" State="local" Children="force" /> <!--InfoPath--> <OptionState Id="XDOCSFiles" State="local" Children="force" /> <!--Lync--> <OptionState Id="LyncCoreFiles" State="absent" Children="force" /> <!--OneNote--> <OptionState Id="OneNoteFiles" State="local" Children="force" /> <!--Outlook--> <OptionState Id="OUTLOOKFiles" State="local" Children="force" /> <!--PowerPoint--> <OptionState Id="PPTFiles" State="local" Children="force" /> <!--Publisher--> <OptionState Id="PubPrimary" State="absent" Children="force" /> <!--SkyDrive Pro--> <OptionState Id="GrooveFiles2" State="local" Children="force" /> <!--Visio Viewer--> <OptionState Id="VisioPreviewerFiles" State="absent" Children="force" /> <!--Word--> <OptionState Id="WORDFiles" State="local" Children="force" /> <!--Shared Files--> <OptionState Id="SHAREDFiles" State="local" Children="force" /> <!--Tools--> <OptionState Id="TOOLSFiles" State="local" Children="force" /> <Setting Id="SETUP_REBOOT" Value="never" /> <!-- <Command Path="%windir%\system32\msiexec.exe" Args="/i [/size][url="file://\\server\share\my.msi"][size="2"]\\server\share\my.msi[/size][/url][size="2"]" QuietArg="/q" ChainPosition="after" Execute="install" /> --> </Configuration>
-
1. Download TUU setup file from official site, and install once 2. Go to "C:\Windows\Installer" (Installer folder is hidden by default) , sort files by "Date modified" in descent order, copy the top two MSI files to a workplace. The smaller one "f21114.msi" is language file whose size is 2.69MB(en-US), the other one "f2111e.msi" is main setup file and size is 22.9MB, filenames may differ in your case. 3.setup commands: MsiExec /norestart /qn /i f21114.msi MsiExec /norestart /qn /i f2111e.msi LANGSTRING=en-US PIDKEY=xxxxxx-xxxxxx-xxxxxx-xxxxxx-xxxxxx-xxxxxx AUTOUPDATE=0 CHECKUPDATE=0 PINONTASKBARW7=0 PINONTASKBAR=0 LAUNCHTUU=0 INSTALLINTEGRATORDESKTOP=1 INSTALLONECLICKDESKTOP=1 INSTALL_DSE_SHELLEXT=1 INSTALLSHELLEXT=1 PINONTASKBARW7: pin TUU to Taskbar (win7) PINONTASKBAR: quicklaunch shortcut switch(not sure) LAUNCHTUU: launch TUU after installation INSTALLINTEGRATORDESKTOP: TUU desktop icon INSTALLONECLICKDESKTOP: 1-Click Maintenance desktop icon INSTALL_DSE_SHELLEXT: TUU Disk Space Explorer shell extension INSTALLSHELLEXT: TUU other shell extesions, such as TuneUp Shredder,TuneUp Undelete etc.
-

"Always ask before opening this file" during install
Rico.JohnnY replied to bigred's topic in Application Installs
or apply this to affect the global. ; Disable the "Open file - Security Warning" [HKEY_CURRENT_USER\Software\Microsoft\Windows\CurrentVersion\Policies\Associations] "LowRiskFileTypes"=".bat;.cmd;.exe;.msi;.reg;.vbs;" -

[Walkthrough] Nero Multimedia Suite 11 Platinum
Rico.JohnnY replied to Rico.JohnnY's topic in Application Installs
Updated to Nero 11. -

Silent Switch for Intel HD Graphic Driver
Rico.JohnnY replied to nice_guy75's topic in Application Installs
Here's mine: setup.exe -s -l 0009 -res 1280x800x32x60 -overwrite and registry tweak,apply it before install the setup.exe. [HKEY_CURRENT_USER\Software\Intel\Display\igfxcui\igfxtray\TrayIcon] "ShowTrayIcon"=dword:00000000 [HKEY_CURRENT_USER\Software\Intel\Display\igfxcui\hkcmd\resources] "UserLangID"="ENU" -

Unlocker 1.90 silent install script for Windows
Rico.JohnnY replied to Rico.JohnnY's topic in Application Installs
Bug fixed, sorry for the inconvenience. Remember to reboot the system after uninstallation to get the deletion of in-use-files to take effect. If u don't need the UnlockerAssistant.exe, just commend out the lines from "INSTALL_UNLOCKER.inf" as follows: ;UnlockerAssistant.exe = 1 ;UnlockerAssistant.exe,,,0x10009 ;HKLM,SOFTWARE\Microsoft\Windows\CurrentVersion\Run,UnlockerAssistant,,"%16422%\%PROGRAM_FLDR%\UnlockerAssistant.exe" and change the line ProfileItems = Shortcut.Readme.txt, Shortcut.Unlocker.exe, Shortcut.Assistant.exe, Shortcut.Unlocker.url to ProfileItems = Shortcut.Readme.txt, Shortcut.Unlocker.exe, Shortcut.Unlocker.url -

User Profile Redirection
Rico.JohnnY replied to Rico.JohnnY's topic in Unattended Windows 7/Server 2008R2
Bug fixed. -

[Walkthrough] Nero Multimedia Suite 11 Platinum
Rico.JohnnY replied to Rico.JohnnY's topic in Application Installs
I am considering making some improvement in the source script and sharing it. -

Unlocker 1.90 silent install script for Windows
Rico.JohnnY replied to Rico.JohnnY's topic in Application Installs
This script will install unlocker without any addonds & toolbars. -

User Profile Redirection
Rico.JohnnY replied to Rico.JohnnY's topic in Unattended Windows 7/Server 2008R2
Maybe the error was caused by the exclamation from the path "C:\!custom\moveshl.cmd", try renaming it and retrying. Theoretically speaking, you only need to add junction point to the top level folder if all its sub-folders inherit permissions from its parent. -
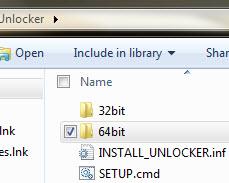
Changelog: 2012-2-22: Update to 1.9.1, resolve the issue that shell extension couldn't be unregistered. Installation: 1. Install unlocker using official installer. 2. Grab all files(exclude uninst.exe) within "%programfiles%\unlocker", then place them in 32bit/64bit folder according to current system architecture. 3. Uninstall unlocker, then run "setup.cmd" with elevated privilege to re-install. 4. To change unlocker's display language, open "setup.cmd" with notepad, change the second line "SET LANG=1033" to your prefered language ID(default is 1033). Uninstallation: Go to control panel and use the "Add/remove programs". Unlocker_Inst.rar
-

User Profile Redirection
Rico.JohnnY replied to Rico.JohnnY's topic in Unattended Windows 7/Server 2008R2
Currently not. I am considering adding support to such folders in the future , but now i need more test to ensure no side effects will arise by doing this.


