the_doc735
Content Type
Profiles
Forums
Events
Everything posted by the_doc735
-
@jaclaz This definition is from answers.com. They describe an item in a way that the layman can understand. Ordinary language NOT technical or professional language.
-
They might be enabled by default, BUT WHAT ARE THEY PLEASE? [example answer] Command extensions are...... i.e. that's like saying a chef uses a frying pan. A chef may use a frying pan, but what is it? A shallow, long-handled, circular metal container, usually 8, 10 and 12 inches in diameter; used for frying food. Also called skillet; also called regionally fry pan, spider. Hope you understand me better now? many thanks!
-
@ Yzowl thanks for the info!! Also: "If Command Extensions are enabled " ...could you explain/define what is meant by this statement please? [thanks]. I know what file extensions are, but not command extensions? I've googled "what are command extensions?" and "command extensions explained" and "command extensions" but no immediate answer seems to be available. Microsoft talk about command extensions but without explaining exactly what they are?
-
@crahak well I have received plenty of positive email's for my posts! enjoy your rant! (this too shall pass)
-
/AR how is this actually written in practice please? i.e. spacing and colon : e.g. /A : R /A:R /A: R /A :R ...etc. Cheers!
-
can anyone do a few examples of usage for this command please? I know: DEL /S /Q %SYSTEMDRIVE%\*.log (for example) "BUT!"..... I need to know how to use the attributes R S H A IN THE LINE Would it be: DEL /S /Q /A : R S H A %SYSTEMDRIVE%\*.log OR DEL /S /Q /A:RSHA %SYSTEMDRIVE%\*.log OR DEL /S /Q /A: /R /S /H /A %SYSTEMDRIVE%\*.log
-
sorry, was only trying to be helpful. But as I'm obviously being ridiculed for my posts and info isn't wanted or welcomed on here I will take your advice and STOP posting. i.e. instead of thanks for the info I get "this isn't new" etc etc. Oh well, at least I tried. I'll stick to reading unless I get stuck. Trouble is no one answers your questions anyway. It's all very well saying "that's because the answers are here already" but what use is that if it's like looking for needles in a hay stack? (i.e. things strewn all over the place). Some people don't have the time to search for hours on end. Those kind of people would appreciate someone's attempt to correlate info. ADMIN - PLEASE MOVE MY 'ABOVE' POST TO THE APPROPRIATE SECTION OR DELETE IT, IF IT'S NOT WANTED?
-
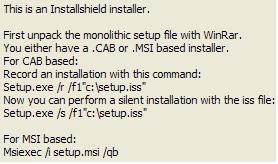
Automating InstallShield InstallShield's ability to perform unattended installations is exciting. InstallShield is popular because it lets you perform unattended installations of many applications. InstallShield's unattended capability, and the ease with which you can use it, isn't a new development. The company doesn't publicize this functionality, however, except as buried in the support documents. "HOWTO: Creating a Silent Installation," an article on InstallShield Software's support site at http://support.installshield.com, reveals the secret to automating InstallShield-based application installations: the -r and -s switches. You perform a typical installation of your InstallShield-based application to create a template for automated installations. However, starting the setup.exe command with the -r option records your responses to the installation panels. This option instructs the installation routine to write your responses to an InstallShield Silent Response File (.iss). Even when you use the -r option, InstallShield diligently installs the application on your computer. After the installation program writes the .iss file, I recommend that you immediately remove the application from your system. InstallShield automatically puts the .iss file it writes into your Windows folder, which isn't necessarily the first place you'd look for the file. Copy the setup.iss file from your Windows folder to the same directory as the application's source code, then use the -s switch with setup.exe to reinstall the application, this time in silent mode. Silent installations (or unattended installations that use your recorded responses) work for most InstallShield-based applications, of which many are on the market. However, InstallShield Software documents scenarios in which silent installations might not work, such as with applications that use custom installation dialog boxes that aren't programmed to obey the -r command. Fortunately, I haven't encountered any InstallShield-based installations I couldn't run in silent mode. Nevertheless, you need to test the application's silent installation before you incorporate the commands into the [GuiRunOnce] section of your unattended installation file. Whether you see dialog boxes, prompts, or graphics after you start the InstallShield silent installation depends on the application's installation routine. You'll probably see increased hard disk activity while the installation proceeds. Knowing when the installation process is finished, however, can be difficult; look on the Windows Start menu or in Windows Task Manager to verify the installation. If, when you run the silent installation, your application doesn't install properly, look for error messages in the setup.log file that the installation process creates. The silent installation process writes into this log file status codes that you can use for troubleshooting. InstallShield Software's documentation about silent setups contains information about error messages you might find. If your application installs correctly, you can then use the -s option in the [GuiRunOnce] section, as the following example shows: "setup.exe -s" For more information about the [GuiRunOnce] section of unattended installation files and other options for automating your installations, see Sean Daily, " Customizing Unattended Win2K Installations,". B)
-
Using Cmdlines.txt The Cmdlines.txt file contains the commands that GUI mode executes when installing optional components, such as applications that must be installed immediately after Windows is installed. If you plan to use Cmdlines.txt, you need to place it in the \$OEM$ subfolder of the distribution folder. If you are using Sysprep, place Cmdlines.txt in the \$OEM$\$1\Sysprep subfolder. Use Cmdlines.txt when the following conditions exist: The syntax for Cmdlines.txt is as follows: [Commands] " command_1 " " command_2 " . . " command_x " Parameters are defined as follows: When using Cmdlines.txt, be aware of the following: • You are installing from the \$OEM$ subfolder of the distribution folder. • The application that you are installing has the following properties: – Or – • It does not configure itself for multiple users—for example, Microsoft® Office 95. • It is designed to be installed by one user and to replicate user-specific information. • " command_1 ", " command_2 ", ... " command_x " refers to the commands you want to run (and in what order) when GUI mode calls Cmdlines.txt. Note that all commands must be in quotation marks. • When the commands in Cmdlines.txt are carried out during Setup, there is no logged-on user and there is no guaranteed network connectivity. Therefore, user-specific information is written to the default user registry, and all subsequently created users also receive that information. • Cmdlines.txt requires that you place the files that are necessary to run an application or tool in directories that are accessed during the Setup process, which means that the files must be on the hard disk. B)
-
Using the [GuiRunOnce] Section of the Answer File The [GuiRunOnce] section of the answer file contains a list of commands that run the first time a user logs on to the computer after Setup runs. For example, you enter the following line to the [GuiRunOnce] section to start the application installation program automatically: [GuiRunOnce] "%systemdrive%\ <appfolder>\<appinstall> -quiet" If you plan to use [GuiRunOnce] to initiate an installation, there are some additional factors to take into consideration: If the application forces a reboot, determine whether there is a way to suppress the reboot. This is important because any time the system restarts, all previous entries in the [GuiRunOnce] section are lost. If the system restarts before completing entries previously listed in the [GuiRunOnce] section, the remaining items will not be run. If there is no way within the application to suppress a reboot, you can try repackaging the application into a Windows Installer package There are third-party products that provide this functionality. Windows 2000 ships with WinINSTALL LE (Limited Edition), a repackaging tool for Windows Installer. WinINSTALL LE allows you to efficiently repackage pre-Windows Installer applications into packages that can be distributed with Windows Installer. For more information about WinINSTALL LE, see the \Valueadd\3rdparty\Mgmt\Winstle folder on the Windows 2000 Server CD. For more information about Windows Installer packaging, see "Automating Client Installation and Upgrade" in this book. Important If you are installing an application to multiple localized language versions of Windows 2000, it is recommended that you test the repackaged application on the localized versions to ensure that it copies the files to the correct locations and writes the required registry entries appropriately. If an application requires a Windows Explorer shell to install, the [GuiRunOnce] section will not work because the shell is not loaded when the Run and RunOnce commands are carried out. Check with the application vendor to determine if they have an update or patch that can address this situation for the application setup. If not, you can repackage the application as a Windows Installer package or use another means of distribution. Applications that use the same type of installation mechanism might not run properly if a /wait command is not used This can happen when an application installation is running and starts another process. When the Setup routine is still running, initiating another process and closing an active one might cause the next routine listed in the RunOnce registry entries to start. Because more than one instance of the installation mechanism is running, the second application will usually fail. For an example of how to control this using a batch file, see "Using a Batch File to Control How Multiple Applications Are Installed" later in this chapter. Using Application Installation Programs The preferred method for preinstalling an application is to use the installation routine supplied with the application. You can do this if the application that you are preinstalling is able to run in quiet mode (without user intervention) by using a /q or /s command-line switch. See the application Help file or documentation for a list of command-line parameters supported by the installation mechanism. Following is an example of a line that you can place in the [GuiRunOnce] section to initiate the unattended installation of an application using its own installation program. <path to setup> \ Setup.exe /q Setup parameters vary between applications. For example, the /l parameter included in some applications is useful when you want to create a log file to monitor the installation. Some applications have commands that can keep them from restarting automatically. This is useful in helping to control application Page Using the [GuiRunOnce] Section of the Answer File e 1 of 2 http://www.microsoft.com/technet/prodtechn.../deploy/dgcb_... 29/09/2006 installations with a minimal number of reboots. Make sure that you check with the application vendor for information, instructions, tools, and best practices information before you preinstall any application. Important You must meet the licensing requirements for any application that you install, regardless of how you install it. Top of page Using a Batch File to Control How Multiple Applications Are Installed If you want to control how multiple applications are installed, you can create a batch file that contains the individual installation commands and uses the Start command with the /wait command line switch. This method ensures that your applications install sequentially and that each application is fully installed before the next application begins its installation routine. The batch file is then run from the [GuiRunOnce] section. The following procedure explains how to create the batch file, how to install the application, and then how to remove all references to the batch file after installation is complete. To install applications using a batch file 1. Create the batch file containing lines similar to the following example: Start /wait <path to 1st application>\<Setup> <command line parameters> Start /wait <path to 2nd application>\<Setup> <command line parameters> Exit where: • <path> is the path to the executable file that starts the installation. This path must be available during Setup. • <Setup> is the name of the executable file that starts the installation. • <command line parameters> are any available quiet-mode parameters appropriate for the application you want to install. 2. Copy the batch file to the distribution folders or another location that can be accessed during setup. 3. With <filename>.bat as the name of the batch file, include an entry in the [GuiRunOnce] section of the answer file to run the batch file, similar to the following example. This example assumes that the batch file was copied to the Sysprep folder on the local hard disk, though it can be located anywhere that Setup has access to during an installation. [GuiRunOnce] "%systemdrive%\sysprep\<filename>.bat" "<path-1>\<Command-1>.exe" " < path-n>\<Command-n>.exe" "%systemdrive%\sysprep\sysprep.exe –quiet" where: • <path-1>\<Command-1.exe> and <path-n>\<Command-n.exe> are fully qualified paths to additional applications or utility installations or configuration tools. This can also be a path to another batch file. These paths must be available during setup.
-
FOR WINXP.SP2... ...you need to amend the presetup.cmd file (from serialzs post): Remove LAST line... REM Scanning for driverdirectories %systemroot%\system32\DevPath.exe %systemdrive%\\Driverz if exist setup.exe ren setup.exe setupold.exe cmd /c "del /f /q *.~xc" start /WAIT setuporg.exe -newsetup Then add 3 lines indicated by "<- - ->" (but don't include <>)... REM Scanning for driverdirectories %systemroot%\system32\DevPath.exe %systemdrive%\\Driverz if exist setup.exe ren setup.exe setupold.exe <if exist setupORG.exe ren setupORG.exe setup.exe> cmd /c "del /f /q *.~xc" <start /WAIT setup.exe -newsetup> <RD /Q /S %SystemDrive%\drivers> Save file (in same place).
-
Q: What service pack is on my source disk? A: Look at the root of the disk. WIN51 = Both Win XP and Server 2003 have this file (Doesn't appear to be required for booting) WIN51IP = Win XP Pro WIN51IP.SP1 = Win XP Pro SP1 WIN51IP.SP2 = Win XP Pro SP2 WIN51IC = Win XP Home WIN51IC.SP1 = Win XP Home SP1 WIN51IC.SP2 = Win XP Home SP2 WIN51IP2 = Windows XP Media Center and Tablet Edition WIN51IL = Small Business server 2003 WIN51ID = Data Center Server 2003 WIN51IA = Enterprise Server 2003 WIN51IS = Standard Server 2003 WIN51IB = Web Server 2003 Server 2003 follows the same conventions with the filename appended with SP and the service pack # These files are also required on your boot CD, if they're missing you'll see errors such as: You're missing the main identifier file, WIN51IP for example. You're missing the service pack identifier file, WIN51IP.SP2 for example.
-
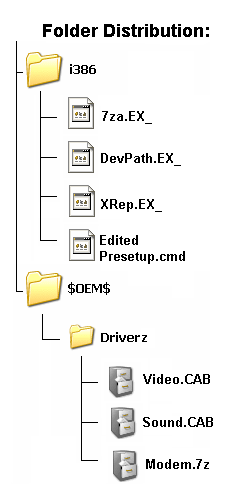
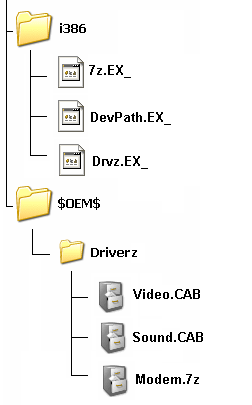
This is what you have to do: [pyron] 1. download the following file: (updated: 12. Sep 2004) SETUP.ZIP (2.62k) (from: http://www.msfn.org/board/index.php?act=At...ost&id=2373), in pyron's post (@:http://www.msfn.org/board/index.php?s=&...st&p=164266) to a temp./working folder (you must also create and name this folder, e.g. pyron's method). Use .7z util to extract the zip into this folder so that you end up with the setup.exe file. Use makecab at the run cmd (from start menu) to compress this file, like so: makecab "your path"\SETUP.EXE "your path"\SETUP.EX_ 3. go to "your path"\I386\ folder and uncab original SETUP.EX_ like this: expand "your path"\I386\SETUP.EX_ "your path"\I386\SETUPORG.EXE 4. copy pyron's SETUP.EX_ to "your path" \I386\ folder and overwrite the old (original) one. 7. edit TXTSETUP.SIF (this is in: "your path" \I386\ folder) by adding the following line directly under [sourceDisksFiles]: setupORG.exe = 1,,,,,,,2,0,0 -------------------------------------------------------------------------------------- [serialzs] 1. Just follow Instructions 1,3,4 & 7 in Pyron's Method (@: http://www.msfn.org/board/index.php?showtopic=12566), then... 2. Download the .cab file (from: http://cc.domaindlx.com/zaqs/download/Guide4Driver.cab), in serialzs' opening post (@: http://www.msfn.org/board/index.php?showtopic=25601) and extract that .cab to a temp./working folder (you must also create and name this folder, e.g. serialzs' method). 3. copy serialzs' presetup.cmd "ONLY!" (i.e. not pyron's as well) to "your path" \I386\ folder, together with 7za.ex_, XRep.ex_, DevPath.ex_ (from the .cab file you downloaded in serialzs' opening post).SEE BELOW FOR WINXP.SP2... 4. Compress your driver files as *.7z files. Only select "THE FILES THEMSELVES" inside each driver folder and name each *.7z file accordingly (e.g. video.7z, audio.7z, modem.7z etc): (.7z download). 5. Put the *.7z files you created inside a folder and name it -> Driverz, (you must also create this folder!). 6. create a folder named -> $OEM$ inside your root CD-folder (e.g. XPCD) and then copy your new Driverz folder into it. 7. edit TXTSETUP.SIF (this is in: "your path" \I386\ folder) by adding the following 4 lines directly under [sourceDisksFiles]: 7za.exe = 1,,,,,,,2,0,0 Presetup.cmd = 1,,,,,,,2,0,0 XRep.exe = 1,,,,,,,2,0,0 DevPath.exe = 1,,,,,,,2,0,0 8. Edit Winnt.SIF (this is in: "your path" \I386\ folder) by adding the following 2 lines directly under [unattended]: DriverSigningPolicy = Ignore NonDriverSigningPolicy = Ignore ------------------------------------------------------------------------------------------ REMARK: ...note that the tagfile (in presetup.cmd) might be different for you. You may have to change it to: set tagfile=\win51ip.SP2 OR "WIN51", "WIN51IP", "WIN51IP.SP1" etc. depending on your 'XP' version. ALL CREDIT FOR THIS GOES TO: MADMUNGO Guide For Compressed Drivers Unattended Install THIS METHOD DOES NOT USE "DRVZ.EXE"
-
is there a way to replace win xp default monitor driver
the_doc735 replied to the_doc735's topic in Device Drivers
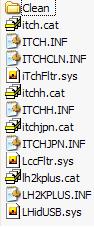
@schalti ...do you know what command lines to use to change default monitor to LG flatron L1915S? What to call the file? Where to put the file? and how to tell windows where to find it? Oh - and where to put devcon on the windows CD? Or anyone else know? many thanks! -
deleted
-
is there a way to replace win xp default monitor driver
the_doc735 replied to the_doc735's topic in Device Drivers
devcon.exe? - ummm......what's that??? there are two certificates in the 'path' under properties> digital signature & counter signature, apparently they can be installed manually with a few mouse clicks? I thought all this would be done automatically though from the *.inf file??? thanks again! -
Guide For Compressed Drivers Unattended Install
the_doc735 replied to serialzs's topic in Device Drivers
[quote name='madmungo' post='229779' date='Dec 4 2004, 07:29 AM']Hi guys I have no problems whatsoever. Everything works like a charm. Here is what I did. 1. Download the file in serialz opening post and extract.......[/quote] take a look at this please: [url="http://www.msfn.org/board/index.php?showtopic=83405"]http://www.msfn.org/board/index.php?showtopic=83405[/url] I was puzzled to say the least!! Many thanks for the clarification and making one complete method out of pyron's + serialzs 'bits and bobs' that are strewn about everywhere! -
Guide For Compressed Drivers Unattended Install
the_doc735 replied to serialzs's topic in Device Drivers
[quote name='InViSibLe Gr' post='481076' date='Mar 18 2006, 07:52 AM']can anyone re-upload the file? it doesnt exists anymore in the link from the 1st post [quote name='Wile.E' post='236042' date='Dec 17 2004, 08:21 AM'] It's possible to use this method also with the Bâshrat the Sneaky's DriverPacks method?[/quote]can anyone answer this plz? [/quote] @ invisible It looks to me as if this board is in decline or something? If you notice , most of the expert comments and developments are 2003/4!!! Substantially less in 2005 and even less in 2006. Seems as if they have all drifted off and abandoned ship? If you look at the experts profiles quite a few have not logged on to this site for several months now! There are an awful lot of people looking for answers but no ones around anymore to give help and support. Guess they're all fed up? -
deleted
-
is there a way to replace win xp default monitor driver
the_doc735 replied to the_doc735's topic in Device Drivers
Just add the signed (!) driver(s) for your monitor(s). Any unsigned monitor driver will be ranked lower by setupapi.dll than the default monitor driver. what is the method for adding this driver to the XP CD so that it will appear in the device manager on first boot by default (i.e. without manual intervention; e.g. update driver section). At the moment, when I go to the device manager (for the first time) it always comes up with 'default monitor' even though my monitor driver has been placed in windows by the 'drivers from CD-SIMPLE METHOD 1,2,3). Indeed, it is available to select manually from the list BUT I WANT IT TO BE THE DEFAULT RIGHT FROM THE VERY START! There is a cat. inf. and ICM file for my LG flatron L1915S monitor. -
Guide For Compressed Drivers Unattended Install
the_doc735 replied to serialzs's topic in Device Drivers
[quote name='serialzs' post='175178' date='Aug 24 2004, 10:32 AM']@all Here is the new guide, a more EASY to USE... If you're having any trouble I am willing to help... -=[serialzs]=- im really sorry for the DRVZ.EXE... i dont know the rules of scanning hardware that tym... NOW Heres the new Guide try it...[/quote] YOU SAY IN YOUR GUIDE4DRIVERS: Just follow the Instruction in Pyron's Method then add 'that' code in the top of presetup.cmd. Compress all your drivers. Put the Compressed Driver FILES inside the directory named ->$OEM$/Driverz. Put the 3 files inside i386 folder then edit TXTSETUP.SIF. In TXTSETUP.SIF find [SourceDisksFiles] then add this 3 lines... 7za.exe = 1,,,,,,,2,0,0 Presetup.cmd = 1,,,,,,,2,0,0 XRep.exe = 1,,,,,,,2,0,0 DevPath.exe = 1,,,,,,,2,0,0 questions: you have one diagram with 4 files in the i386 and another with 3 files in it. Which diagram am I meant to follow and where are the 3 files that are not in the downloaded zip? [url="http://cc.domaindlx.com/zaqs/download/Guide4Driver.cab"]http://cc.domaindlx.com/zaqs/download/Guide4Driver.cab[/url] you mention about adding 3 lines but there are four lines and four files? Am I meant to complete ALL SEVEN steps in PYRONS method BEFORE adding on your 'easy to use' guide? I can't see how the two guides blend together? Rather than a continuation it's more like an overlap, maybe I only follow the first few points on pyrons method without the end point(s)? I find this very confusing and not straight forward at all! Don't you think ONE complete guide would be better? With text that corresponds to the diagrams and matching files to download; rather than loads of little bits here there and everywhere? Could you tell me what is the difference between ALL THIS and the 'drivers from CD...simple method 1,2,3'. Yes, I am having trouble serial - please do help, many thanks!
-
...is there a way to replace win xp default monitor driver, in device manager? "on the xp cd" - of course!
-
I got installshield 12. I used USSF that produced the result in the attachment herewith. I want to know how to record (/r) an install and then use it silently (iss)? This is for the logitech itouch v2.22 Basically I need a step by step walk through of the procedure? I don't know whether to open the run dialog from the start menu on winxp (sp2) OR open a cmd line dialogue (blank/black) window? OR initiate this from somewhere(?) within Installshield itself? etc.etc. I don't know whether to type: (the first one is my path) "H:\complete downloaded driver packages [not extracted]\Logitech\it222enu.exe" /r OR Setup.exe /r OR it222enu.exe /r OR -r OR even where to put the inverted commas? (if any?) I don't know if it is a basic or installscript MSI project? Is there a way to find out please? It DOES have the installscript logo/icon on the package though; and not the basic logo! A recordmode walk through (tutorial) needed please! many thanks in advance for any help offered!
-
Silent IntelliType and IntelliPoint
the_doc735 replied to spacesurfer's topic in Application Installs
[GuiRunOnce] is a section of the answer file winnt.sif which is located in the i386 folder. i.e. it is a section of a file, not the file itself. -
Download Promise PDC20378 (FastTrak S150TX2 Plus) Drivers: ftp://ftp.tyan.com/Promise_RAID/PDC20378/Promise378RAID.zip The first place to add a copy is to the TXTMODE folder of your CD. That is: "c:\xpcd\$OEM$\TEXTMODE" Here you can dump the 9 RAID/SATA files. PROMISE PDC20378 RAID [WINXP]: fasttx2k.inf fasttx2k.cat fasttx2k.sys ptipbmf.dll PROMISE PDC20378 SATA [WINXP]: ulsata.inf ulsata.cat ulsata.sys ptipbm.dll vssver.scc Location number two is the location specified (or will be specified) in WINNT.SIF for the OEMpnpDriversPath. On my CD this is: [$OEM$\$1\] Drivers\000_PrRa1 Drivers\001_PrRa2 I have added the RAID drivers (all 4 files) to folder 000_PrRa1 and the SATA drivers (5 files) to 001_PrRa2. Here you need to have your RAID/SATA drivers in the LOWEST numbered folders, i.e. don't have your printer drivers in 000 and RAID/SATA in 001/2. The third and final location is in the i386 directory which will be located at the root of your CD. This time we only need to be concerned with the *.sys files of each driver set. That would be fasttx2k.sys and ulsata.sys. I chose to compress these files and I recommend you do the same. Use the MAKECAB utility to do so. You'll end up with "fasttx2k.sy_" and "ulsata.sy_" Now simply copy both of these files to the i386 directory. Copying finished! Modifying installation files: The first file to be modified is TXTSETUP.SIF which is in the i386 directory. This file tells Windows what files to load during the text-only portion of setup. We are going to modify the file to make Windows think that Microsoft put these new driver files in i386 and load them accordingly. Open up TXTSETUP.SIF [with notepad] and do a search for: [sourceDisksFiles]. Now add this text EXACTLY AS SHOWN (except what's in the brackets). CODE: [sourceDisksFiles] fasttx2k.sys=1,,,,,,4_,4,1,,,1,4 ulsata.sys=1,,,,,,4_,4,1,,,1,4 Each driver listing needs to be on its own line...you'll get the format once you look in TXTSETUP.SIF. You can put this anywhere within the [sourceDisksFiles] section. I'm aware that there are multiple instances of [sDF]...I added my drivers to the first instance. Still within TXTSETUP.SIF search for [HardwareIdsDatabase]. These entries associate drivers with PCI device Ids detected on the machine. Within this section add these lines: CODE: [HardwareIdsDatabase] PCI\VEN_105A&DEV_6629="fasttx2k" PCI\VEN_105A&DEV_3371="fasttx2k" PCI\VEN_105A&DEV_3319="fasttx2k" PCI\VEN_105A&DEV_3375="ulsata" PCI\VEN_105A&DEV_3318="ulsata" PCI\VEN_105A&DEV_6626="ulsata" The "TXTSETUP.OEM" is a text file which can be opened & read in Notepad etc. and it contains the device Ids. These two files can be found in the 378RAID/378ATA folders in the PROMISE package you download. If you're trying this out with other drivers and don't know the proper Id, look in txtsetup.oem or the INF file associated with that particular driver. Now find [sCSI.load] in TXTSETUP.SIF. Do a search within notepad (if necessary?). Add the lines below to this section: CODE: [sCSI.load] fasttx2k=fasttx2k.sys,4 ulsata=ulsata.sys,4 Lastly: (in TXTSETUP.SIF) Search for[sCSI] and add this: CODE: [sCSI] fasttx2k="Promise FastTrak fasttx2k Controller" ulsata="Promise SATA150 TX Series IDE Controller" Above, you can replace the text in quotes with anything you prefer. The next file we need to create or modify is WINNT.SIF (also in the i386 directory) Here all we need to do is point OEMpnpDriversPath to the locations we set up. Remember $OEM$\$1\Drivers\000_PrRa1 & 001_PrRa2? If that is the location of the RAID & SATA files then WINNT.SIF should read like this... CODE: [unattended] OemPnPDriversPath="Drivers\000_PrRa1;Drivers\001_PrRa2" If you have multiple folders like I do make sure that its all contained on ONE line (the forum software might wrap it here). The final file we need to create or modify is DOSNET.INF (also in the i386 directory). Search for[FloppyFiles.2] and add this: CODE: [FloppyFiles.2] d1,fasttx2k.sys d1,ulsata.sys Then search for[Files] and add this: CODE: [Files] d1,fasttx2k.sys d1,ulsata.sys ALL CREDIT GOES TO RASKREN FOR THE ORIGINAL TEXT UPON WHICH THIS VERSION IS SOLELY BASED.